It is no secret to anyone that the internet is a fundamental tool in daily life. Without it, we would not be able to do anything, or share information through social networks , or communicate in real time, much less search for important resources through Web browsers ..
That is why, the different devices currently have different options to enjoy the internet even when we are not anchored to a fixed WiFi network , and one of them is through the “Share internet” feature found in the settings of the mobile. This way you will be able to turn your phone into a WiFi hotspot so that other devices can connect to it, such as your computer.
If you want to exercise this internal function and you have a Xiaomi Redmi Note 5, follow the following methods and watch this video..
To keep up, remember to subscribe to our YouTube channel! SUBSCRIBE
1. How to configure Wi-Fi zone to share internet Xiaomi Redmi Note 5
To be able to share the internet, you have to configure the Wi-Fi zone of your mobile device. To achieve the latter, you just have to follow the steps that we will mention below:
Step 1
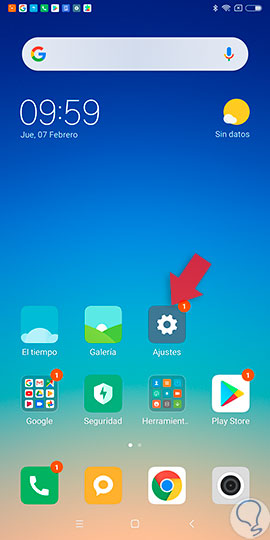
If we have not changed the basic configuration of our operating system, we have to go to the main menu of applications. To do this we just have to click on the "Home" button that is in the middle of the quick system options.
Then, we go to "Settings", whose main symbol is a nut with a gray background.
Step 2
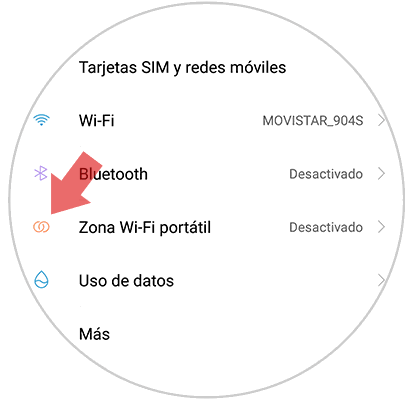
Once you have selected “Settings”, we will have to descend on the tab where we will appear, in order to find the option known as “Portable WiFi Zone”. Once we see it, we must press on it.
Step 3
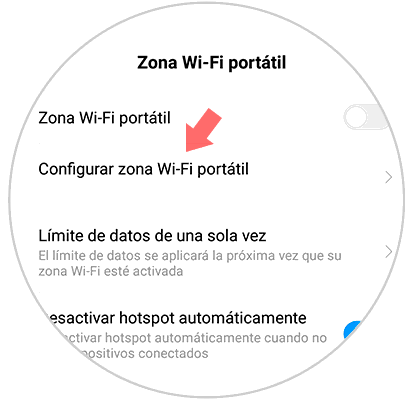
Next, we will appear in a new options window, which is called “Portable WiFi Zone”. We must go to the second tab that appears there, which is "Configure WiFi Zone" to continue with the procedure.
Step 4
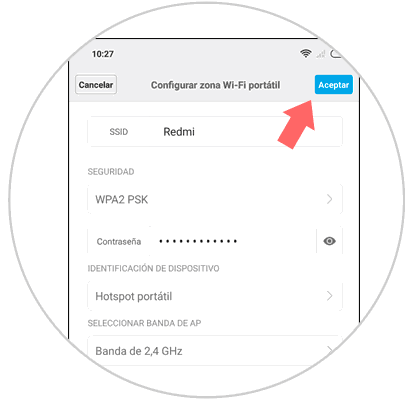
In this tab, it is where we will make all the settings we want from the WiFi zone, for example, in the “SSID” section we can change the name we want, also in “Password”, we can place a default code for it.
Once we have placed and customized these two options, we must click on the “Accept” option, which is located in the upper right part of that tab..
And voila, that's how easy we will have customized and configured the WiFi zone of our mobile device. It should be mentioned that when we go to choose the password, it should be a simple one to facilitate placing it on the device, but that only we know. We can combine keys and numbers to make it safer.
2. How to activate Internet sharing on Xiaomi Redmi Note 5
In case we have already done the last method, we must now proceed to share the internet. To do this we just have to do the following.
Step 1
To start we have to go to the option called "Settings", which is in the main menu of the mobile.

Step 2
When we go back to the "Settings" window, we have to go again to the option called "Portable WiFi Zone", which you can differentiate by its main symbol, which is orange and has two interwoven objects between them .

Step 3
Next, we will see all the options of the portable WiFi zone, but the one that interests us is directly the first one, which bears the same name. This is represented by an activation bar, this same, in case we are not sharing the internet, it will be gray and the main ball will be on the left side.
To activate it, we only have to move the ball to the right side of the screen, wait for it to turn a blue color, and ready the option “Share internet” on the Xiaomi Redmi Note 5 device will be activated.
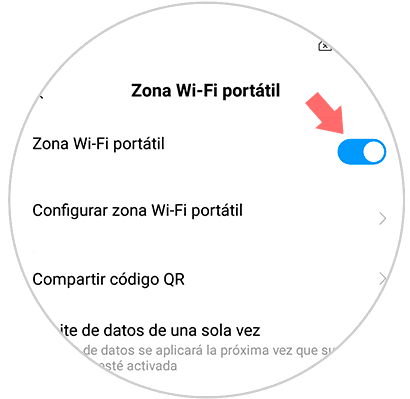
At this point, the person to whom we want to share the internet, you should simply look in your "WiFi" section for the name that we put to the network, select it and put the password (This is in case we have placed a code like indicated in the first section of this tutorial).
As you can see, this procedure, like almost everyone on the Xiaomi Redmi Note 5, is really simple, so try it, and you can see how easy it is to share your internet networks to any other device you want.