As a security measure Windows 10 incorporates the possibility of blocking your computer, turning off the screen to prevent access to the operating system and with it all the personal information stored there. However, although this security function is highly recommended, the truth is that sometimes it can be somewhat annoying since if the blocking is carried out very frequently, we will have to constantly unlock our computer.
Related: How to disable automatic restart of Windows 10 after installing updates.
In general, the blocking of your Windows 10 computer is carried out after a reasonable time to precisely avoid the user having to constantly unlock it after a few minutes. The problem is that some Windows settings lock the computer in a very frequent way, which forces users to move at least the mouse or touchpad so that inactivity causes your computer screen to lock..
Windows 10 locks your computer screen when you don't interact with your computer. In other words, if we do not want our computer to crash, we should maintain its activity. In general, the idle time until your computer crashes can be configured, however even if you have it configured correctly, your computer may still continue to crash.
That said, if your computer automatically locks too often and you want to disable the lock on your computer screen, we recommend that you follow the steps below:
How to prevent your computer from automatically crashing Windows 10
- Use the keyboard shortcut: Windows key + R
- When the Execute tool opens, enter the following command and press Enter:
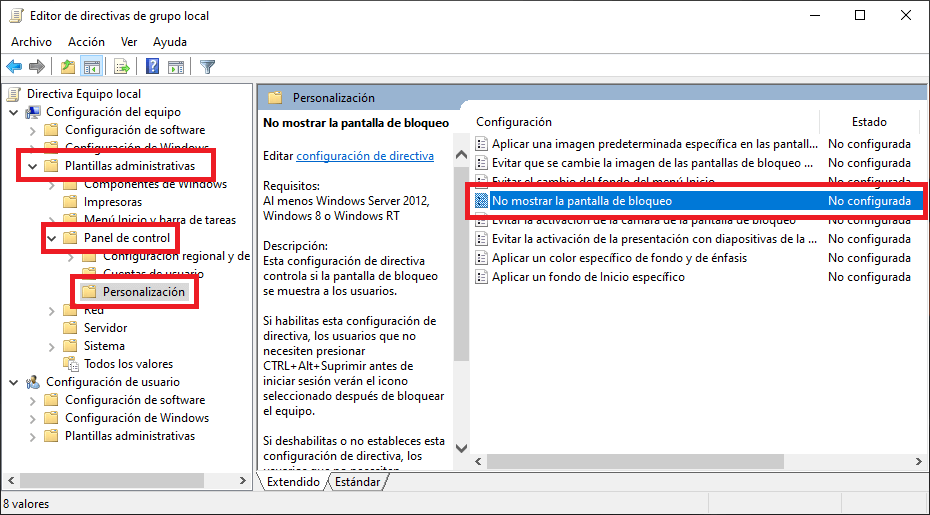
- This will open the Local Group Policy Editor in which we will have to go to: Computer configuration> Administrative templates> Control panel> Personalization
- Once we are on this screen you must search and double-click on the option: Do not show the lock screen
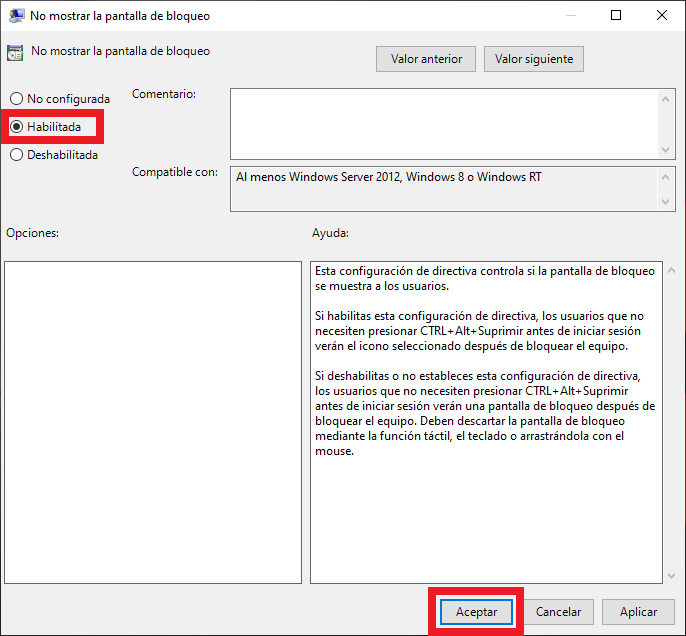
- When the small configuration window is displayed you will have to check the Enabled option ..
- Finally, click on OK to save the configuration and check how your computer will not block the screen now as it detects no activity.
If you have the Windows 10 Home version you will have to carry out the following steps:
- Open the Windows registry editor..
- Here go to the following key:
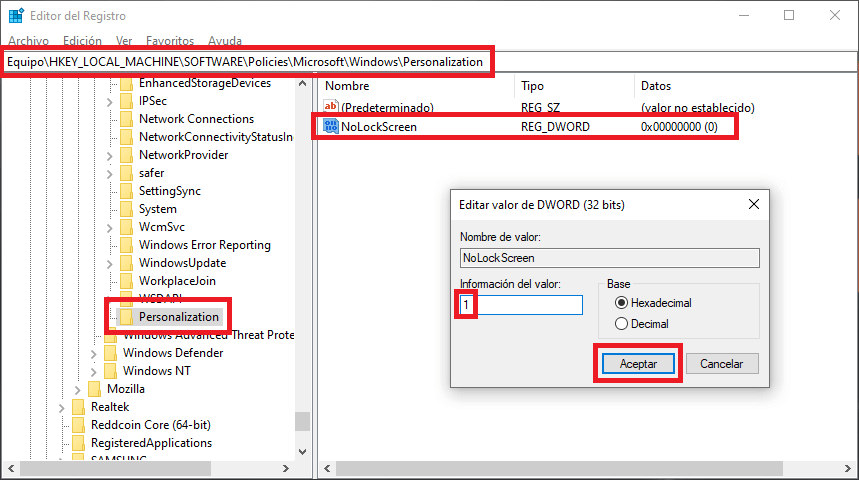
HKEY_LOCAL_MACHINE \ SOFTWARE \ Policies \ Microsoft \ Windows \ Personalization
- If you don't see the Personalization key in the menu on the left, you must create it and name it: Personalization
- Now, on the right side of the screen you must right-click and create a new DWORD (32-bit) value and name it: NoLockScreen
- Then double click on NoLockScreen to change the value information from 0 to 1 .
- Finally you will only have to click OK to save the changes. From this moment on, the lock screen will be deactivated.
Other things to consider:
1) Deactivation of dynamic blocking: if you don't know how to do it, we recommend reading the following tutorial: How to deactivate Dynamic Blocking in Windows 10
2) Turn off screen saver Va cio
If you use a screen protector, make sure it's not blank. The problem is, you will never know that a screen saver is running.
- Type " Change screen saver " in the search bar and select the result.
- Click on the dropdown menu and select the option: None instead of Empty .
- Finally click on the Apply button .

3) Modify the timeout to activate Windows sleep.
Available in Power and Sleep Settings which can be accessed from the Settings app and heading to System Start / Shutdown and Sleep. On the right side of the screen you should focus on the Suspend section. Here you will find two configuration options: when the computer is using the battery or when it is plugged in. This will be where we must use the drop-down menu to increase the time or even disable it by selecting the option: Never .