A virtual drive is the emulation of a drive, mostly a virtual CD or DVD drive. The drives created in this way on the computer are not hardware, but are simply interpreted by the computer for the user in the same way as physical drives. In our tips + tricks we explain how you can set up such a drive yourself without additional software in Windows 10.
What are the properties of a virtual drive?
A virtual drive is a piece of software that emulates an actual drive , such as an optical drive (CD and DVD), a floppy disk drive, or a hard disk drive. To other programs, the virtual drive behaves and looks like an actual physical drive, but unlike a normal drive, it is not an actual physical drive.
Virtual drives are used on computers to transfer the contents of optical disks to hard disk drives. This also helps in solving the short lifespan problem of CDs and DVDs and takes advantage of the faster data transfer rate of hard drives. You don't always have to insert the physical CD, you can mount the image file from the hard drive instead..
This has the advantage that the access times to the virtual drive are significantly shorter than when reading from optical CD or DVD media. Windows creates a VHD file (virtual hard disk) on existing partitions , which stands for the virtual drive. It is also possible to save and copy the VHD file and to integrate it at another location on another computer. In contrast to virtual machines, VHD files are an integral part of the main system and do not only receive part of the hardware performance.
The main disadvantage of a virtual drive is that it takes up the space on the hard drive, since the CD or DVD is copied completely onto the hard drive (e.g. as an ISO file)..
How to create a virtual drive in Windows 10
A virtual drive can be created in Windows with in-house resources. Follow our step-by-step instructions or take a look at the quick start guide .
1st step:
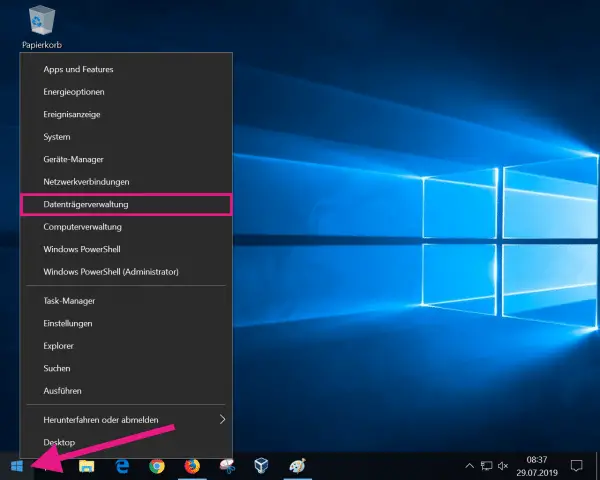 Right click on the Windows logo and select the entry " Disk Management ". Alternatively, you can also press the key combination [Windows] + [X] and click on the corresponding entry.