Having a second hard drive in the computer has some advantages, but mostly more storage space. The installation of this hard drive varies depending on the type of computer. We'll show you how to install the hard drive and set it up directly under Windows 10.
Space is running out
Stationary computers, i.e. the traditional towers, usually come in from the start with two hard drives : a fast solid state drive (SSD) for the operating system and programs and a traditional hard disk drive (HDD) with a lot of storage space. Now there are many ways to expand the storage space: external hard drives, network attached storages (NAS) and of course the cloud. But nothing is as convenient as another internal HDD..
There is plenty of choice: In addition to classic HDD drives , which offer a lot of storage at an affordable price, there is also a wide range of SSD hard drives . These run noiselessly because they no longer have any mechanically moving parts. The transmission speeds are usually higher, too, but this depends entirely on the interface used. If you use the classic S-ATA interface , you can look forward to faster data transfers. It gets even faster if the SSD comes in the so-called M.2 format and via the PCI Express interface connected. Depending on the PCI version, up to an unbelievable 7000 MBps are possible. Provided that the mainboard and the CPU already support the new PCI version. However, these hard drives are very expensive and are worthwhile at best for computer enthusiasts or professional users in media creation. The purchase of a now quite cheap S-ATA-SSD is worthwhile in any case.
Installation and setup are basically quite simple, but Plug & Play does not work . But don't be afraid of unscrewing the computer: On the one hand, the devices are designed for this, on the other hand, it is hardly possible to really do anything wrong. We will first show you how to install an HDD in a tower, then the procedure for a laptop. This is followed by the setup under Windows, which always proceeds in the same way.
Install the HDD in the tower
Fortunately, PC cases are standardized, so you can use any 3.5-inch SATA hard drive. Incidentally, the Serial Advanced Technology Attachment (SATA) connection is identical on the 3.5-inch and the small 2.5-inch hard drives. You will often find mounting material for the hard disks in the housing itself, otherwise a couple of screws should be enclosed with them. Tip for emergencies: If nothing else works, you can remove two of the four screws from another HDD or the DVD drive and use them for the new HDD. However, this can cause vibrations in the long term and should be remedied in good time.
Unscrew the housing and remove the cover . First of all, you should find the appropriate connector on the mainboard. Just look at the cabling of the existing hard drive - it ends up on a SATA connection, more precisely SATA III (also called 6G). If you take a closer look, you will most likely find at least four SATA ports. Some of them should only be SATA-II (3G) connections. SATA III is simply much faster than its predecessor SATA II. And that is why the system hard drive of your computer, regardless of whether it is an HDD or SSD, is connected to SATA III. You will find corresponding labels on the mainboard itself..
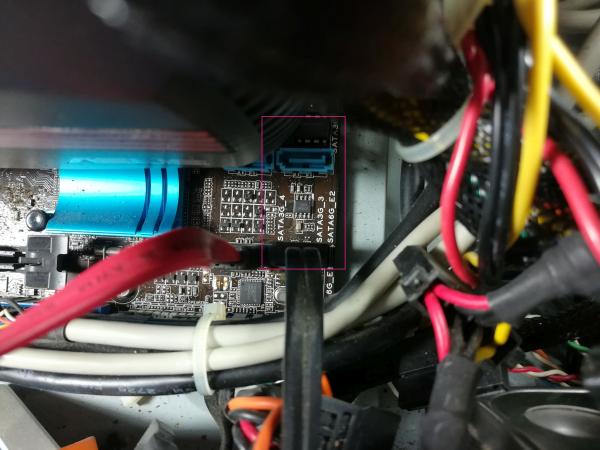 System disks and SSDs should be connected to SATA 6G ports, and 3G connections are sufficient for data storage.
 You should preferably choose a SATA-III connection , for pure data hard disks on which hundreds of gigabytes of data are not written every day, but a SATA-II connection is no big deal either. Plug in the SATA cable already.
Now build the hard drive into the bay . There are different approaches here, depending on the housing manufacturer. With better housings, you will sometimes find mountings that do without tools or screws. Sometimes hard drives have to be screwed onto small sleds , which in turn come into the 3.5-inch frame. By default, HDDs are screwed directly into it . In order to counteract the development of heat, it is best to leave a space between the existing and the new hard disk. The plate should also be installed in such a way that other components (graphics card, etc.) can still be replaced - if possible. At least on HDDs, tighten the screws properly so that the vibrations do not loosen them later. Speaking of which: If a quiet computer is important to you, you can of course also use small rubber washers between the HDD, screw and housing to ensure more peace and quiet. There is seldom such decoupling in the housings themselves.
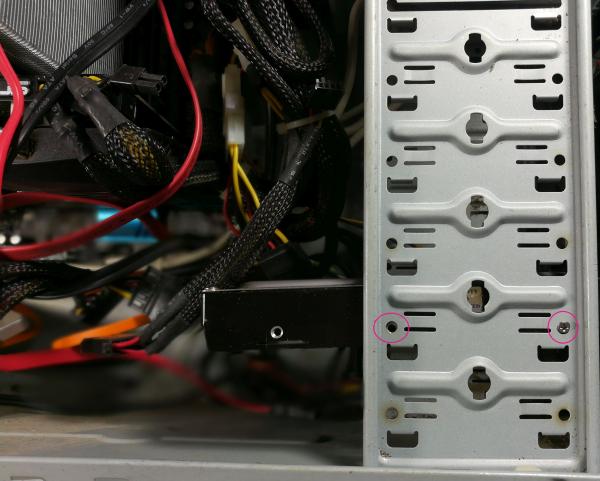 The hard drive is screwed into any free space - the rear is unfortunately often tricky to reach.
 Install the HDD in the notebook
There are two options for notebooks : If you are (very) lucky, you will actually have a slot for a separate hard drive - but that can usually be ruled out. It is much more likely that you can replace the DVD drive with a so-called caddy , i.e. a holder for 2.5-inch hard drives in the form of the DVD drive. Such brackets are available from around 10 euros and are suitable for all devices that have an optical drive in a slot.
First you have to loosen the screws of the optical drive: You will usually find two screws directly on the edge of the housing, and often a third screw where the bay ends. There is a tendency that you can now get the drive out by gently shaking and pulling..
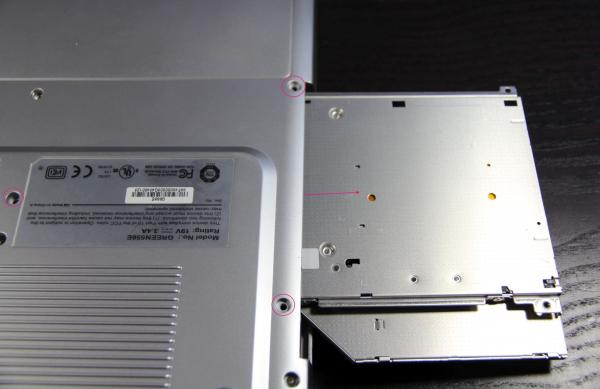 The DVD drive must be released on the underside.
 But if that doesn't work, you have to remove the plastic flap for better or worse - underneath there are many starting points for a small pair of pliers. The installation of the caddy is then limited to tightening the corresponding screws.
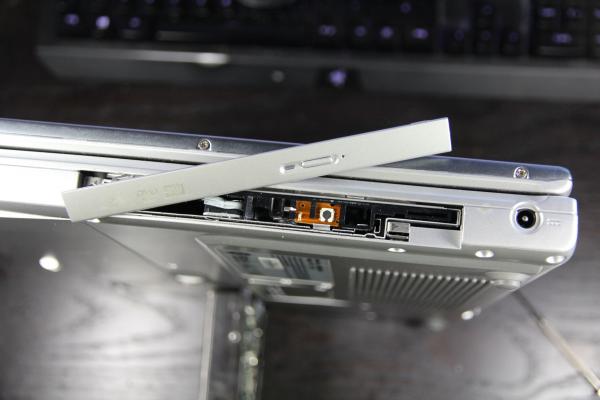 In a pinch, you have to remove the front cover.
 Set up HDD under Windows
Now the part under Windows follows: It is quite possible that the hard disk is automatically recognized and (on request) formatted and integrated into the system. If so, great, you're done. As a rule, however, you first have to set up hard disks briefly, i.e. specify (at least) one partition, a file system and a drive letter. Here are even more tips on partitioning hard drives.
Open the hard disk settings via " Control Panel / Administrative Tools / Computer Management / Disk Management ". There you will find a list of the drives that are already available at the top and all connected devices at the bottom. Your new hard drive will be called there as a " disk " "plus a consecutive number and to the right of it you will see the label" Unallocated ". Open the context menu of the entry and select" New simple volume ".
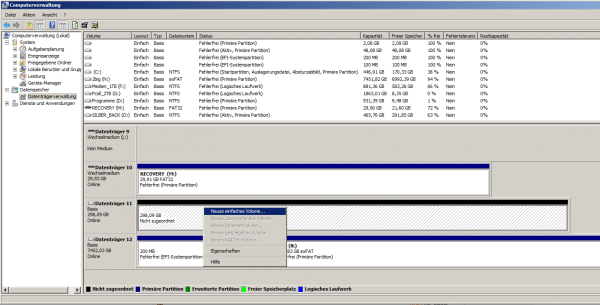 Hardware alone is not enough, the HDD has to be set up.
 In the following wizard you can simply click through - there are two steps to change: On the one hand, you can change the drive letter , for example to include a backup hard drive as "B: \".
In the next step you shouldn't forget to give it a name - "Volume" as a default is not very helpful. You also determine the file system . The default here is NTFS set and it can stay that way. Even if at some point you want to use Linux on the computer in parallel or boot from a live CD, access is not a problem. And with that you can also complete the wizard. Formatting takes a few seconds, then you will find the new hard disk as drive "B: \" in Windows Explorer.
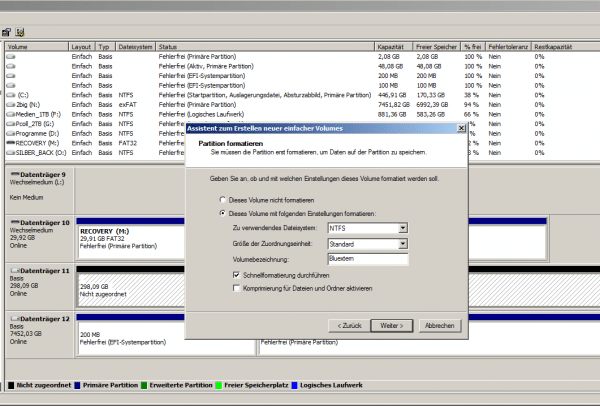 With many hard drives, proper names are essential.
 Tip: If you are not the craft type, there is an enormous potential for frustration waiting for you! And then, if the hard disk is defective - and you have to dismantle everything (screwing hard disks into housings can be tricky with small / inexpensive variants ...). Treat yourself to a SATA-USB cable : for a few euros you can easily connect internal hard drives via USB and only start screwing after a test. In general, these cables are practical: if the laptop falls and is over, they are the fastest way to rescue data from the hard drive. The adapters are also great for using disused HDDs as external backup hard disks!