If you want to quickly capture your desktop or the open website, you will quickly ask: How do I take a screenshot? There are various ways to do this under Windows 7, 8 and 10. We will show you which ways there are:
Create a screenshot using a keyboard shortcut (from Windows 7)
You can easily take a screenshot on Windows using a keyboard shortcut . These instructions help not only for Windows 7, but also for Windows 8 and Windows 10. With this method, your mouse pointer will not appear in the picture taken. You have to proceed as follows:
- To create a screenshot, press the [Print] key on your keyboard. Alternatively, you can also record an active, open window with the key combination [Alt] + [Print] . Only what you can currently see on your screen is photographed. On non-German keyboards, "Prnt" or "Print" may appear on the corresponding key instead of "Print".
- The screen recording has been copied to the clipboard . In the next step you have to insert the picture into an image processing program such as Paint or Photoshop and edit it if necessary. To insert an image, either right-click in your program and then go to " Insert " or use the shortcut [Ctrl] + [V] .
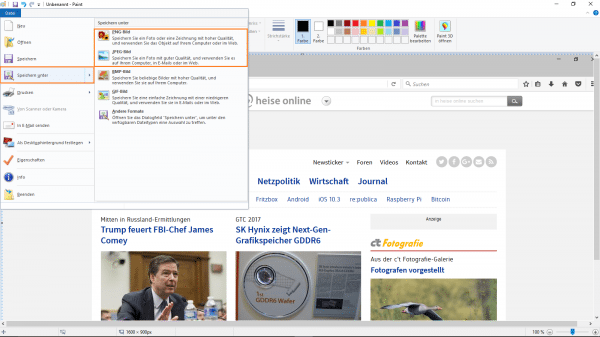
- Finally, you still need to save the screenshot . This works in most editing programs in the menu under " Save as " or " Export as ... ". It makes sense to save the recording as a JPG or PNG.
 After you have pasted the screenshot into an image editing program, it still has to be saved.
 Tip: You can also create a screenshot directly from Windows 8 using the key combination [Windows] + [Print] . This is then automatically saved under Pictures (C: \ Users \ Username \ Pictures \ Screenshots).
Create a screenshot with the Snipping Tool in Windows 8 and Windows 10
In addition to the method shown above, taking a screenshot using the Snipping Tool is probably the most popular way to capture your screen. The Snipping Tool has also been used regularly for screenshots since Windows 8. Even with this method, your mouse pointer will not appear in the captured image. We'll show you how to do this:
Note: Windows plans to discontinue the Snipping Tool in future versions. You get the same functionality with the function "Cut and Sketch". To do this, simply press [Windows] + [Shift] + [S] - with this you can create and save screen clippings as usual..
- Windows has the Snipping Tool pre-installed out of the box . To do this, navigate to " Windows Accessories " via " Start ". Alternatively, you can also search for the Snipping Tool using the search bar and then run it.
- In the Snipping Tool you can then make some presettings . For example, different cutting modes can be selected under Mode. You can also set a recording delay of up to 6 seconds under "Delay".
- You can make some additional settings under Settings. However, the presets should be sufficient for a simple screenshot.
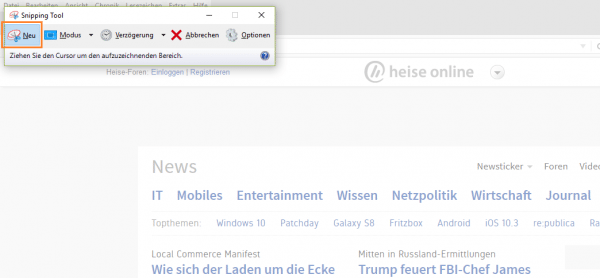
- If you now want to take a screenshot, click on " New ". Now, based on your settings, you can select and scale the area to be mapped by holding down the left mouse button .
- When you release the left mouse button , the screenshot will be taken. The generated screen recording will then be opened in a new window of the Snipping Tool.
- If you want, you can still make some simple edits to the image in the preview of the screenshot . For example, you can mark certain parts of the image with a virtual highlighter or pen.
- If you want to finally save the recording, then click in the top right of the window on the item " File " and then on " Save as ... "
- Now you can specify the storage location , the file name and the file format . PNG or JPEG is recommended there. Finally, just click on " Save ".
How to create a shortcut for opening the Snipping Tool is explained here.
 If you click on "New" in the Windows Snipping Tool, you can select the area to be photographed with the left mouse button pressed.
 Create screenshots using external programs
In addition to the possibilities offered by Windows, there are also a number of external free programs . At heise Download you will find a large selection of external programs for screen recordings. We particularly recommend Snipping Tool Plus (a more extensive version of the pre-installed Snipping Tool) and Greenshot.
There are also a number of browser plug-ins for screenshots. FireShot is a good example of such an add-on. This tipps + tricks article provides instructions on how to create extensions in the browser.
Problems with Windows screenshots
From time to time, screenshots on Windows 7, 8, or 10 may not look the way they should. For example, only black images are created. In this case, a fault in the graphics card could be to blame. If you use a program in full screen mode, you should reduce it to window mode. Often that already helps to solve the problem.
If the screenshots still don't look the way they should, restart your computer. That should fix the bug..
In some cases, however, the problem can also be caused by copy protection: Netflix, Amazon Prime and Co use this to prevent copyrighted material from being simply copied and distributed. You will therefore not receive a usable screenshot. Unfortunately, you cannot bypass this protection.