One of the most used suites in the world for hundreds of management, control and administration tasks is Office; which is already available, in beta phase still, in the 2019 version..
This new version will bring a series of various useful features to have even more complete tools and functions for each task to be performed in any of its available applications. Two of the most used Office applications are Microsoft Word and Microsoft Excel, with which we can create professional documents and manage large amounts of data in a simple way with their functions, formulas and other actions.
One of the most complete resources that we can apply in both Word and Excel is to create checklists, which allow us as users to have the possibility to mark a box with one or more options according to the available content. In both Word and Excel it is possible to create two types of checklists that are:
Lists with boxes or check marks
Which can replace the typical bullets or numbers. These are useful if we are going to print this list.
Lists that can be marked in Word or Excel
These types of lists require adding a content control from the Developer tab.
1. How to create checklists in Microsoft Word 2019 for printing
The purpose of a checklist to print is, as the name implies, to print the document in order to mark the options directly on the printed paper.
To create such a list, it is ideal and useful to create a special type of bulleted list, where we will select the lines that will be converted into a checklist. But we also have the possibility to start from an empty line and then write the elements of the checklist..
Step 1
To make this type of list, we open a new Word 2019 document and go to the "Start" menu and go to the "Paragraph" group.
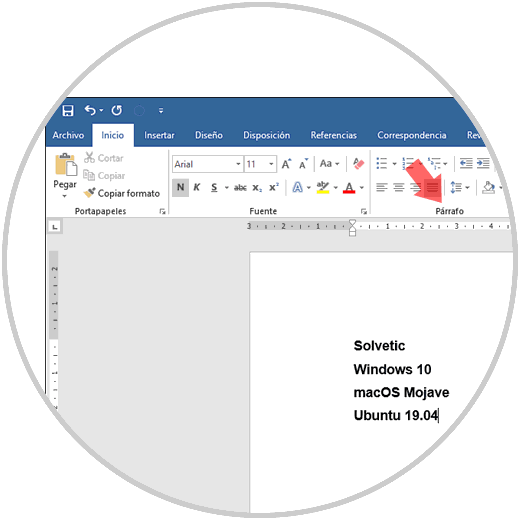
Step 2
There we click on the "Bullets" option. In the displayed list we select the "Define new bullet" line:
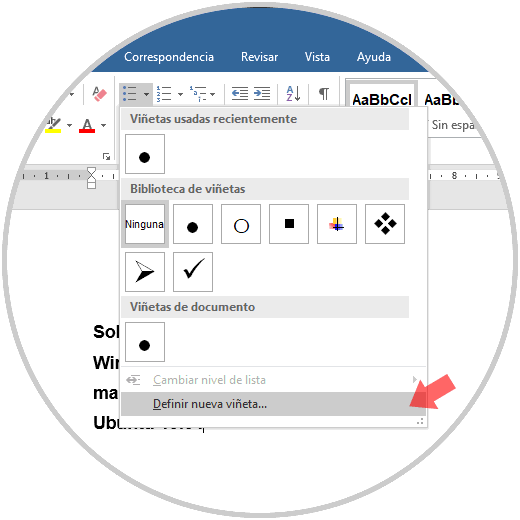
Step 3
The following window will be displayed. There we click on the "Symbol" button.
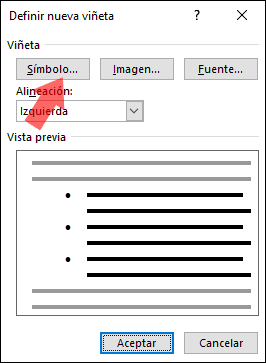
Step 4
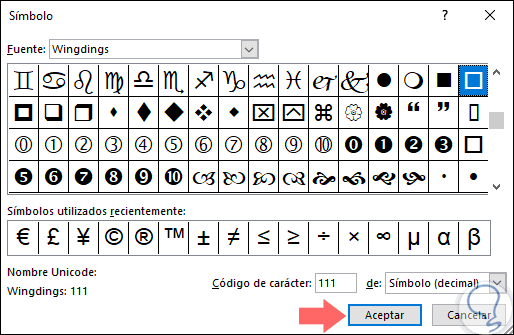
In the "Source" field we locate the "Wingdings" line:
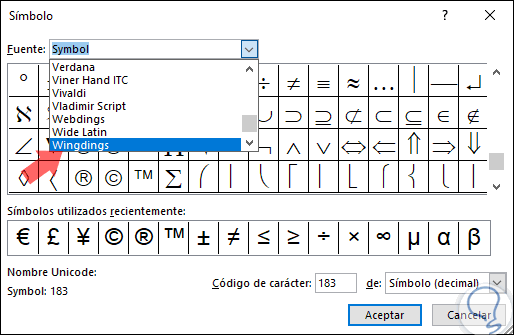
Step 5
In the options displayed we select the box whose character code is 111. Now, click on "OK".
Note
We can use the 3D boxes located in the immediately lower row if we wish.
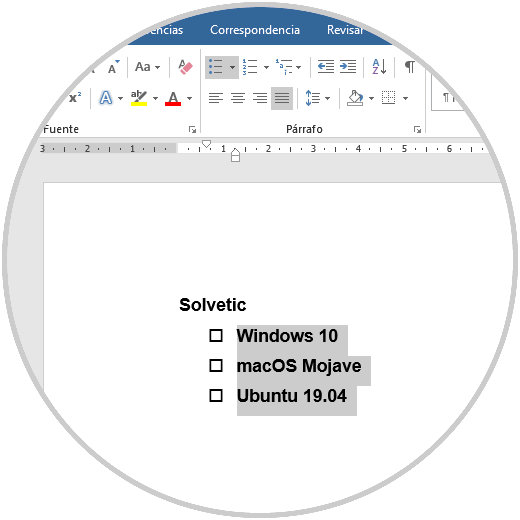
Step 6
We can see that the selected lines will have the checklist option to be marked on printed paper:
Note
If it is necessary to add the lines, we must place the cursor at the end of a line in the list and press the "Enter" key. Thus, the new line automatically begins with the check box character.
2. How to create a checklist to fill out as a form in Word 2019
This option is a bit more complex, since it involves checking the boxes directly in Word in the Form format, and for this it will be necessary to use a function called "Content checkbox control". This function is available through Programmer mode, which is not visible by default in Microsoft Word 2019.
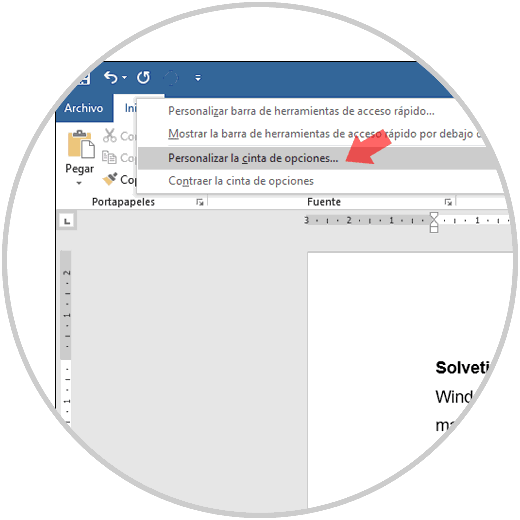
Step 1
To make it visible, we must right click somewhere on the Word ribbon and there select the line "Customize the ribbon":
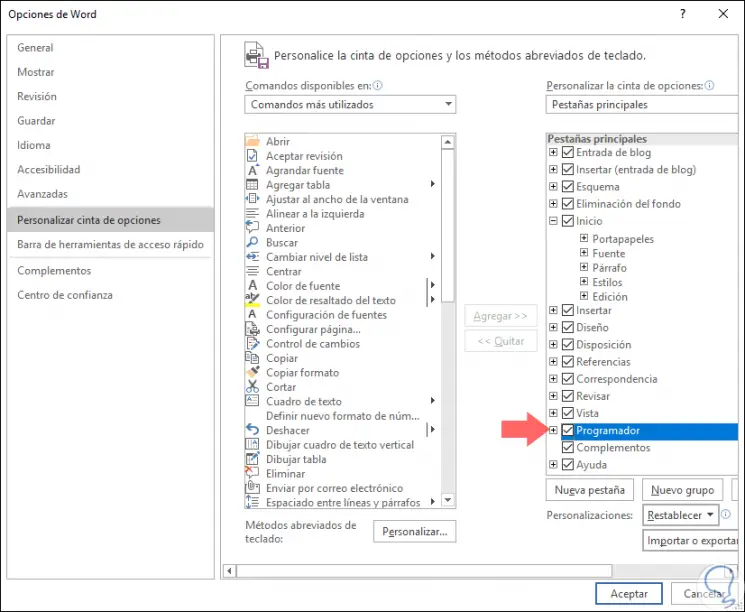
Step 2
The following window will be displayed and in the right side column we must activate the "Programmer" box. Click on "Accept" to apply the changes.
Step 3
Now we have the Programmer menu in Word 2019, there we access and in the "Content" group we select "Control box content":
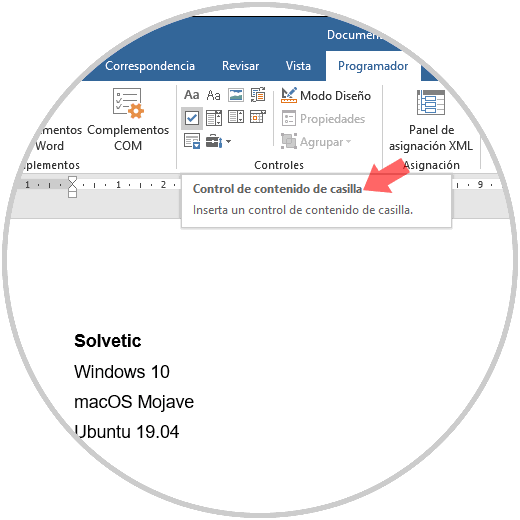
Step 4
After inserting the "Content control box", the cursor will remain inside the control element, we must place the cursor before each line where the check box is to be added:
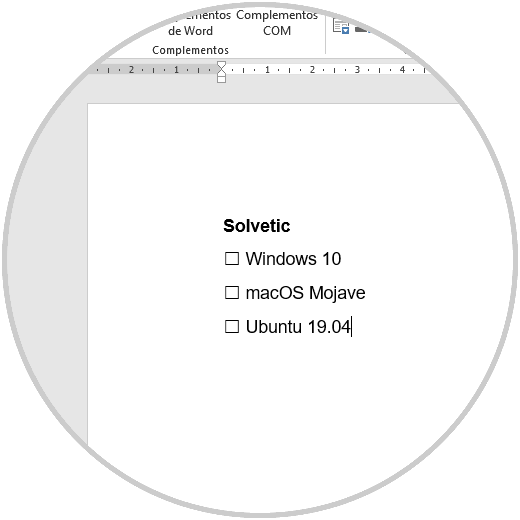
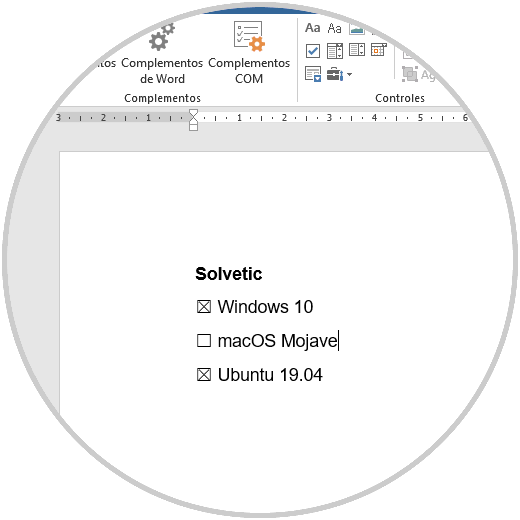
Step 5
To mark a box we must select it and press the space bar:
Note
If you need to add the "Content checkbox control" to other lines, we must place the cursor at the beginning of each line and click or touch the Content control button on the checkbox or simply copy and paste an existing control .
3. How to modify the checkbox symbols in Word 2019
This option will give us the opportunity to customize the way in which the checkbox activation is to be displayed.
Step 1
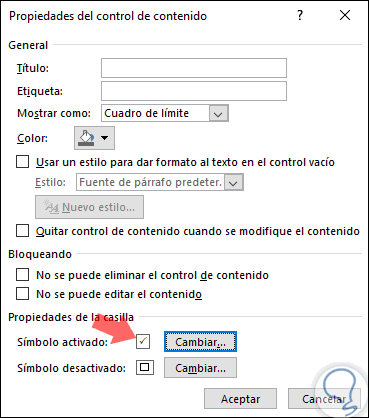
For this, we select the box and go to the "Programmer" menu and in the "Content" group select the "Properties" option:

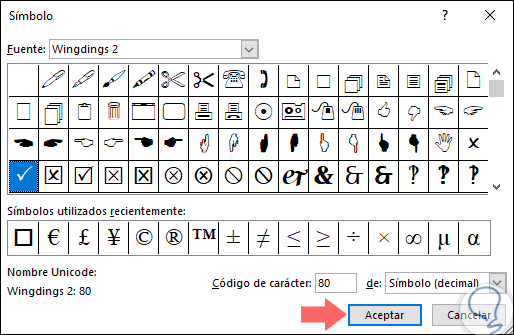
Step 2
The following pop-up window will be displayed and there we go to the "Properties of the box" section. As we can see, we have the option "Symbol activated" which by default displays the letter X. Click on "Change".
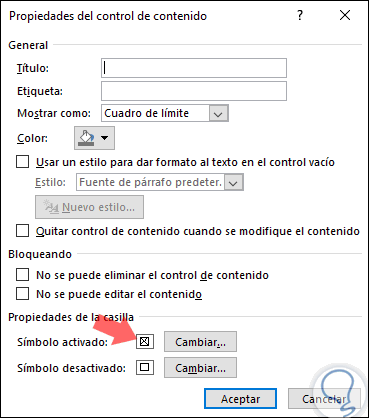
Step 3
We can choose one of the available sources and select the desired symbol. Click on "Accept".
Step 4
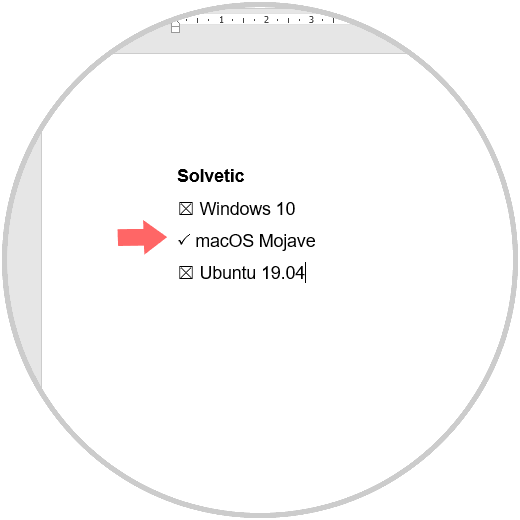
We will see that the change applies. Again click on "accept".
Step 5
We can see the difference between the default value and the custom value:
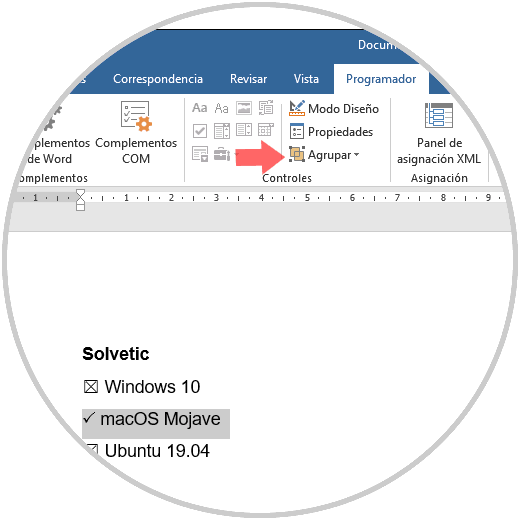
4. How to block the checklist to avoid text changes in a Microsoft Word 2019 form
This option is useful to prevent unauthorized users from accessing the document and making changes without authorization.
Step 1
To achieve this, we will select the rows to be protected and in the "Programmer" menu we go to the "Controls" group and there we click on "Group" and select "Group":
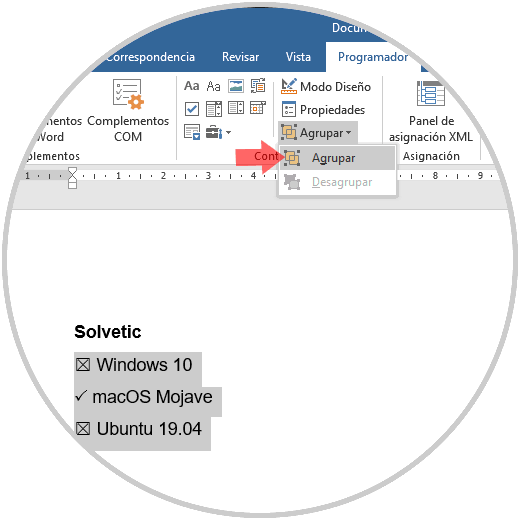
Step 2
Thus, when you try to make any changes, such as text modification or deletion of a line, we will see at the bottom the message You cannot make this change because the edition is locked. To enable editing again, we go to the Controls group and go to the route:
Some of these methods allow us to create documents with checklists in Word 2019.
5. How to create checklists in Microsoft Excel 2019
The first step to take is to add the "Programmer" tab
Step 1
For this we right click on the ribbon and there we select the option "Customize the ribbon":
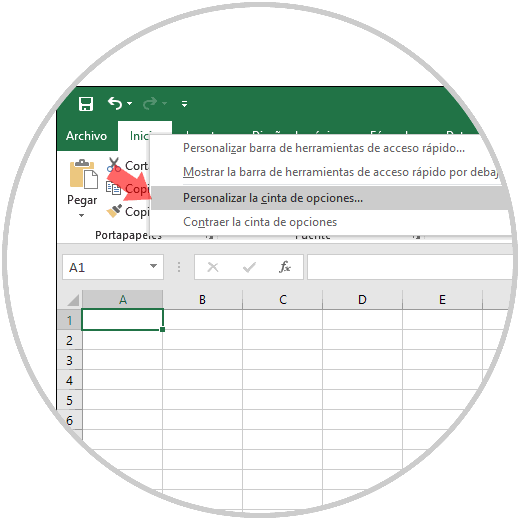
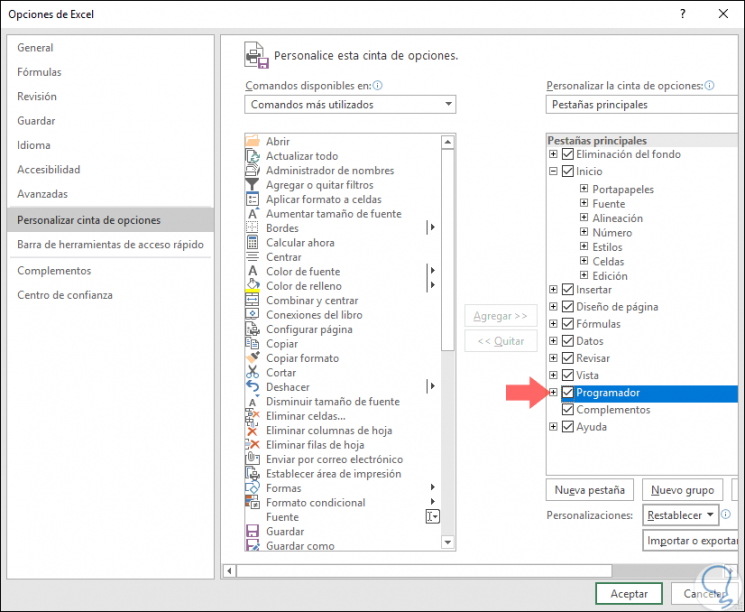
Step 2
In the pop-up window displayed, we activate the "Programmer on the right side side" box. Click on "Accept" to add it to the Excel 2019 ribbon. After this we must have the data to be used in the verification of an organized way.
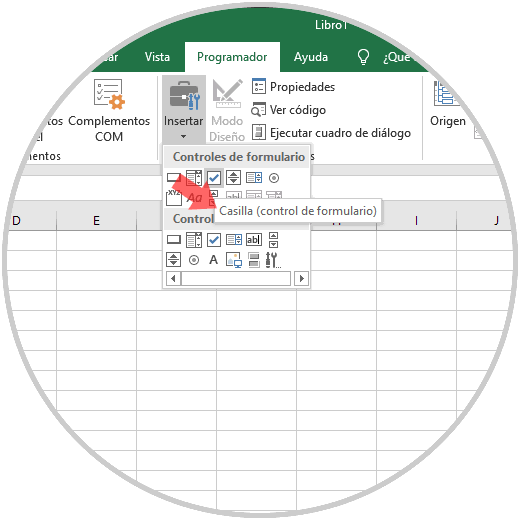
Step 3
Once the data has been registered, we go to the "Programmer" menu and in the "Controls" group click on "Insert" and there we click on the "Box" option (form control):
Step 4
When clicking there, we must click on the cell where the checkbox is to be inserted:
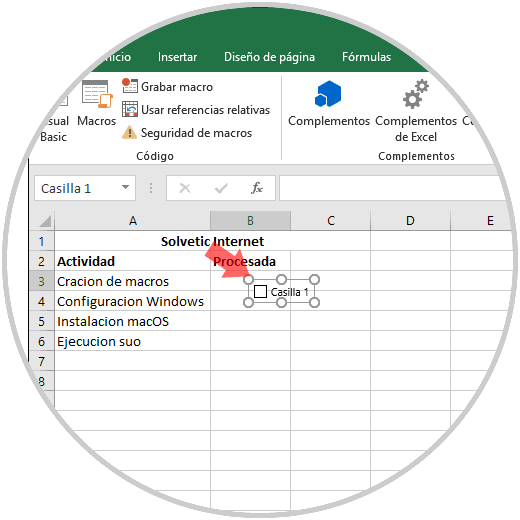
Step 5
When the cell takes shape with the points in each corner, we can move it to the desired location:
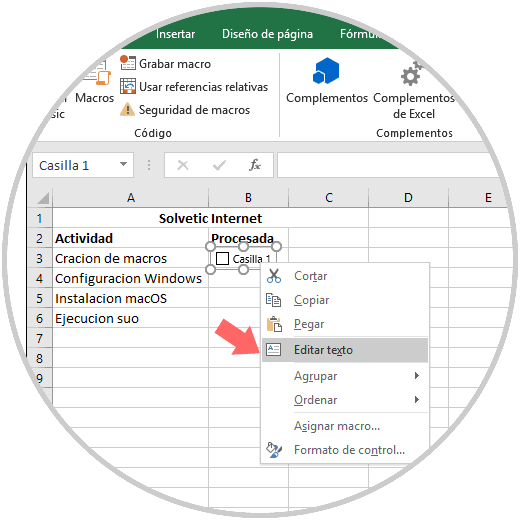
Step 6
To delete the text "Box 1", we right click on the checkbox, select the text and delete it, it is also possible to right click on the checkbox, select "Edit text" in the context menu and then delete the unfolded text:
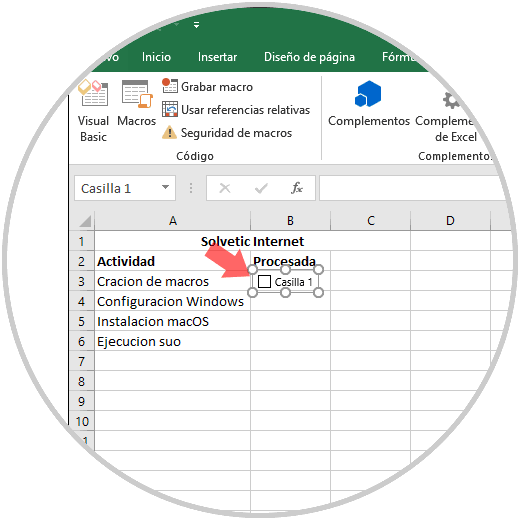
Step 7
Once this is done, we can drag the cell down so that this format is replicated to the other cells to complete:
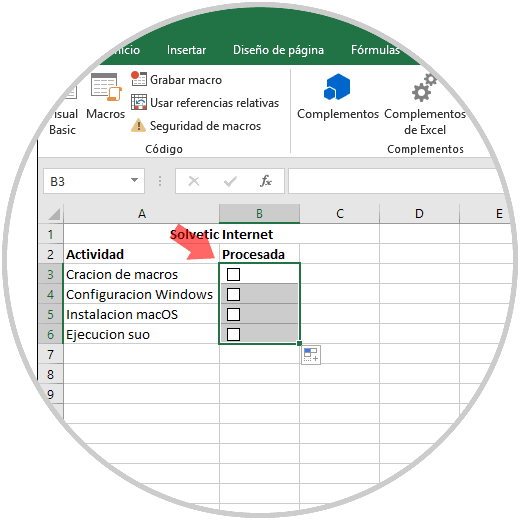
Note
Although we already have the cells designed, Microsoft Excel 2019 still cannot respond to the changes because no cell is linked to any of the check boxes.
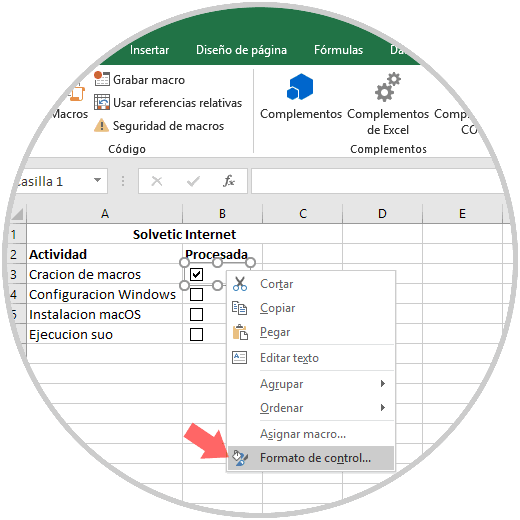
Step 8
To achieve this we click on the cell and select the "Control format" option:
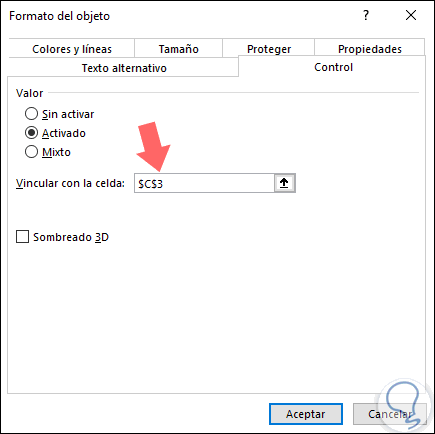
Step 9
In the window displayed, in the "Link to cell" box we must select an empty cell in the sheet to which you want to link to the checkbox. Click on "Accept".
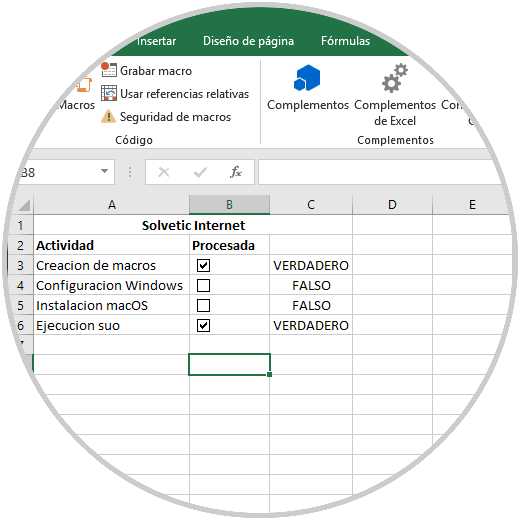
Step 10
The result will be as follows.

Step 11
There we can copy this formula to create the validation according to the answers:
Step 12
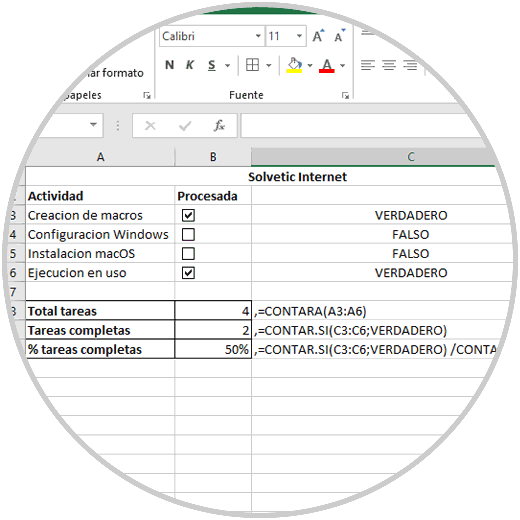
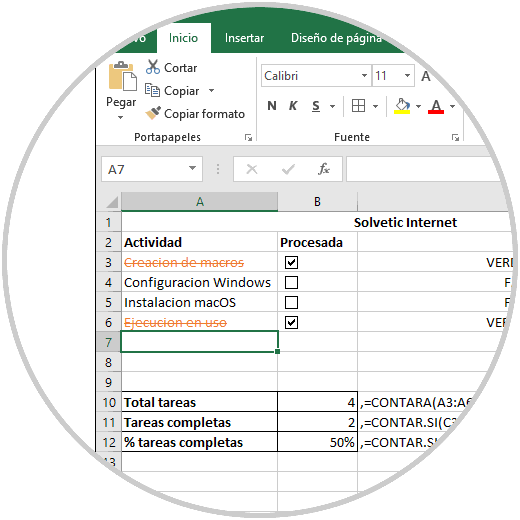
We can generate a summary of the tasks performed in Excel 2019, for this we will use the following:
To count all assigned tasks we will use the following formula:
= COULD (A3: A6) To get all the complete tasks we will use: = COUNT IF (C3: C6; TRUE) To obtain the percentage of the tasks performed: = COUNT IF (C3: C6; TRUE) / COUNT (A3: A6)
6. How to create checklists with conditional formatting in Word or Excel
With this option it will be possible to add rules for the conditions of the boxes.
Step 1
For example, we are going to select our range of cells, A3: A6, and go to the "Start" menu and in the "Styles" group we select:
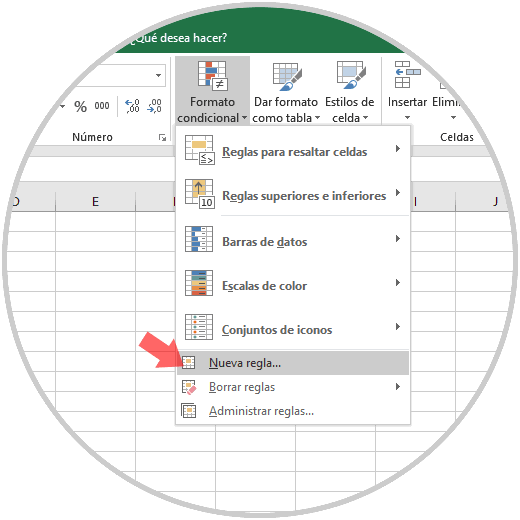
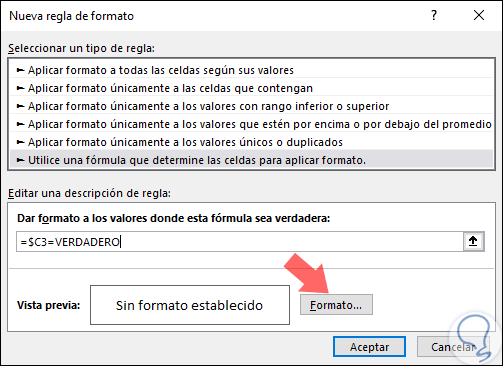
Step 2
In the displayed window we select the line Use a formula that determines the cells to apply formatting and in the field Format the values ​​where this formula is true we will enter the following:
= $ C3 = TRUE
Click on the "Format" button.
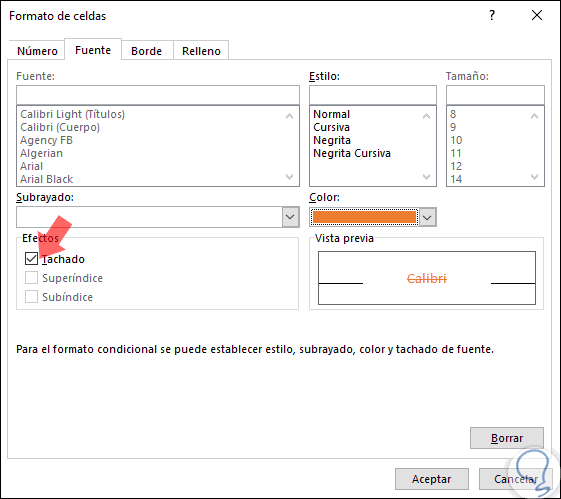
Step 3
There we activate the "Crossed out" box and choose the desired color. We click "Accept."
Step 4
We will see that the rule is applied according to the assigned condition:
As we can see, it is possible to create a file with checklists in both Word and Excel 2019 and in this way achieve a much more professional design..