Microsoft offers us the Azure platform through which we have more than 100 Microsoft products, including operating systems and applications, to increase the possibilities of growth of the organization and of each of its various segments, Azure allows us to manage all of a centralized directly in the cloud without investing in large amounts of physical and economic resources. Although Microsoft has a monthly cost based on the needs of each organization , we can enjoy a completely free year. To learn more about how to register with Azure and to know the various options of use and costs we can visit the following link of TechnoWikis where each of these aspects is detailed:
Now, the Azure platform is cloud based and allows us to carry out administration tasks in 3 different ways:
Each of these options has its own functions, but without a doubt that, if we are lovers of the CLI command line, it is the ideal option for these tasks thanks to its versatility and administration levels. Through this tutorial TechnoWikis will give a special focus on how to install CLI on the various operating system platforms and we will see what commands we can execute for this purpose..
What is the Azure CLI
The Azure CLI, which we can also know as Cloud Shell, has been developed as a tool focused on facilitating the integral work with Azure services, but with a special emphasis on automation since many of these commands will execute complex tasks by yes alone. The Azure CLI is focused on the command line and is cross-platform, so it will be possible to manage Azure resources from Linux, Windows or macOS computers. In addition to this, the CLI can be used both in the browser with Azure Cloud Shell or installed directly on macOS, Linux and Windows and then, from there, run it from the command line of each local system.
One of the great advantages of using the Azure CLI is the ease of creating automation scripts that are compatible with Azure Resource Manager.
Use Azure CLI
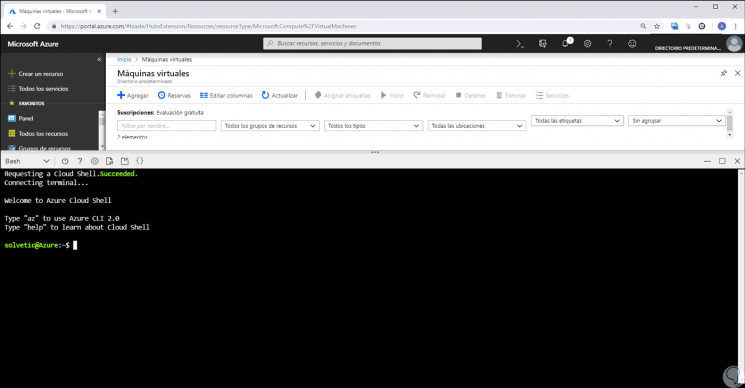
Many users choose to use the Azure CLI integrated in the Azure Portal, if we want to use this method we must create our account and go to the following link:
Azure Portal
There we will access the central console and to use the CLI we must press the icon you see in the image located at the top to establish the connection and start the process of managing the Azure resources available:
TechnoWikis will focus on how to install this CLI, or Cloud Shell, on Windows, Linux and macOS and thus manage all these resources locally..
1. Install CLI Azure on Windows 10
For this case we will use Windows 10. In the case of Windows operating systems, the Azure CLI is installed through an MSI file that will give us all access to the CLI using the Windows command prompt, CMD or we can also do it through Windows PowerShell. In the event that we enable the Windows subsystem for Linux (WSL), we will have packages available for Linux distribution.
Step 1
The distributable MSI file is used to install, update and uninstall the “az†command in Windows 10 and can be downloaded from the following link:
MSI Azure Windows installer
Step 2
Once downloaded we proceed to its execution and the following wizard will be displayed:
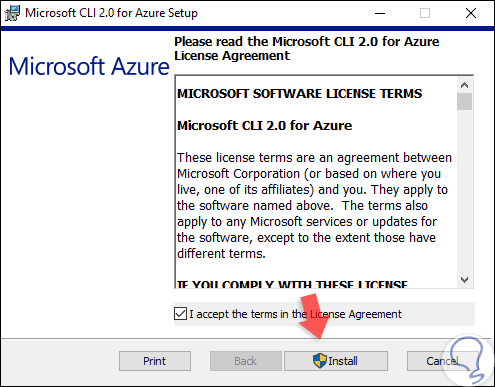
Step 3
There we activate the “I accept the terms in the License Agreement†box and click on the “Install†button to start the CLI installation process in Windows 10.
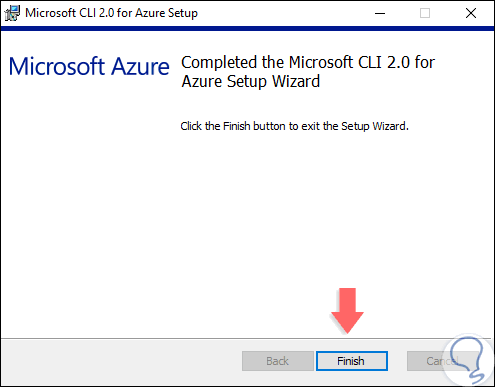
Step 4
Once this process is finished we will see the following. Click on the "Finish" button to complete the CLI installation process in Windows 10.
Step 5
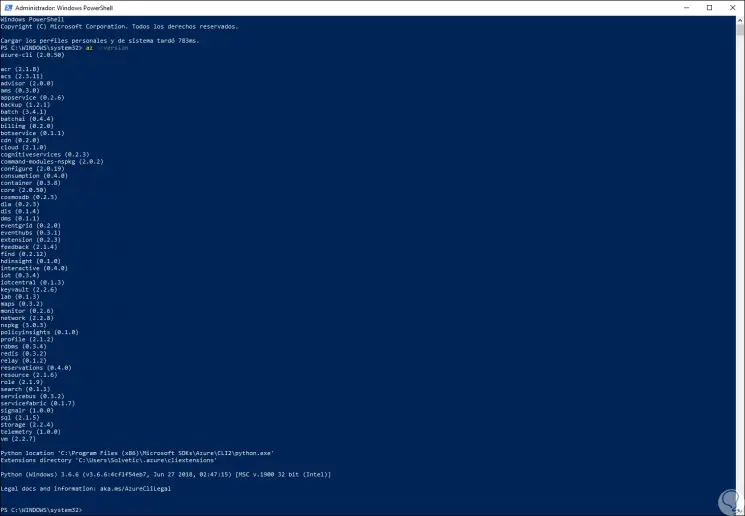
To know the version of CLI that we have installed, we will execute the following line either from the command prompt or from Windows PowerShell.
az --version
Step 6
We will see the same result in the command prompt:

Note
It is recommended to start as administrators for permission issues.
2. Run CLI on Windows 10
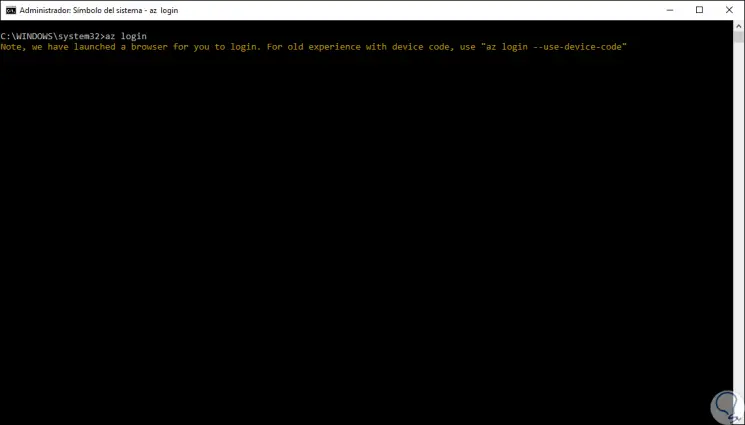
Step 1
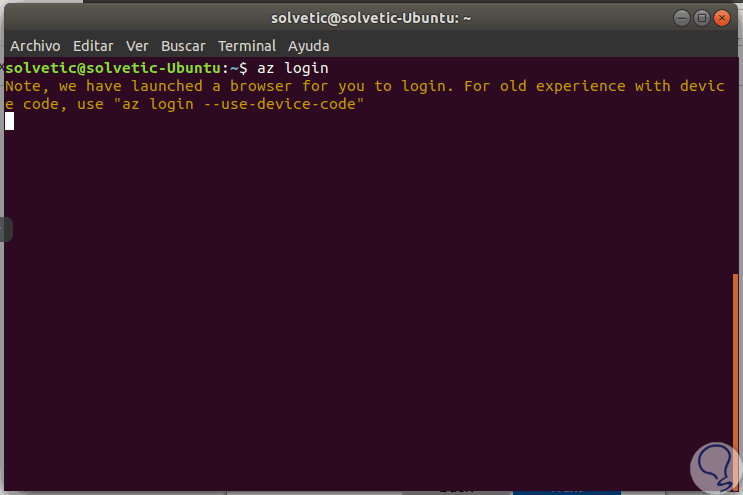
To start this process we go to the console and execute the following:
az login
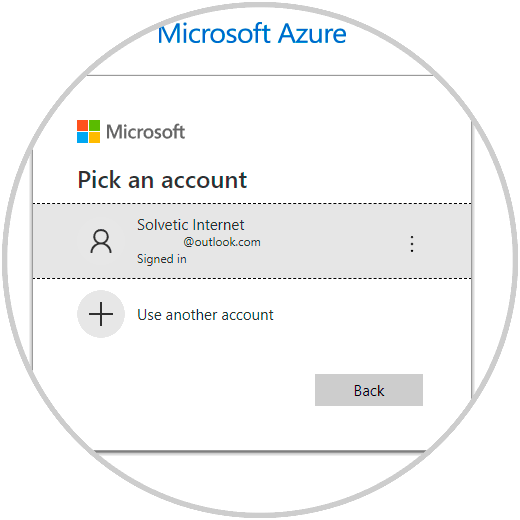
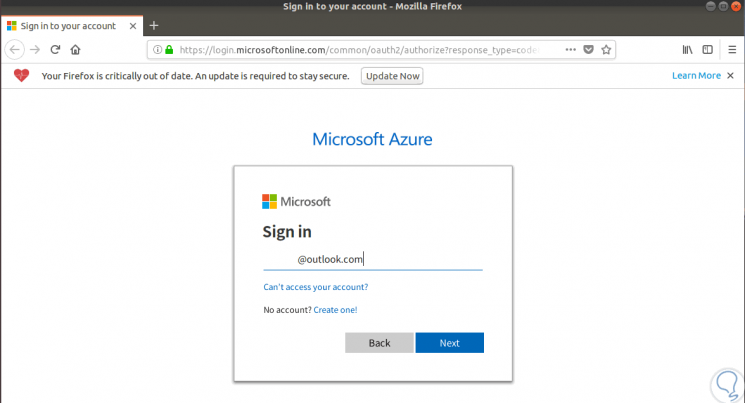
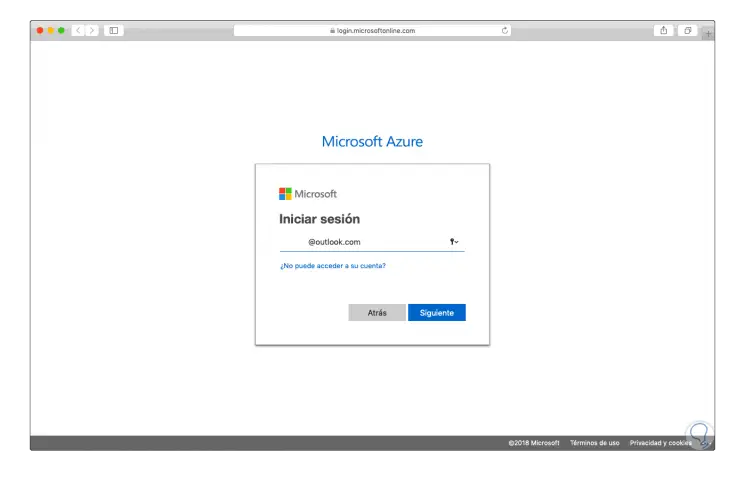
Step 2
This will automatically display the browser for us to enter the credentials of our Azure account:
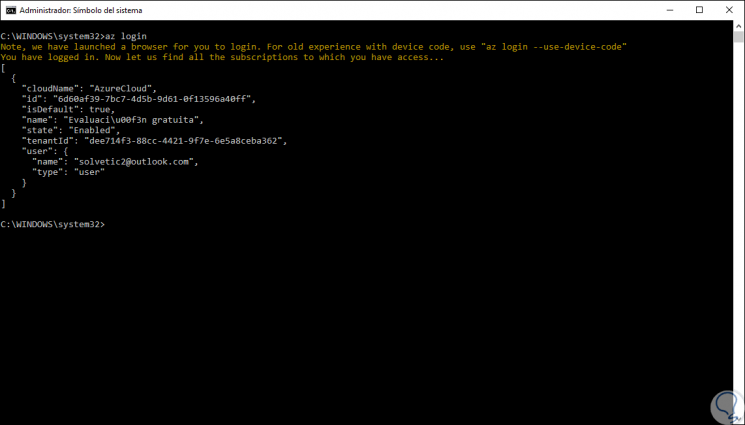
Step 3
Once we log in to the command prompt we will see that the connection has been established and we have details such as. From this point it will be possible to make changes to Azure through the CLI in Windows 10.
- Name of the resource in the cloud
3. Uninstall CLI Azure on Windows 10
If we want to uninstall the Windows CLI, we can download again, if we have deleted it, the MSI file in the following link. Then we will execute it and we will select the option “Uninstallâ€.
MSI Azure Windows
4. Install CLI Azure on Linux
Being an open source system and various distributions, in the case of Linux we will have multiple installation options.
Install CLI Azure using the APT package manager
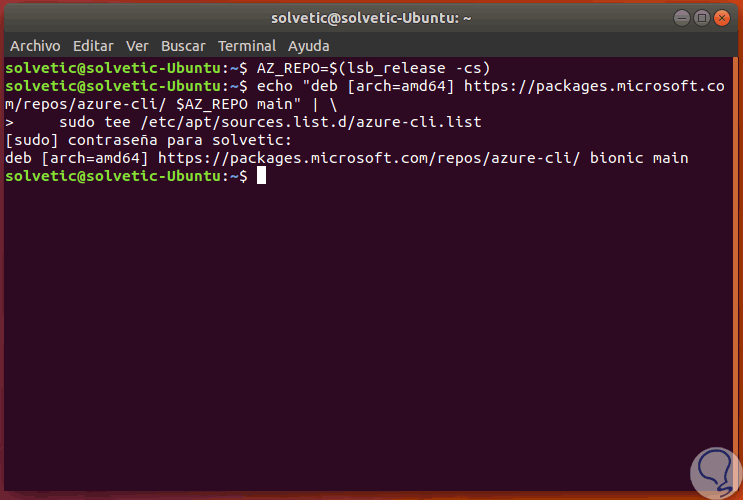
This will be the method used by TechnoWikis for this tutorial and this APT administrator is available for systems such as Ubuntu, Mint or Debian. The first step to take is to modify the list of sources by executing the following:
AZ_REPO = $ (lsb_release -cs) echo "deb [arch = amd64] https://packages.microsoft.com/repos/azure-cli/ $ AZ_REPO main" | \ sudo tee /etc/apt/sources.list.d/azure-cli.list
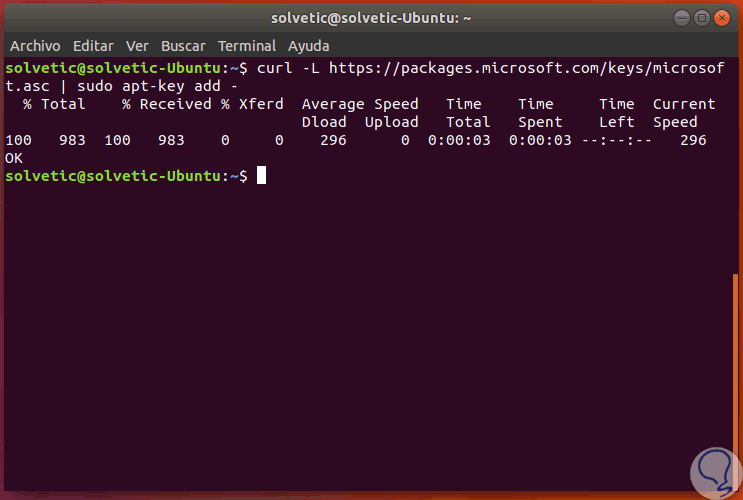
Then, we will execute the following to obtain the Microsoft signature key:
curl -L https://packages.microsoft.com/keys/microsoft.asc | sudo apt-key add -
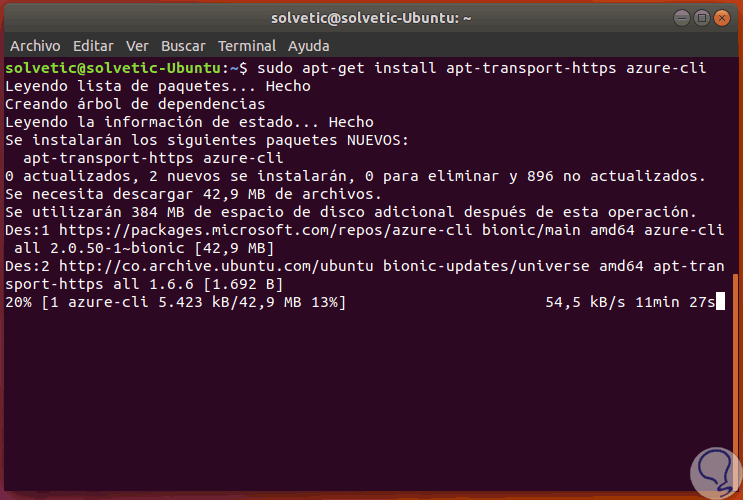
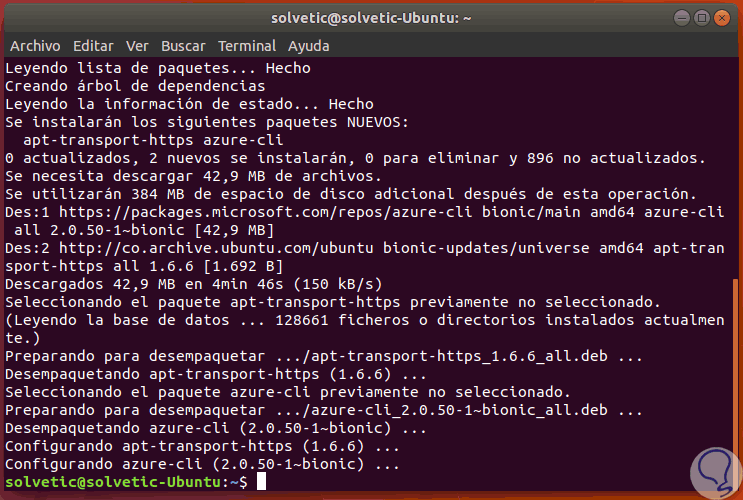
We proceed to install the Azure CLI before updating the packages like this:
sudo apt-get update sudo apt-get install apt-transport-https azure-cli
Once the process is finished we will see that the CLI has been configured in Linux:
After this we can log in by running:
az login
We will be redirected to the browser to log in to Azure:
Note
If the following error is displayed, "bash: lsb_release: command not found", simply install lsb_release by running:
sudo apt-get install lsb-release
Install CLI Azure using the YUM package manager
This manager is used for RedHat and CentOS systems. In this case to install CLI it is required to have the following:
- Python 2.7x or Python 3.x
For this type of system the first step is to import the Microsoft repository key:
sudo rpm --import https://packages.microsoft.com/keys/microsoft.asc
Then we proceed to create the local azure-cli repository information like this:
sudo sh -c 'echo -e "[azure-cli] \ nname = Azure CLI \ nbaseurl = https: //packages.microsoft.com/yumrepos/azure-cli \ nenabled = 1 \ ngpgcheck = 1 \ ngpgkey = https: //packages.microsoft.com/keys/microsoft.asc "> /etc/yum.repos.d/azure-cli.repo '
We proceed with the installation of CLI by running:
sudo yum install azure-cli
Once installed we will log in with az login.
To update CLI in these distributions we will execute the following:
sudo yum update azure-cli
Now, to uninstall CLI it will be necessary to run:
sudo yum remove azure-cli
If CLI is not to be installed again, we will remove the repositories by running:
sudo rm /etc/yum.repos.d/azure-cli.repo
Finally, we delete the Microsoft GPG signature with the following command:
MSFT_KEY = `rpm -qa gpg-pubkey / * --qf"% {version} -% {release}% {summary} \ n "| grep Microsoft | awk '{print $ 1}' ' sudo rpm -e --allmatches gpg-pubkey- $ MSFT_KEY
5. Uninstall CLI Azure on Linux
Step 1
At the moment we want to uninstall Linux CLI we will execute the following:
sudo apt-get remove -y azure-cli
Step 2
If the goal is not to reinstall CLI on Linux, we can remove the information from the Azure CLI repository with the following command:
sudo rm /etc/apt/sources.list.d/azure-cli.list
Step 3
Then we remove the unnecessary packages:
sudo apt autoremove
6. Install CLI Azure on macOS
For this case we will use macOS Mojave, in this case the Azure CLI can be installed through the HomeBrew package manager, HomeBrew is a tool that helps to manage and keep the installation of the CLI in macOS updated.
Step 1
If you do not have HomeBrew installed on macOS Mojave, we can perform this step with the following command:
mkdir homebrew && curl -L https://github.com/Homebrew/brew/tarball/master | tar xz --strip 1 -C homebrew
Step 2
Now, before installing the CLI, it will be necessary to update the Homebrew repository information and run the install command if:
brew update && brew install azure-cli
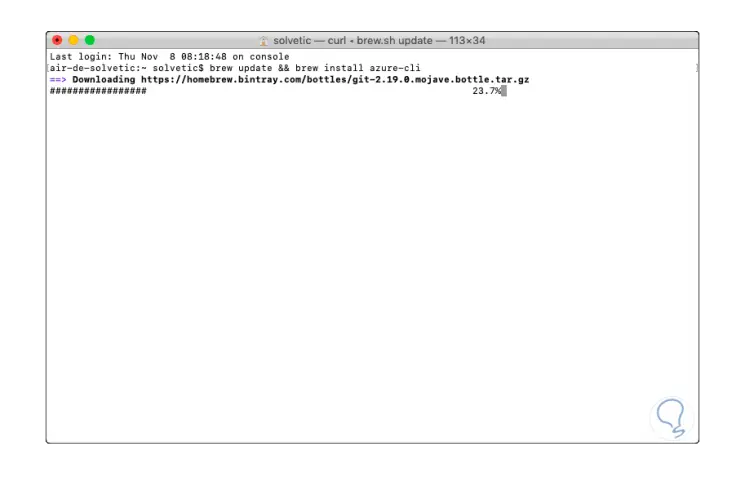
Step 3
We can see the progress of this installation:
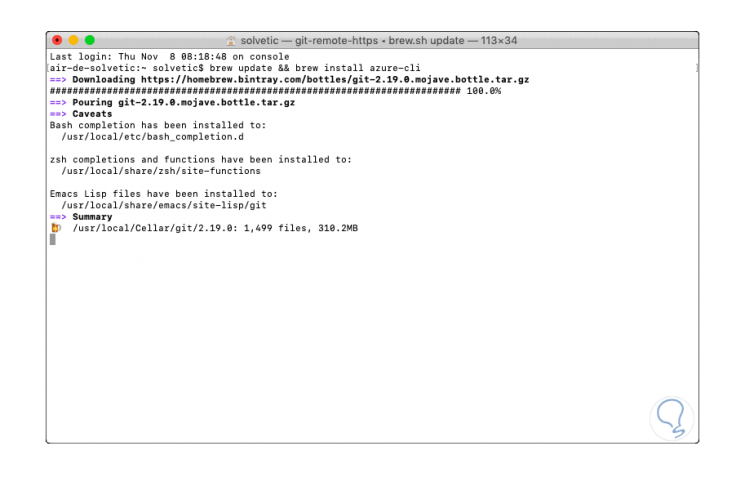
Step 4
Once installed we will log in with “az login†and we will be redirected to the browser to log in:
Step 5
To update CLI in macOS Mojave we must execute the following:
brew update && brew upgrade azure-cli
Step 6
For its uninstallation it will be necessary to execute the following.
brew uninstall azure-cli
7. Use CLI Azure on Windows 10, Linux and macOS
For this tutorial we will use CLI on Windows 10. The CLI has the autocomplete function with the tab for all the commands in the bash shell which facilitates the execution of them. The global arguments that are available for all commands are:
Print information
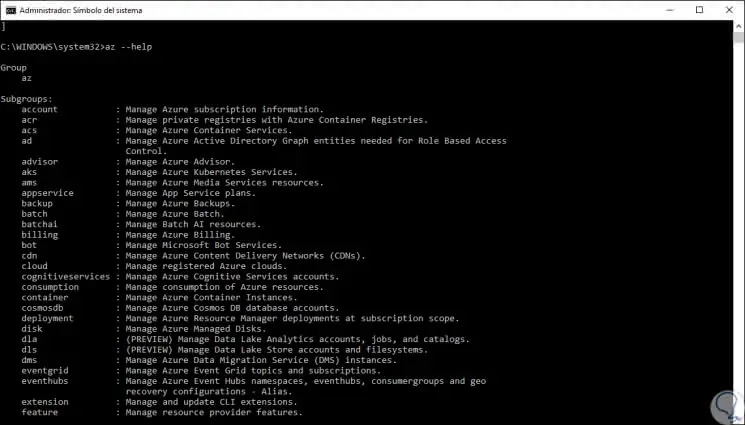
This parameter prints reference information of the CLI with each or not of its commands along with its arguments, also lists the available commands and subgroups.
--help
Change output format
allows us to change the output format, the available options are json, jsonc (colored JSON), tsv (Tab-separated values) and table (natural language ASCII tables). By default, the CLI generates json.
--output
Filter results
This option uses the JMESPath query language in order to filter the results returned by Azure services.
--query
Resources created
It is responsible for printing information about the resources created in Azure during an operation and other useful information.
--verbose
More information
It has the mission of printing even more information about the CLI's operations and is used for debugging purposes.
--debug
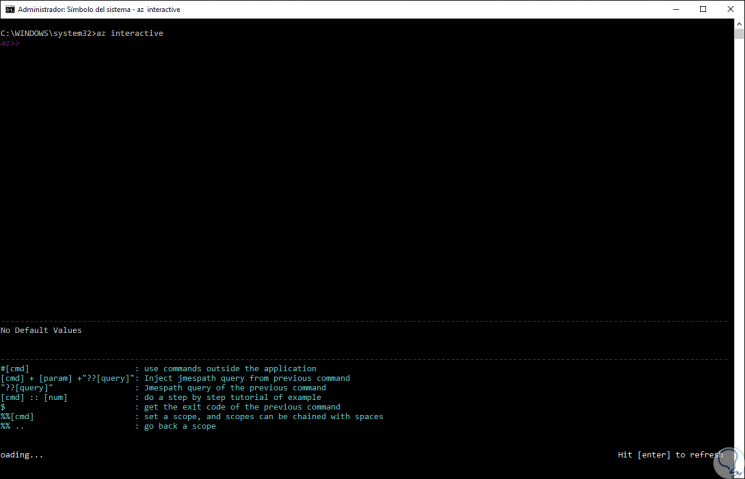
8. Use CLI Azure interactive mode
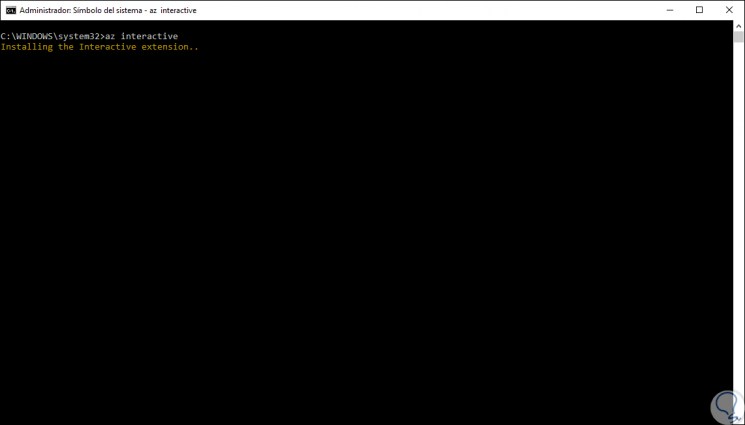
Step 1
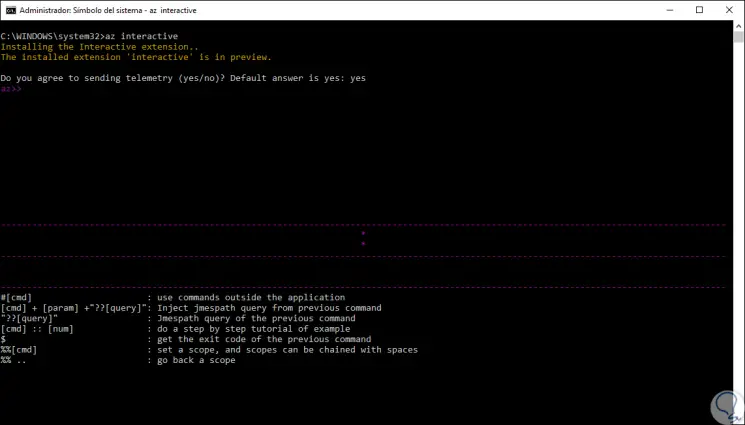
It is an additional option with which you can use the Azure CLI in interactive mode through the “az interactive†command, with this mode an interactive shell with autocomplete function, descriptions of the commands and examples will be opened, when we execute this it will start the process of downloading and installing said extension:
Step 2
We will enter the term "yes" to access this mode:
Step 3
In this mode we can enable or disable descriptions and examples with the F1 key:
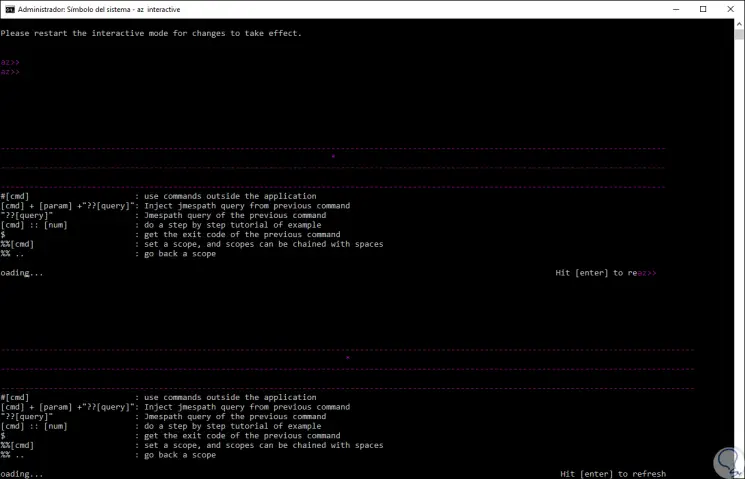
Step 4
To activate or deactivate the display of the default parameters we will use F2 and with the F3 key the display of key gestures is alternated.
9. Commands to use CLI Azure on Windows 10, Linux and macOS
CLI gives us a series of useful commands both for creation and for the administration of resources in Azure. TechnoWikis will analyze the most important commands that will undoubtedly be essential for the tasks to be performed with Azure.
az account
This command allows us to manage the accounts registered in Azure, it is composed of some variables such as:
az account clear
Clear all subscriptions in the CLI local cache
az account get-access-token
Allows access to a token so that utilities have access to Azure.
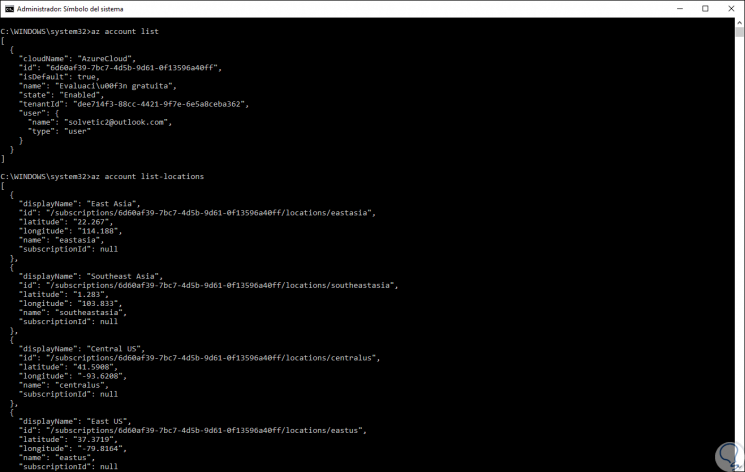
az account list
Displays the list of subscriptions for the account with which you are logged in.
az account list-locations
Show the supported regions for the current subscription
az account lock
Block subscription levels
az account lock create
Create an account lock
az account lock delete
Delete an account lock
az account management-group
Manage Azure Management Groups
az account show
Display details of the current subscription
az acr
With this command it will be possible to manage private records with Azure Container records. Some of its available options are:
az acr build
Create a quick compilation, in which distributed records are provided for an Azure Container record.
az acr build-task
Manage compilation definitions
az acr build-task create
It facilitates the creation of a new compilation definition which can be activated by git confirmations or base image updates for an Azure Container Registry.
az acr build-task delete
Deletes a compilation task from an Azure Container Registry.
az acr build-task list
List the construction tasks for an Azure Container Registry.
az acs
This command allows you to manage Azure container services (Azure Container Services). Some options available are:
az acs browse
Displays the manager panel of a service container in a web browser.
az acs create
Create a service container
az acs dcos
Allows you to manage an Azure container service orchestrated by DC / OS.
az acs dcos browse
Its mission is to create an SSH tunnel destined for the Azure container service and opens the Mesosphere DC / OS control panel in the browser.
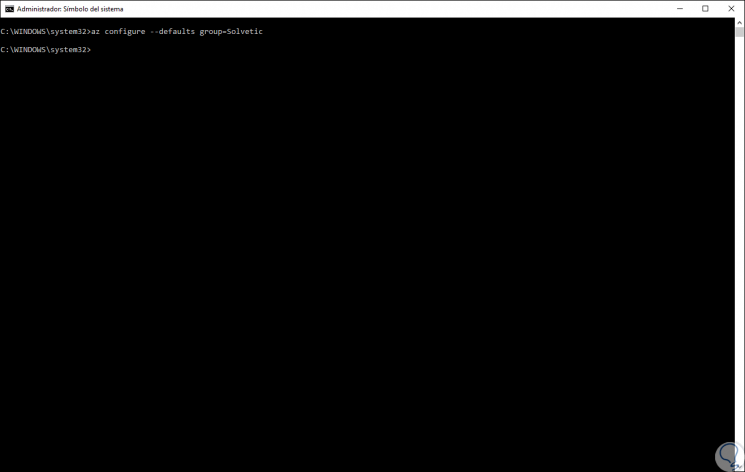
az configure
One of the most used commands in CLI is az configure, the basic syntax of this command is:
az configure [--defaults]
For example, if we want to establish a default group we can execute the following:
az configure --defaults group = TechnoWikis
To delete the names of web applications and the names of virtual machines:
az configure --defaults vm = '' web = ''
Other Azure commands
Azure CLI has a wide range of options to use such as:
az ad
Manage the Azure Active Directory Graph entities that are required for role-based access control.
az advisor
It allows us to manage Azure subscription information.
az aks
It facilitates the administration of Azure Kubernetes Services.
az ams
Manage Azure Media resources
az appservice
With this command you can manage application service plans
az backup
Facilitates the management of Azure Backup backups
az batch
Manage Azure Batch
az billing
It is useful for managing purchases and credit in Azure
az bot
Manage Microsoft Bot services.
az cdn
Manage Azure content distribution networks (CDN).
Az Cloud
As the name implies, manage the registered Azure clouds.
az cognitiveservices
Allows you to manage Azure Cognitive Services accounts.
az configure
Allows you to manage the configuration of the Azure CLI. This command is interactive.
az disk
Manage Azure disks with tasks like list (lis), delete (delete) and more
az eventgrid
Manage Azure Event Grid themes and subscriptions.
az eventhubs
It facilitates the management of namespaces, events, consumption groups and geographical recovery configurations of Azure Event Hubs - Alias.
az extension
Manage and update CLI extensions
az feature
This command allows you to manage the characteristics of the resource provider
az feedback
Allows sending feedback to Microsoft on Azure
az find
Find the Azure CLI commands in a simple way
az hdinsight
Manage HDInsight clusters.
az lab
It allows us to administer Azure DevTest Labs.
az login
It allows us to log in to Azure.
az logout
It is responsible for closing the session in order to prevent access to Azure subscriptions.
az maps
Manage Azure maps
az monitor
Your task is to manage the Azure Monitor service, it allows you to access events, create alerts and many more tasks.
az search
It allows you to manage Azure search services, administration keys and query keys.
10. Create a virtual machine with CLI Cloud Shell in Azure
Now, for all IT administrators and users, Azure is a more than practical alternative for creating a virtual machine, something common in a cloud environment. To create a machine through the Azure CLI we will follow the following steps.
Step 1
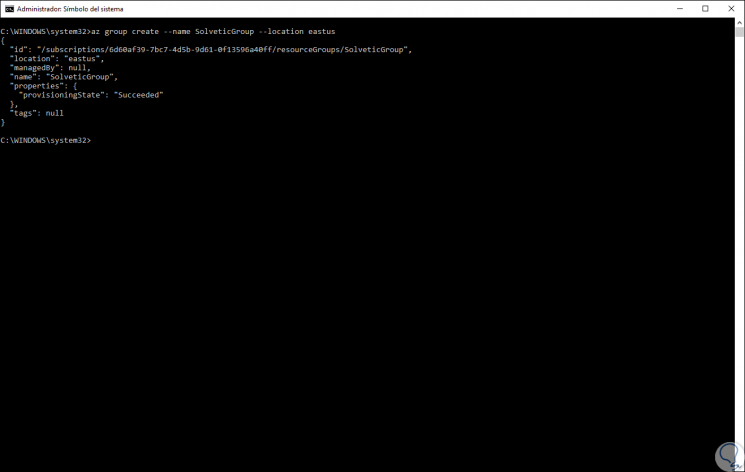
First, let's create a new resource group and assign the desired zone:
az group create --name TechnoWikisGroup --location eastus
Step 2
After this step, we will create our virtual machine indicating values ​​such as:
Step 3
We execute the following:
az vm create \ --resource-group TechnoWikisGroup \ --name TechnoWikisVM \ --image win2016datacenter \ --admin-username TechnoWikis \ --admin-password TechnoWikistest123

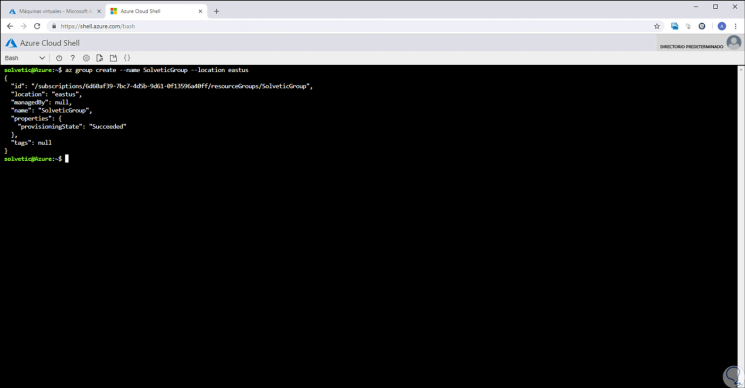
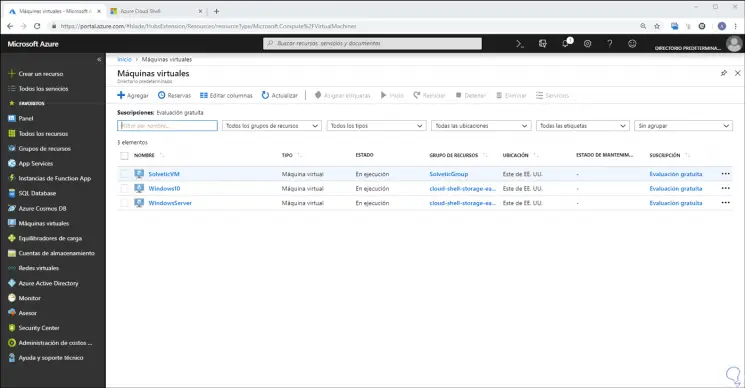
Step 4
We can see that our machine is created according to the criteria indicated. We have used CLI in the browser mode (Cloud Shell), in order to validate that the use is simple either locally or through the web.
CLI is a powerful complement of Azure with which you can perform all the tasks associated with the resources available in Azure which are not few, but very complete.