Quality is one of the aspects that we have to take into account when we are creating content for a professional purpose or simply because we want our photographs to show their best possible version. One of the things that is very fast is having a photograph that we have taken in high quality and that when we upload it to our social networks it appears grainy or with a very low quality, thus clouding the final result that we wanted to show. At the end of the day, it is useless to use a good camera if when we publish our content it does not honor it. That is why today's objective is to talk to you about the elements and tips that must be taken into account when editing an image in Lightroom Mobile and then posting it on our Instagram social network..
Instagram is one of the social networks with the greatest visibility today. In addition to its multiple possibilities for uploading content that it offers, it can be used as a window to show our work and that is why photo editing is increasingly a necessity in the sector. Users tend more to take care of the content and prioritize careful editing so that the end user sees quality content that is attractive on our profile.
But as you already know, each social network has its rules and its rules of use, something that we will have to take into account if we want the quality of information of our content not to be lost along the way and to reach the final platform in a correct way. . If you have experienced that when uploading a photograph to Instagram the quality of this has decreased, it is because in the editing or publication process we have not made the necessary adjustments..

Instagram indicates its own rules and ways of acting when uploading content to its platform. Indicates that when you are going to share a photo on your iPhone or Android mobile application, try to upload it with the highest possible quality, but limiting the maximum width of pixels to 1080. If you are going to share an image that has a width between 320 and 1080 pixels Instagram It will keep the native resolution always clear, as long as an aspect ratio of 1.91:1 and 4:5 is maintained, that is, a height between 566 and 1350 pixels with a maximum width of 1080 pixels. At the moment that the photograph that you are going to upload moves away from this aspect ratio and this Instagram configuration will tend to crop and adjust it to meet these requirements. This means that if you share a photo that is larger than 1080 pixels wide, reduce the quality and if you share a smaller photo, they will enlarge it to 320 pixels. Hence, it is important that we take into account the requirements that Instagram asks us and configure them as we will see below in Lightroom Mobile to avoid quality losses when publishing our content.
Taking into account these tips that Instagram itself gives us, we are going to see how to work from Lightroom Mobile to configure our photographs so that they adapt perfectly to this platform and avoid that there may be a loss of quality that we do not want..
To stay up to date, remember to subscribe to our YouTube channel!
SUBSCRIBE ON YOUTUBE
Export Lightroom Mobile Photos for Instagram
As we have previously mentioned, Instagram has its own rules and regulations when it comes to taking into account the content you upload and will adapt it to its platform in one way or another. If you publish photography content that has a width greater than 1080 pixels, you will see how it reduces it, thus worsening the quality. If you share a photo that has a resolution of less than 320 pixels, it will enlarge it, but it will also have that quality loss effect since it will be forcing the dimensions to change. That is why it is necessary that we take into account from the beginning what measurements our image should have and how we should configure them in Lightroom Mobile to avoid losing quality in our social network.
Although it seems that the content that we upload to a social network should not be as precise as what we would need in a professional portfolio, the truth is that more and more Instagram is one of the preferred showcases for content creators to show their work and for that good quality and original and professional content will be a differentiating element that attracts the attention of users. To avoid problems when publishing your photos correctly on Instagram, we suggest that you take into account the following options when you want to correctly upload a photo with a width of 1080 pixels:
- Have downloaded the most recent version of Instagram. You can enter the Play Store and check if you have any update available to be installed.
- When uploading your photo, keep in mind that it must have a width of 1080 pixels and an aspect ratio between 1.91: 1 and 4:5.
- Use a quality camera either from your mobile phone or with an external DSLR.
- If the photograph is taken with external devices and you need to transfer them from PC to mobile, use cloud platforms such as drives to transfer your photographs to your phone, since if you use intermediary tools such as WhatsApp or email, they may suffer an initial compression that we do not want to lose. so final quality.
We are going to see how to apply these tips to post on Instagram with Lightroom Mobile without losing quality in our photos.
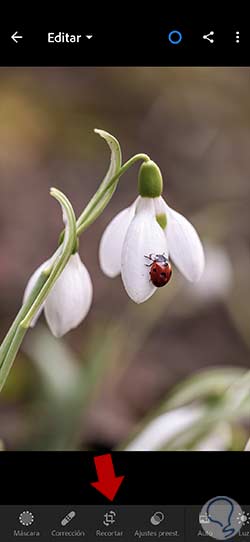
Step 1
We start by opening our photograph in Lightroom Mobile. From its "Edit" panel we will be able to apply the changes we want to our photograph until it is ready.
We are going to start by giving our photography adequate proportions since it will end up on Instagram. To do this, click on the "Crop" section.
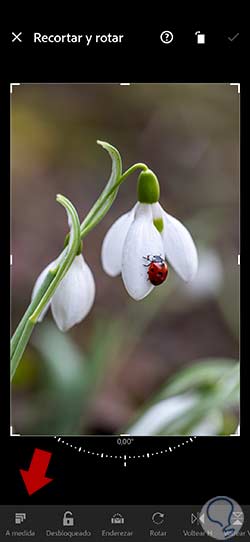
Step 2
Here we will click on the "Custom" icon to select a suitable proportion for Instagram.
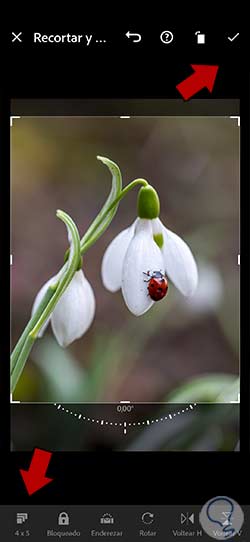
Step 3
Remember that the platform recommends a size between 1.91:1 and 4:5. We will select this proportion in the list and we will adjust our photograph in the new frame.
Click on the top check when you are done to apply the changes.
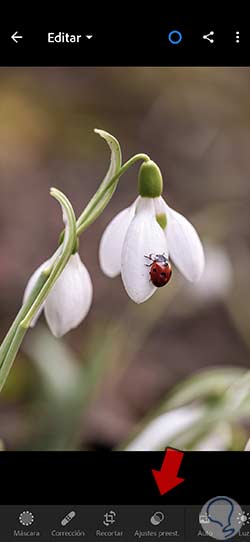
Step 4
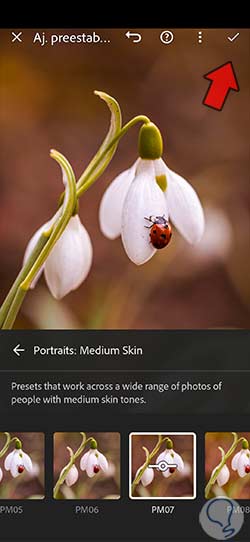
In case you don't have time for deep editing, you can choose to use the Presets that the application offers us and that you can find at the bottom.
step 5
Here we will choose a preset or preset adjustment that we like and click on it to apply it.
When you have it ready, click on the upper check box to apply the changes.
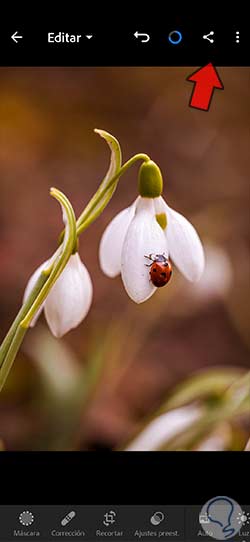
step 6
As we already have our photograph ready to be exported, we will click on the option to export or share at the top.
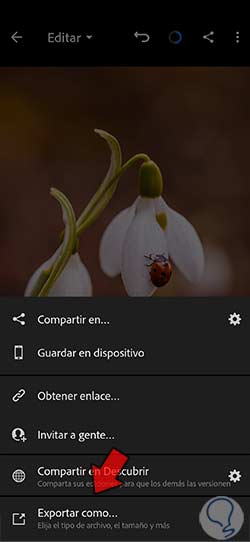
step 7
We will see different possible options to export our photography. In this case we are going to select "Export as" to be able to select options completely.
step 8
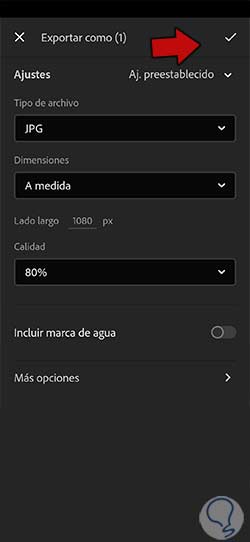
Here we will be able to give the first configurations for our photography. The first thing we will do is adjust the "File type" which in this case will be JPG.
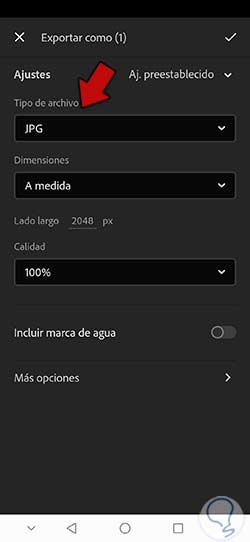
step 9
In the "Dimensions" section we will select the "Custom" option. We will see that just below it says "Long side". This is where we'll put the 1080 pixel limit we talked about earlier.
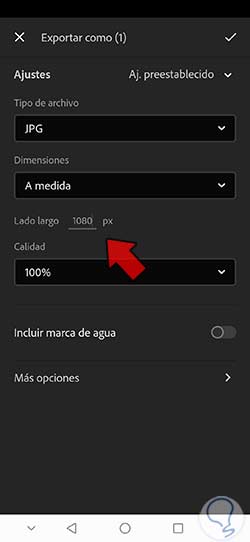
step 10
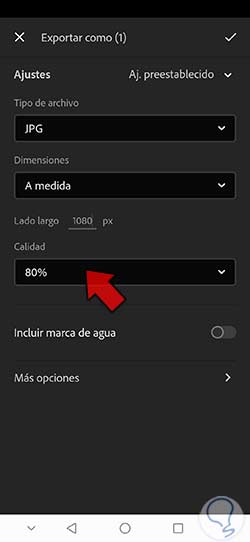
We continue configuring our image working on the "Quality" with which we will export. Based on the experience of the users within Instagram, an adequate quality to avoid quality cuts would be to establish a percentage close to 80%. For this reason, we will click on the drop-down menu and choose that value.
step 11
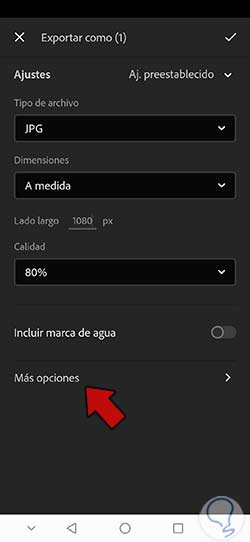
As we still need some settings that do not appear in this first window, we are going to click on "More options" to enter some additional options.
step 12
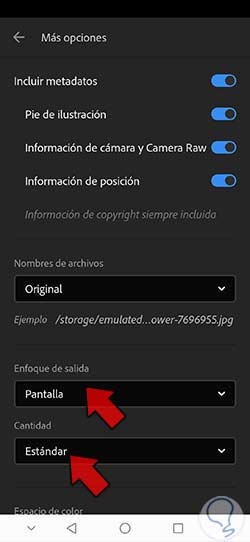
We are going to go to the "Output Focus" which will be the amount of focus that Lightroom Mobile will apply depending on the output medium and the resolution that we are indicating.
In this case we will use these values for our Instagram photo:
- Quantity: We will put Standard or High depending on the need of our image if we see that it would need a lot or a moderate quantity.
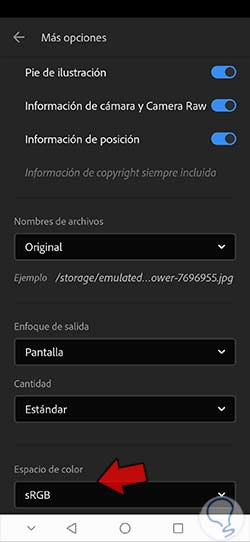
step 13
Finally, we will go to the "Color space" section. Here we will have to choose one that has high compatibility with different devices. Depending on the color mode of your mobile screen, it is possible that the edition you make of what is uploaded to your Instagram differs, so this must be taken into account. Hence, to maximize compatibility we select the Color Space of “sRGB”.
step 14
Once we finish modifying this window we will return to the previous window. If we are already prepared to export our image, we will proceed to export it using the upper check to apply the changes.
Note
Don't worry about the settings for future exports as the changes you've made are saved by default and you'll have them configured the same way for future exports.
step 14
Finally, when you upload your image to Instagram, remember to click on the lower left icon so that your photograph is seen in its entirety and the proportion is not changed.

In this way we will have our photography ready to be published on Instagram and avoid losing quality when uploading it to our profile.