Although it may seem like a simple task, exporting also needs a suitable configuration so that all the effort we have made editing from our tools is not wasted. Depending on the final objective that we want to achieve with our photographic archive, we will need to make one configuration or another. Sometimes we think that since our image will end up in our Social Network profile, it is not necessary to apply a specific configuration, but the truth is that if we do not take into account the requirements of the final platform, we can find quality losses or compatibility errors..
Another aspect that must be taken into account when exporting is that the quality that we will need will not be the same for a blog or professional website as for a personal profile on a social platform, so the final care should be more or less exhaustive depending on the end. Ideally, you should always work with settings adapted to the final medium and thus avoid having those photographs that seem low quality despite having been taken in high resolutions.
Tips to avoid quality loss
Send the files to your mobile device under platforms that do not compress the content such as Google Drive or connection via WiFi or Bluetooth.
- Avoid using intermediary tools other than Lightroom Mobile. After exporting your file, do not export it again in another application as it will surely apply some type of compression and you will lose the Lightroom settings.
- Verify the needs of the final platform and use the recommendations to apply them during the edition and in the export.
- Avoid using the camera included in applications such as Instagram or WhatsApp as they offer poor quality results, always try to do it with your phone's native camera or the Lightroom Mobile camera in DNG format.
- Don't let end apps crop your photo, this happens a lot on Instagram so it's best to work with proper sizes from the start.
- Be careful with using the highest quality when exporting, since in applications like Instagram or Facebook you can see this loss of quality forced.
The format with which you work will also be decisive and that is why it is interesting that you use raw formats such as Raw or DNG that will not apply compression to your photographs and you will avoid losing information from the moment the photograph is taken. When editing for the ultimate goal, you will probably need to apply a compressed format like JPG, but try to adjust the export so that the loss of quality is not too great..
Format types to export Lightroom Mobile
When exporting we will see different export options and that is why we are going to see what each one consists of:
- JPG. Its name is Joint Photographic Experts Group and it is a fairly widespread type of format that is used to compress large images, thus allowing them to be saved.
- DNG. This file type is called open source Adobe Digital Negative and has been created by Adobe Systems as an alternative to the popular RAW formats. It is used in raw digital images and is responsible for saving information obtained from the camera sensor that will be stored without loss of quality.
- TIF. They are a type of file used for the storage of raster images and graphics. It is often used a lot in photography to be able to have high-quality images before they are edited, thus avoiding the use of formats that cause data loss. They compress without loss of data avoiding the loss of quality, although generating large file sizes.
- Original. It will keep the original format of the photograph to be exported.
Once we take into account different elements when editing and exporting our photos, we are going to see how we can do a complete export of photos in Lightroom Mobile.
To stay up to date, remember to subscribe to our YouTube channel!
SUBSCRIBE ON YOUTUBE
Export photos in Lightroom Mobile
As we have been seeing, we will be able to make quality editions and exports from Lightroom Mobile trying to avoid large losses of information in our final files. To do this, tools like Lightroom Mobile will allow us to make personalized configurations in our photo files that prevent us from ending up with low-quality images and obvious errors. In today's example we will go step by step seeing the different options that we have when we choose that we want to make a custom export from Lightroom Mobile.
Although you have quick export options in Lightroom Mobile, today we want to show you the most complete option that we can make to export photography from our mobile device. It is the best option if we want an optimized result with good quality, although you can always select faster options as needed. Among the export options that we can see in Lightroom Mobile we will have:
- Share on. Allows you to do a quick export by choosing a photo sharing tool.
- Save to device. It will automatically export our photography to the gallery of the mobile device.
- Get link. It generates a link that allows us to share our photography according to the configuration that we establish.
- Invite people. It is an option to invite people by email to work with the photo or just view it.
- Share on Discover. It allows us to publish our photography in the “Discover” category.
- export as. It is the most complete export configuration and allows us to customize our export preferences.

With these options we will be able to choose the way in which we want to export our photography. We are going to focus today on the most complete option that allows you to customize the attributes of the final image and which is called Export as. It should be noted that the configuration you establish will be marked for the next exports..
Step 1
The first thing we will do is open or import the image that we want to end up exporting from Lightroom Mobile.

Step 2
Once we open it we will see that we are inside the "Edit" panel where we can make all the modifications we need for our photography using Lightroom Mobile.

Step 3
When we have our photograph ready, we can start the export process by clicking on the upper share icon that you can see.
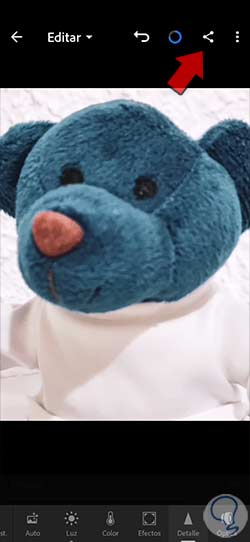
Step 4
In the export list we will see different options depending on how we want to export. We are going to use the “Export as” option to be able to manually configure the export parameters. If you want to export quickly on your mobile device you can choose “Save to device”.
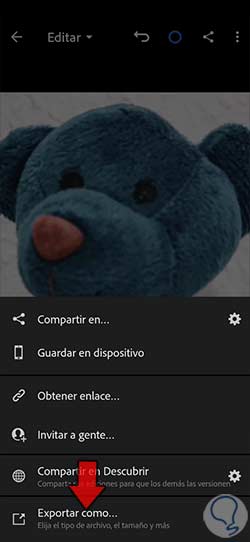
step 5
We see a new window where we can start configuring different parameters of our export. If you want a quick export you can click on “Presets” and select an already established export setting.
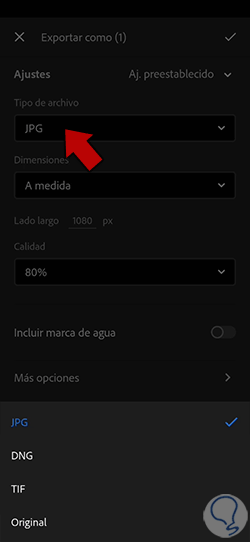
step 6
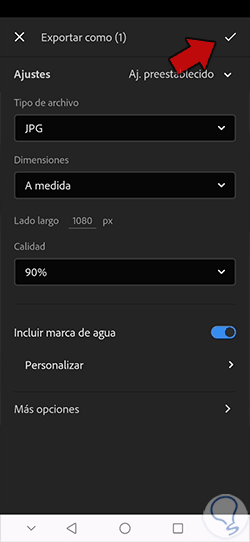
In this case we are going to configure everything manually. To do this, we will begin by clicking on "File type" and we will choose a format to be the one with which our photograph is exported. It will depend on the final use but normally the format will be JPG.
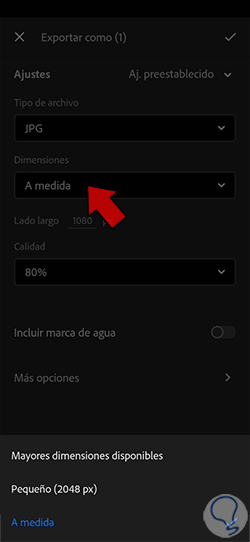
step 7
We continue editing our photograph and we are now going to configure the "Dimensions" that our image will have. It is important that you consult the platform where you are going to publish the image since excessive or too small dimensions can cause quality loss. If you have certain measurements like those offered by Instagram, you can use the "Custom" parameter.
step 8
Together with the dimensions that we have established, we can also determine the "Quality" with which we are going to export our image. Although it is thought that putting the highest quality is always the best, the truth is that in many Social Networks it is best to put a lower percentage to avoid errors or loss of quality.

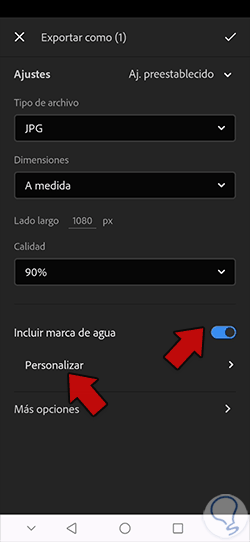
step 9
Another interesting option to take into account is the possibility of “Include watermark”. This is useful if we want our name or brand to appear within our photograph. We can activate this option with the switch that appears and click on "Customize" to configure it.
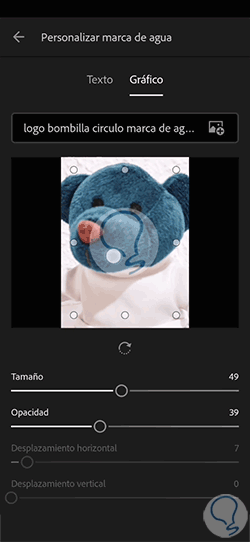
step 10
Within the “Customize” panel you can choose if you want a Text-based or Graphic-based watermark, choose the file, as well as the position, size and Opacity.
step 11
When you have configured the above we can continue to see more options to customize the export of the image by clicking on "More options".

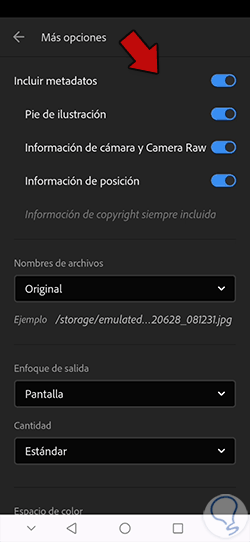
step 12
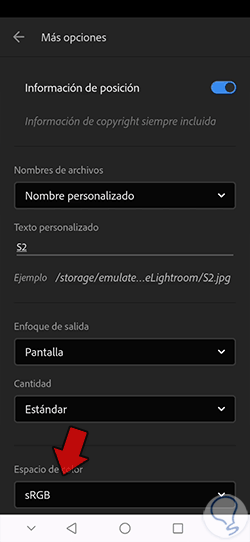
In the new window that appears we can continue editing export settings. The first thing we see is the possibility of activating or deactivating the content of the metadata, that is, the information that our image file will have included. Copyright information will always be included.
Turn some or all of the metadata elements your image will contain on or off depending on what you prefer.
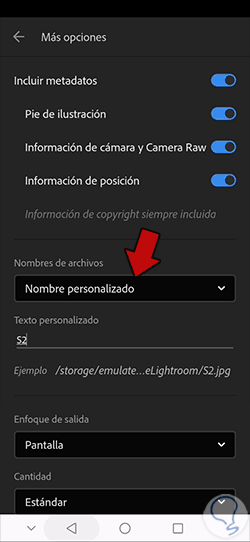
step 13
Another part that we will be able to customize in our photography are the “File names”. We can let it be established by default or give it a "Custom Text".
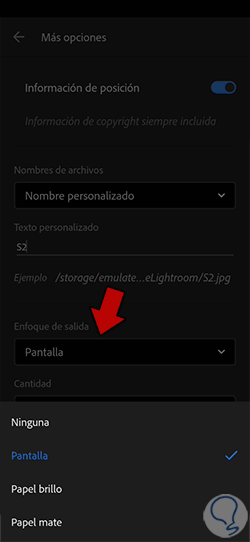
step 14
The next step will be to determine the "Output Focus" that we want to apply to our photography. It will also depend on the final use that we are going to give it, but if, for example, we want to publish it on Instagram, we will use a type of "Screen".
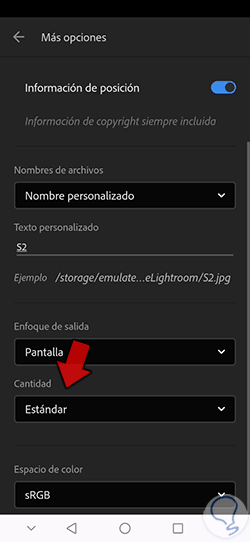
step 15
Once we define how the output focus will be, we will also determine the "Amount" that we will configure. In this case we will choose the “Standard” level.
step 16
The last thing we are going to modify will be the "Color Space" that our final photograph will have configured. It will depend on the final use that we are going to give it, but if it is a digital web use with using the sRGB space for compatibility, it is the most appropriate.
step 17
Once we have configured each of these elements we can apply the final changes that will start the export of our photograph, for this we return to the previous window. Here we will see the upper check to apply the necessary changes and start the export of the photograph.
step 18
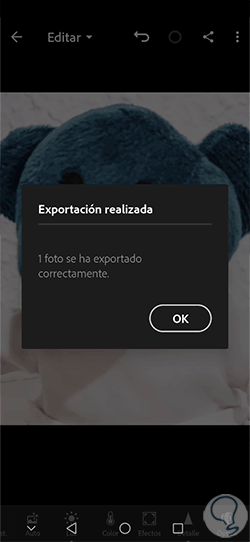
The export of the photograph will begin and once the process is complete you will see a notice on the screen that tells you so.
step 19
Once the export is complete, you can search for your photograph taken in the gallery of your mobile device with the settings we have made.

In this way we will be able to export our photographs in a personalized way using Lightroom Mobile and adjust it to the platform where our image will end up to avoid loss of quality.