In the same photograph we can find a great variety of elements that we need to edit to improve its result. Many times we will find photographs where the adjustments are mostly general, such as exposure or color temperature, but the truth is that it is very common for there to be a specific area where we need to act precisely. That is why it is interesting to know tools that allow us to make fragmented editions within our photography, avoiding general editions that affect the final result without any type of filtering..
The use of masks in professional photo editing is common and this possibility allows us to work non-destructively on our photographs, being able to make local modifications and preventing all our photography from suffering general modifications. If you need to give more focus and shine to some eyes, it is totally absurd for us to apply these modifications to the rest of the image and that is why the use of masks is going to be key in this type of edition. Imagine that you want to change the color of the clothes, the lighting of the sky or the saturation of an object, with the use of masks we are going to make all this possible and what we will achieve as a result will be a professional edition.

What is a Mask
The Mask tool present in Lightroom Mobile allows you to use different utilities to make local adjustments. We will be able to make precise modifications such as changing the color or changing the lighting, focusing only on a specific area. Thanks to masking we will be able to make much more precise and professional local adjustments.
utilities of a mask
The masks help us to work the layers in a more concrete way, being able to make editions in a non-destructive way. By working with a mask we will be hiding parts of a layer that we can edit at any time. We will therefore be able to make much more precise editions, preventing all of our photography from being influenced by the adjustments that we are making. If you only want to make adjustments to the sky, you no longer have to worry about the rest of your image being affected as well.
Next, we are going to see what mask tools we have available in Lightroom Mobile, as well as the actions we can perform with them to achieve concrete and professional editions.
1 Lightroom Mobile Mask Tools
How we have been mentioning the use of masks in our photo editions is going to help us a lot when it comes to getting photos with a professional style, since we are going to be able to focus adjustments and modifications on areas that we need, avoiding making typical global modifications in our photography that cause results. too heterogeneous and not at all uniform.
It is absurd to make a global modification of the color in our photograph if, for example, we only want to change the color of the sky. The problem is that many of the applications that exist for photo editing only allow us global adjustments, opting for the entire photograph itself and preventing us from focusing our attention on improvement in delimited areas. For this reason, Lightroom Mobile becomes the perfect ally for professional mobile editing, allowing us to make local adjustments only in those areas that interest us..
The mobile version of Lightroom Mobile will also allow us to use different mask tools that make it possible to adapt to the needs of each photograph. Next, we show you the masking tools that this application offers us and how easy it will be to use them, thus achieving very well-defined local editions to achieve great results.
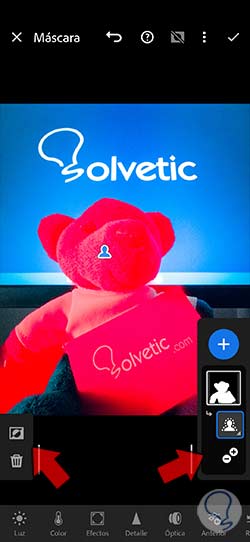
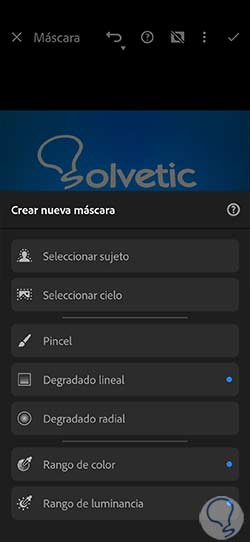
select subject
This option will allow us to create a layer mask quickly by making a selection of a subject automatically to be able to work only on it, avoiding modifying information around it.
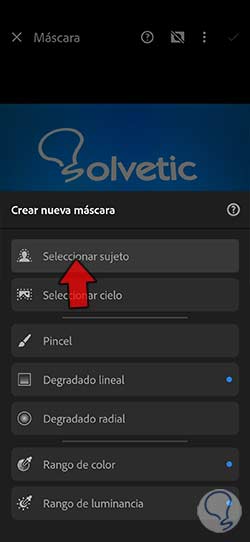
We will only have to execute this option to see how an automatic selection of the subject is created. Then you can use the different tools that appear to adjust the selection and refine it, such as "Add" or "Subtract"..
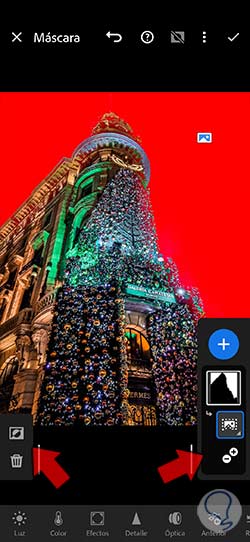
select sky
A very interesting tool when we only need to work on the sky of our photograph. With this option an automatic selection of only the sky will be made.
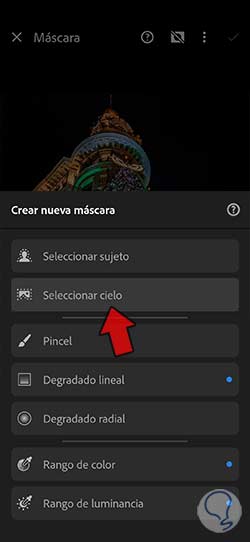
Once we apply this tool we will see that the sky of the photograph is selected automatically and we can start working on it. You can refine the selection area if you need to, and then start making the necessary adjustments.
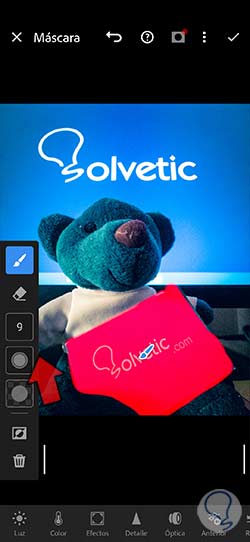
Brush
With this tool we will be able to make selections in our image manually to create the mask only in the area that we want. This will allow us to delimit the area where we want to work without the danger of modifying other nearby ones.
When you have this option selected you can start painting over the area you want to adjust later. You have a left side panel where you can configure aspects of the brush such as “Size”, “Fade” and “Flow”.
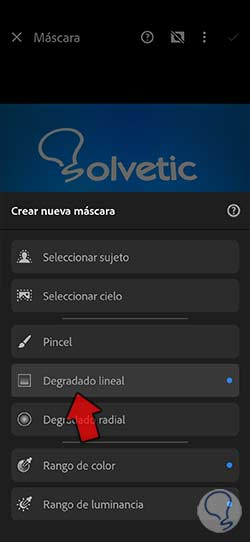
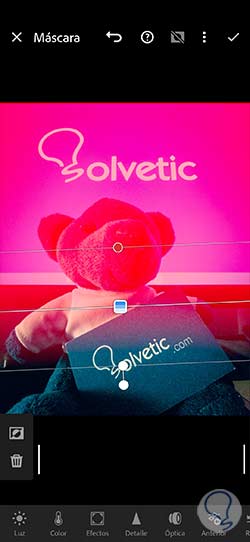
linear gradient
This tool will allow us to apply adjustments using a gradual transition process that will give smooth transition results. In this way, we will be able to apply adjustments that have that blurred effect and are not applied too markedly in our photography.
To use this tool place the blue dot in the center and then use the white lines from that center to readjust the angle that the overlap will have. If you want to increase or decrease the effect of the gradient, move the white lines out or in.
You can use the "Eraser" option to remove areas of the mask.
radial gradient
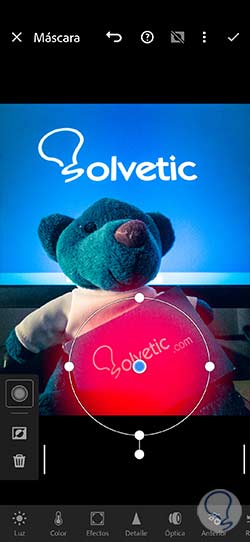
With this option we will create a mask that will allow to make changes and adjustments with an oval gradient effect making the limits have a faded effect. To adjust this level of fading you have the option to regulate it in "Fade".
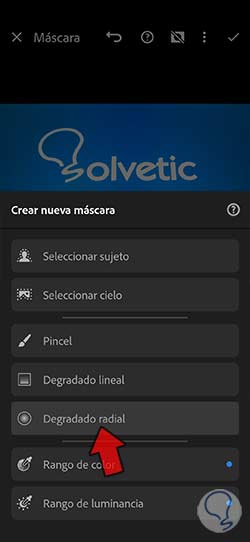
Place the blue dot to indicate the center of the oval shape of the mask and then with the white dots you can delimit the shape and size of this linear gradient. You will have a panel on the left side to be able to "Fade", "Invert" or "Delete".
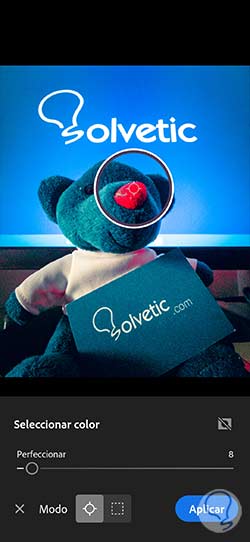
color range
This mask will allow us to make color changes in a certain area that we select. It will be optimal when there are quite identifiable colors.
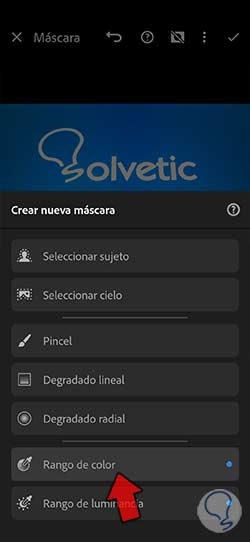
To use the tool, click on an area and drag it to identify the colors we want to test. Then use the “Change Color” option and set an “Amount” to determine the color range. This way you can change the color of the selected area. You also have the options to “Invert” and “Delete”.
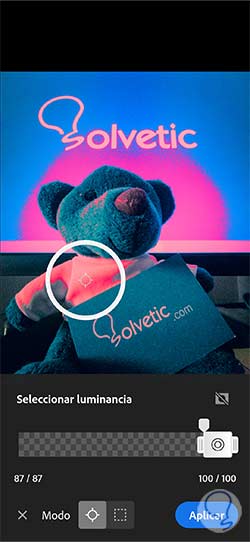
Luminance Range
With this mask tool we will be able to delimit a work area. Afterwards, those parts that have a chosen brightness range will be converted into a mask. In this way we can make brightness changes in the image.
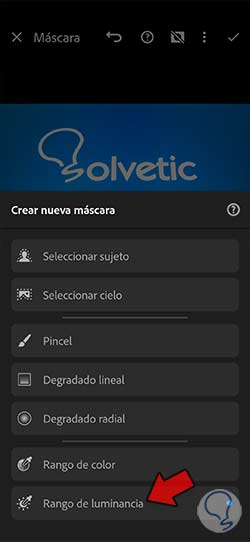
Click on an area of the image, hold and drag to later with the "Select luminance" option to determine the luminance range. To modify that range we can use the “Change luminance” option. So we can go modifying the range of luminance of our photography.
You also have the options to “Invert” or “Delete”.
depth range
This mask tool is indicated to be used in those photographs where we have depth data. It will allow us to make selections of zones according to the distance to the camera.
To determine a depth range we can use the blue dot that will define the depth of an area or you can use the "Select depth" option to configure it manually.
To adjust the selection you also have the options to “Change depth”, “Invert” and “Delete”.
2 Lightroom Mobile Skin Actions
We have already known the different mask tools that Lightroom Mobile offers us within its range of possibilities. You will have seen that from now on your photographs will make more sense as it is possible to make very local adjustments that we can customize at any time, something really useful. We will now be able to escape from those global adjustments that completely modified our photography and did not allow us to focus on what is really important.
Once we know all those possibilities that Lightroom Mobile offers us, we are going to give you a summary with the main actions that we can do with these masks within the application. Not only will you know that you have different options to work on specific areas of your photography, but you will also have the possibility of working with these masks in different ways, from creating several masks at the same time to modifying their size or form of action.
We are going to see how to work with these masks in Lightroom Mobile and thereby master the work of editing in specific areas of our photography, creating truly professional results from your mobile devices.
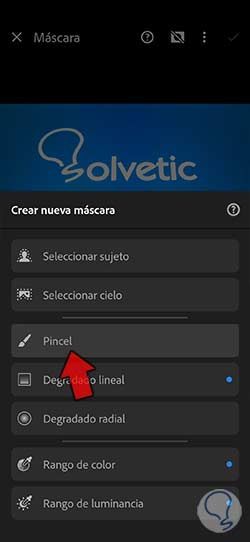
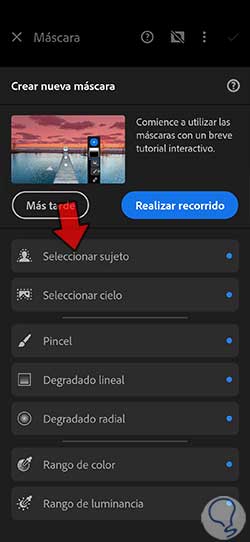
create a mask
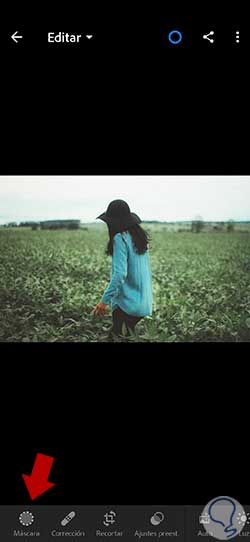
The first thing will be to create a first mask with which to start editing locally. To do this we will go to the "Mask" option in the lower panel of options.
Then we will click on the “Add new skin” button that we see under the “+” icon.
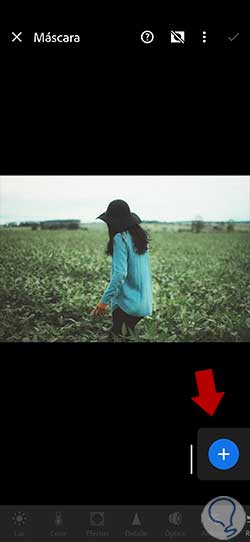
The last thing will be to select what kind of mask tool we want to use to edit our photo.
add another skin
It is possible to work with several masks at the same time within our photograph since we may need to make different types of local adjustments at the same time. To be able to add another new mask, it will be as simple as clicking on the "Create new mask" button that you will see within the edition of the current mask.
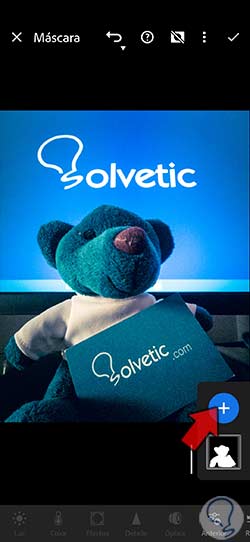
Then you will only have to select the new type of mask that you want to add.
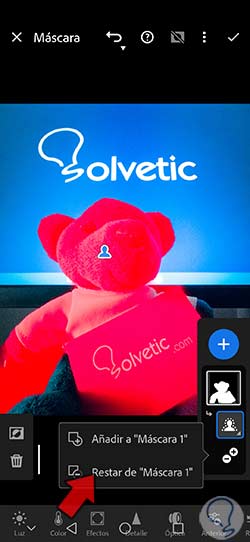
add to mask
If you have a selection made using some type of mask, you can also expand the area to be edited with the "Add to mask" option. Imagine that, when performing a Subject Selection, there are areas that have not been well defined. Well, with the option to add to mask we can select a tool with which to expand this area, such as the "Brush".
You'll be able to see this option just below the layer mask under a plus and minus symbol. Here you will only have to choose “Add to X Mask” and select the way to add more selection to your current area using one of the tools we have seen.
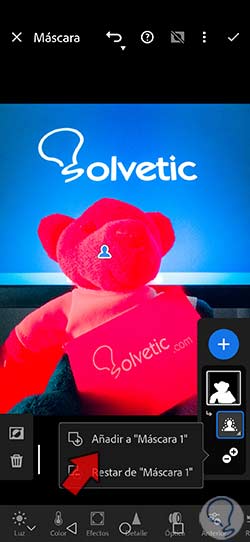
subtract mask
Just as we have seen that we can add new zones to our selected area, we will also be able to subtract zones from the mask. To carry out this option we will do as before and click on the “+” and “-” icon that is just below the current mask.
Then we will only have to select the option "Subtract from "X Mask"" and select a tool that will help us eliminate areas of our current area, such as the Brush.
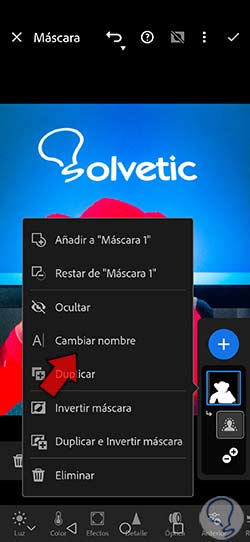
Change mask name
To maintain an order of time in all our composition, since sometimes the workflow is quite complex, we recommend that you rename the components or skins that you are using so that your work structure is cleaner and clearer and you can find what you need more easily. that you look for at all times.
To change the name of a skin, we are going to click on it and we will see that a menu of options is displayed, among which is “Change name”. Click on it to customize the name of that skin.
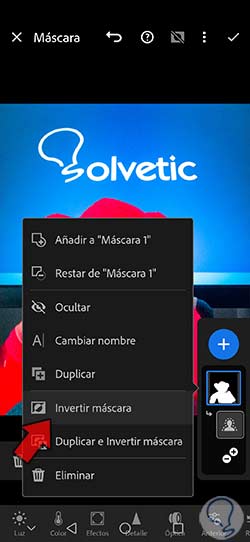
invert mask
Many times we can carry out the selection process by choosing a specific area to invert the selection and mark the opposite. This is useful when we need large areas and it is faster to pick the excess and invert the selection.
To carry out this process, once we have selected an area in our photograph, we can click on the mask and an options panel will be displayed. Here we will find the option "Invert mask" that will select the opposite.
Invert Mask Component
Just like we can invert an entire mask, we can invert a component that we are using. To do this we will see a panel on the left side that will allow us to see the "Invest" option.
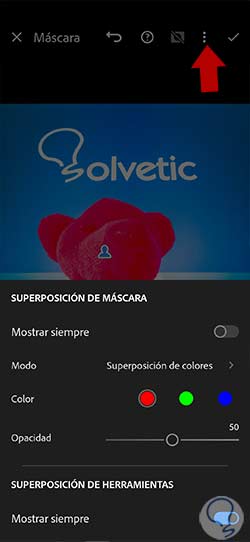
Change skin overlay
If you want to customize the color of the skin overlay, you can tap on the top three dots. Next we'll look at the “Mask Overlay” panel which will allow you to configure that mask overlay as we work with it.
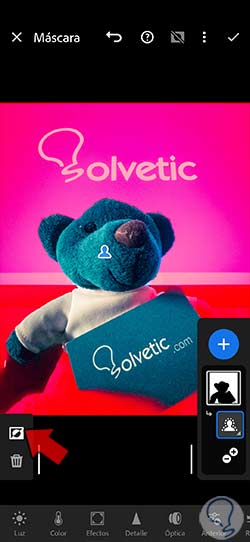
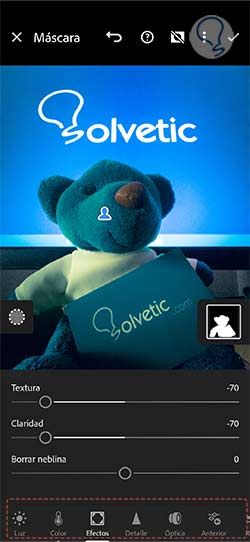
Make adjustments to the created skin
Once we have defined our work area through the use of masks, we will only have to apply the adjustments that we need in that specific area that we have delimited. To do this we will go to the lower panel of options where we will find the different local settings that we have available.
In this way we will have managed to know what the masks are in Lightroom Mobile and how we can work with them to be able to make local editions that focus on specific areas of our photography and avoid modifying the rest of the image. You will no longer need to go to your computer to make professional and meticulous editions of your digital photographs.