It is a reality that with the ingestion of visual content that exists when on social networks with The Digital World itself, it is increasingly difficult to make our own content stand out above the rest. For this, it is necessary to look for strategies and methods with which to be able to achieve it, being in the end a trial and error work where we will see what is what attracts attention and how we can even improve it. In social networks we have a large amount of content that competes with each other continuously to get the attention of users and for this reason it will be necessary to use, for example, effects or filters that make specific elements stand out..
Although there are many elements in a photograph to make it stand out, such as its composition and above all its originality, the use of effects is the order of the day and that is why they can be a good help vehicle when trying to convey a message. We can use effects of cold tones when we want to convey a perhaps sadder feeling and we can use brighter and warmer tones when we want to associate feelings of happiness or energy. Although we can make these editions in a more segmented way with tools like Lightroom Mobile, there are filters and effects that can also help us with this, even creating them from scratch.
Today we will see how we can create a grainy effect to find a feeling of personalization in our photos. In the end, making edits to our images is very important since we are going to be able to both give that personal touch and get more authentic and unique photographs that differ from the rest of the content that exists. We recommend that you look for your own style in your photos and, as we will see later today, save them in your Lightroom Mobile presets to generate a dense library of custom effects and styles..
Characteristics of the Grain Effect
Some positive points of using the grainy effect in your photos can be the following:
- It generates an analog sensation. The grainy effect is a fairly obvious feature of analog cameras, so by adding that grain to our digital images we can simulate this analog aspect. This aspect for some types of photography such as sepia or black and white can be quite interesting.
- Increases texture and depth. The grainy effect can help us to provide a greater effect of texture and depth to the photograph, giving the image more vividness and avoiding a flat sensation when contemplating it.
- Reduces digital noise. A grainy effect could help us smooth out digital noise when there are areas in the image that are too dark.
- Influence on print quality. A controlled grainy effect can give our photography a sharper and more detailed look, thus improving the final quality when we are going to print a photograph.
- It creates a feeling of nostalgia. With this grainy effect we can evoke feelings of nostalgia for earlier times where analogue photography reigned. For certain moments, this effect can be useful since it greatly enhances the sensations it generates.
- More personality. Adding a grainy effect can give your photos more personality, making them stand out.
Taking into account that creating certain effects and styles will be able to enhance our photos and create personalized aspects in our content to make them stand out, today we are going to suggest the use of the grainy effect both to achieve corrections and to evoke nostalgic atmospheres when they see your photos.
To stay up to date, remember to subscribe to our YouTube channel!
SUBSCRIBE ON YOUTUBE
How to Make Matte Effect in Lightroom Mobile
When we use a grainy effect in our digital photographs we will be directly influencing its appearance in different ways. One of the most obvious characteristics is that we are going to be adding more texture and depth to our photography, something that can become more attractive and interest on the part of the rest of the users towards it. In addition, the use of certain styles such as the grainy effect can give that artistic touch to our photography that also helps us to make it stand out and stand out from other photographic content.
With the existence of such a high volume on social networks at the photographic level, it is difficult to make our photographs stand out in a few seconds and that is why we must always try to find ways to achieve it. For this reason, if we use, for example, this grainy effect on social networks, we could get the user to notice it at first glance, since it is not an effect that is usually used on a daily basis or that at least is not recommended. What we advise you is that this grainy effect, once we have seen its characteristics, has been used in a specific way to enhance a certain sensation at a specific moment..
For this reason, the ideal is to identify in which photographs we are going to want to provide that grainy effect and generate that feeling of nostalgic and artistic atmosphere that makes that photograph stand out above the rest, whether they are ours or those of other users. If we only want to use a grainy effect to hide some kind of imperfection in the image, keep in mind that you should use more subtle settings that do not show the intentional use of this effect.
Today we want to show you a general process to achieve that grainy effect with an analog look that you can give to your photos to make it stand out. Although you can apply these adjustments in a general way, you will always be able to adapt and customize them based on your image or your personal taste.
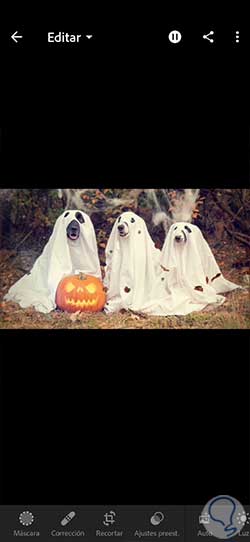
Step 1
The first thing will be to open our photograph in Lightroom Mobile to start working with it either from the gallery or by importing it from the start.
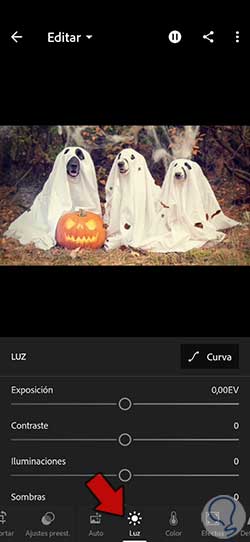
Step 2
The first thing we are going to start working on will be the lighting, so we are going to click on the "Light" section that we will see in the options bar.
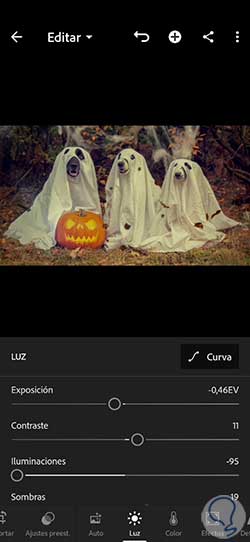
Step 3
Although it will depend a bit on the starting light conditions of your image, we will use values similar to these. If your image is too dark, you may need to increase the "Exposure" values positively.
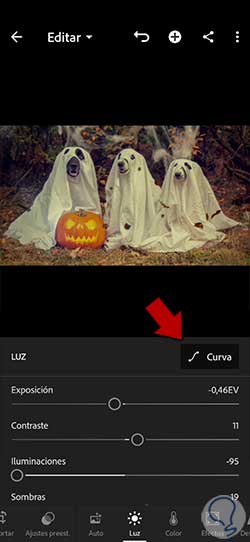
Step 4
We are going to continue editing the lighting of our photograph in a more segmented way using the “Curve” option.
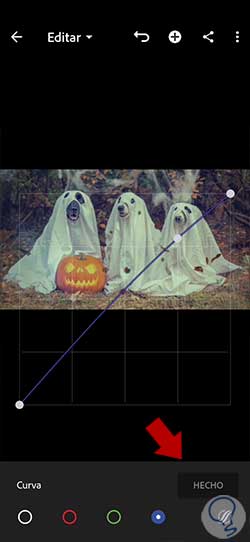
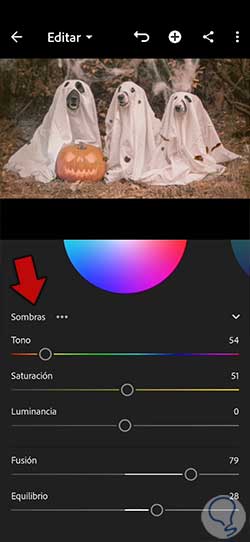
step 5
Here we are going to edit the curve related to the overall look, the color red and the color blue looking. For this we can move the curve line even by clicking and creating new modification points.
step 6
We will click on the "Done" option when we have finished the different light curves.
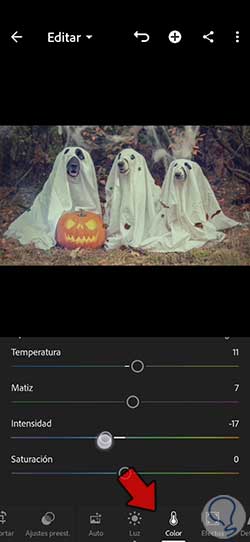
step 7
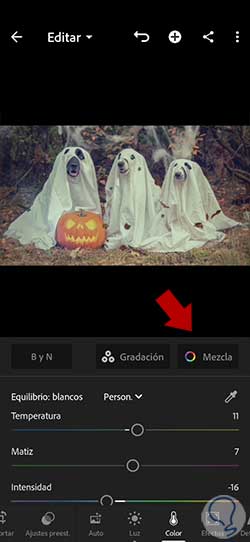
We continue our edition of the grainy effect by going to the color section that we will also see at the bottom.
In this section we are going to give a configuration similar to the following to achieve the effect we are looking for in terms of color.
step 8
We are going to further customize the color of our photograph by doing a color segmented edition of the color of the image. To do this, click on the "Mix" option.
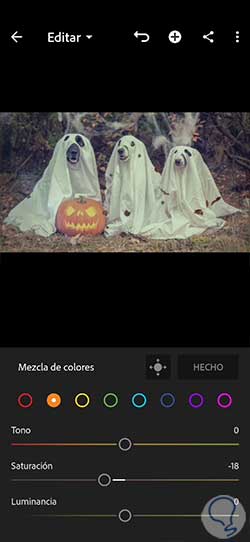
step 9
To do this, we are going to go through each color applying values similar to the following based on Hue, Saturation and Luminance:
step 10
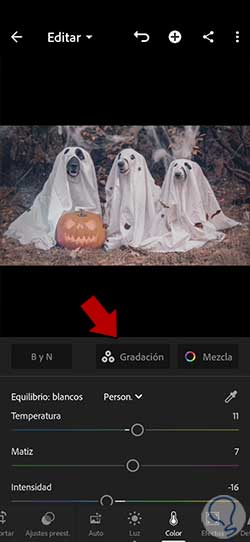
When we have edited the colors individually, we are going to work on the color in Shadows and Highlights from the "Gradation" option that we will see next to Mix.
step 11
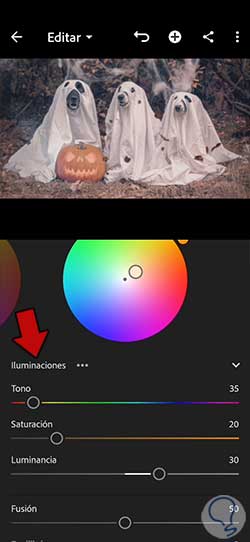
We will click on the Illuminations icon and display its options to achieve a configuration similar to this:
step 12
We also click on the Shadows option and select a configuration similar to the following. When you have finished editing, apply the changes with the “Done” icon.
step 13
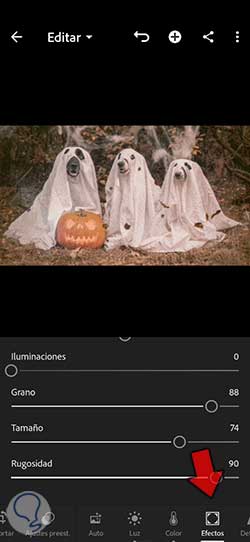
We already have our color and lighting settings defined. We are going to continue our edition working on different parameters under the “Effects” category that we will find.
Here we go, above all, to work on the graininess that you can increase if you prefer more intensity and providing a bit of Clarity effect. With the Size and Roughness in the granules we will be able to determine the presence of size of each grain, as well as its distribution. With low roughness we will have a more orderly distribution while with higher roughness the distribution of the grain will be more dispersed.
step 14
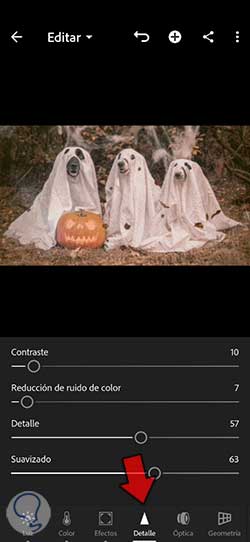
We are going to continue applying more editing to our image, working on both the sharpening and the noise reductions that may exist in our starting image or after the application of grain. To do this, we will click on the "Detail" option and give values similar to:
step 15
We are going to finish editing our photograph by readjusting the framing and that you will have to take into account depending on the platform where you later want to locate your photograph. To do this, click on the "Crop" option:
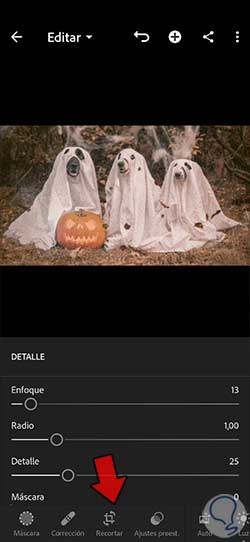
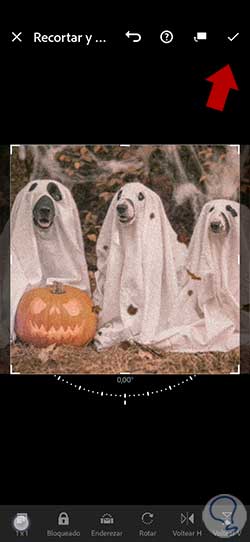
step 16
In this window you can change the proportions of your photograph thus changing the framing. You can use the predefined measurements to give the look you want based on the final tool. For example, if you are going to upload it to networks, the measurements will be different on Instagram than on Facebook:
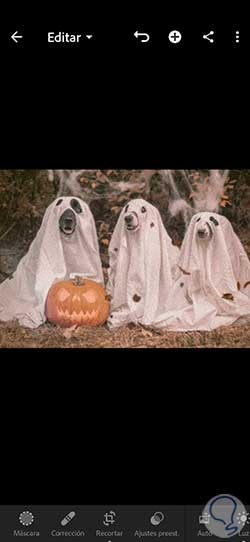
step 17
When we have finished the complete edition of our grainy effect, we will be able to compare the before and after of our edition to see how the appearance of our photograph changes:
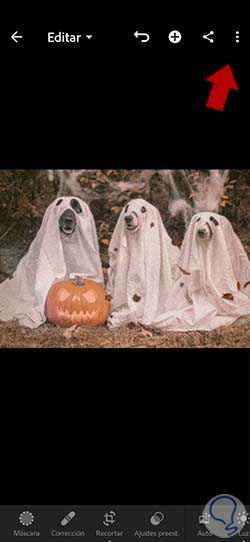
step 18
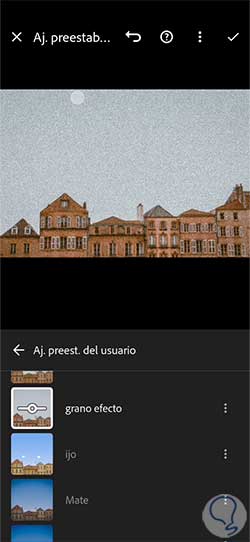
Since you probably want to use the grainy effect on other photos, we recommend that you create a custom preset to use whenever you want. For this we are going to click on the three upper points in the image:
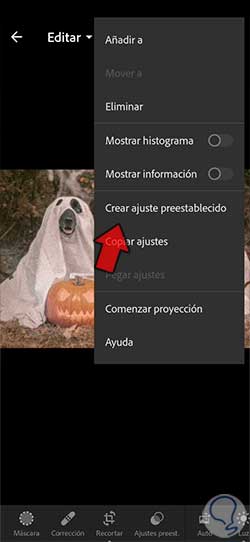
step 18
In the options that appear, click on the one called "Create preset" to create a new one.
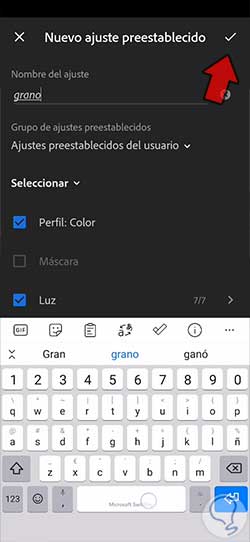
step 19
In this window we will be able to select the settings that we want to be linked to our preset. We also give a name to identify it and apply the changes using the top check that appears.
step 20
As we already have our preset created, we can now apply it whenever we want to any other photo by going to our own presets. In addition, you can modify any configuration to adjust it to your image
With this process we are going to achieve a grainy effect in Lightroom Mobile that will also remind us of those analog photographs that are so present today to give personality to our photographs.