One of the most demanded styles when it comes to editing photography is the cinematographic style with which we seek to emulate that film look in our images. Although it may seem paradoxical, if we want to emulate a film style in the photographs, then they will be really attractive. The truth is that by giving this type of cinematographic style we are getting an appearance in which it seems that we have taken a frame directly from a movie and therefore it becomes a quite demanded style..
Among the options that exist when creating a cinematographic style we can find a variety of options, although today we are going to show you two widely used cinematographic styles that give very striking results and that will allow you to create your presets with style cinematic in a complete way using Lightroom Mobile.
Surely on social networks or on photographic platforms you will have found that cinematographic style in which there is a predominance of reduced depth of field, a coma chromatic degradation and quite marked contrasts or even blues that are not very saturated or quite contrasted. All of me will end up giving a cinematographic style that gives our photographs a special personality..
Although nowadays we are going to be able to find automatic filters that give us a style similar to that cinematographic aspect that we are looking for, the ideal is that you create a preset from scratch yourself and make your images much more personalized looking for the style that best defines you. or need. That is why we are going to see how to create that cinematographic effect in Lightroom Mobile with two different but very interesting styles.
To stay up to date, remember to subscribe to our YouTube channel!
SUBSCRIBE ON YOUTUBE
1 Lightroom Mobile Cinematic Effect
As we have mentioned, looking for a photography process based on a cinematographic style is one of the most demanded workflows and you will be able to find a multitude of styles related to this field of audiovisual cinema. Although here we are going to offer you two possibilities when trying to achieve that cinematic effect in your photographs, we encourage you to do different configuration tests to achieve varied styles with more possibilities of use.
In order to achieve this cinematographic style, we are going to have to do a complete edition professionally in which we edit most of the parameters that the Lightroom Mobile tool offers us and in which light and color are going to be the protagonists that mark the Real difference between some styles and others. We will begin by editing the lighting of our photograph to continue configuring the color aspect And then finish retouching our photograph with different parameters such as effects or detail..
Although here we are going to give you some values in each of these settings, you can vary them depending on your photography since, although we are going to find a cinematographic style with our configuration, it is possible that you are looking for something more personalized and that is why you need to modify some of what we propose below. Let's see then how we can create a cinematographic effect in Lightroom Mobile in a complete way, resulting in a preset preset that we can use whenever we want.
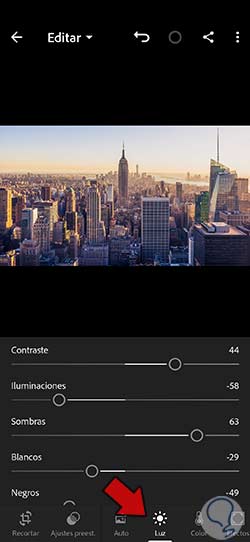
Step 1
After opening our image, we are going to go to the first section to edit, which in this case will be the one called "Light" to configure the lighting of our photograph. We will put some values similar to these where the exposure could vary depending on the photograph:
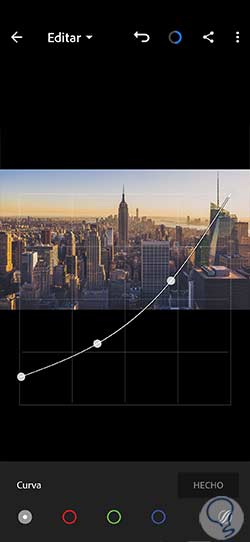
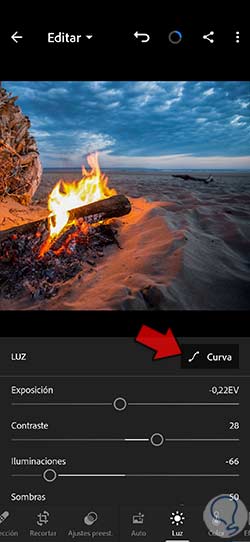
Step 2
To transform the light configuration of our photograph in a more precise way, we are going to click on the “Curve” option.

Step 3
Here we are going to click on the default curve to create new modification points that allow us to create a custom lighting curve.
Click “Done” when you are finished adjusting this light curve.
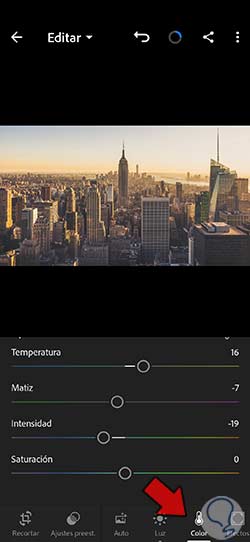
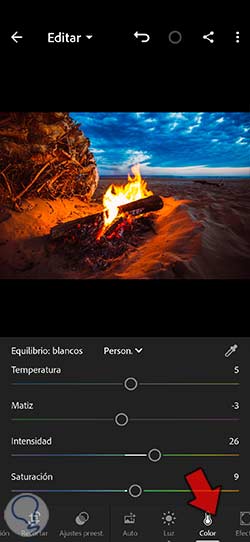
Step 4
We will continue editing our photography by going to the "Color" section that we also have in the lower menu. We look for this option and click to configure its different parameters in a similar way to this:
Note
Another interesting configuration to get more power from the cinematic effect will be:
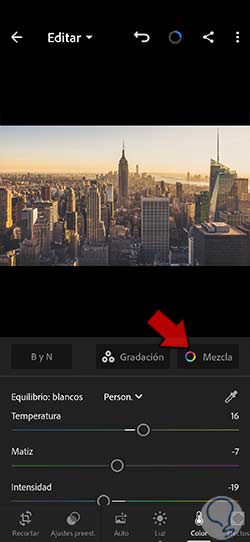
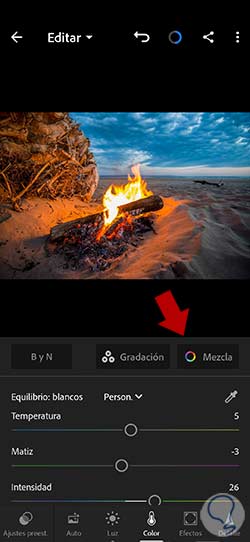
step 5
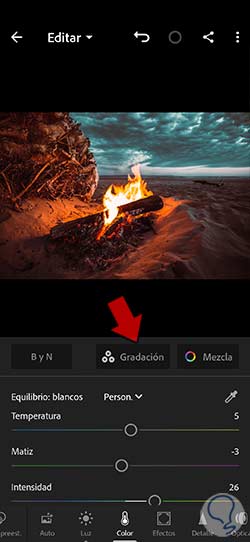
We will also be able to make a color configuration in a more segmented way, for this we will use the option that appears as "Mix".
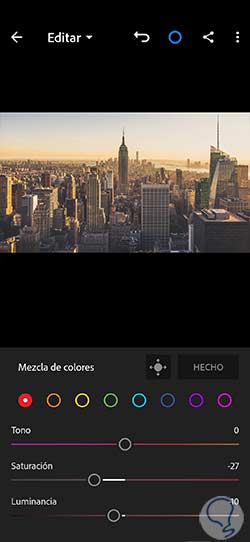
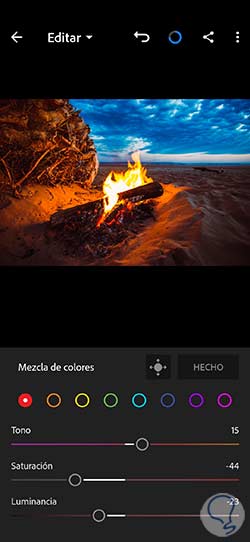
step 6
Here we are going to modify each color that we find in a similar way to the following values. When you finish, click on the "Done" icon to apply the modifications made.
step 7
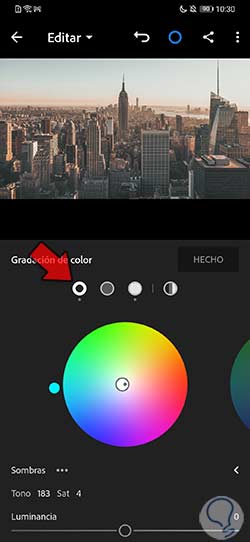
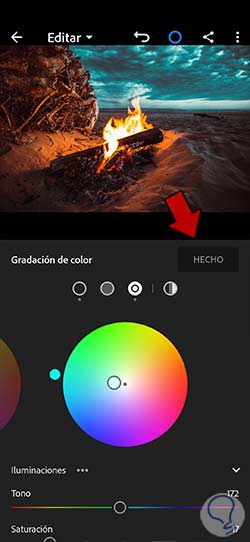
To give a specific atmosphere to our photography, which in this case seeks a cinematic air, we are going to work with color in lighting and shadows. To do this, we are going to click on the “Gradation” option.

step 8
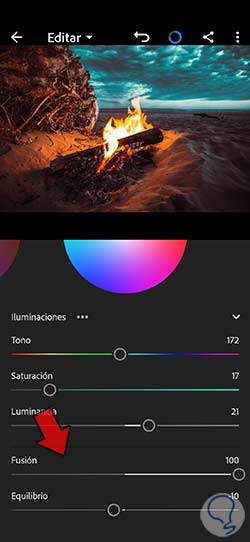
We will see that there are different icons to configure the Shadows and the highlights or Midtones. In this case we are going to click on Highlights and Shadows and we will give approximate values of:
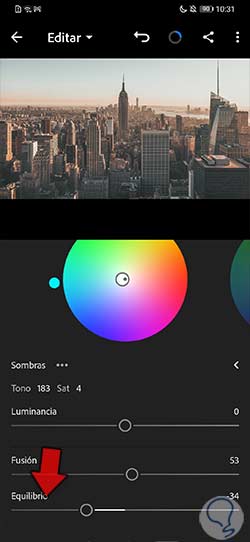
step 9
We are going to be able to configure the value of “Balance” in an approximate one of “-34” to adjust the transition between both color configurations. Click on “Done” to apply all the changes.
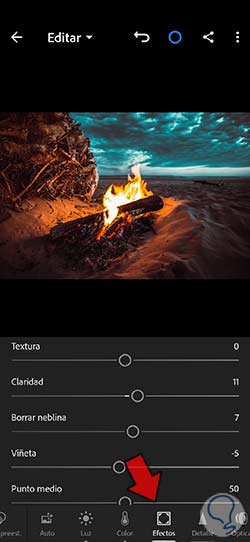
step 10
We continue editing our photography and in this case we will go to the "Effects" section where we will give values similar to these:

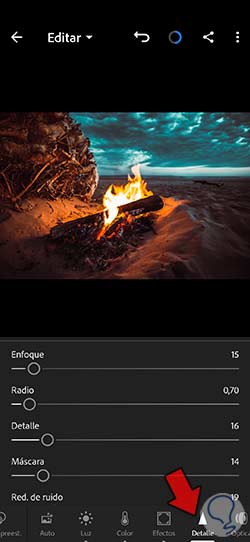
step 11
The next thing that we are going to edit our photograph to achieve the desired effect will be the "Detail". Click on this lower option and give approximate values to the following:
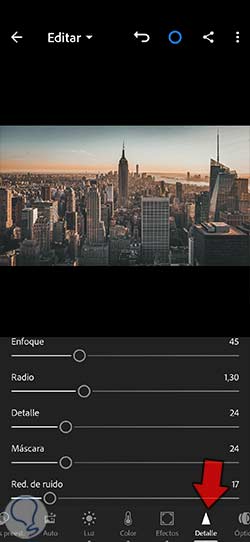
step 12
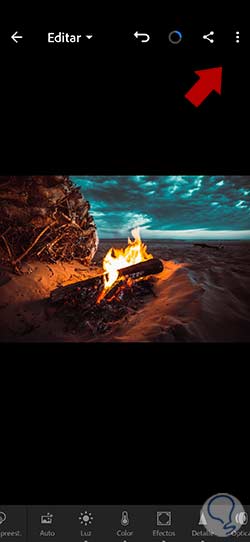
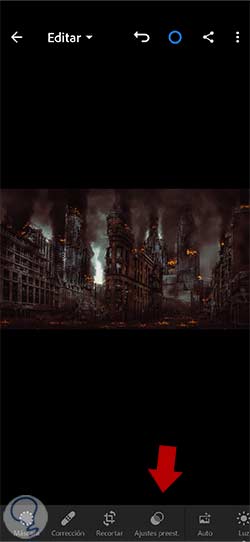
We already have our cinematic effect created, but if we want to have it ready whenever we want to apply it to any of our photos, it is best to create a preset and thus apply it whenever we want. To do this we begin by clicking on the three upper points of our image:
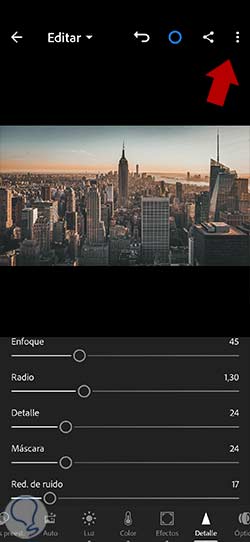
step 13
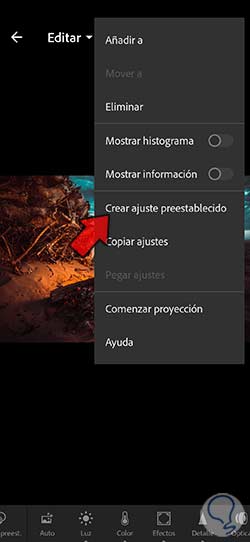
Next, we will click on the option that we see under the name of “Create preset” to generate a new one.
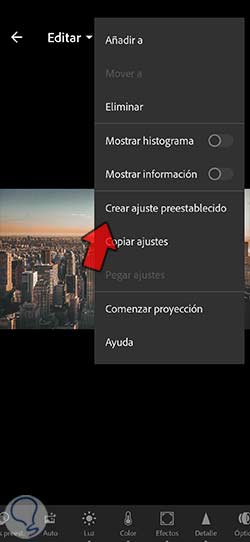
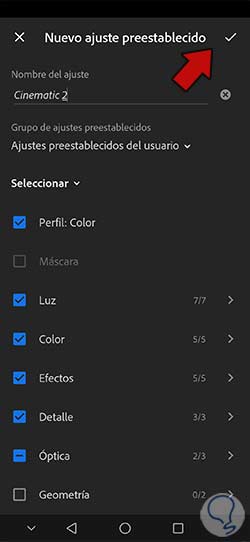
step 14
In the next window we will have to check all those boxes in which we have made changes and we want it to remain stored. We will give a personalized name and we will apply changes with the upper check that we see on the screen.
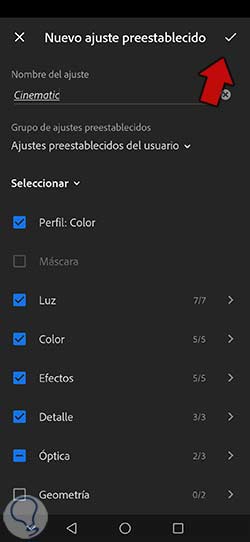
step 15
We can see before and after applying our created cinematic preset in Lightroom Mobile:
step 16
As we have created a preset we will be able to apply it to any image automatically from the presets panel.
2 Lightroom Mobile Cinematic Light Effect
To create our cinematographic light effect, we are going to have to edit the different parameters of our image in a precise and personalized way. We are going to have to correct both the light and the color trying to give light to darker areas, but without losing detail in those lighter points. When working on the color, those orange tones in our photography will be enhanced a little more and for this we will carry out a segmented color edition that will allow us to change the property parameters of each of the colors, thus being able to work individually on the tone, saturation and luminance. Then we will provide a series of effects such as texture or noise reduction to achieve a much more real and cinematographic appearance.
Although the effect that we are going to see next follows the line of the first one that we have shown you, the truth is that when you see the result you will be able to see that this cinematographic look has much more marked contrasts and much more vivid colors, which makes our image have a more striking appearance with a more marked movie style. As we have already mentioned, although we give you a guide to approximate values, you can modify them and even create different presets with different variations to get your own catalog of editable presets in Lightroom Mobile.
Step 1
Let's start by opening our image to edit in Lightroom Mobile. After that we can start editing and we will start with the “Light” section that we will see in the lower section. Here we are going to give a lighting configuration similar to the following:

Step 2
We are going to configure the lighting of our photograph in a segmented way, to do this, click on the “Curve” option.
Step 3
Here we will find the possibility of editing the different curves depending on whether it is the general one or each curve segmented by color. We are going to click on each one to edit it, giving values similar to those we see. We will click on the curve to create new change points.
Click “Done” when you are finished adjusting this light curve.
Step 4
Once we have finished with the lighting section, we are going to continue our edition working on the "Color" part that we will find in the lower menu. We are going to give some precious values to these:
step 5
We will also carry out a color edition in a segmented way through the section that includes "Mixture".
step 6
In this way we will be able to go color by color to achieve a configuration similar to this one and that gives the effect we are looking for.
step 7
We already have the colors modified individually, the next thing will be to modify the predominant color in lighting and shadows. For this we are going to enter the “Gradation” section.
step 8
Using the icons that appear we will be able to switch between the Shadows and the Highlights. In this case we are going to click on Highlights and Shadows and we will give approximate values of:
step 9
We are going to complete the color configuration in shadows and highlights with the three parameters that also appear at the bottom:
Click on “Done” when you are finished to apply the changes made.
step 10
We are done with the color of our image so we will continue modifying some more areas. In this case we will go to the "Effects" section and give values similar to these:
step 11
We continue with the next option and here we will enter the "Detail" option. We are going to give some approximate values to the following to arrive at the appearance we are looking for.
- Color Noise Reduction: 26
step 12
As we already have our Cinematic Light adjustment ready, we are going to proceed to save it as a preset so that you can apply it directly to any photograph, for this we are going to click on the three upper points of our image:
step 13
The next thing will be to click on the option called "Create preset" to generate a new one.
step 14
In the window that appears we have to check all those boxes in which we have made modifications and we want them to remain saved in the preset. We give a personalized name and apply changes with the upper check that we see on the screen.
step 15
To see how our image changes, let's see before and after applying the Cinematic light effect in Lightroom Mobile:
step 16
By having a preset or preset adjustment already generated, we will be able to quickly apply it to any other image from the "Presets" option.
In this way we will be able to create a Cinematic effect in different ways and achieve a more cinematic look in our photographs from Lightroom Mobile, creating a more cinematic effect.