When we take photographs we cannot control absolutely everything that happens in the scene, although it is convenient to know what we should pay attention to and know the different settings of our Camera to configure it according to the conditions we have. It was not the same to make a configuration for a night photograph than to do it for a photograph in broad daylight, and it is that, although we cannot control the atmospheric situation in open spaces, the truth is that we can adjust the parameters so that the result of the photography is as optimal as possible..
One of the situations in which it is difficult for us to take a good photograph is in low light conditions, since a lot of training is normally lost if we do not have the necessary light to obtain great information about our photograph when we capture it. If we do not make a good adjustment when taking the photograph, we will find a result in which we will have very dark areas with loss of information and generally with grain or noise. If in addition to correcting these dark areas we have had to raise the ISO levels, the degree of noise will increase significantly in our photography.
Thanks to the advancement of the different editing tools such as Lightroom Mobile, we will have the possibility of reducing that amount of noise that appears in our photographs and that gives a negative aspect. The first thing will be to list some tips that if the interesting thing goes to avoid having noise in our photos..
Tips to avoid noise in photos
Some tips that you can take into account when making your images avoiding the presence of noise are:
- Use reduced ISO levels. Always try to use a low ISO value since as you raise it the possible presence of noise increases and can ruin our photography. That is why it always tries to achieve better light conditions without having to force it with an ISO value.
- Look for an overexposed setting. When you take the photograph, try to adjust the camera parameters to achieve a result of overexposed lighting, but without having burnt areas. This is to try to get as much light as possible, avoiding that we have too many dark areas that later in editing can translate into more noise.
- Use of tripod or similar. Always try to make your photography as static as possible, as this will allow you to adjust parameters such as exposure time in a more controlled way. In this way, we can achieve that the subject or element can be moved or static depending on what we are looking for, making a good configuration and avoiding only forcing values such as ISO.
- The light in the revealed. We must try not to add light in areas of the image that are underexposed, since we are forcing the illumination of dark areas that will end up generating noise. That is why it is always better to have a somewhat overexposed image since we will also have light information in shadow areas and we can work with it.
- Be careful with the focus. When you are processing your photo with an editor like Lightroom Mobile, be careful not to use focus adjustments too abruptly, since you would also be focusing on the noise areas of the photo. It is best to always try to focus by areas and always cautiously avoiding further enhancing the noise.
- Remove noise when editing. In applications like Lightroom Mobile you will be able to find settings that allow you to make an optimal noise reduction to improve the appearance of your photos.
- Use RAW format. Try to take your photographs in RAW format to have much more information in your photograph and that when editing we can recover more data from it.
If we have already done everything possible in the process of taking our photography to avoid noise, the next thing to do is to move on to the moment of development where Lightroom Mobile will allow us to reduce that amount of noise and improve the detail and sharpness of our photography. The crude thing about working with raw files is that we were working non-destructively on our photography, being able to do a noise reduction that we can undo at any time. Therefore you can do the noise reduction at the beginning of your edit or do it at the end when you have all the parameters applied.
General steps to reduce noise in Lightroom Mobile
We can mention a few general steps in the process of editing noisy images in Lightroom Mobile:
- Do a noise analysis of your photo to decide if a general noise reduction is necessary or to do it locally.
- Use general or specific noise reduction tuning options in Lightroom Mobile.
- In case of loss of detail, sharpness or contrast, you can complement it with “Clarity”, “Texture” or “Contrast” adjustments.
Once we have drawn in our heads how to avoid the appearance of noise in the initial steps and how to decide what we need to reduce it, we are going to see the process to reduce noise in Lightroom Mobile..
To stay up to date, remember to subscribe to our YouTube channel!
SUBSCRIBE ON YOUTUBE
Lightroom Mobile Noise Reduction
As we have mentioned before, having a photograph with pronounced noise can totally ruin its appearance and that is why it is an element that we must avoid and learn to reduce as completely as possible. If you have been careful not to have a lot of noise in your photography and it is still present, we will turn to Lightroom Mobile to improve our sharpness and detail in photography from our mobile device. We are going to start by looking at some tips that we want to show you to reduce noise in Lightroom Mobile in its development process.
Tips to reduce noise in Lightroom Mobile
Some edits we could make in Lightroom Mobile to improve the appearance of noise are:
- Adjust the Luminance slider under “Noise Reduction” to the right to try to make the noise disappear. Zoom in to see the effect in the noise zones in more detail. Even if some detail is lost, don't worry because it can be recovered with other sliders.
- Move the detail slider to recover that level of focus and detail that we have previously lost.
- Move the contrast slider in a similar fashion to the detail slider until you see that there is a level of balance between the detail level and noise suppression.
- Adjust the Luminance slider again in the “Noise Reduction” to adjust it until you get a balance between removing noise and having detail in the photo.
What we have seen previously were a series of steps to achieve noise reduction in Lightroom Mobile in a general way in our photography. But many times the noise effect has been generated only in one area of our image, so then it will be better to look for a more focused edition in that area, avoiding that the noise reduction settings are applied equally to the entire photograph. In this case we can use some of the tools that Lightroom Mobile provides us to reduce the amount of noise.
Local Noise Reduction in Lightroom Mobile
If we prefer to do a more professional and focused edition where we only apply a noise reduction in specific areas of our photograph, we can use local adjustments that allow it. For the mobile version we will use the "Masks" to be able to apply the reduction in a smoother or more focused way if we use the Brush.
- Linear Gradient Mask. Interesting use when we have areas with a lot of noise and others not and we want to make a reduction of different levels by areas.
- Radial Gradient Mask. Interesting for specific areas with noise and a lot of shade.
- Luminance Range Mask. To work on noise by zones according to ranges of light.
- Brush. When the area with noise has a heterogeneous and very specific shape to define it with another type of mask.
With all these ideas we will be able to start editing our photography from Lightroom Mobile and try to achieve a substantial noise reduction that improves the sharpness and detail of our photography.
Step 1
The first thing will be to open our photograph with noise from Lightroom Mobile, either by importing it from scratch or by searching for it in a category.

Step 2
Click on our photo to open the “Edit” panel. Here we are going to start the editing for the noise reduction and then we will do the general editing that we want. You can do it in reverse if you prefer.
To start reducing our noise in the photograph we are going to go to the "Detail" section.
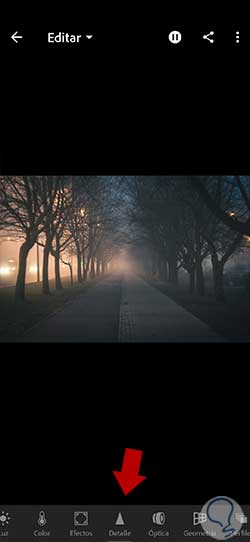
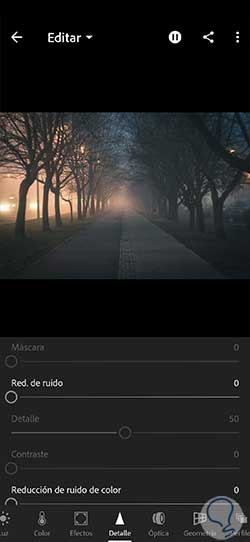
Step 3
Let's start by reducing the luminance noise with the “Noise Reduction” setting. In this first noise reduction option we will find these options:
Luminance noise reduction
- Noise reduction. It will remove more of the noise as we increase the slider.
- Detail. It allows control of the luminance noise threshold and is usually quite useful when we have pictures with a lot of noise. If we put a high value, more details are preserved, but it can produce more noise. With low values we will have more sharpness, but we may lose certain details.
- Contrast. Adjusts the Luminance control. Its use is useful in photographs where we have a lot of noise. Using high values preserves the contrast, but we can find some more noise. With low values we will have smoother results, but also less contrast.
Step 4
We are going to move the slider to the right until we get an acceptable level of noise reduction. We advise you to work with a high zoom level to better see the result.
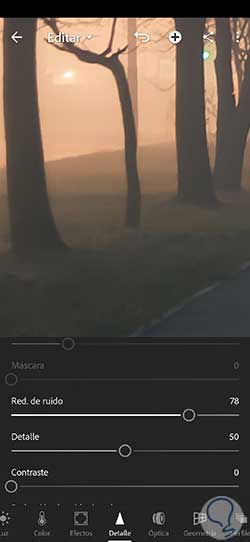
step 5
We will see that moving the Noise Reduction slider activates the "Detail" and "Contrast" options. This will help us to delimit the action threshold of the noise reduction, as well as the contrast. We are going to move the different sliders until we find an acceptable balance between sharpness and noise reduction.
We will see that a higher level of sharpness also implies a certain degree of noise in the image, but if we reduce the detail a lot, we will have a much smoother image.
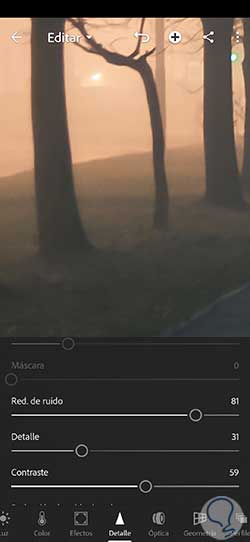
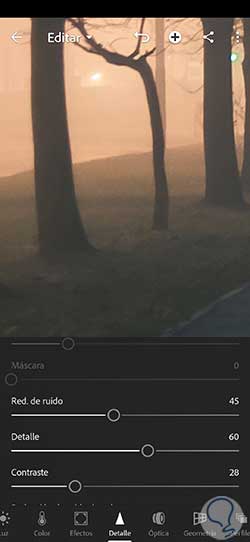
step 6
For this particular photograph we have used the following settings to achieve a balance between reducing noise, but not losing too much detail:
step 7
Once we have reduced the noise in Luminance, we are going to continue editing our photograph by reducing the noise, but in the color of the image. On many occasions there is also a noise or speckled effect in the color of the photograph.
For this we are going to have the Color Noise Reduction option in which we will see these options:
color noise reduction
- Color noise reduction. Noise in the color will be reduced as we increase the slider.
- Detail. Regulates the noise threshold within the color. Setting high values protects edges with color that is detailed and thin, but may cause speckled effects. If we set low values, that mottling will be eliminated in color, but we could suffer some type of color loss.
- smoothed. It will regulate the softness that will be configured in the photograph when we do the color noise reduction.

step 8
Let's start by turning up the Color Noise Reduction slider to start reducing the noise in the color components.
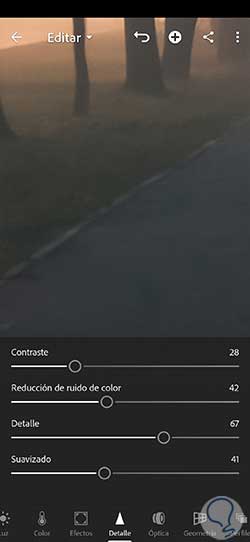
step 9
We'll find the balance between noise reduction and sharpness by playing with the “Detail” and “Smoothing” sliders.

step 10
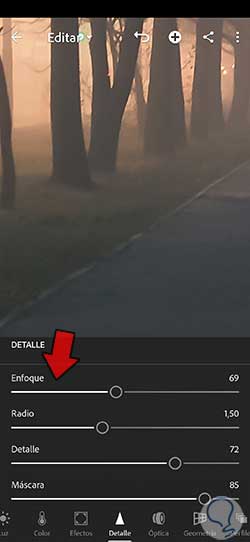
In case you feel that our image has lost some focus or sharpness in the details, we can also play within the "Detail" section with the "Focus" option.
Go moving each of the following regulators to improve the focus, but avoiding increasing the presence of noise. If you want to further enhance the focus of your image, you can consult how to correct focus and improve sharpness in Lightroom Mobile in a complete and professional way.
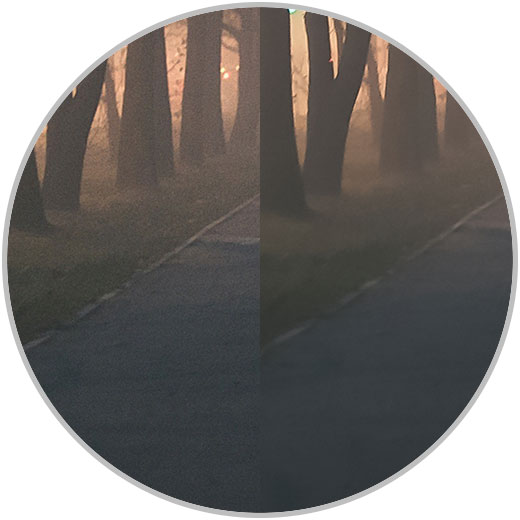
step 11
Once we have done both the noise reduction correction and the focus improvement, we are going to see the difference between the before and after:
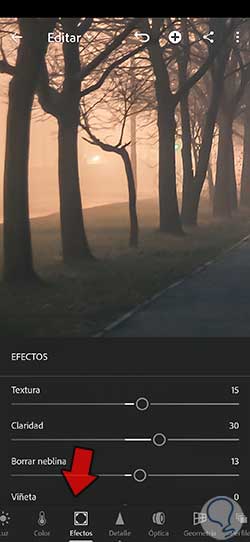
step 12
Other options that you can use to improve the level of detail and contrast in your photos after reducing noise are the “Texture”, “Clarity” and “Dehaze” options within the “Effects” section.
They are effects that will help to give more presence in the contrasts of the details, but they could also highlight the presence of noise. That is why you have to apply them carefully and carefully observing each result.
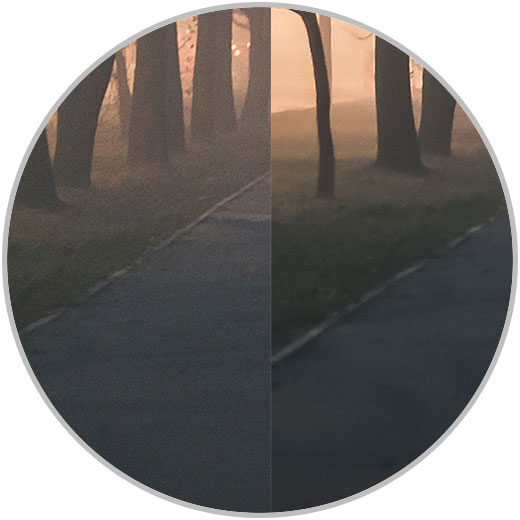
step 13
We see again the difference between the before and after achieved once we have edited the photograph.
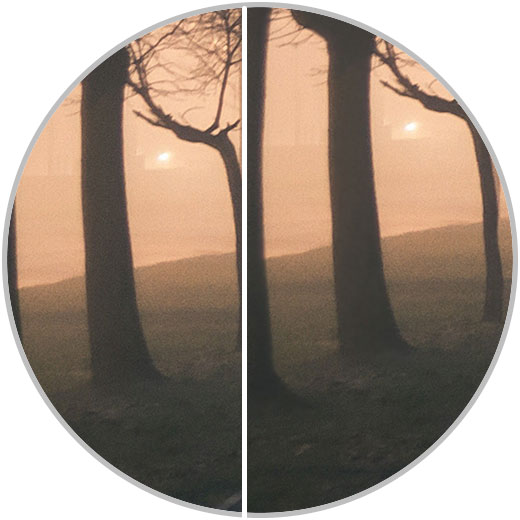
step 14
So far we have seen a global editing of the noise in our photography, but it is possible that what we need is a more precise editing in a specific area. For this we are going to work with the “Mask” tools from our settings panel.
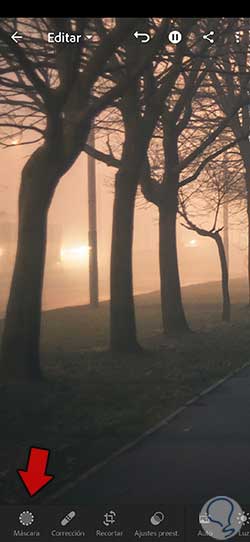
step 15
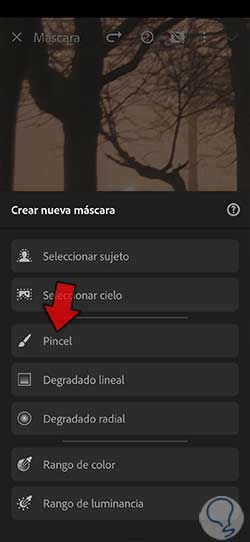
Click on the button that appears to "Create a new mask" with which to work on our photography.
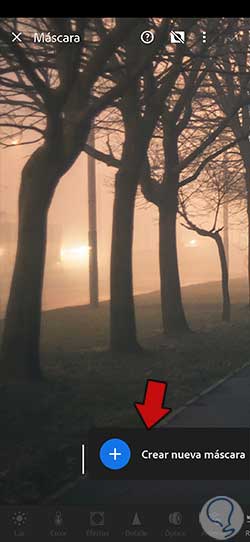
step 16
Here it will depend a bit on our photography since, as we have seen at the beginning, depending on the type of noise and its location, one type of mask or another will come in handy. In this case, imagine that you have a specific area in your dark image with noise and you do not want to modify the rest of the photograph. In this example, imagine that we only want to remove the noise from the trunk of this tree, so we will choose the "Brush" tool to work more precisely.
step 17
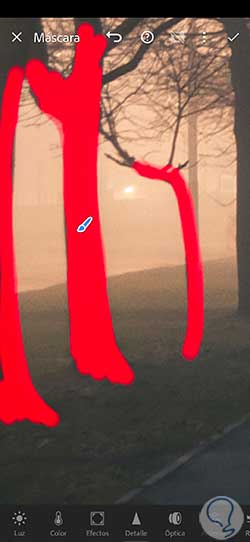
We paint over the part that we want to edit to reduce the noise, which in this case is the trunk of the tree.
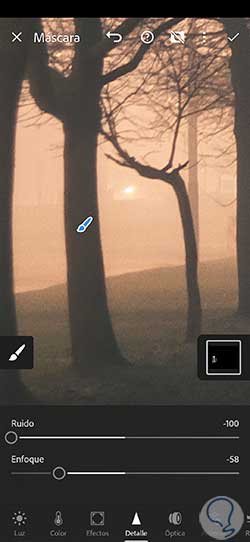
step 18
Once we have the delimited areas we will go to the "Detail" panel and we will be able to modify the "Noise" setting. Although it is true that we do not have as complete a configuration as we have seen before, playing with "Noise" and "Focus" we will be able to reduce the amount of noise and improve the focus manually and precisely.
We can reduce the noise and also the focus a bit to reduce the emphasis of the noisy area.
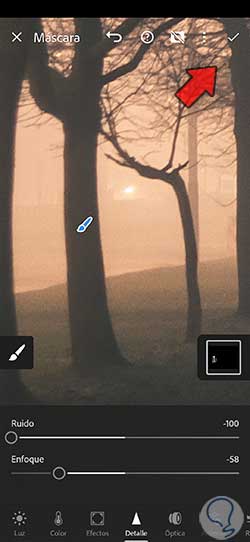
step 19
To apply the changes we will click on the upper check icon and we will reduce the amount of noise in our photograph.
step 20
We will be able to see the before and after of the areas that we have modified to reduce noise in a localized way.
In this way we will have managed both to reduce noise in a general way in our photography and to do it locally from the Lightroom Mobile tool and only with a mobile device. So we can not sacrifice the sharpness of the image, but reduce the evidence of noise in it.