Our computer has become one of the essential devices of everyday life. In Windows 11 we find a wide set of options to make the user experience as complete as possible and one of the options we use the most in Windows 11 is sound, whether it's to watch movies or series, to participate in work or personal meetings. or simply to play our favorite music..
Windows 11 gives us a group of settings that we can implement to improve the experience at the sound level and TechnoWikis will give you a series of tips to get the most out of these functions. That is why below you will see different ways to configure and adjust the sound of your PC, so that in this way you feel more comfortable when you use it.
To stay up to date, remember to subscribe to our YouTube channel!
SUBSCRIBE ON YOUTUBE
1 Configure sound Windows 11 by changing the output device
It is possible that in our equipment we have more than one output device connected so we have the possibility of using one or the other based on the quality, sharpness and characteristics of the device.
Step 1
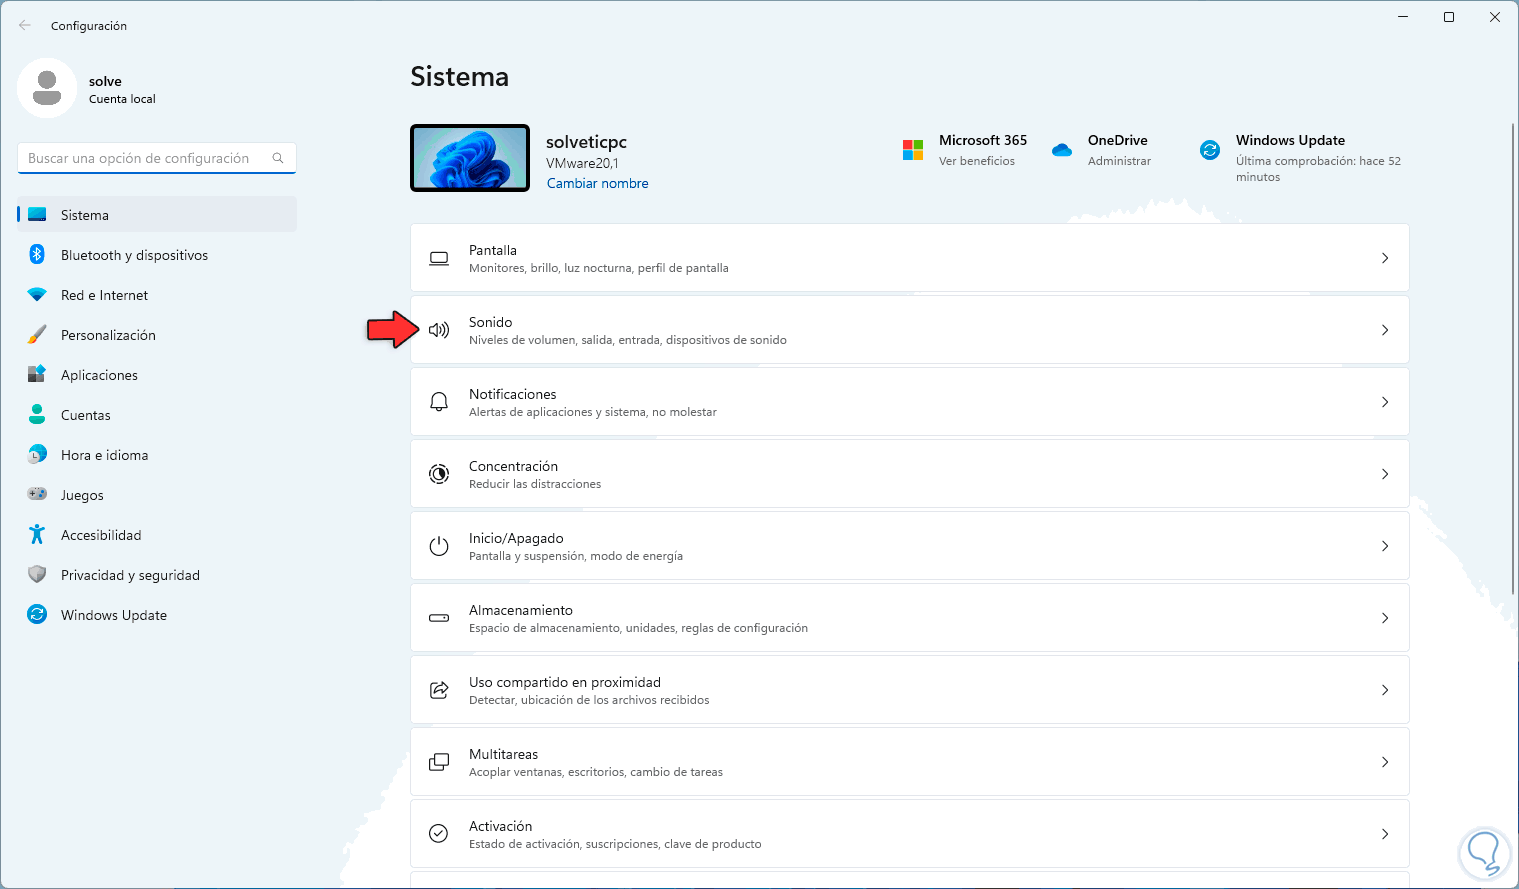
To achieve this we go to "Start - Settings - Sound":
Step 2
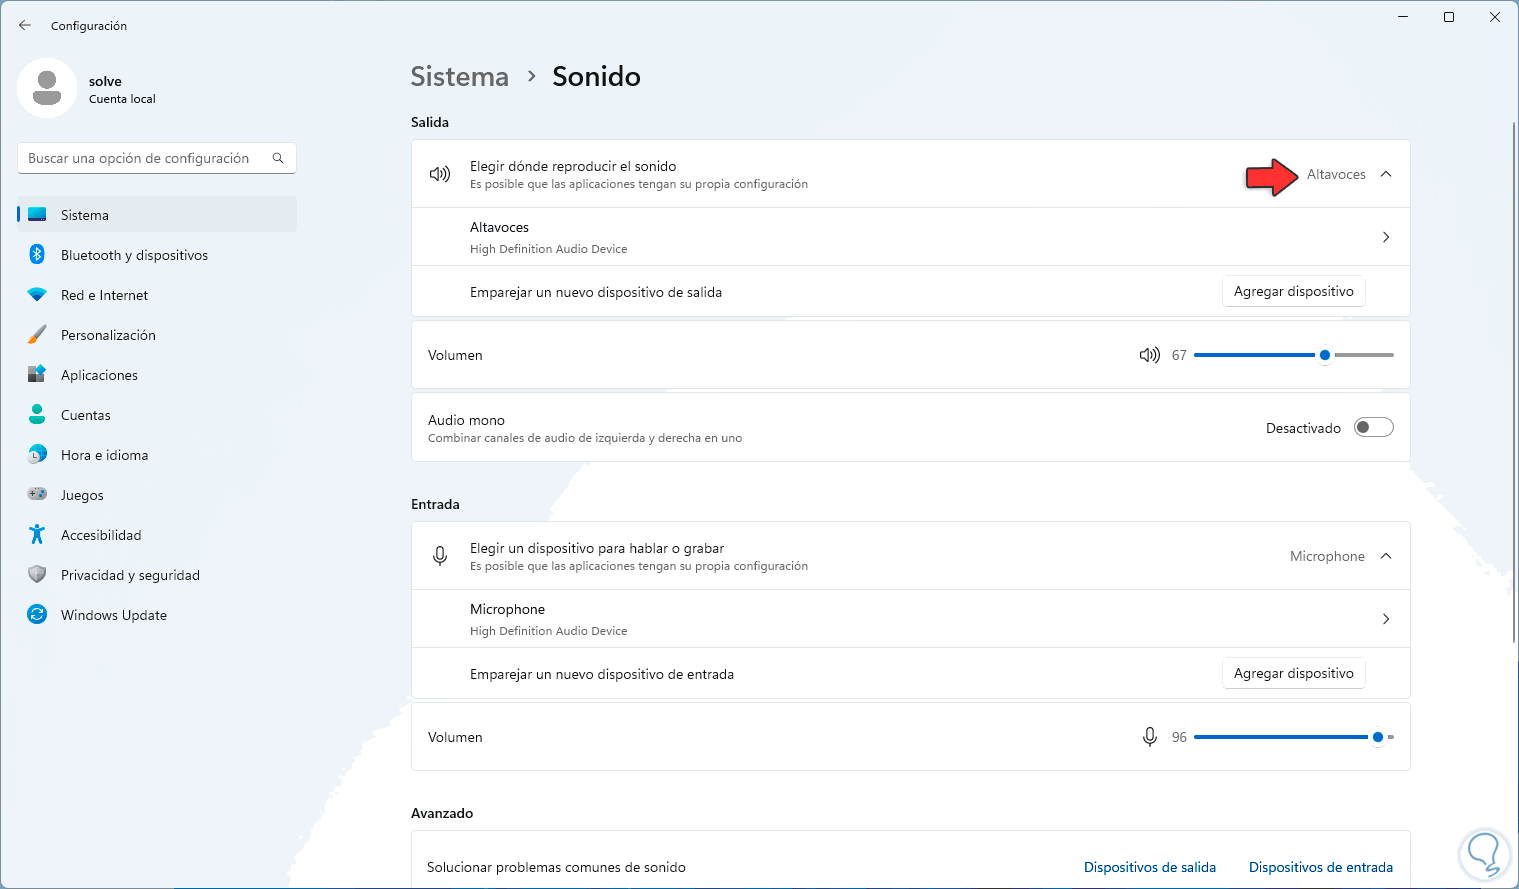
By clicking there on "Choose where to play the audio" we select the medium (if you have several):
Step 3
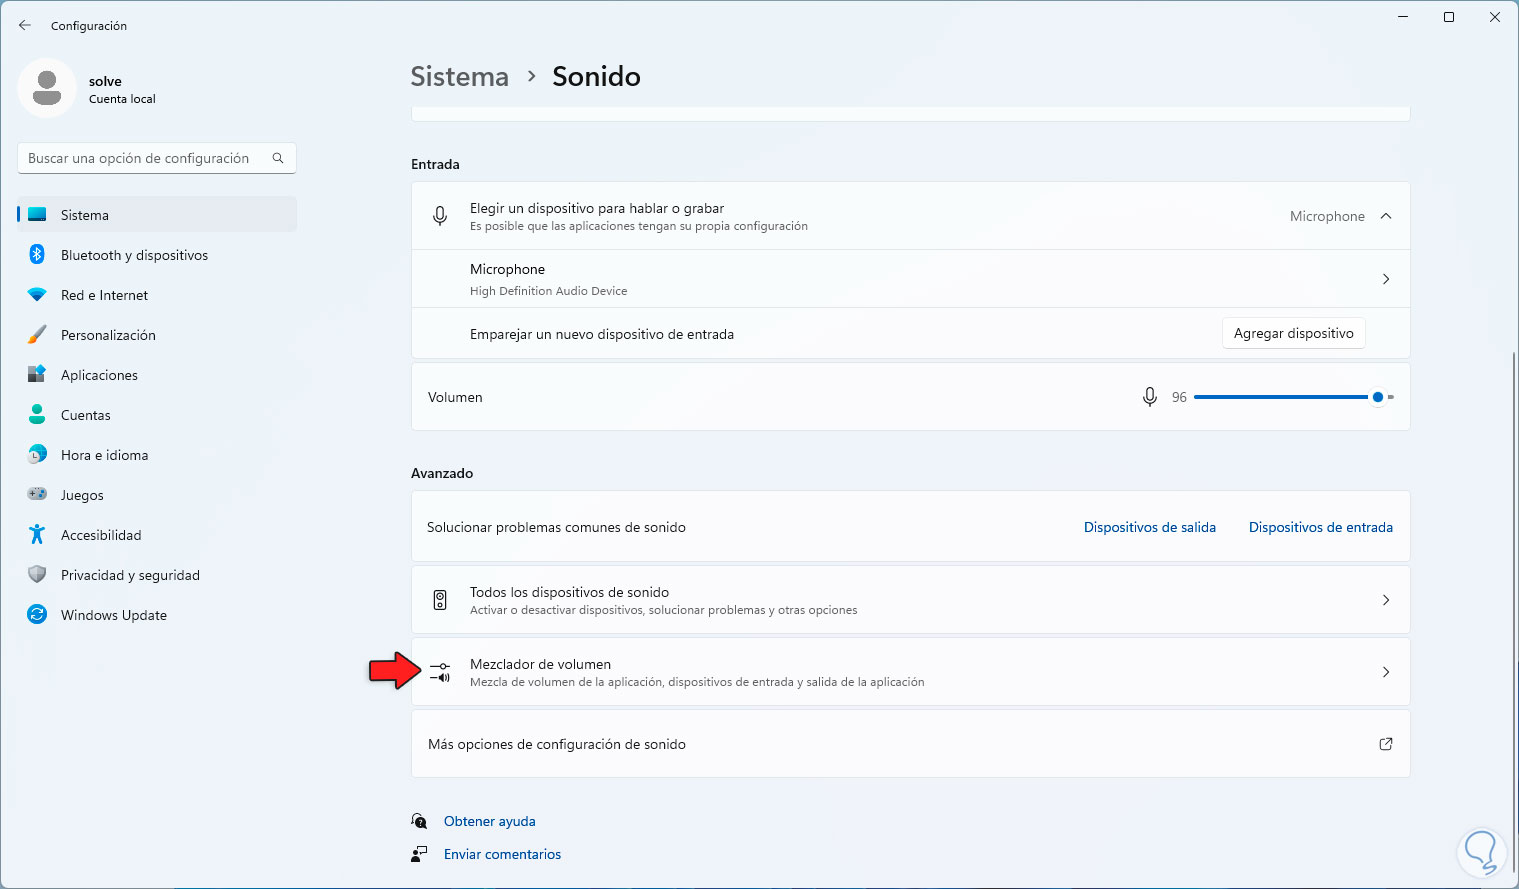
Now in "Sound" we click on "Volume mixer":
Step 4
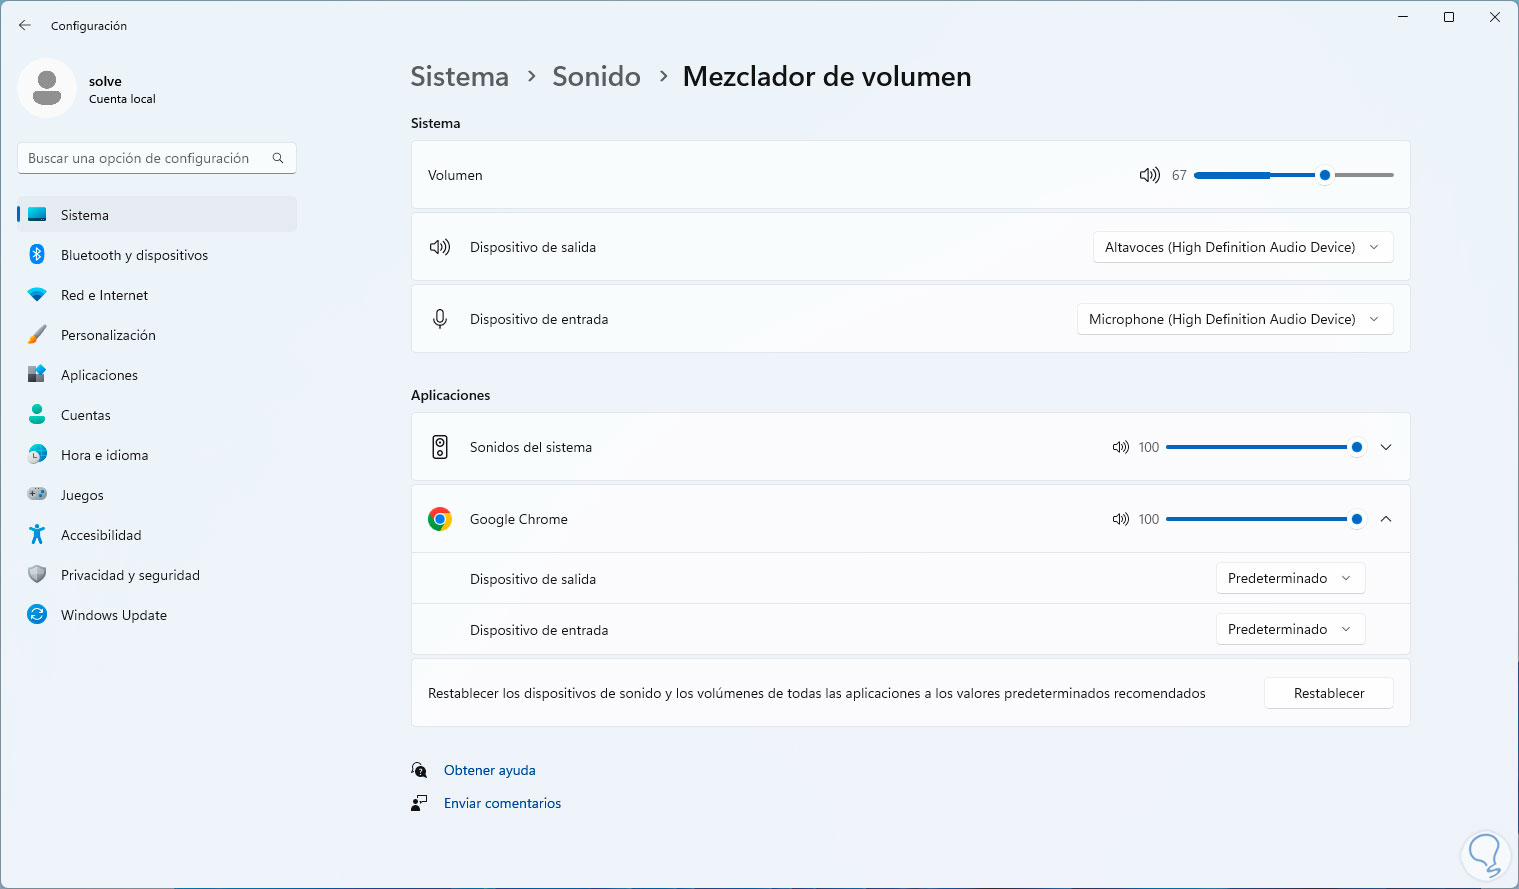
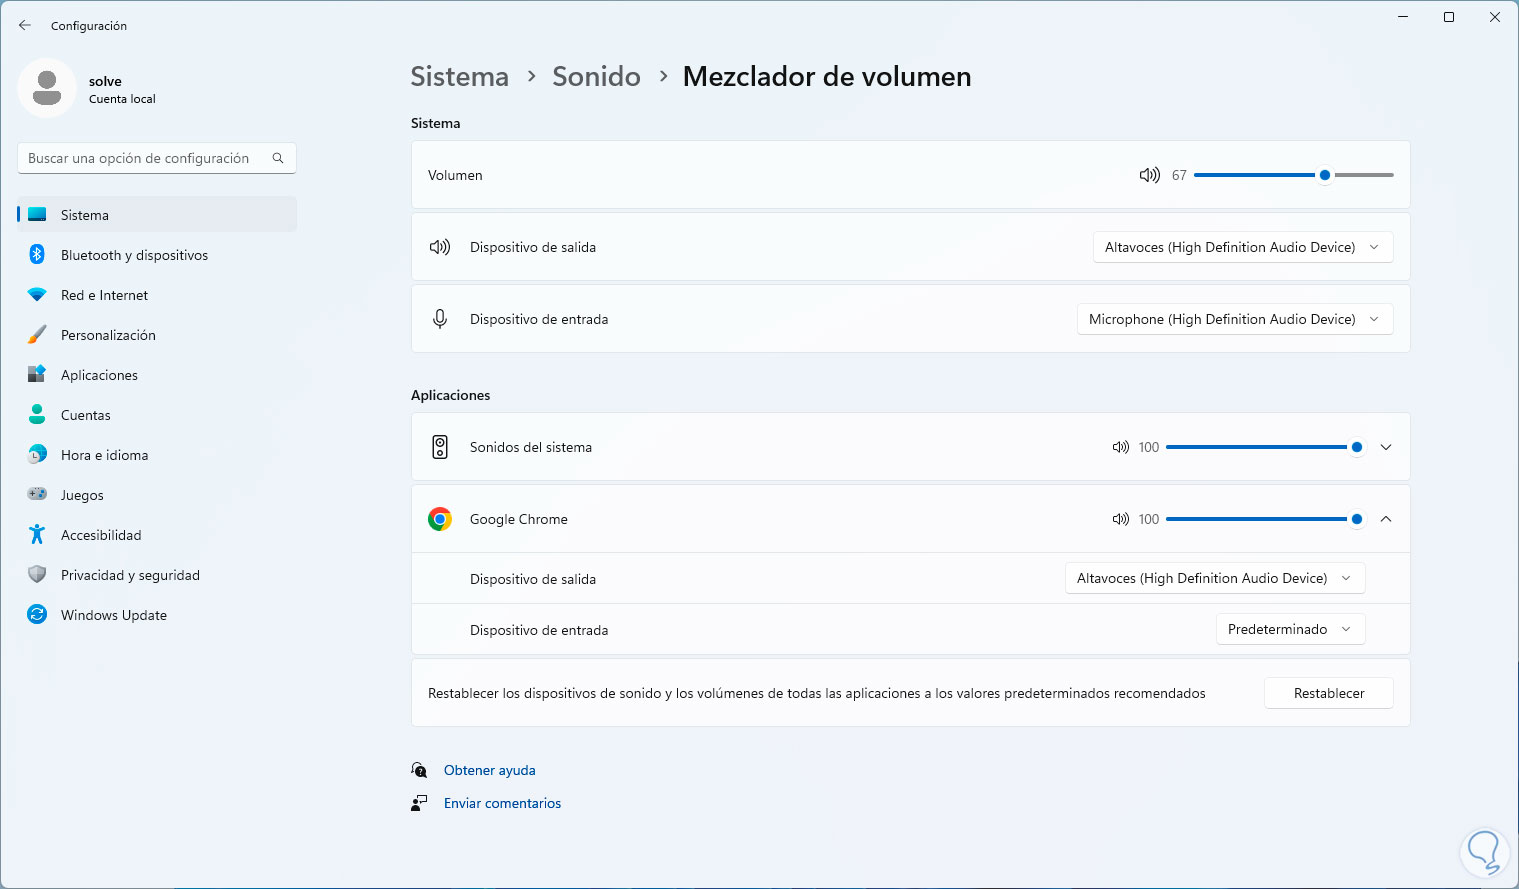
We will see all the applications that have access to the audio player:
step 5
It is possible to click on the application and choose where to play the audio:
2 Configure sound Windows 11 enabling spatial sound
Spatial sound in Windows 11 helps to create a more immersive sound when performing certain activities, this sound has been developed as a Microsoft technology that is at the same level as other functions such as EAX, Dolby or DTS, for activation, as long as when you have a good quality audio device.
Step 1
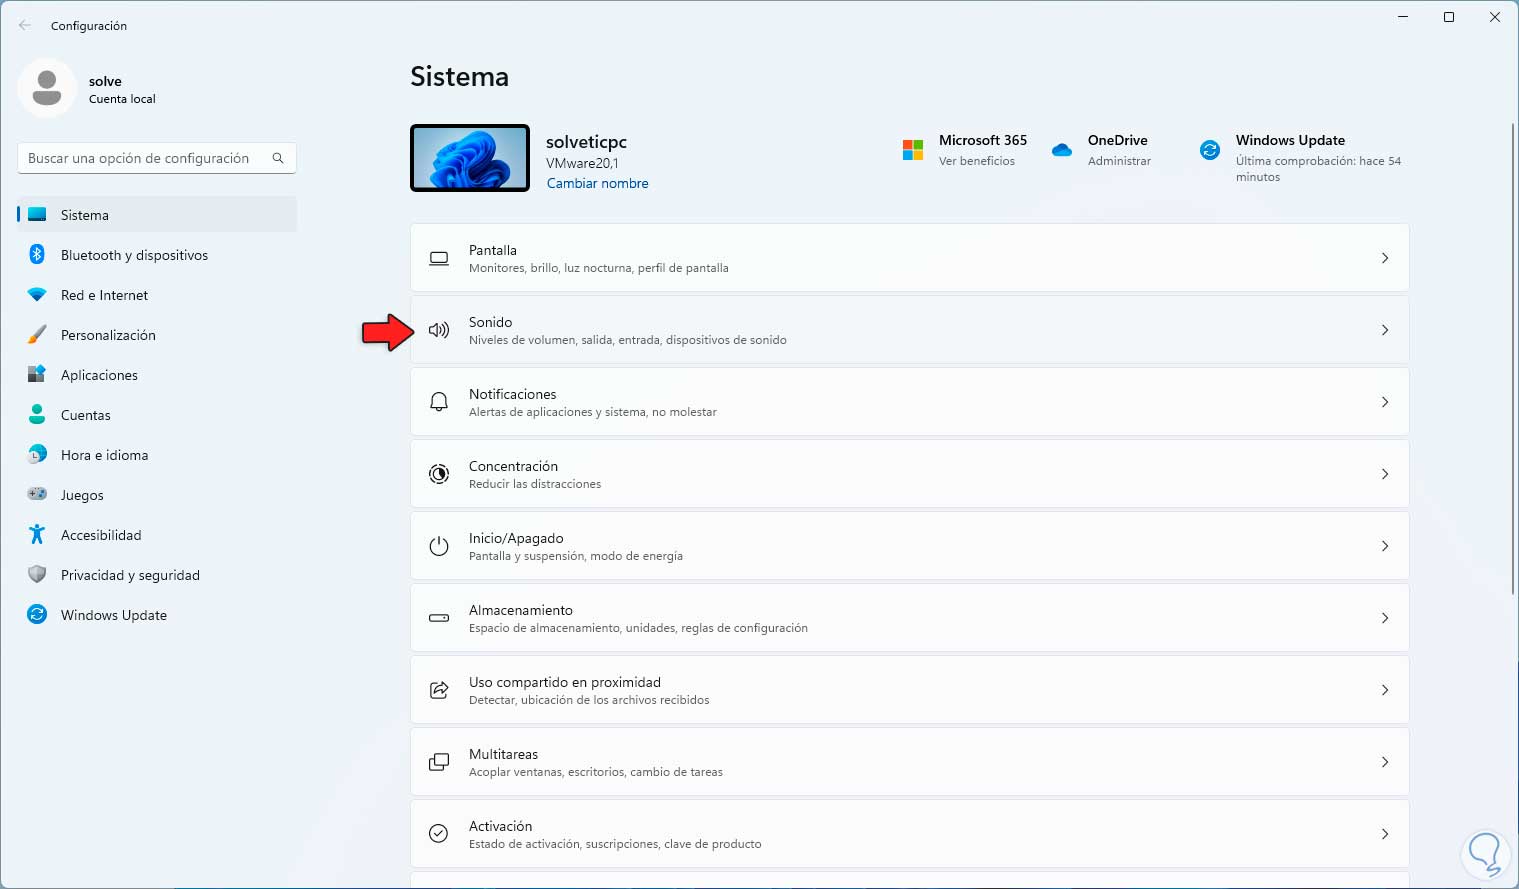
We must go to "Start - Settings - Sound":
Step 2
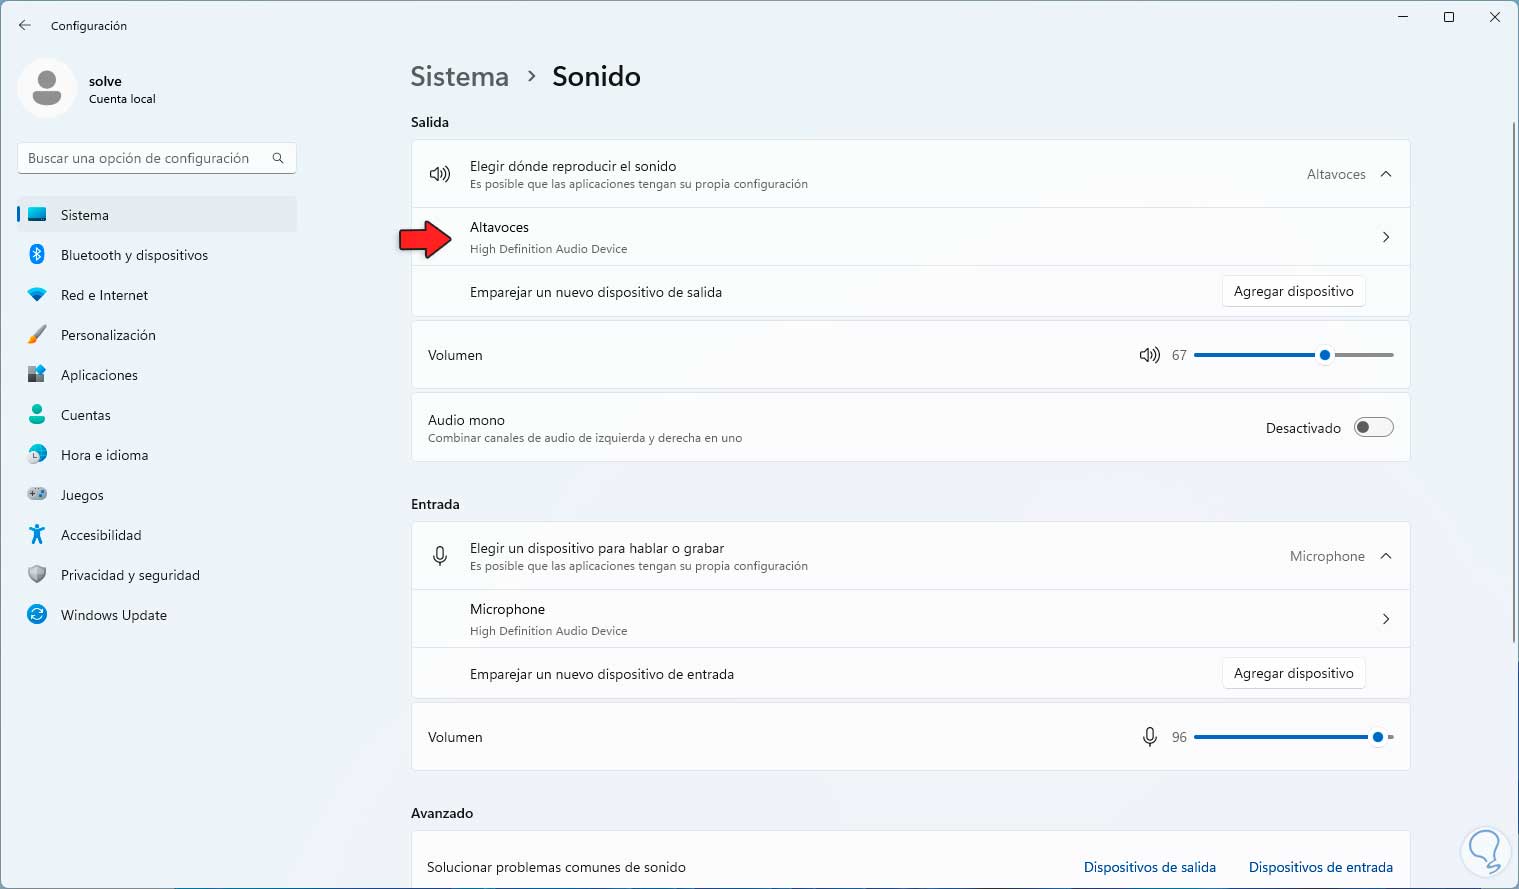
Then we go to "Speakers":
Step 3
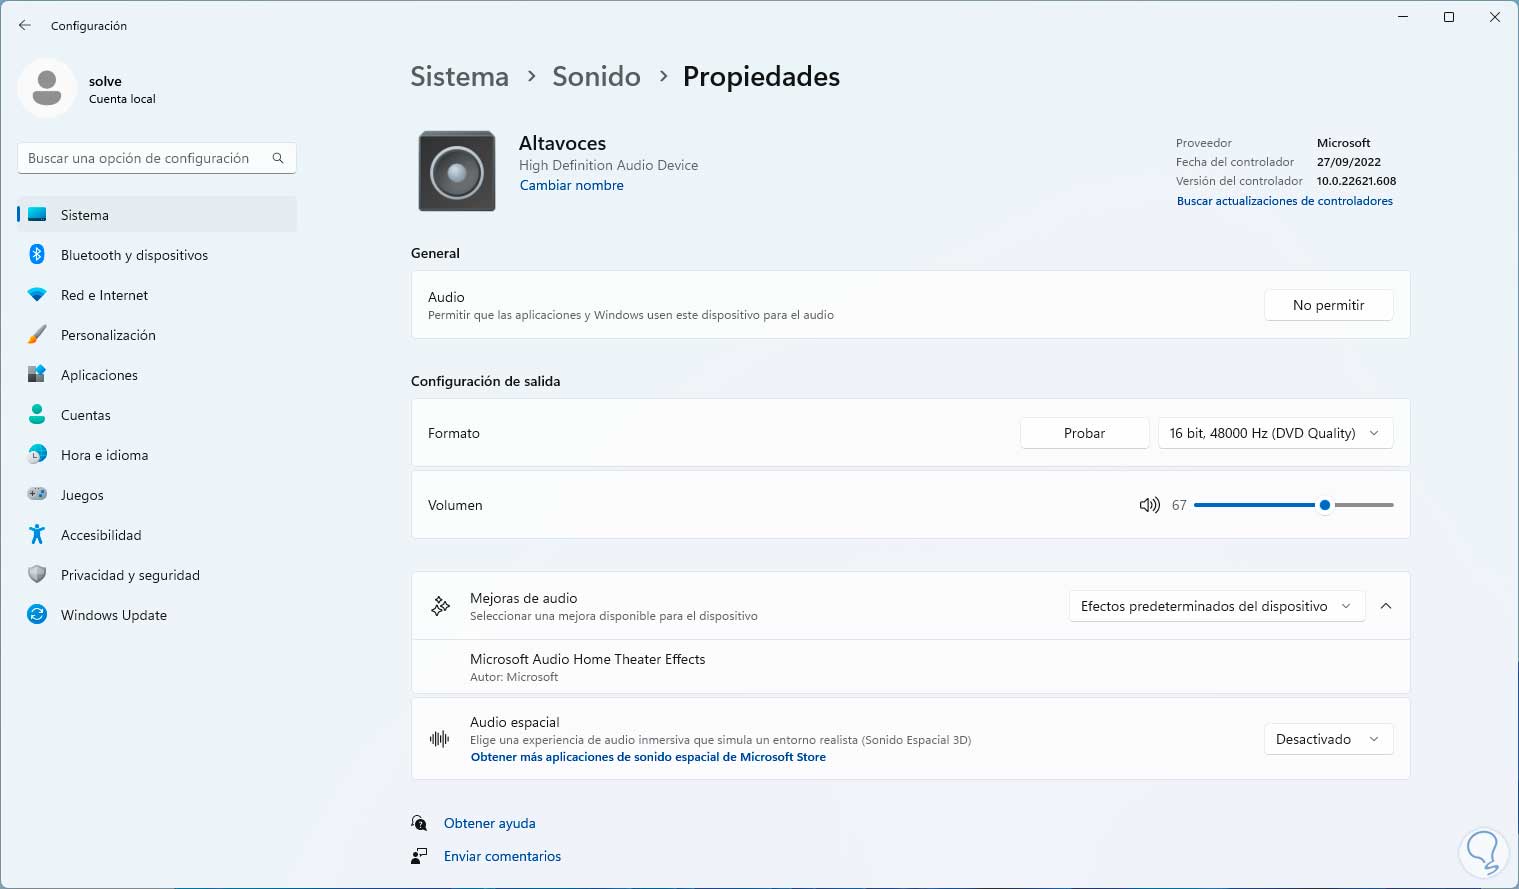
When accessing this option we will see the following:
Step 4
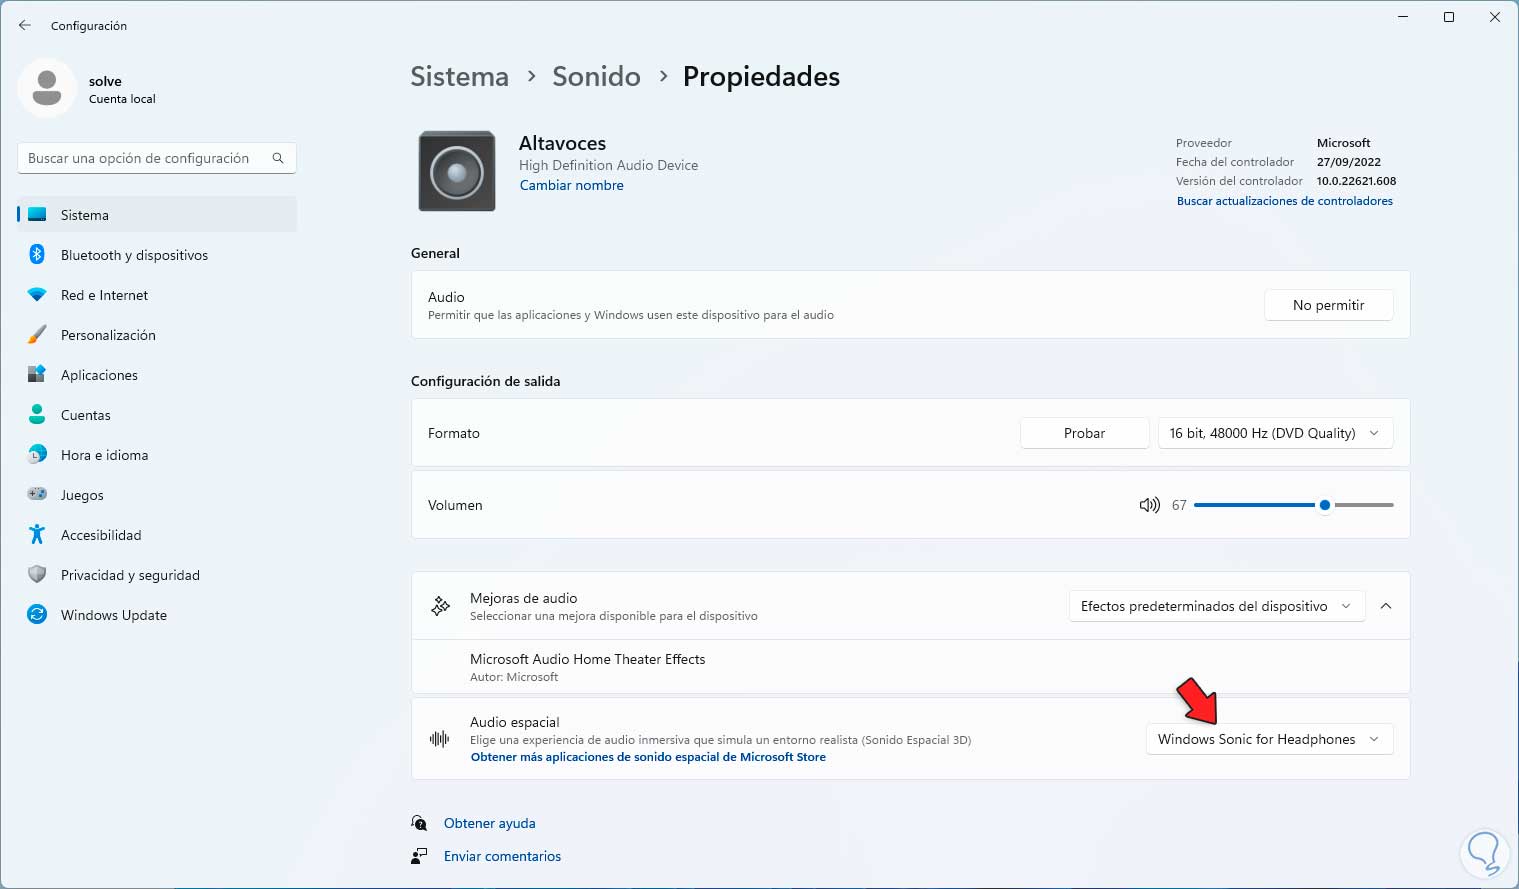
In "Spatial Audio" we select the "Windows Sonic for Headphones" option:
3 Configure sound Windows 11 by configuring Enhanced Audio
This is a function that seeks to automate the audio quality in case of few resources.
Step 1
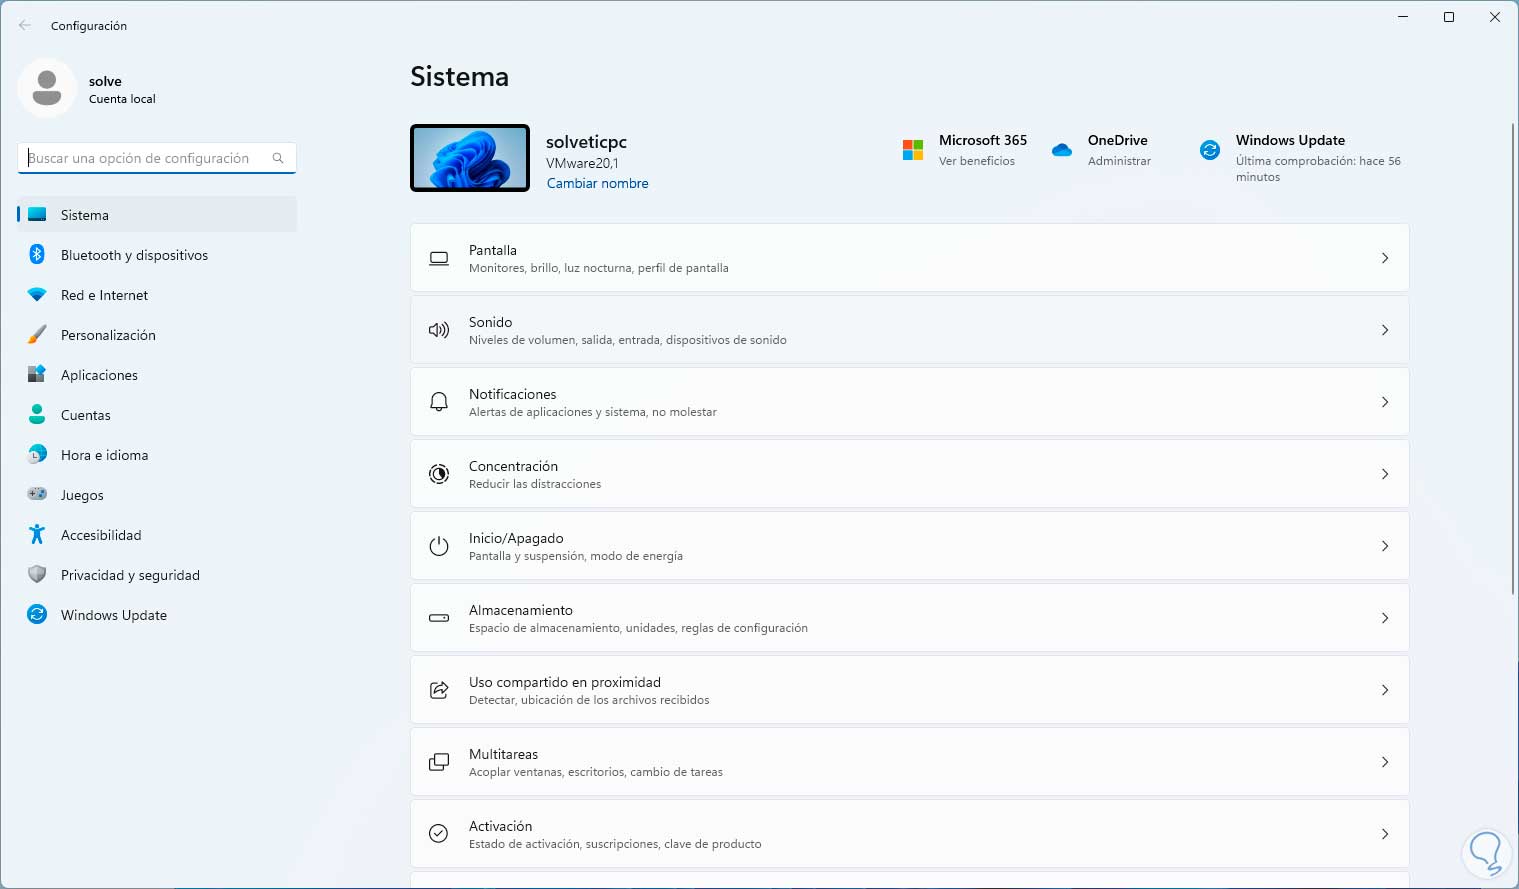
To make use of this option we go to "Start - Settings - Sound":
Step 2
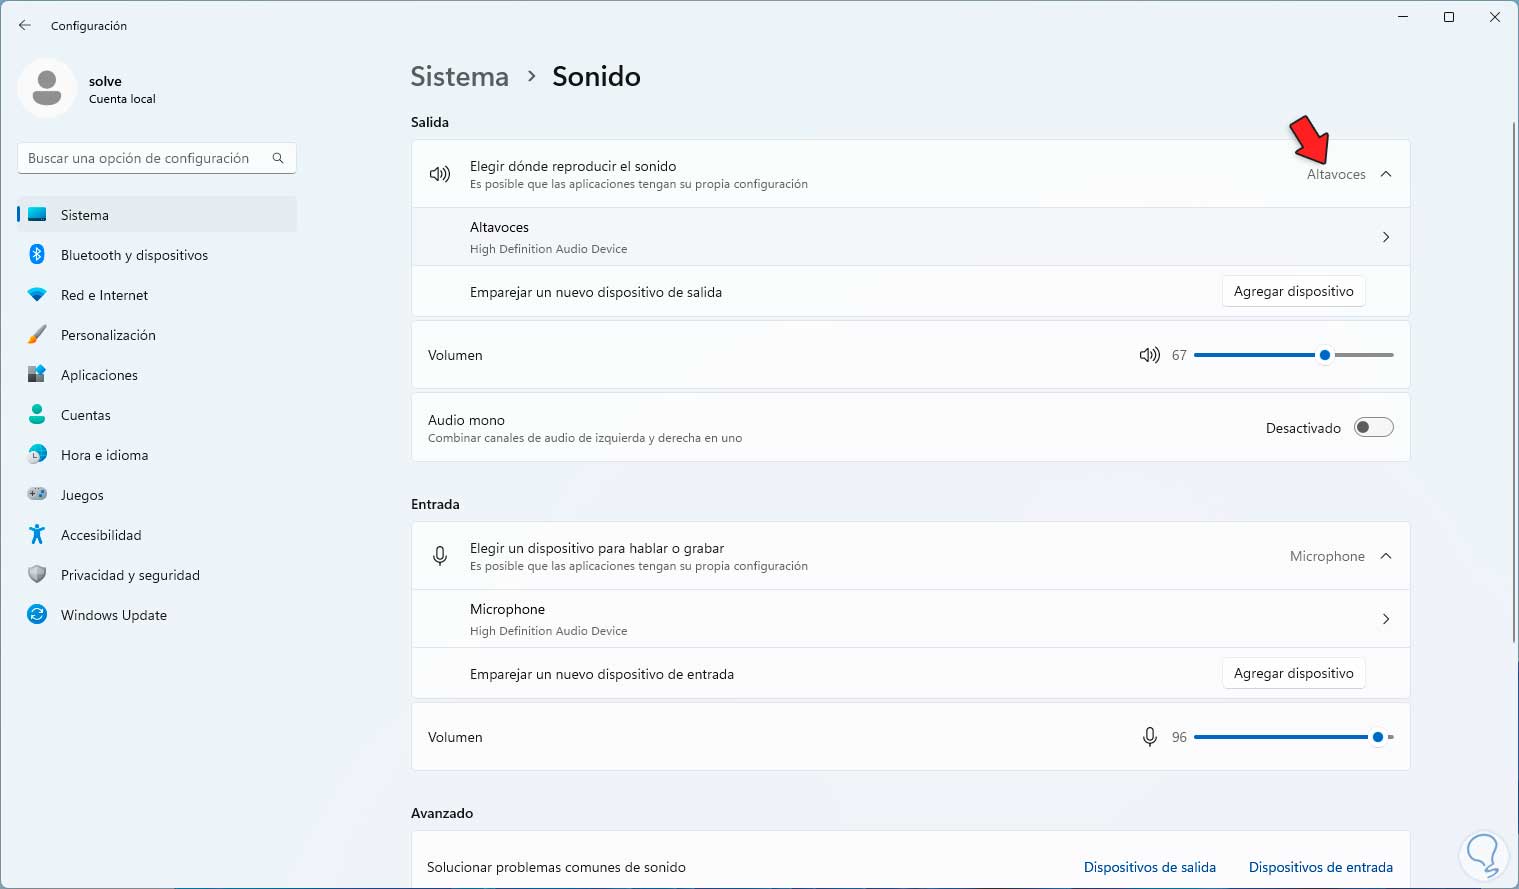
Then we click on "Speakers":
Step 3
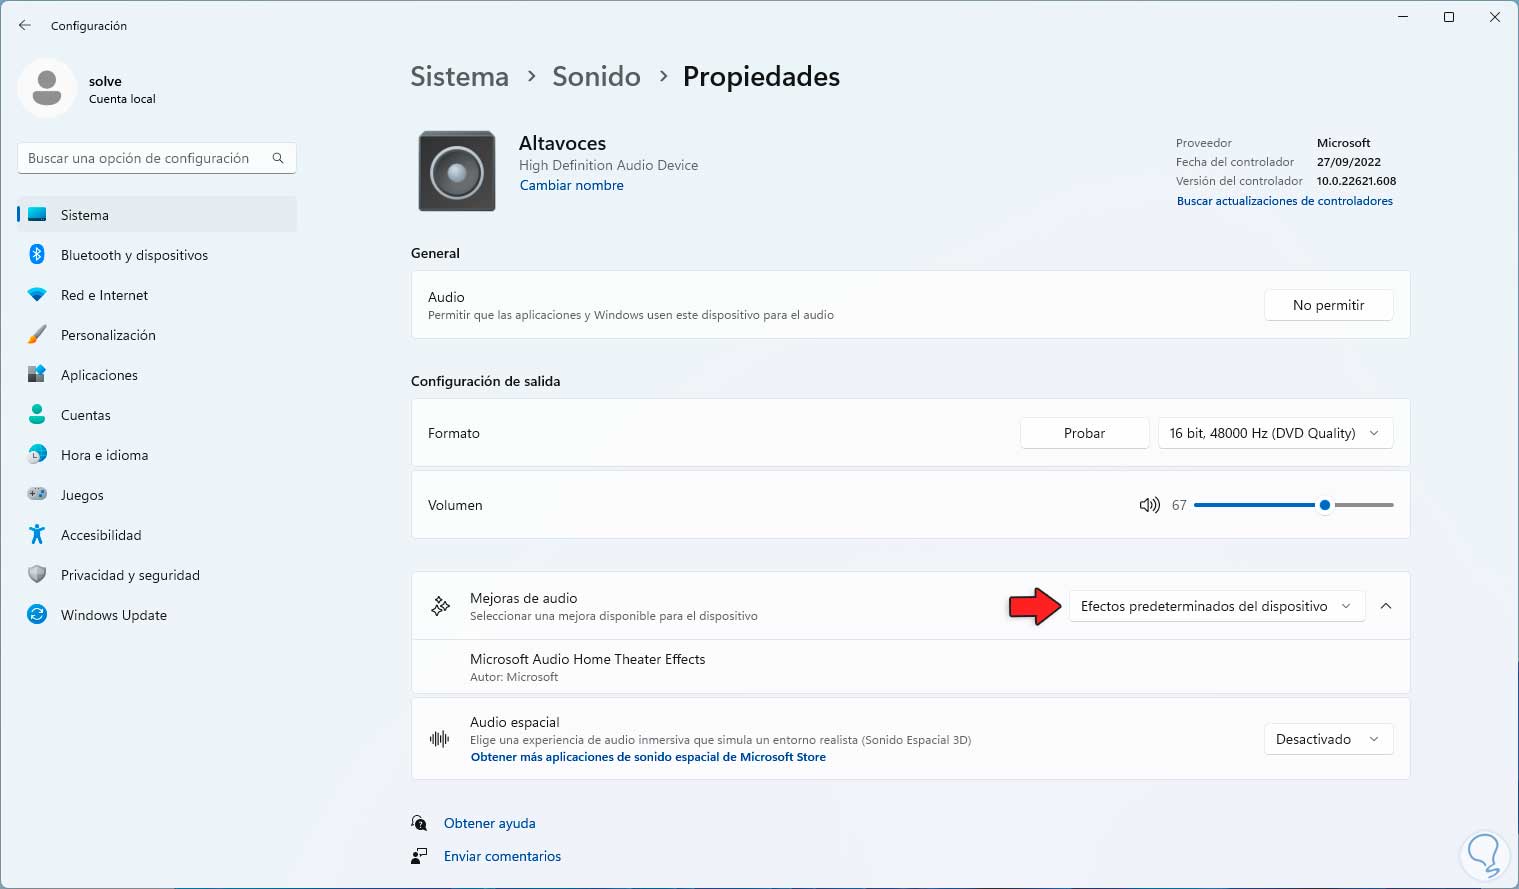
When entering this option we will see the following:
Step 4
Under "Audio Enhancements" we set "Device Default Effects" if it isn't already.
Now in "Sound" we click on "More sound configuration options":
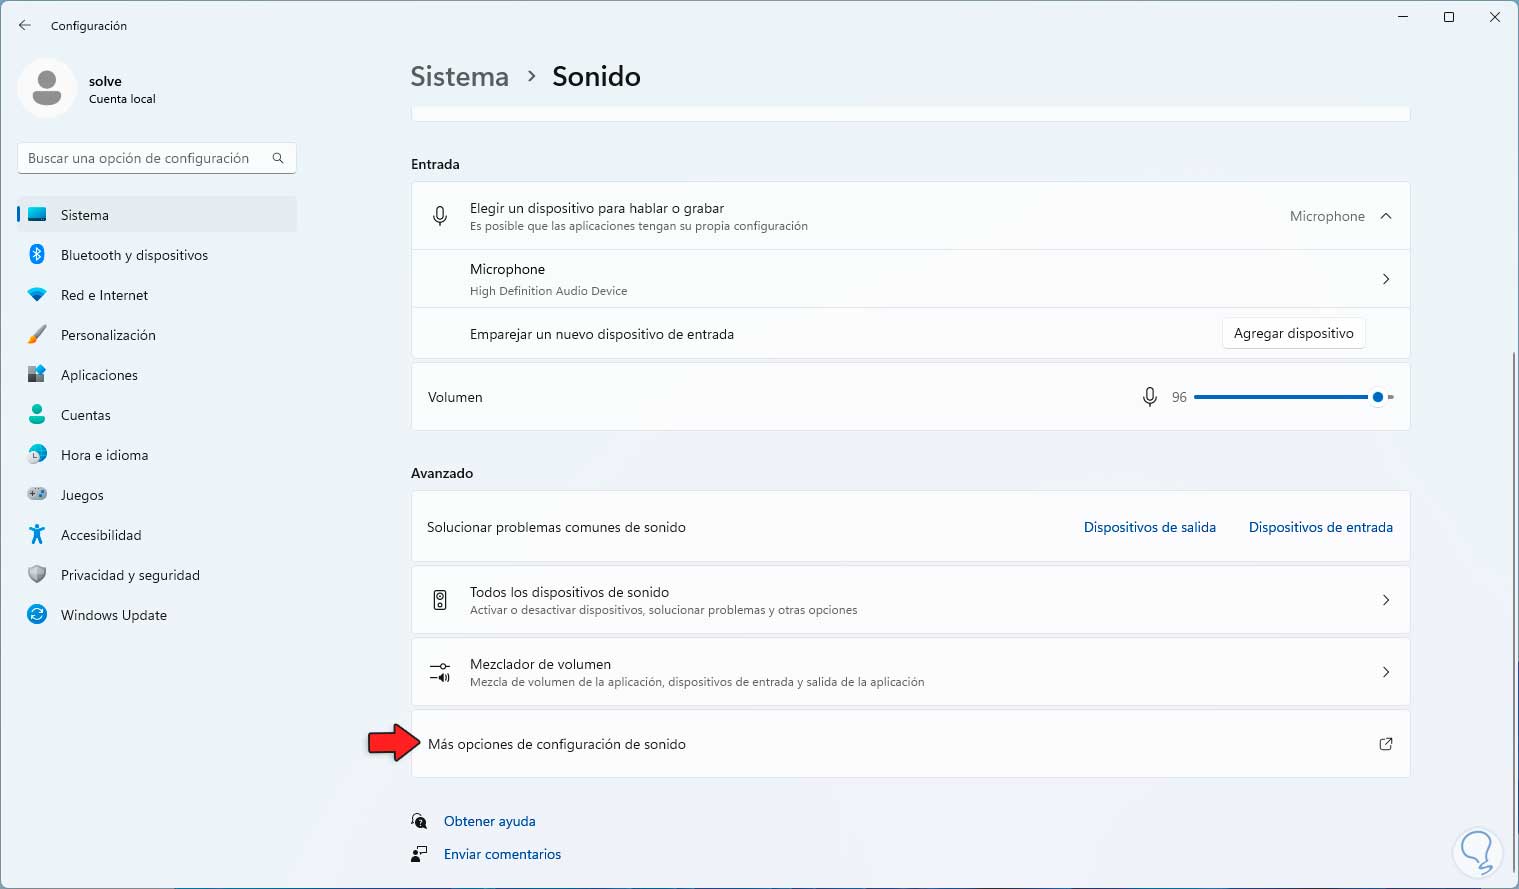
step 5
In the pop-up window in "Playback" we select the device and then click
on "Properties":
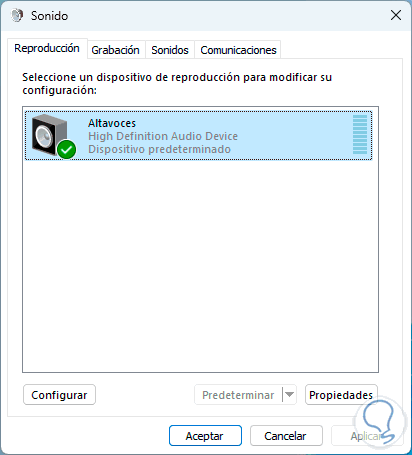
step 6
Then we go to the "Improvements" tab:
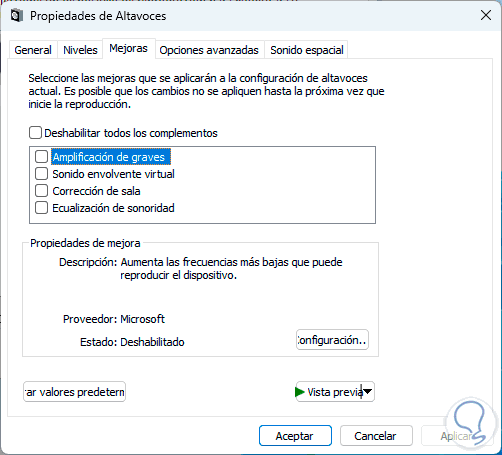
step 7
We activate the "Bass amplification" and "Loudness equalization" boxes:
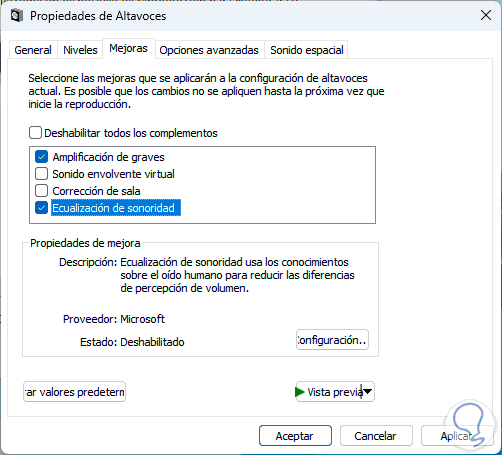
Apply the changes..
step 8
In case you want to deactivate these improvements, we go to "Sound - Speakers":
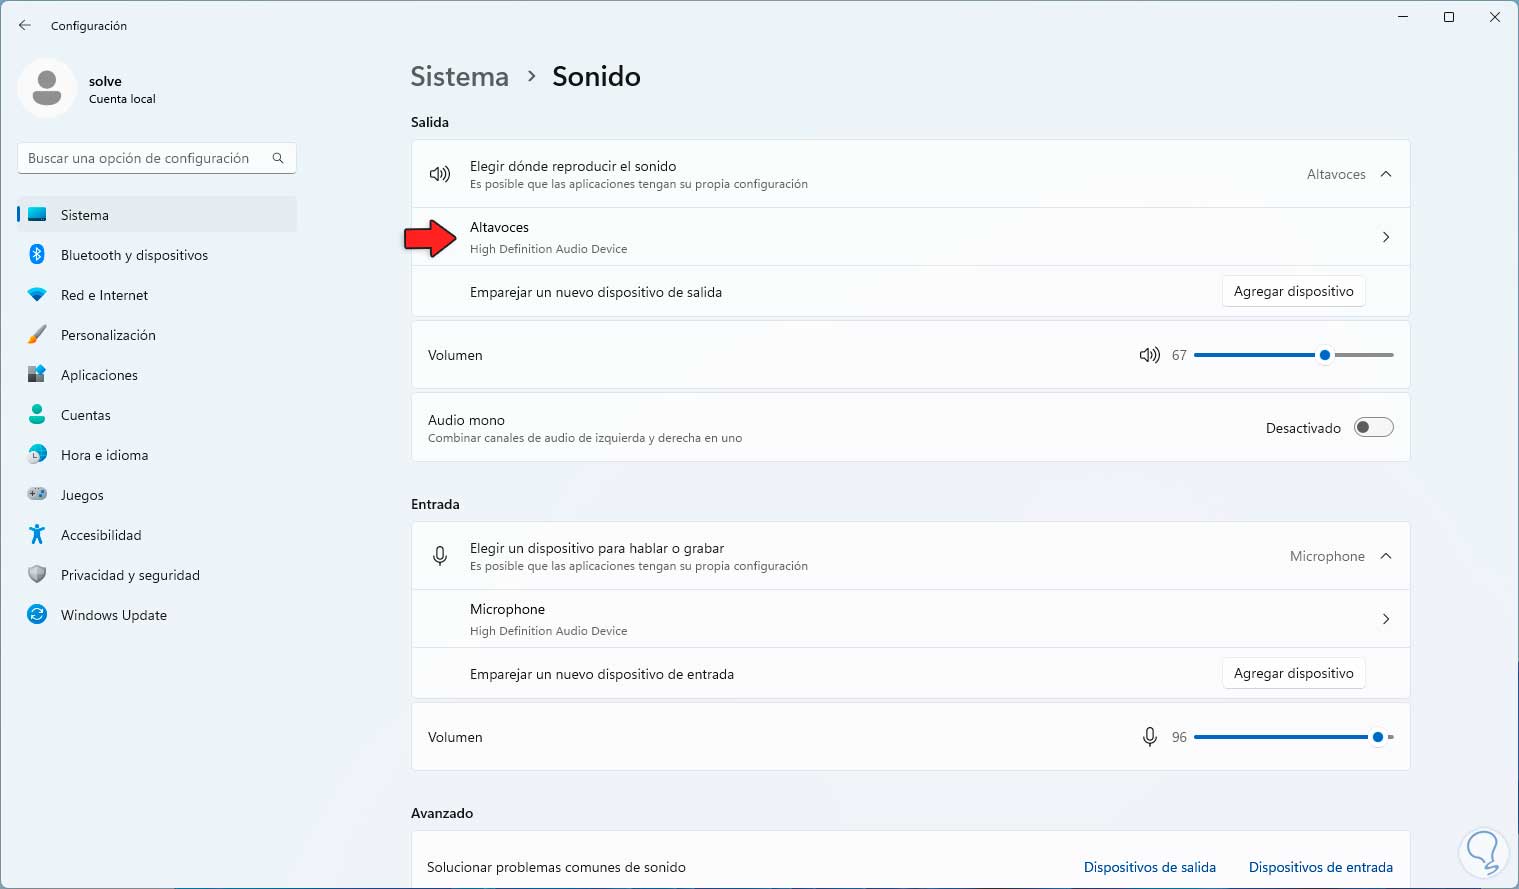
step 9
Then it is possible to select "Off" in "Audio enhancements":
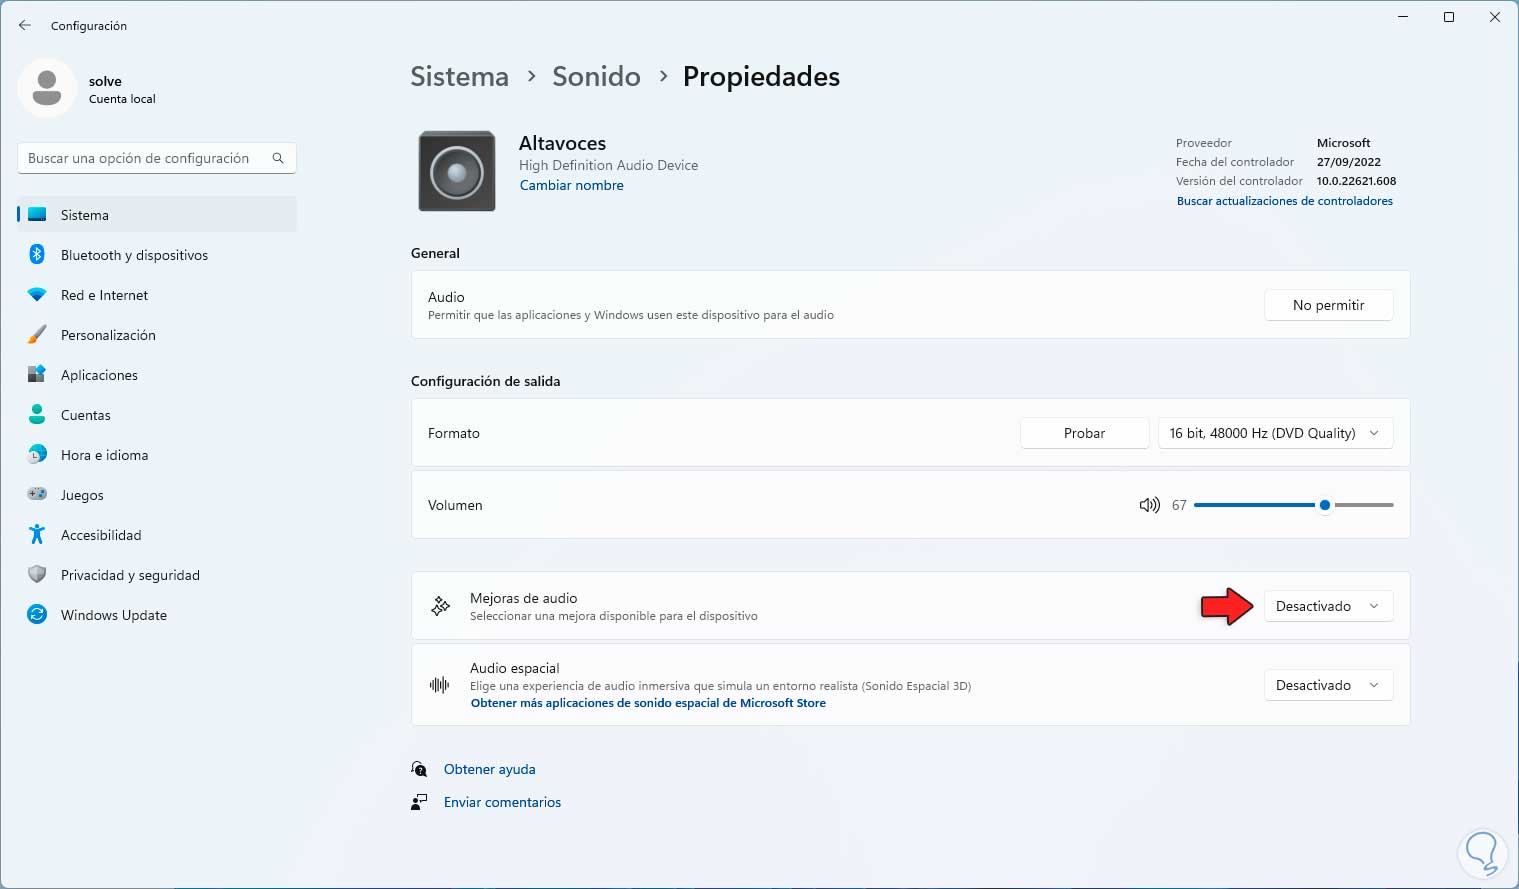
4 Configure sound Windows 11 disabling audio output
With this function it is sought that both Windows 11 and the applications use the equipment for audio tasks, it is not always recommended due to the quality with which the audio is generated.
Step 1
To manage this option we go to "Start - Settings - Sound":
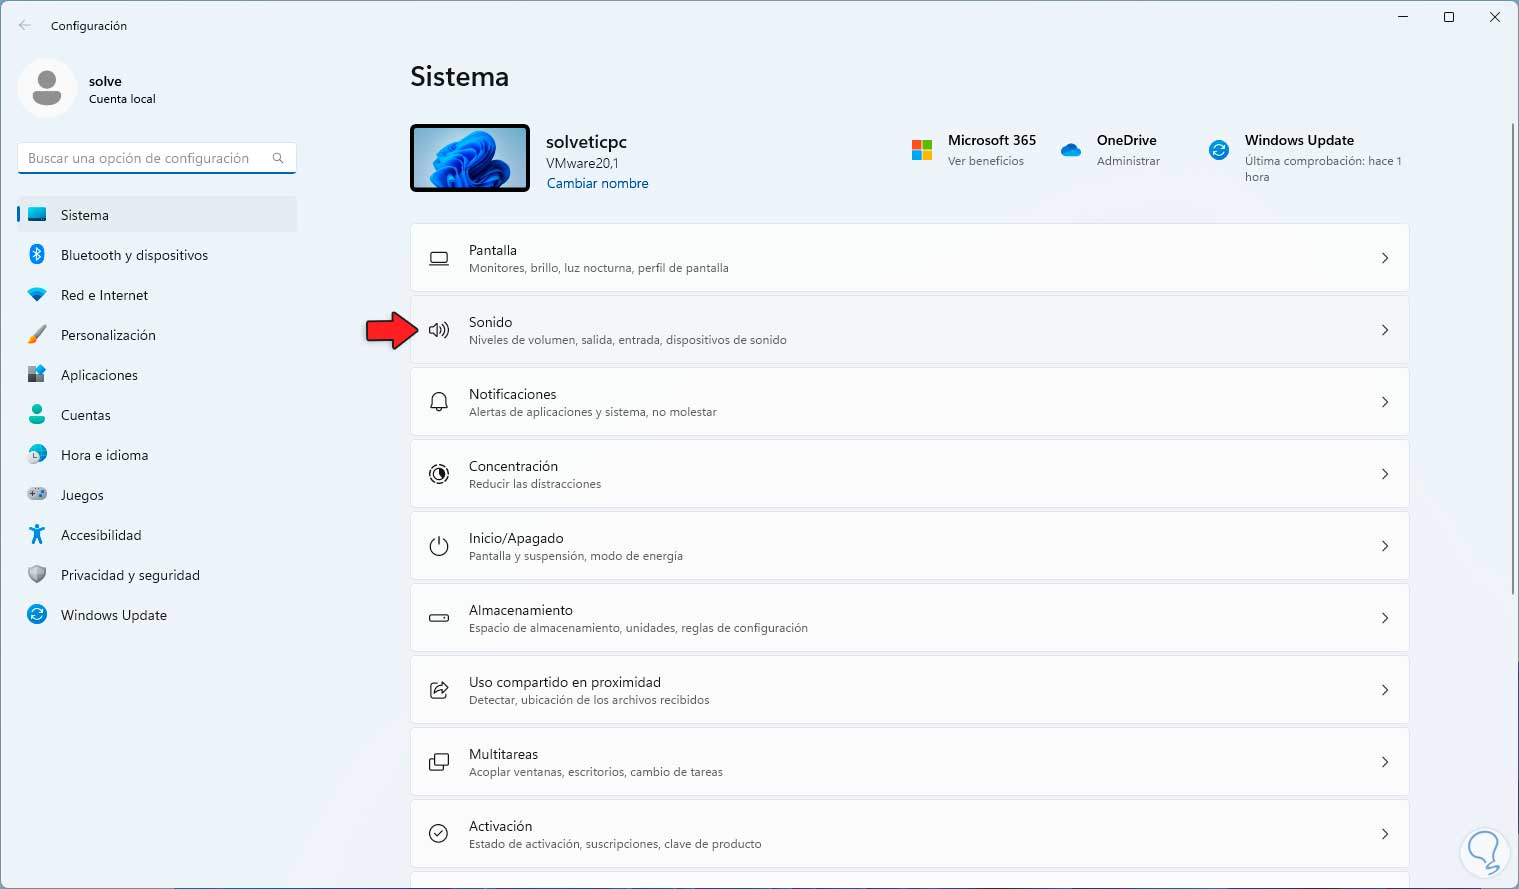
Step 2
Then we click on "Speakers":
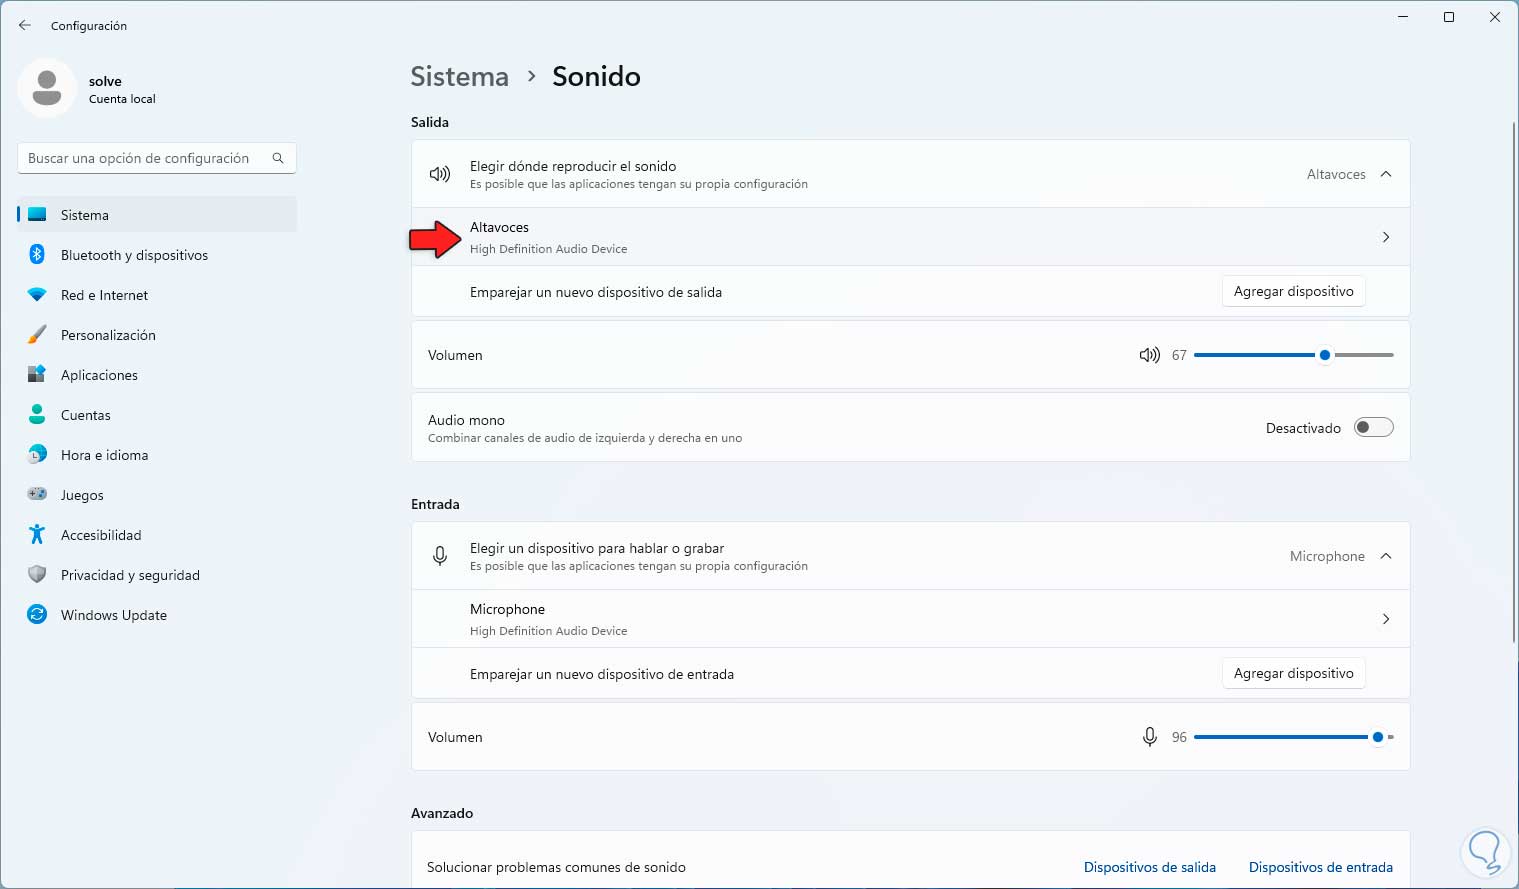
Step 3
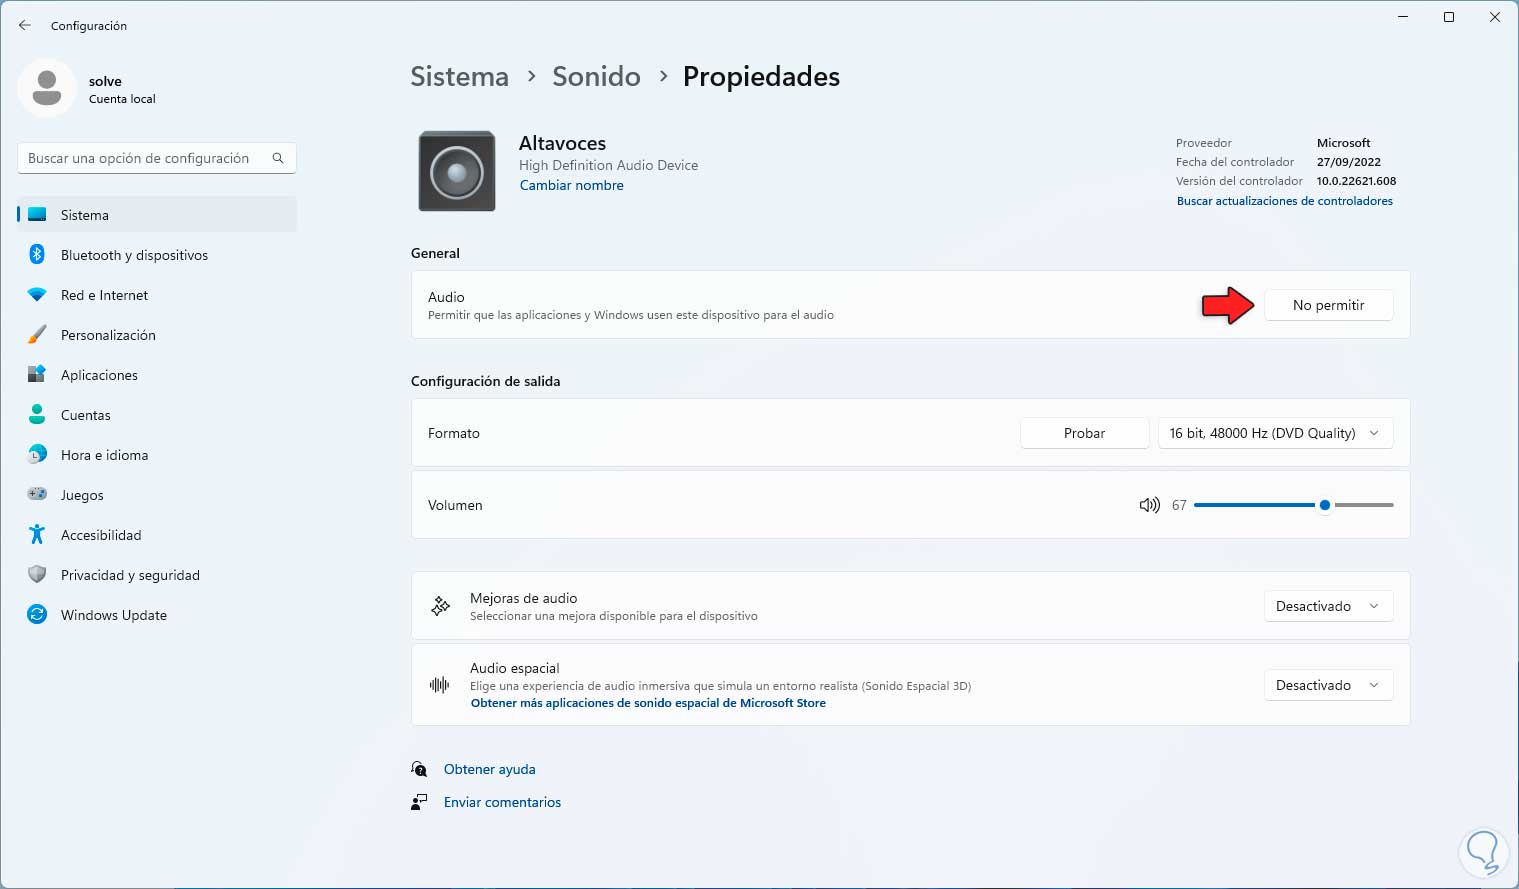
When accessing there we will have the following options:
Step 4
In "Audio" we click on "Do not allow" and a small message will open:
step 5
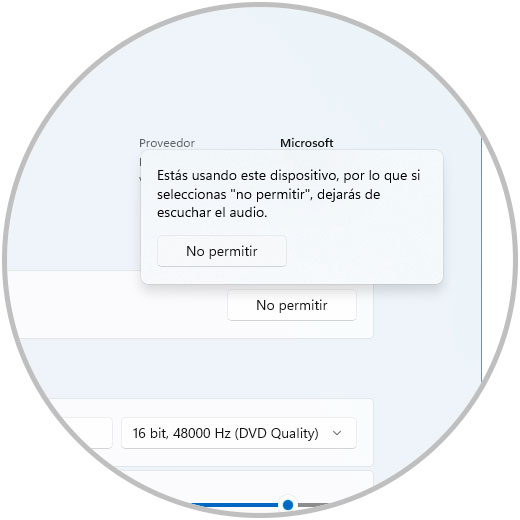
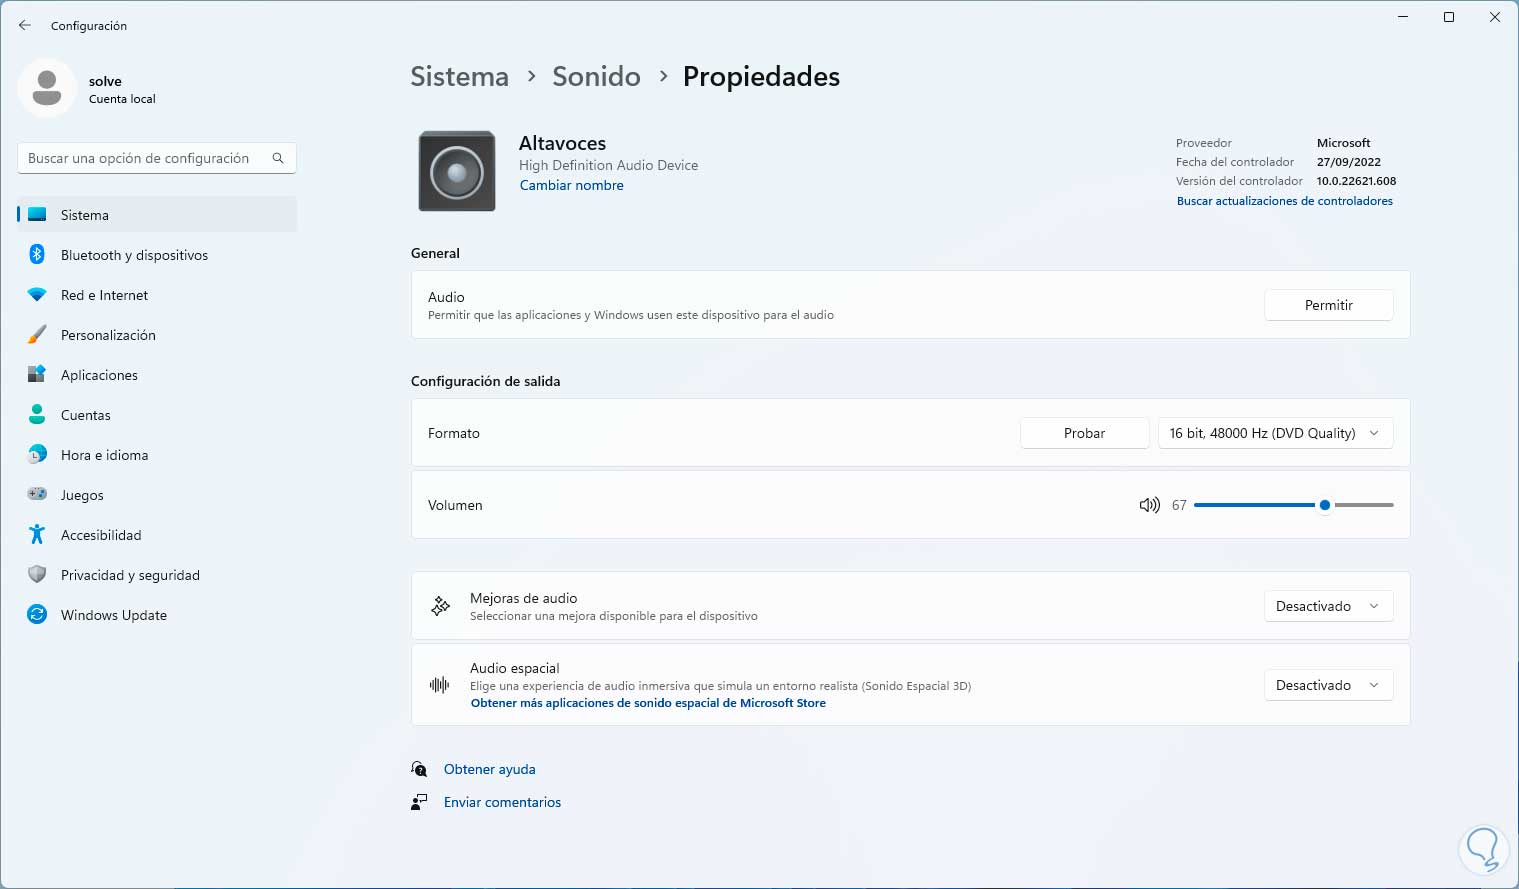
Again we click on "Do not allow" to confirm and change the mode to "Allow":
step 6
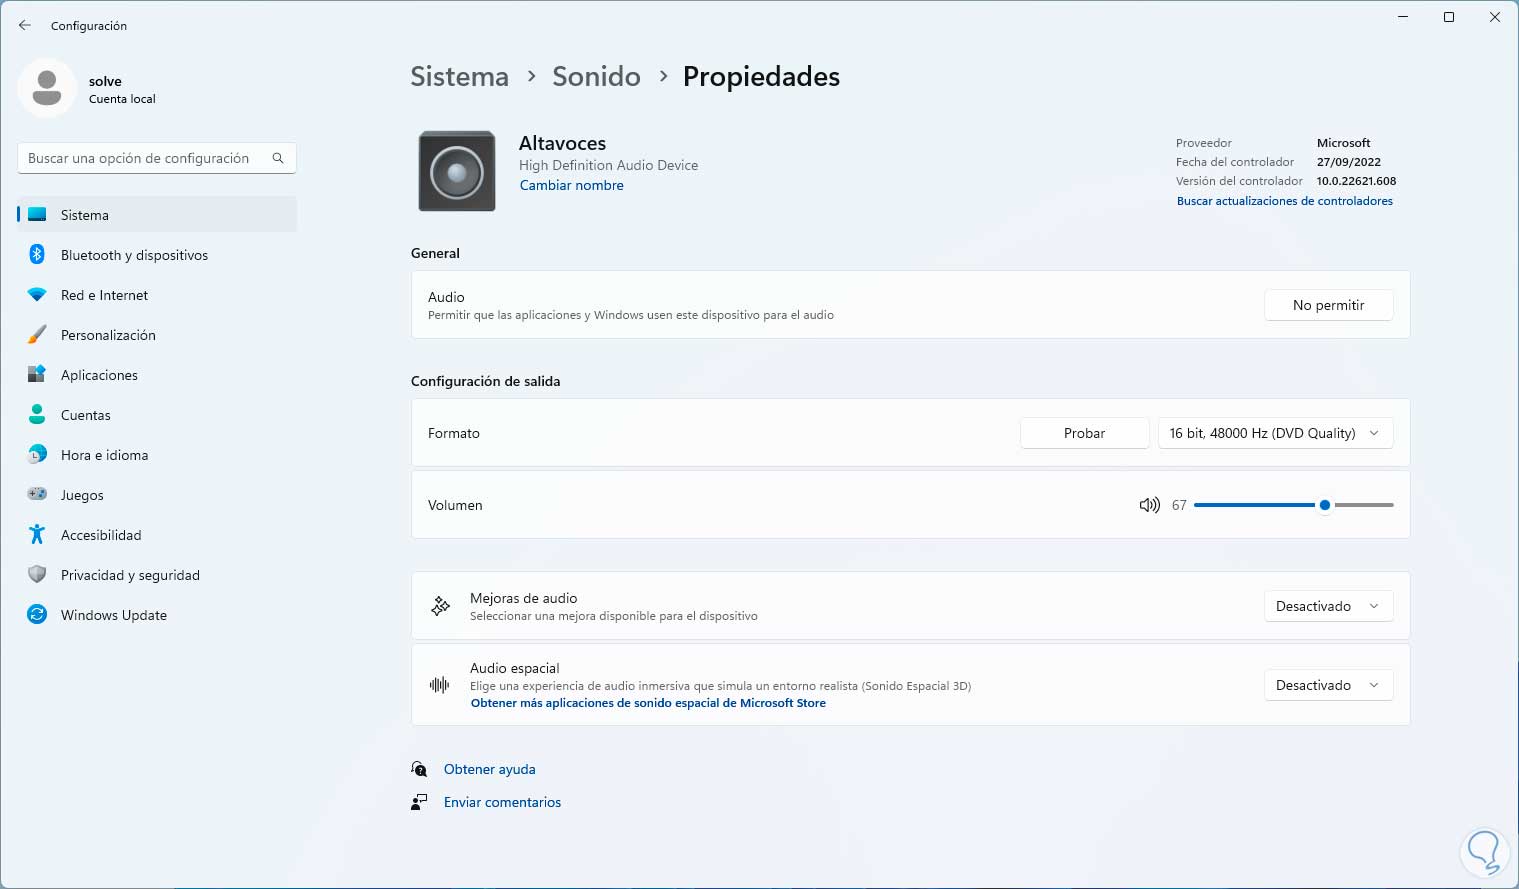
To prevent the use of this mode, click on "Allow" to change its status:
5 Configure sound Windows 11 by checking the driver version
The audio driver allows all the functions of both the audio device and Windows 11 to be fully exploited.
Step 1
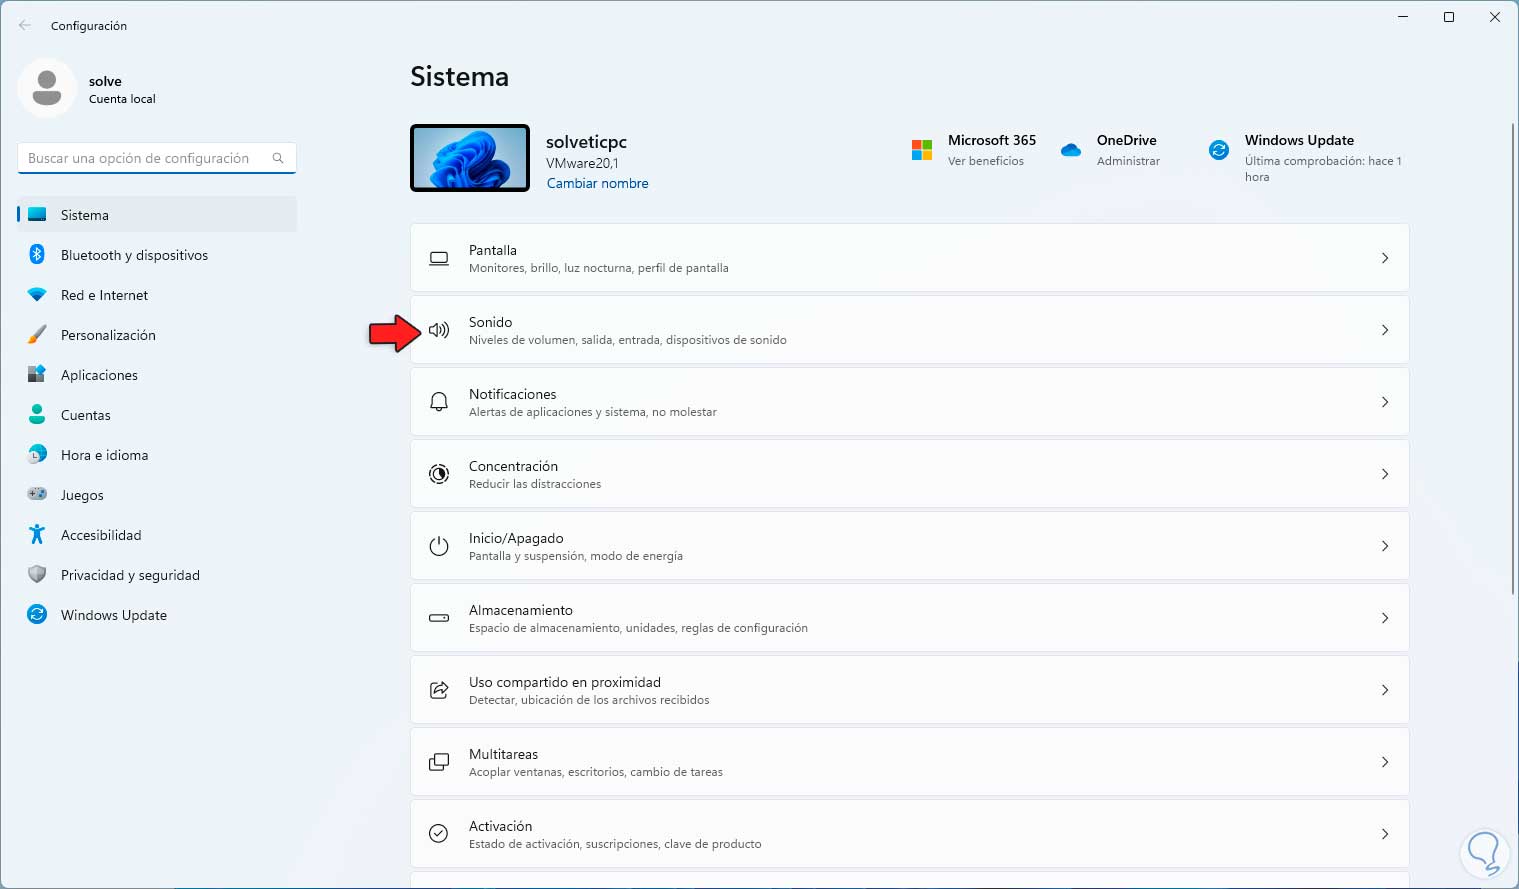
To see the current version of the driver used we will go to "Start - Settings - Sound":
Step 2
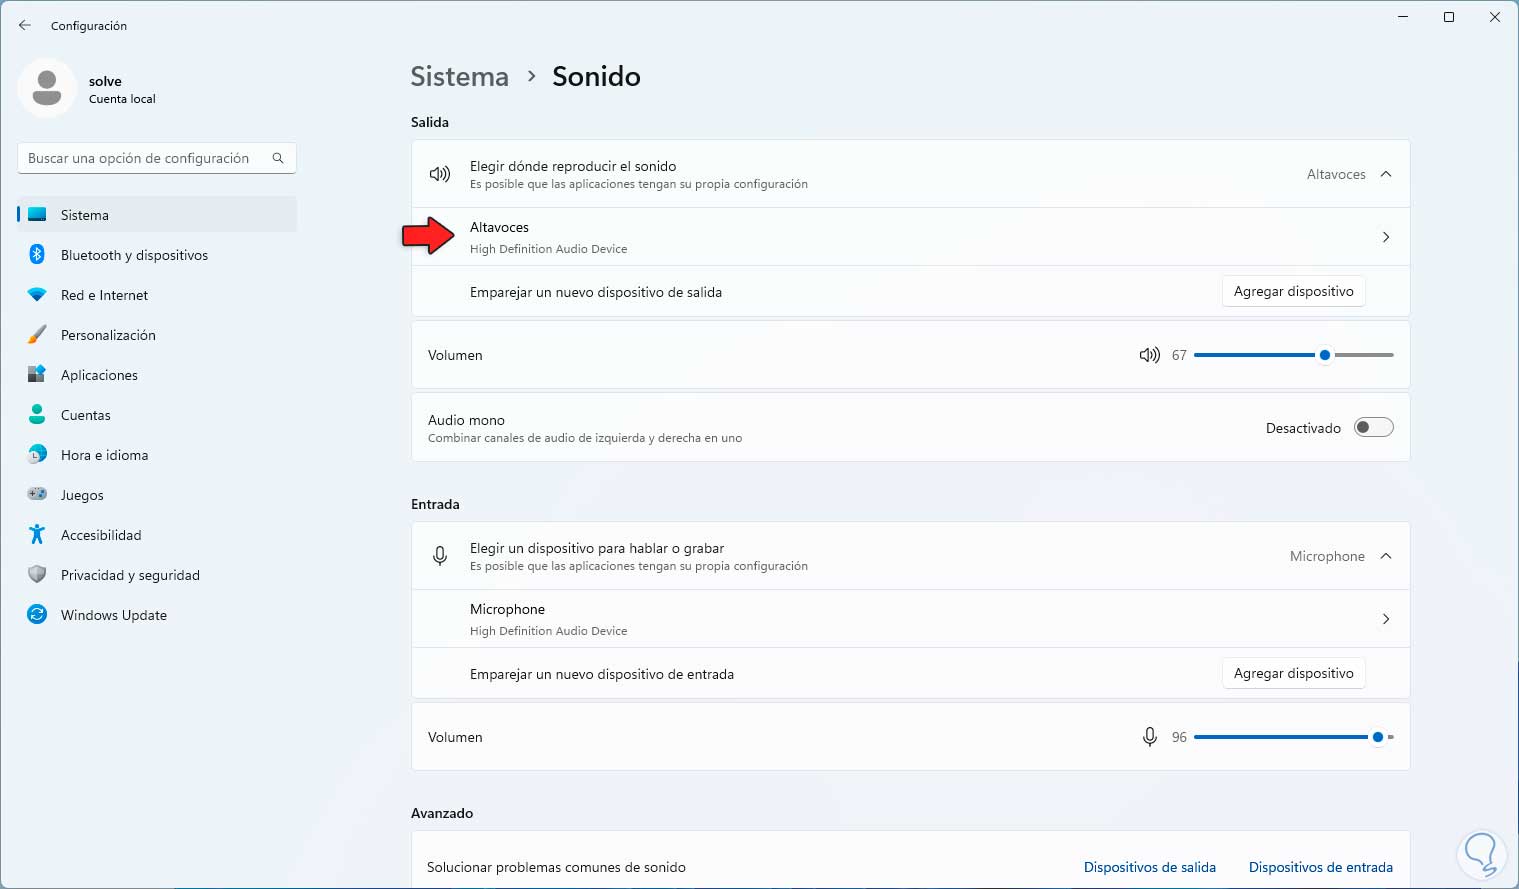
Let's go to "Speakers":
Step 3
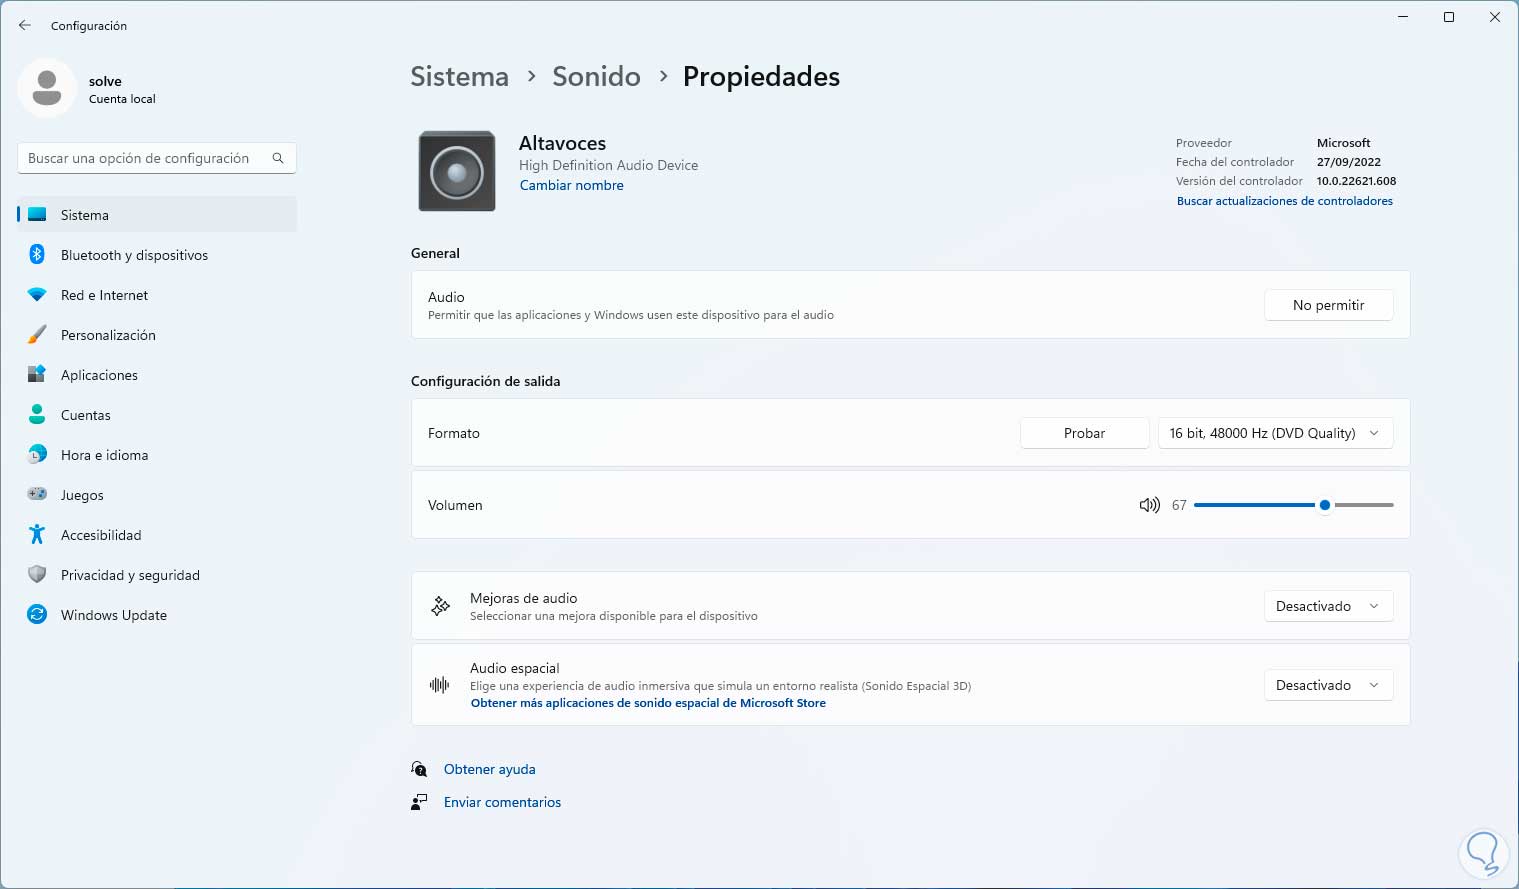
When you enter this option in the upper right corner you find driver details:
6 Configure sound Windows 11 enabling Mono mode
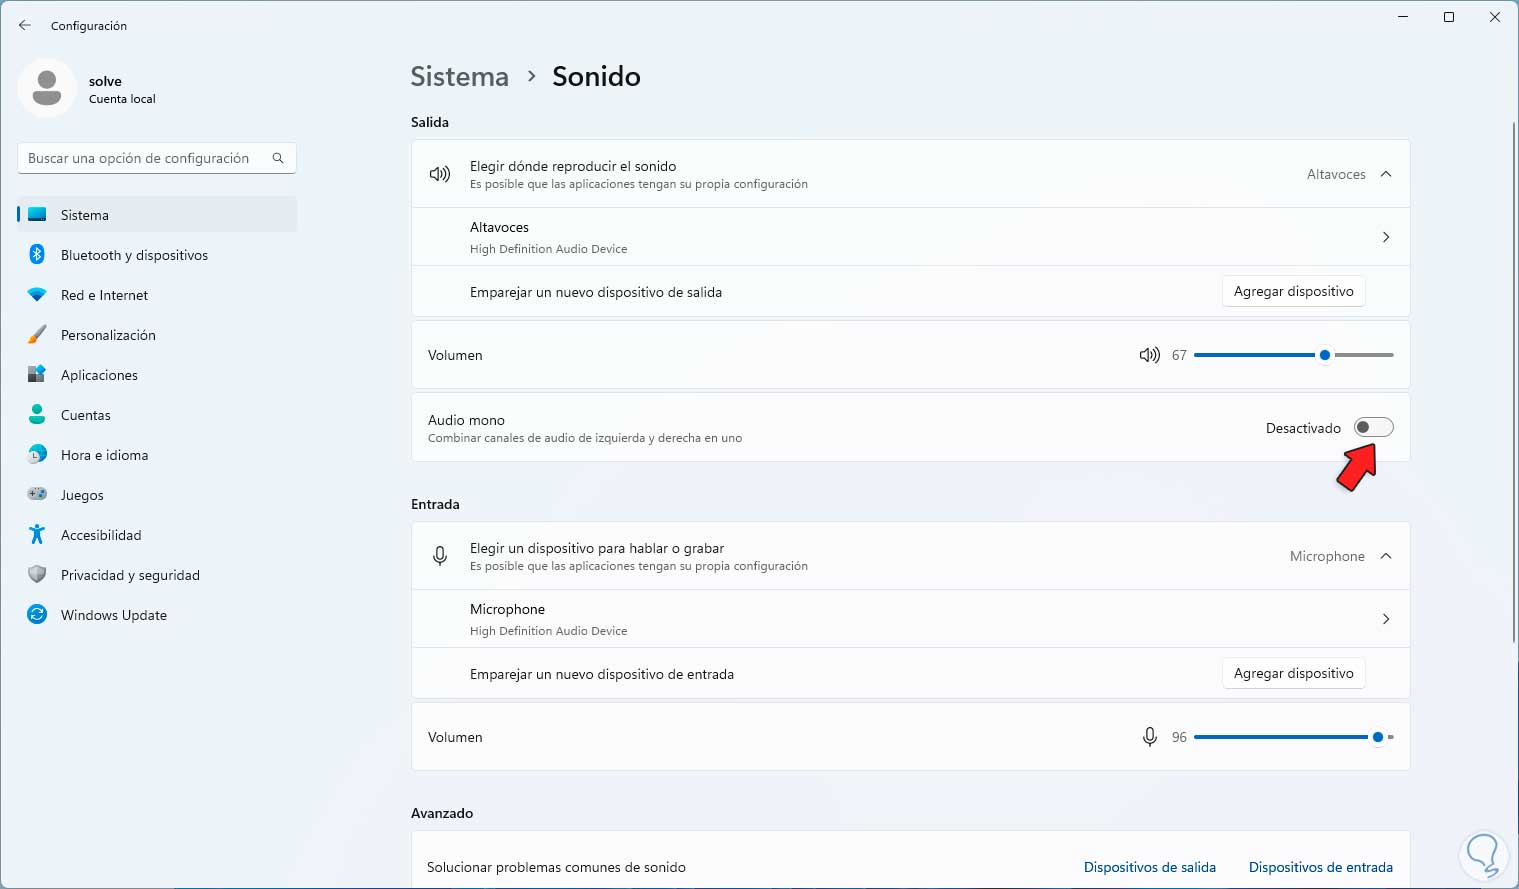
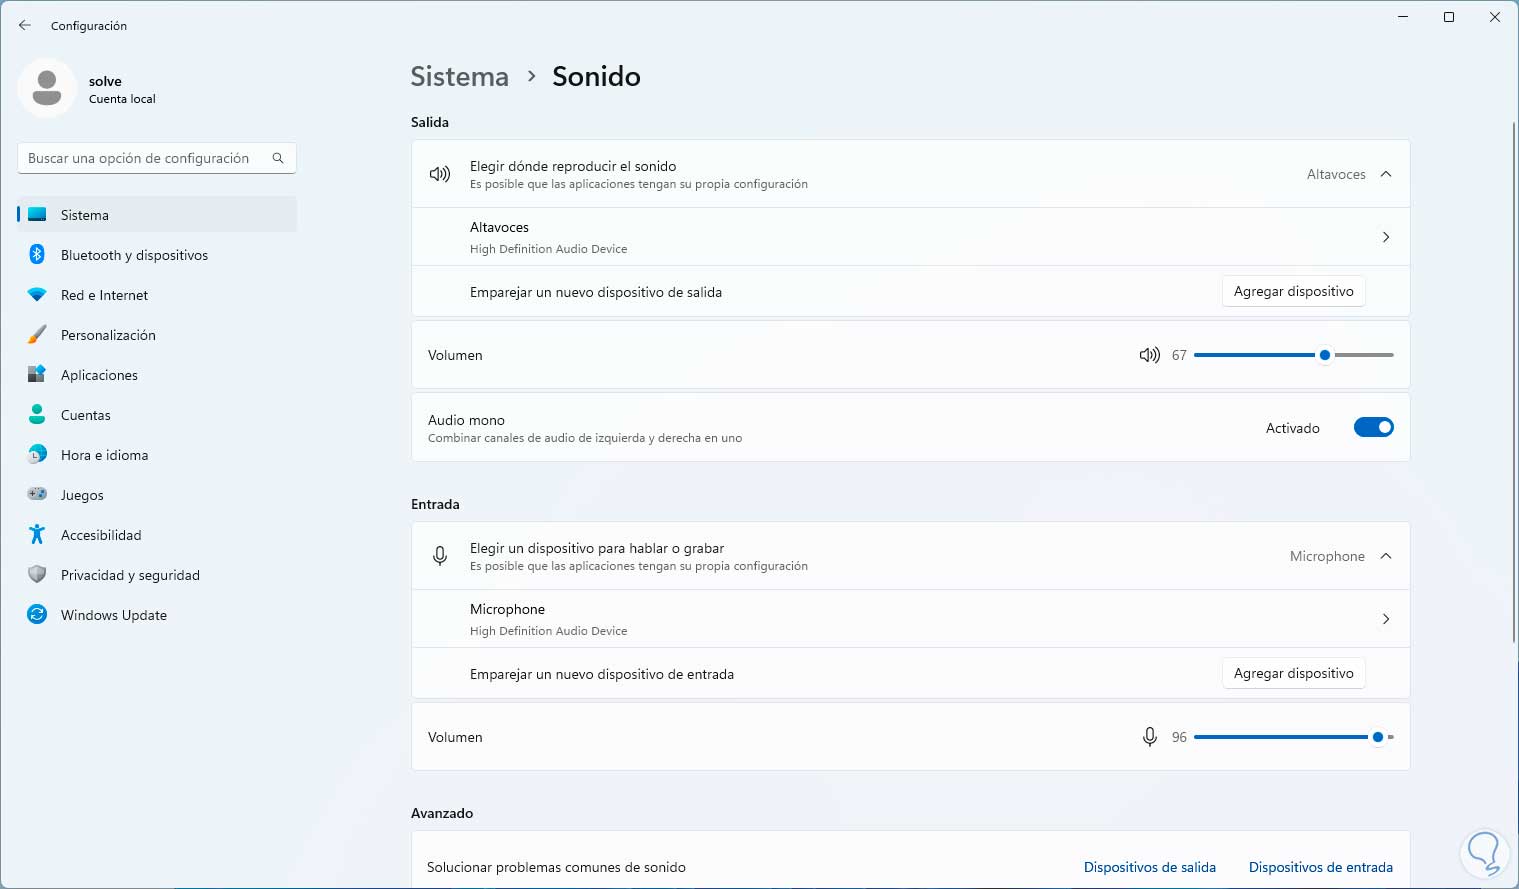
This Mono mode allows the sound to come out in Windows 11 only through one of the sides of the player, right or left, it is functional on specific occasions.
Step 1
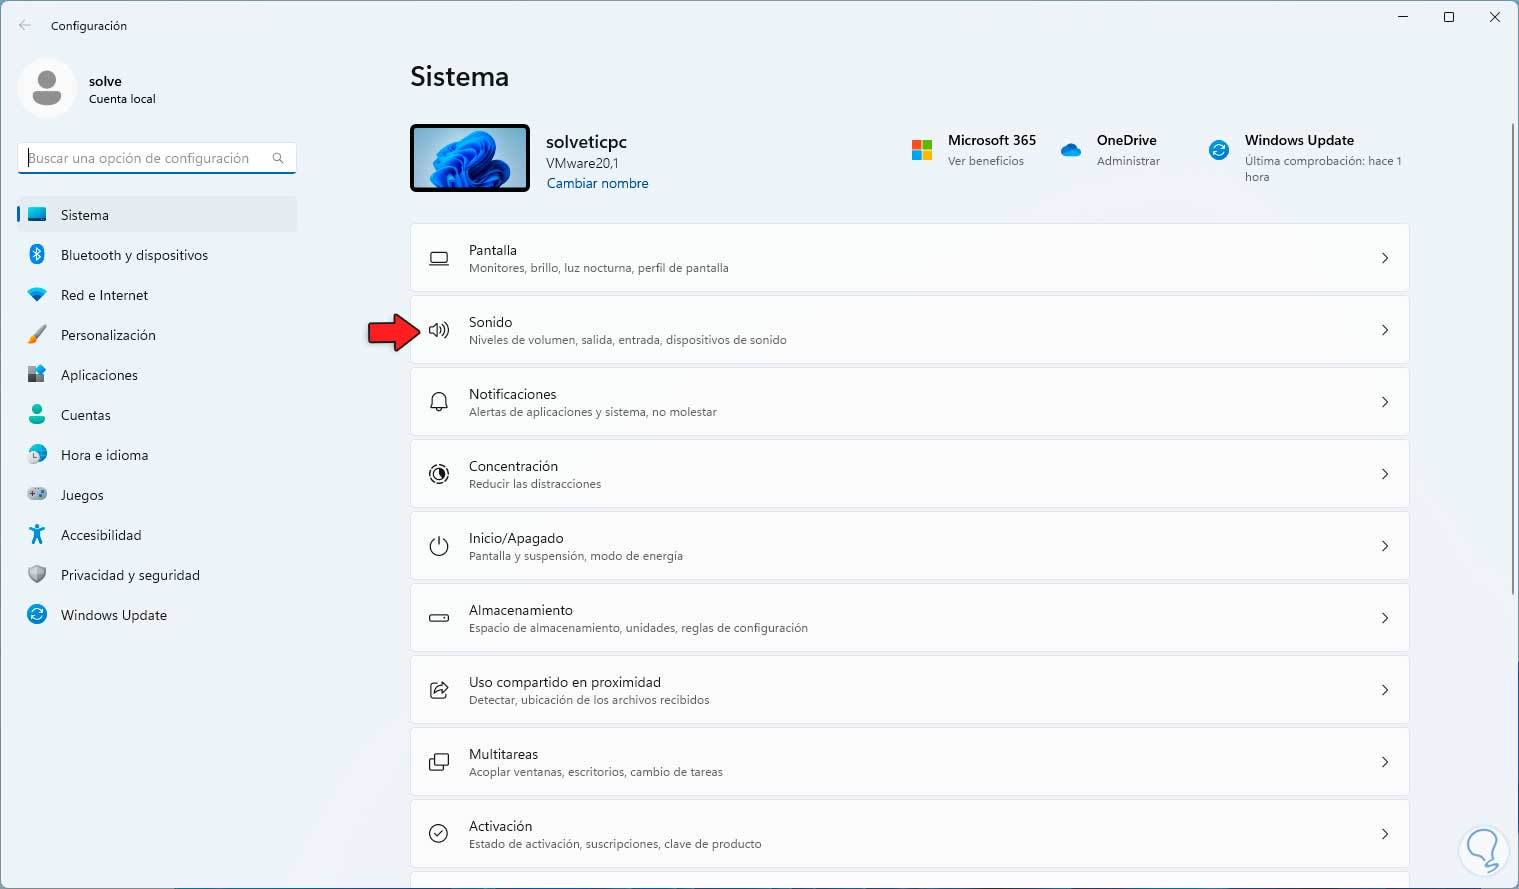
To activate it or not we go to "Start - Settings - Sound":
Step 2
Activate or deactivate the "Mono Audio" switch as the case may be:
Step 3
If required, we simply activate the switch and the change is immediate:
7 Configure sound Windows 11 by adding devices
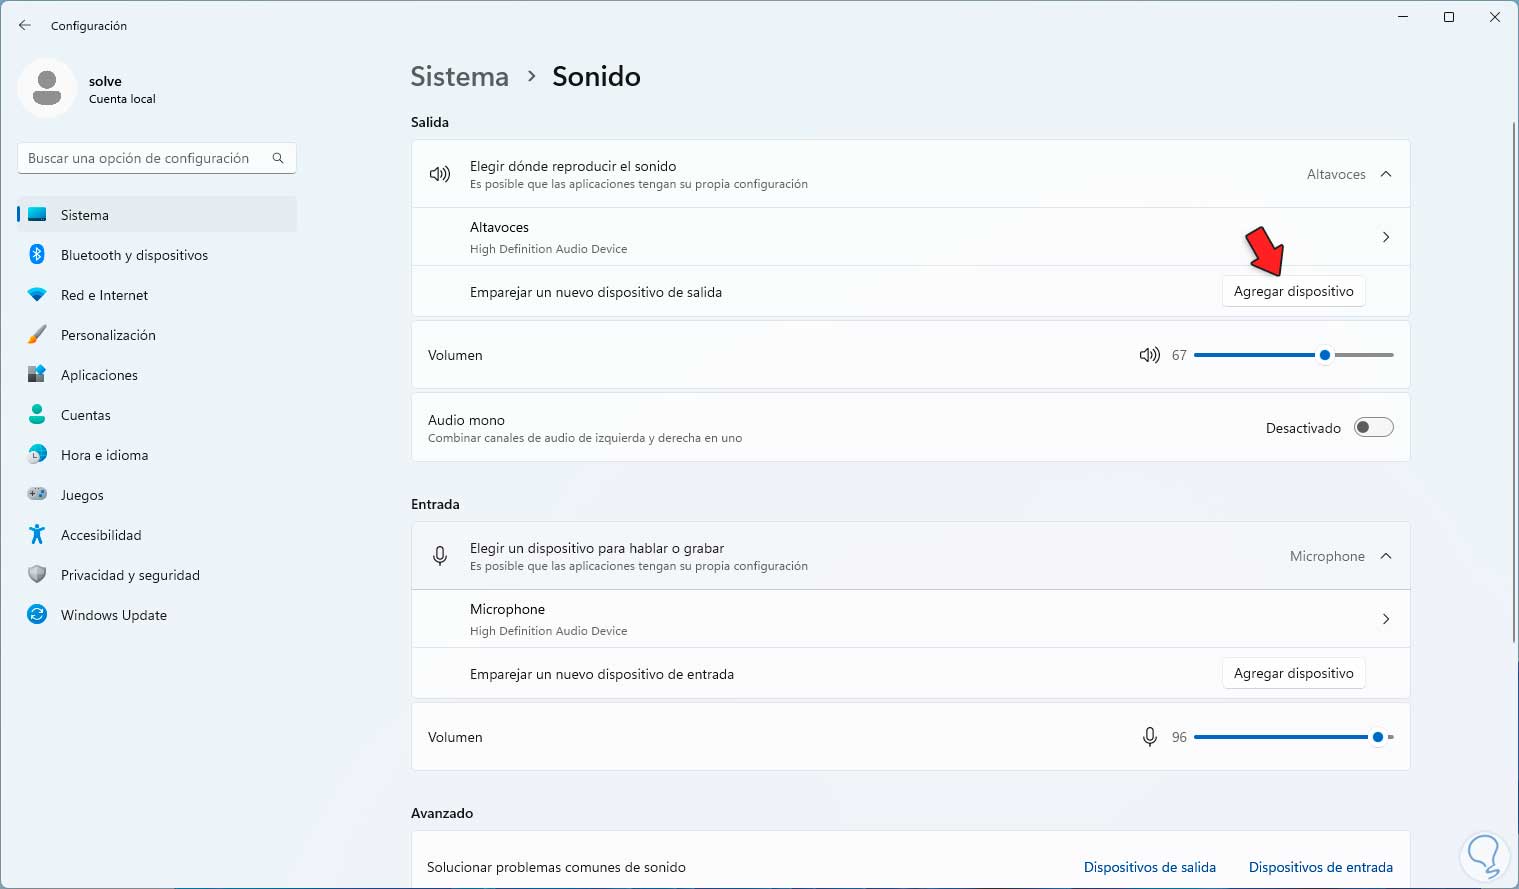
Windows 11 gives us the opportunity to add new audio devices to the computer to have access to more playback options. To add a new device, the simplest thing is through a USB port, but it will also be possible through Bluetooth.
Step 1
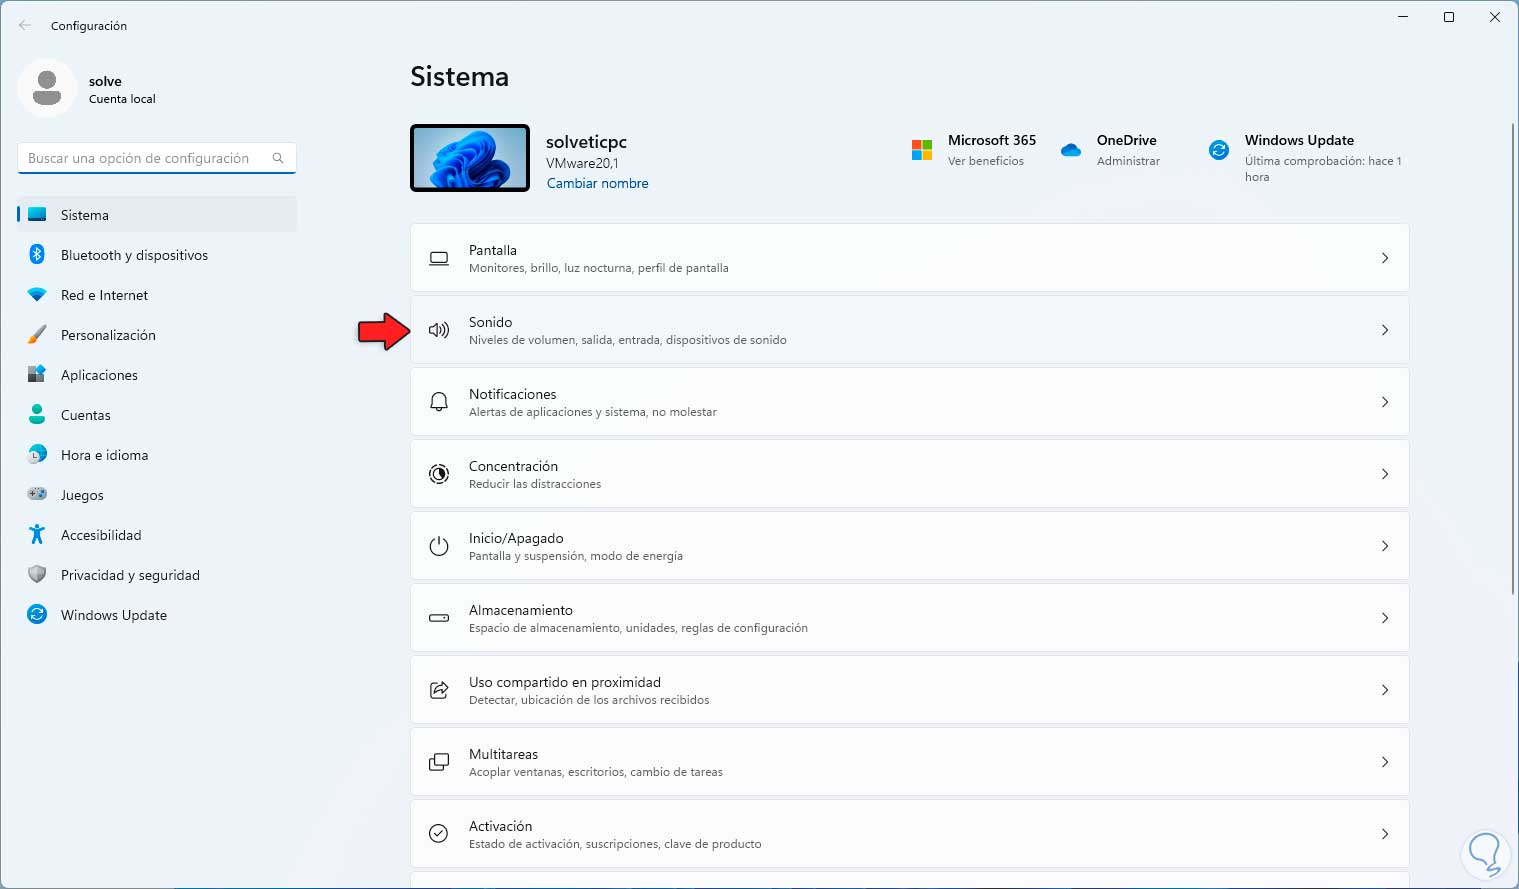
In this case we go to "Start - Settings - Sound":
Step 2
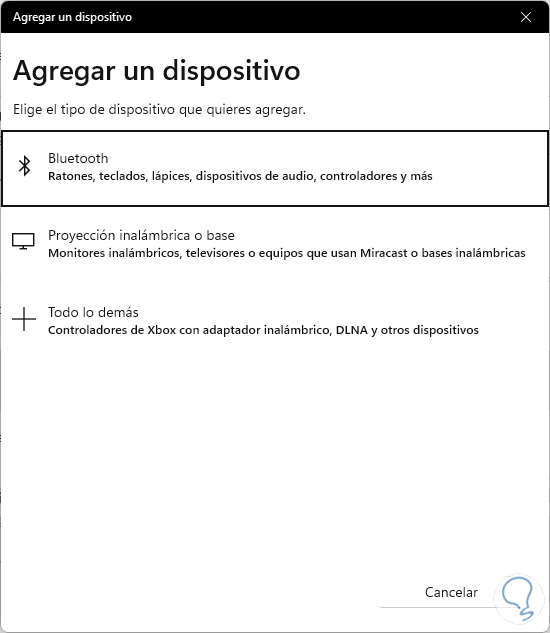
Now we click on "Add device":
Step 3
Select the type of media and validate if it is detected:
8 Configure sound Windows 11 by adjusting the volume
We have the possibility of adjusting the volume of the medium either to lower its volume or raise it to the highest percentage.
Step 1
To achieve this we will go to "Start - Settings - Sound":
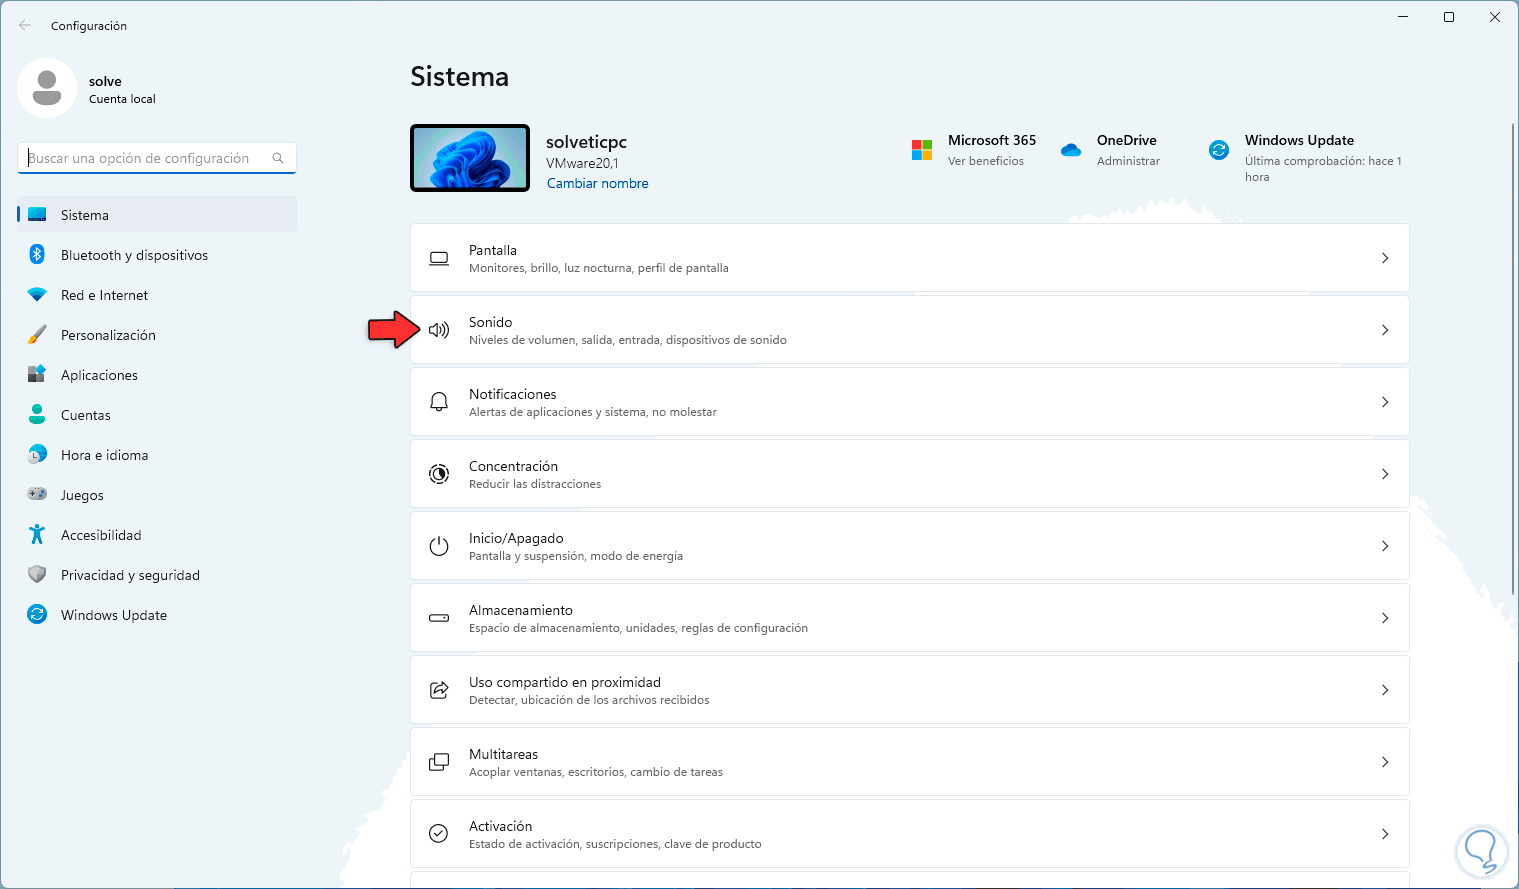
Step 2
In Sound we adjust the volume with the slider bar:
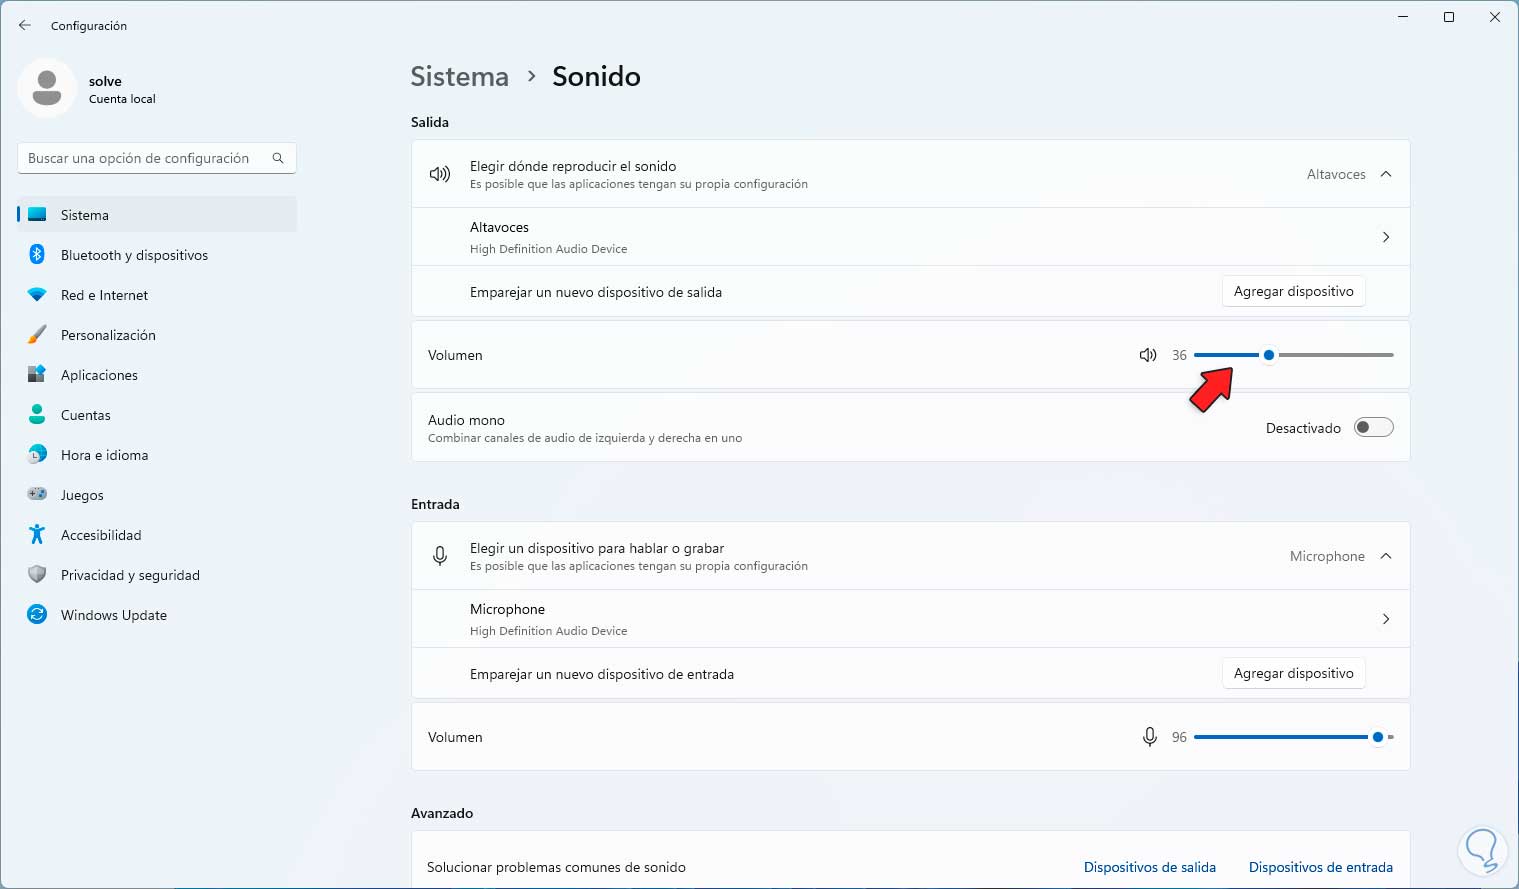
Step 3
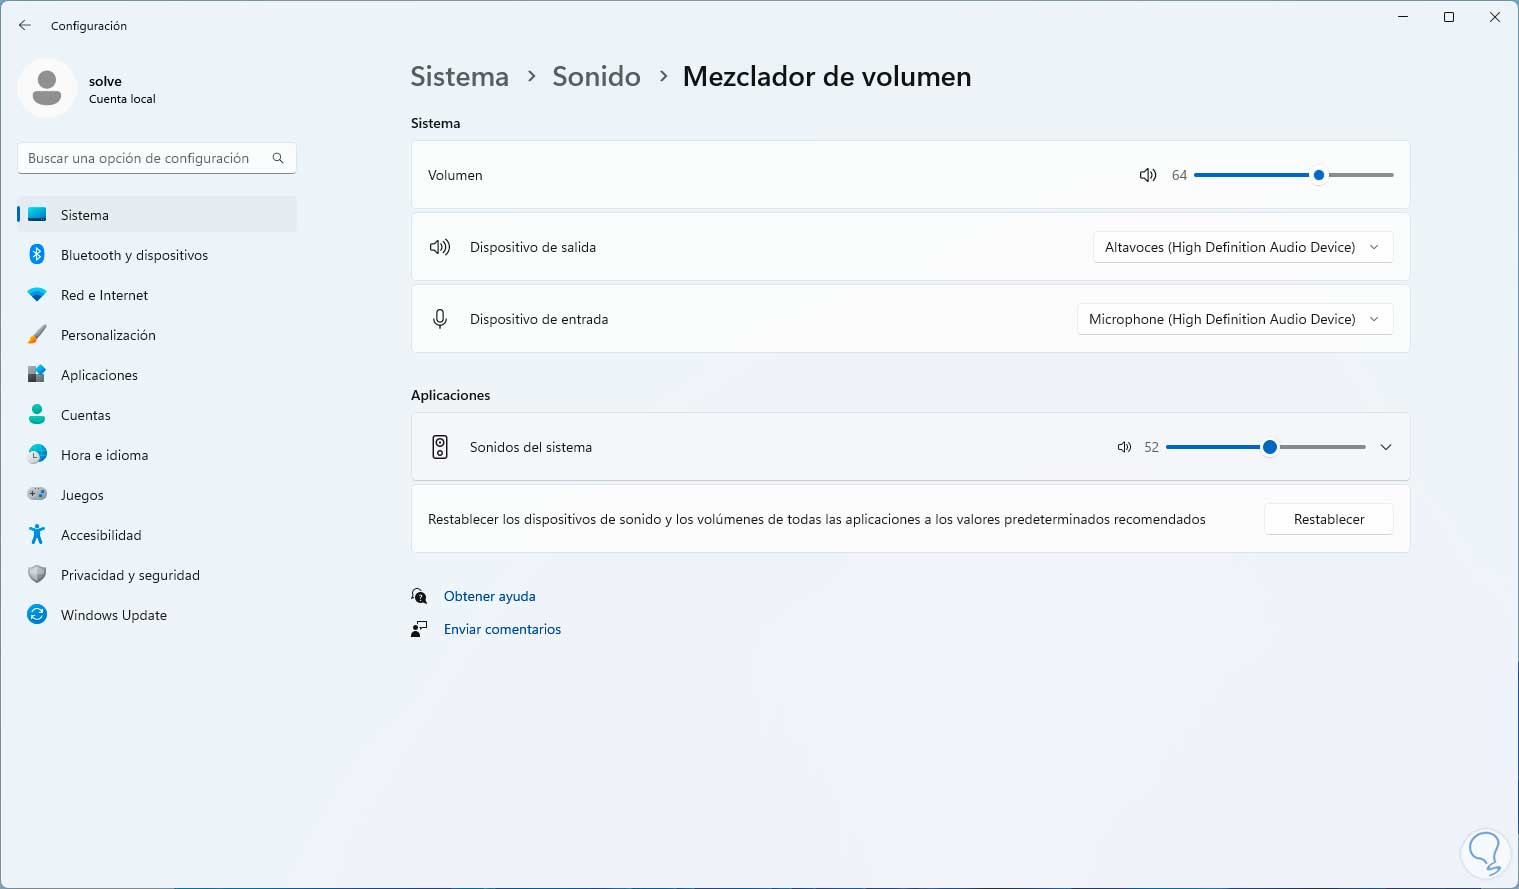
It is possible to adjust the volume directly by application, for this we click on "Volume mixer":
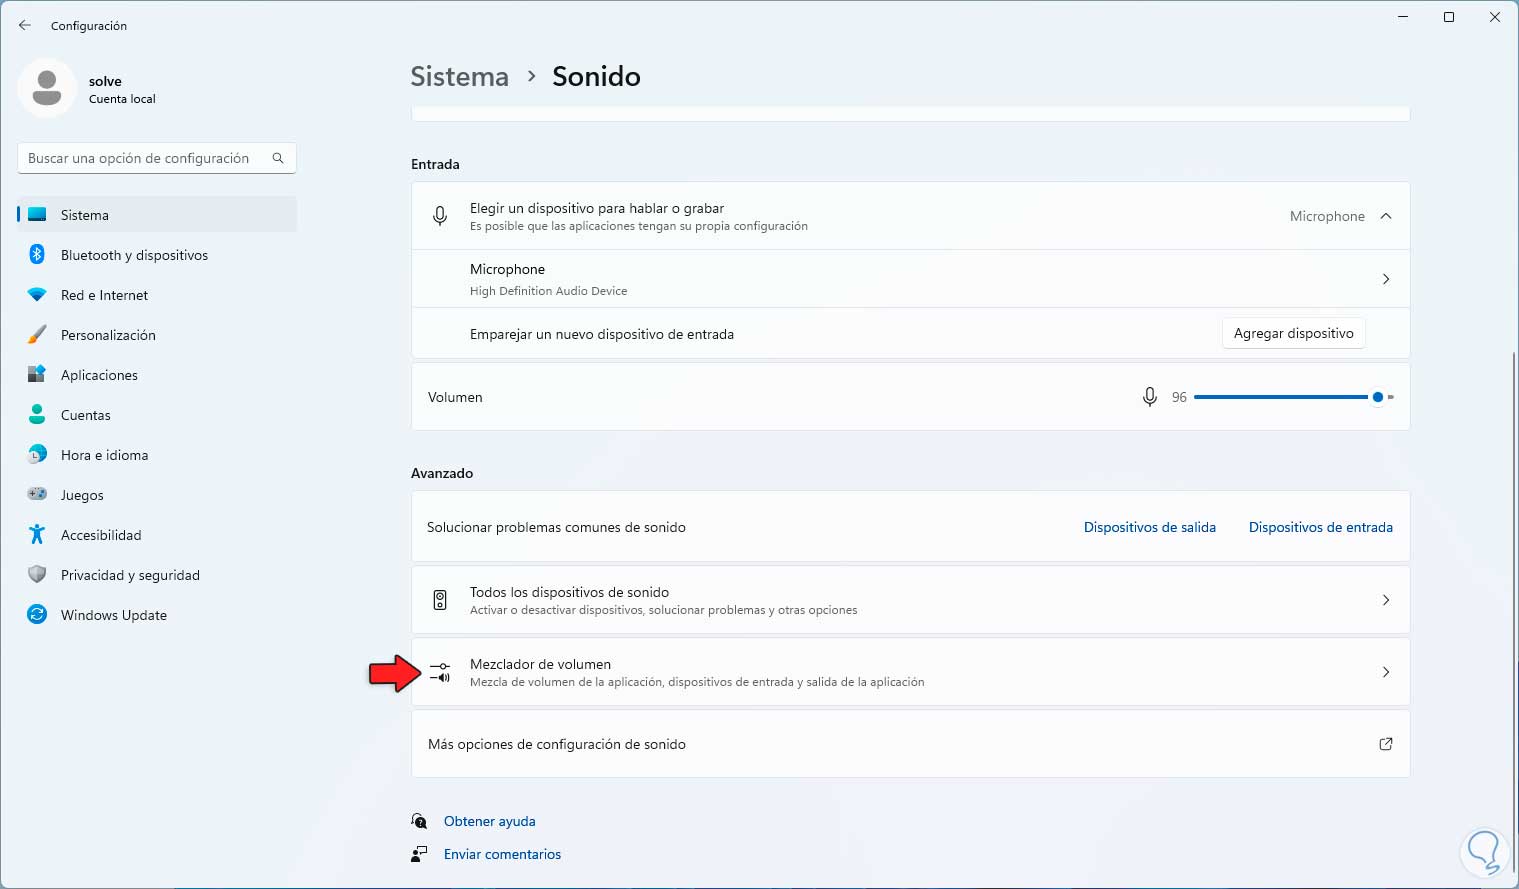
Step 4
There adjust the volume with the slider bar according to the necessary option:
9 Configure sound Windows 11 by changing the name of the device
By default Windows 11 assigns a name (Speakers) to the audio players but to customize the experience we can change its name.
Step 1
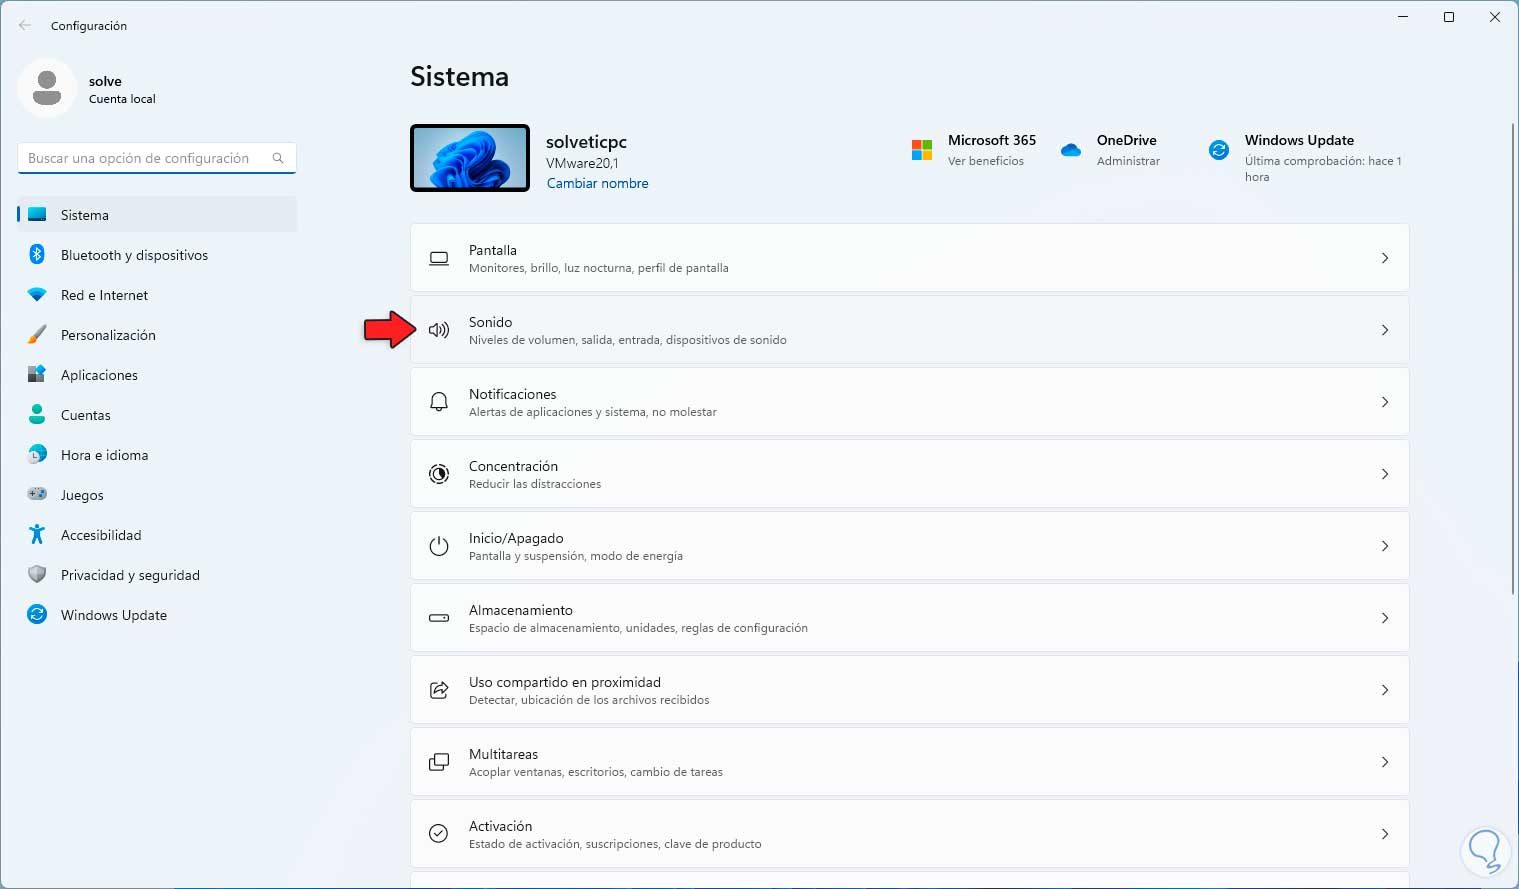
If you want to do this we will go to "Start - Settings - Sound":
Step 2
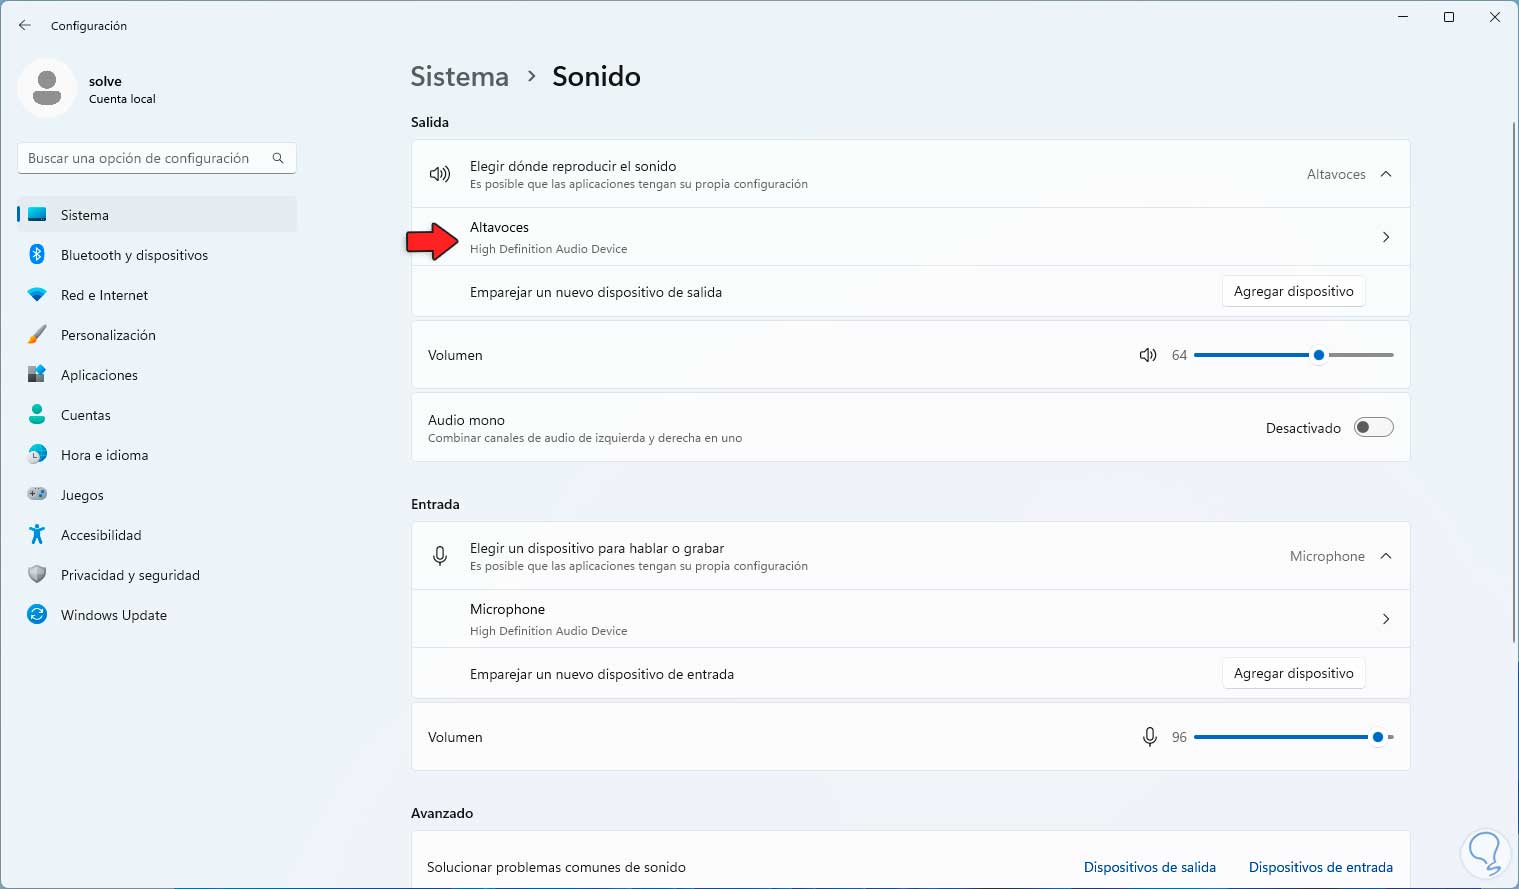
Now we will go to "Speakers":
Step 3
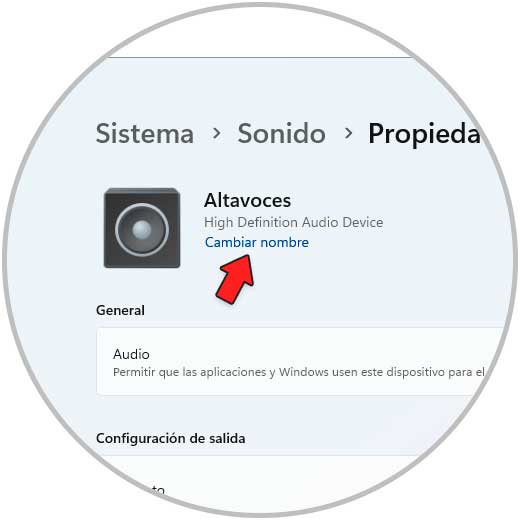
In Speakers we will see this:
Step 4
We click on "Change name" and establish the new name:
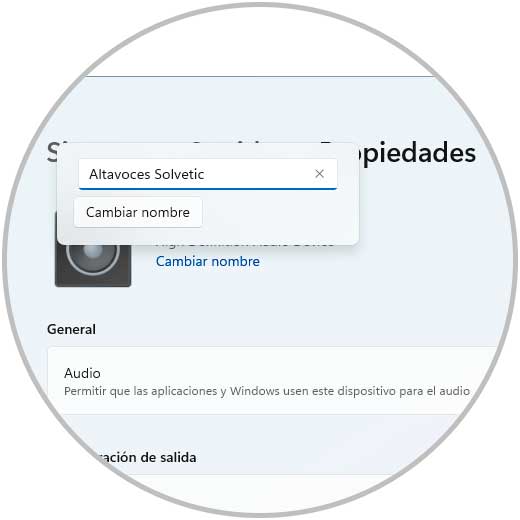
step 5
We click on "Change name" to apply the changes:
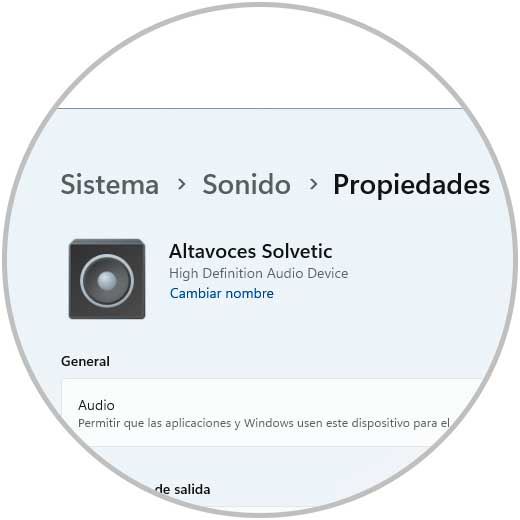
10 Configure sound Windows 11 testing the device
This method allows us to determine if the sound is correct on the device used.
Step 1
To carry out this process we go to "Start - Settings - Sound":
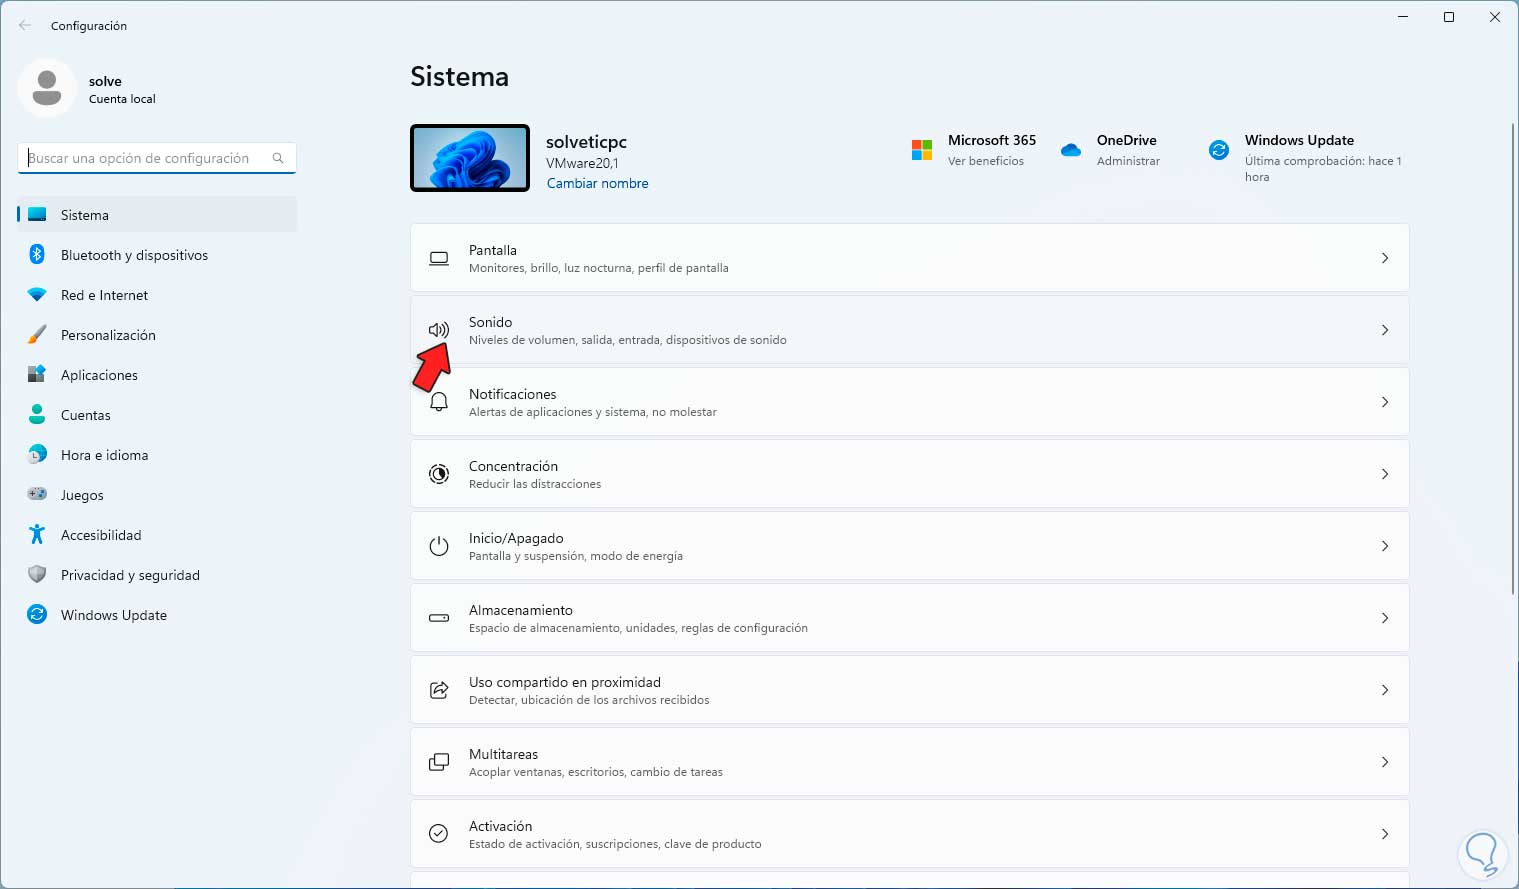
Step 2
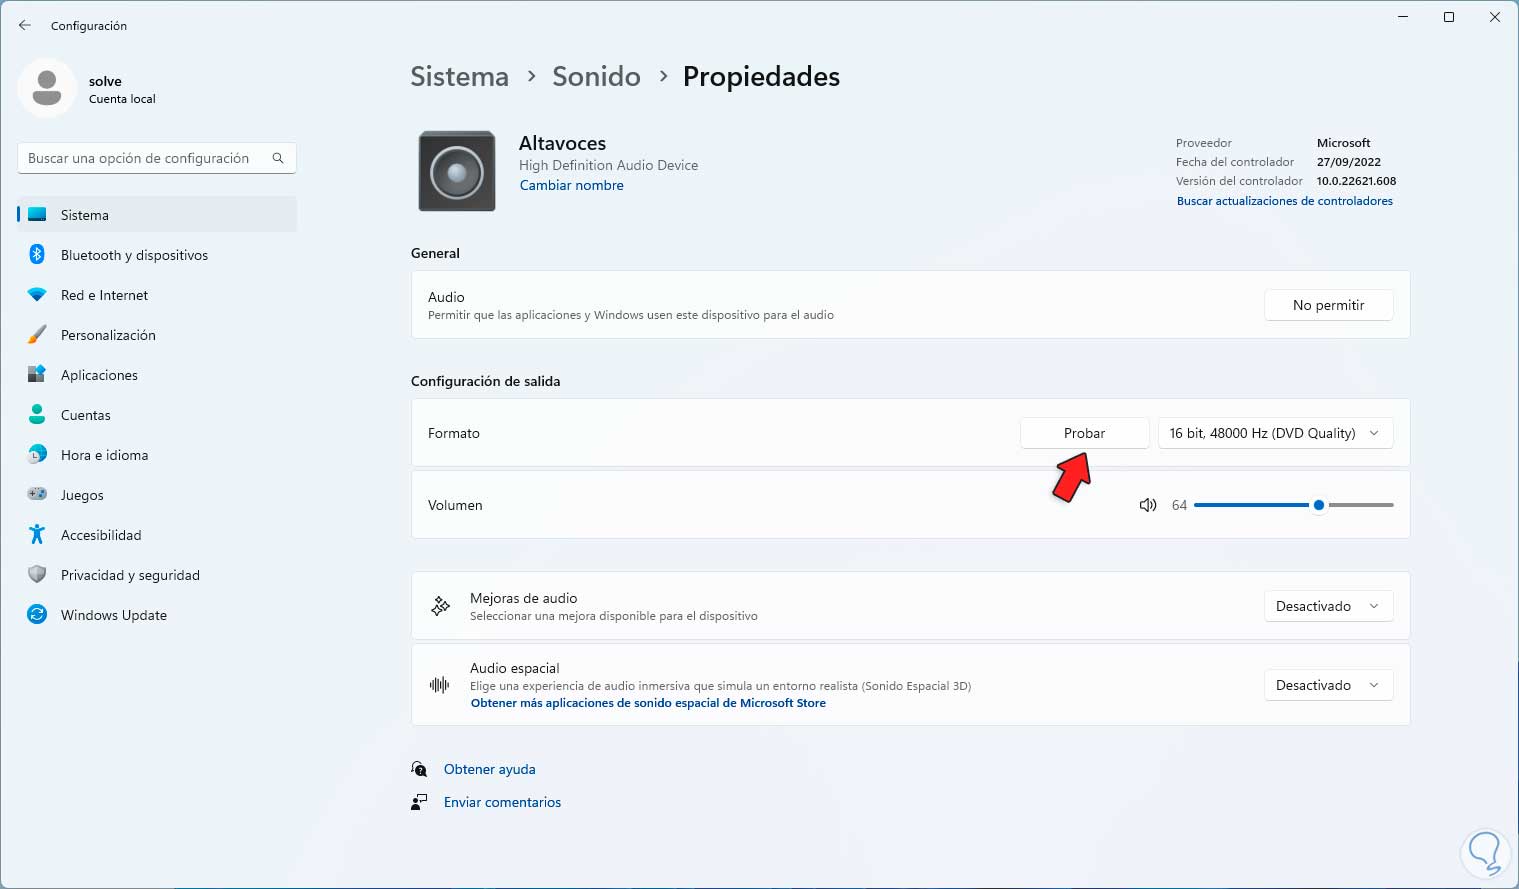
We click on "Speakers":
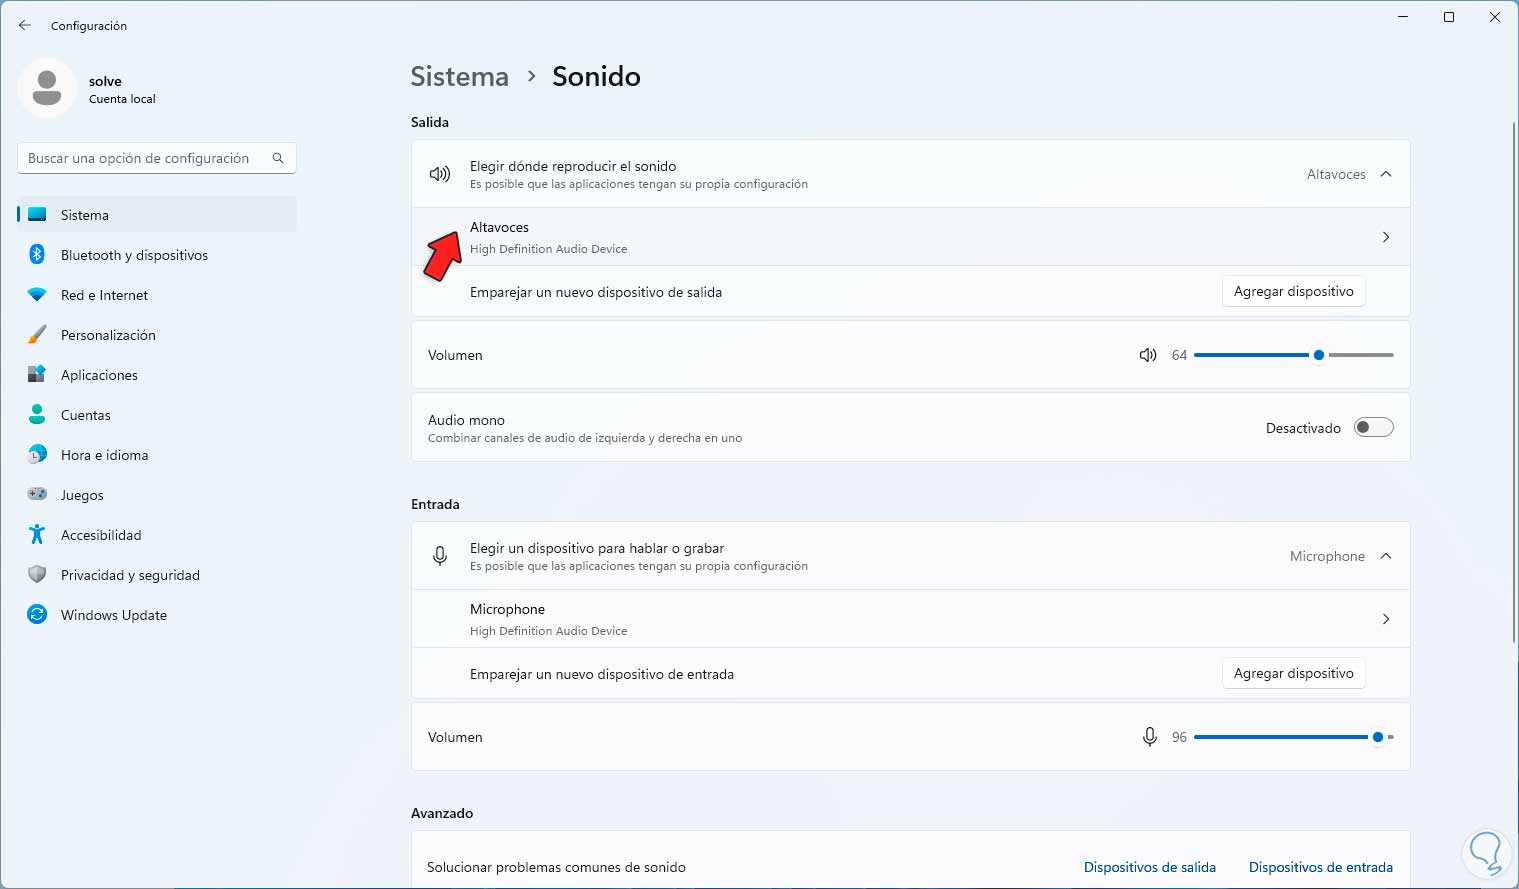
Step 3
Now we click on "Test" located in the "Format" section:
11 Configure sound Windows 11 managing the balance
Balance allows us to manage the volume level of the medium on a specific side, we can use a 50/50 or allow one side to handle more volume than the other.
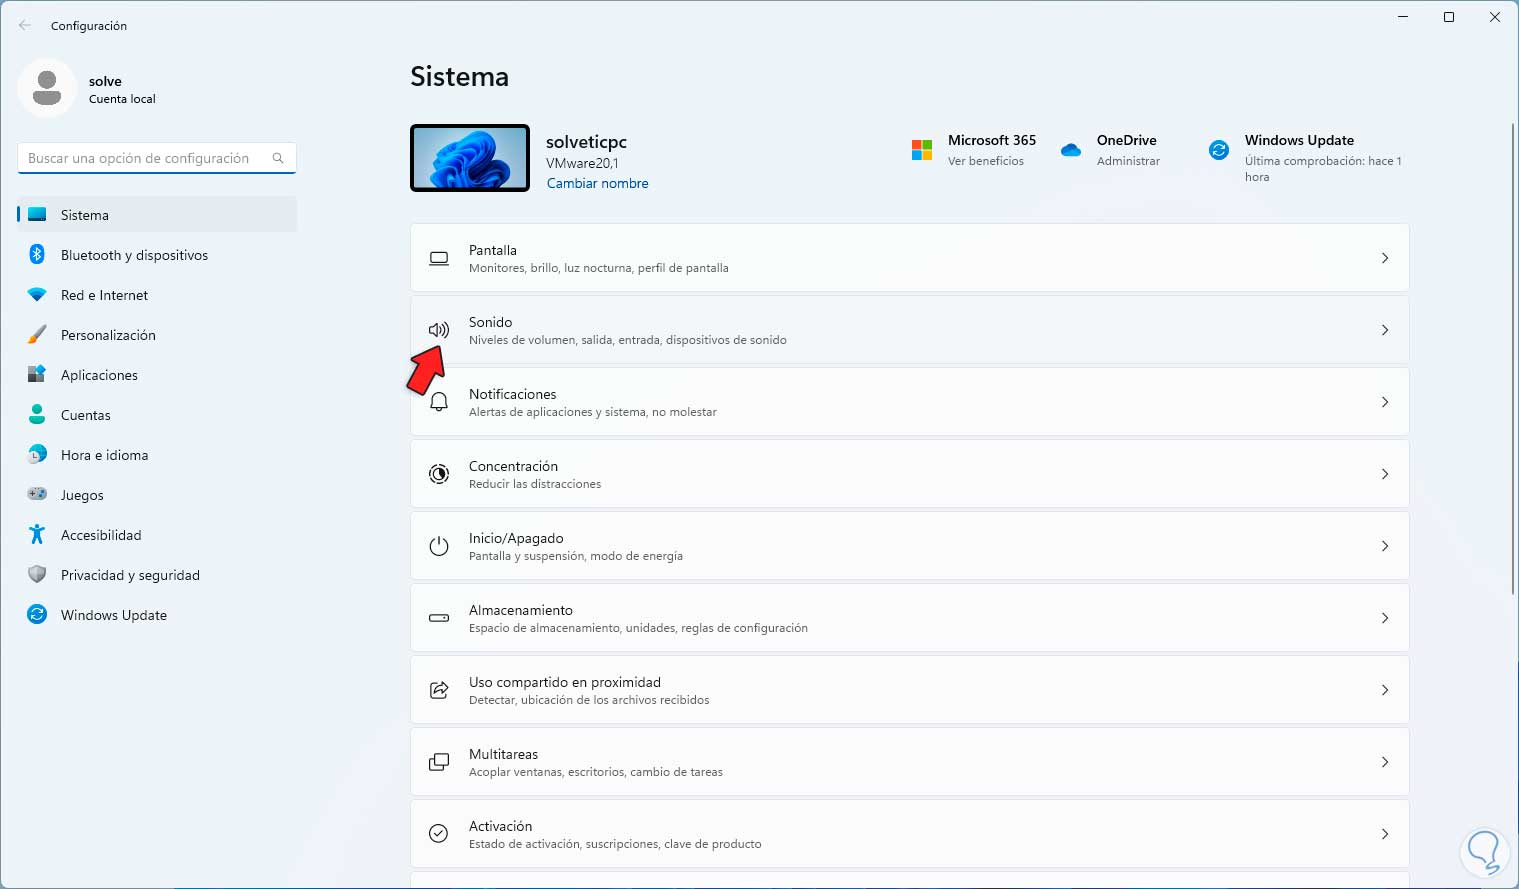
Step 1
If you want to do this we will go to "Start - Settings - Sound":
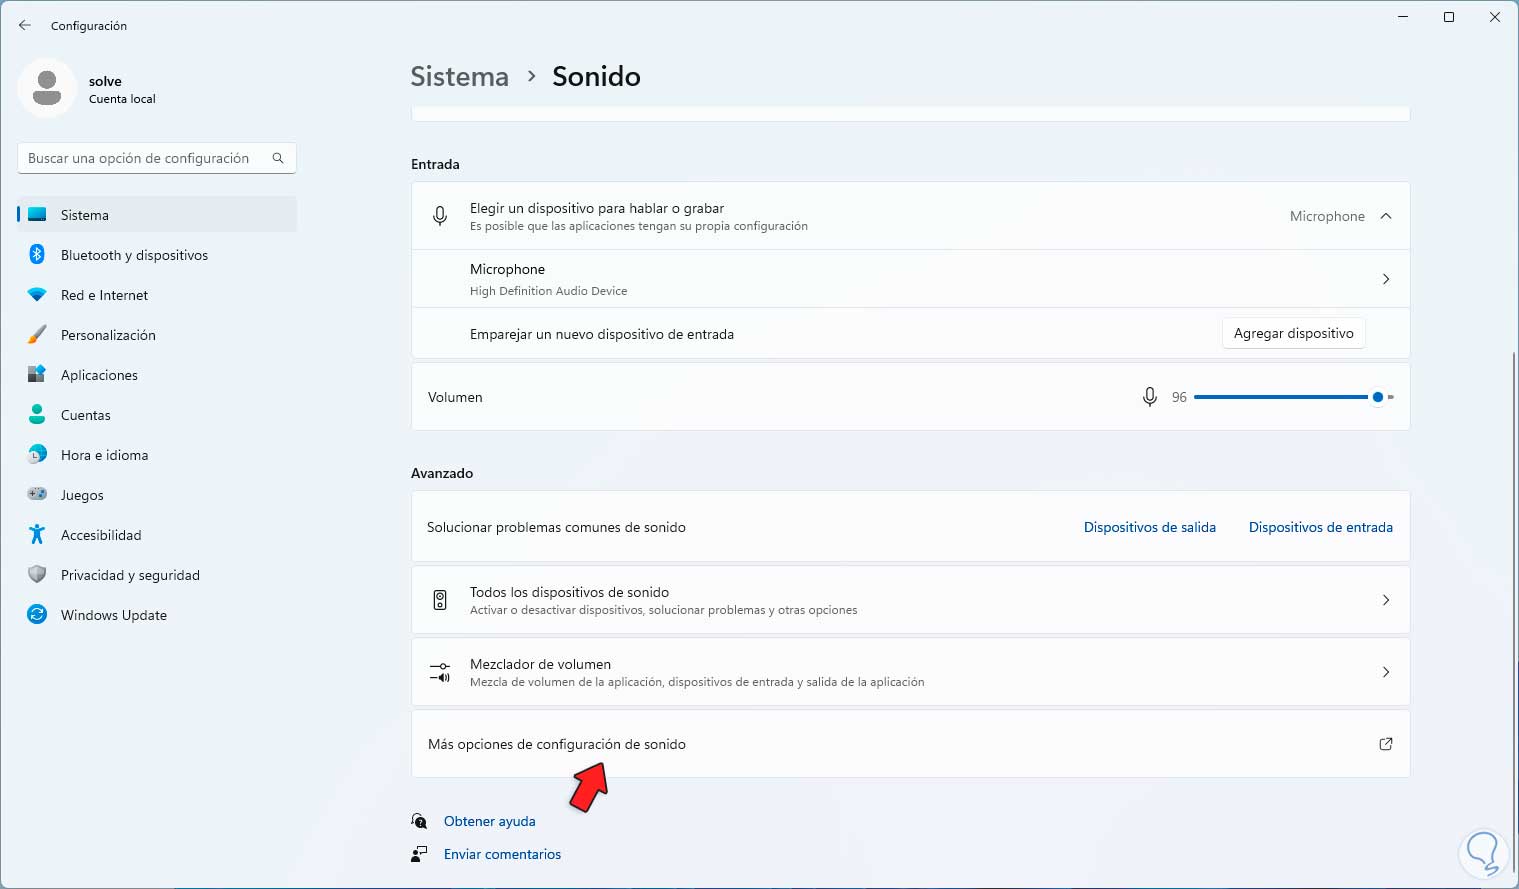
Step 2
We click on "More sound configuration options":
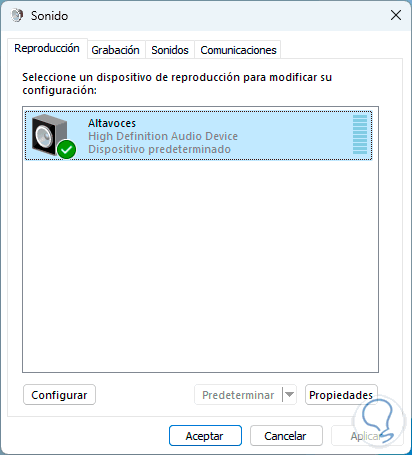
Step 3
In the pop-up window we select the device and click on "Properties":
Step 4
Now we go to "Levels":

step 5
We click on "Balance" and adjust the levels of L, R or the necessary ones:
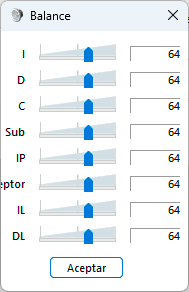
Apply the changes.
12 Configure sound Windows 11 troubleshooting
Finally, it is possible that we have an error with the audio output, Windows 11 integrates a utility to help us detect these anomalies and give them a solution.
Step 1
Let's go to "Start - Settings - Sound":
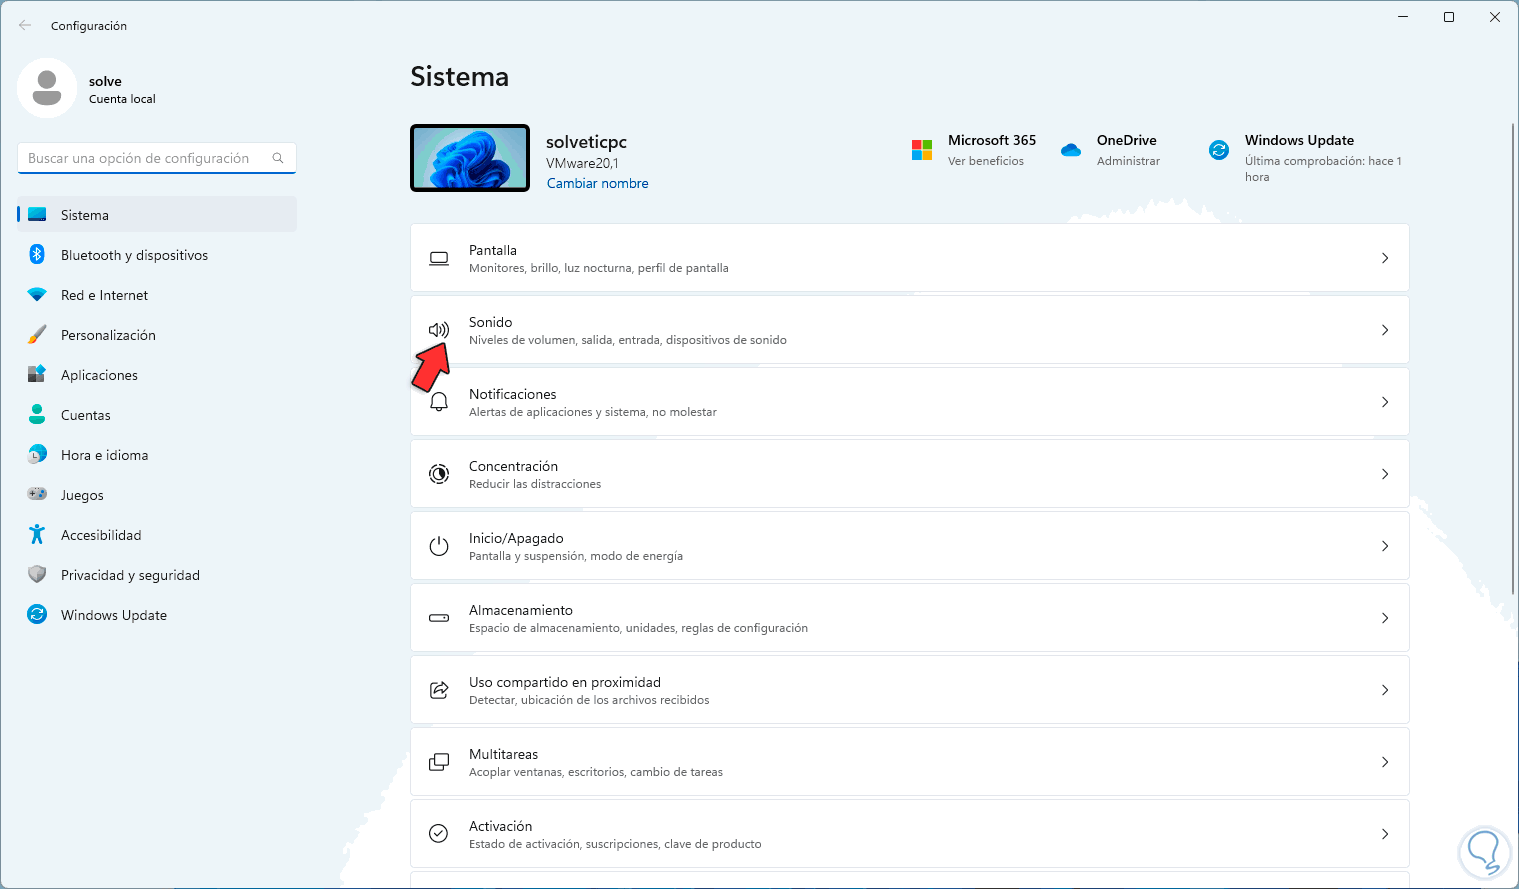
Step 2
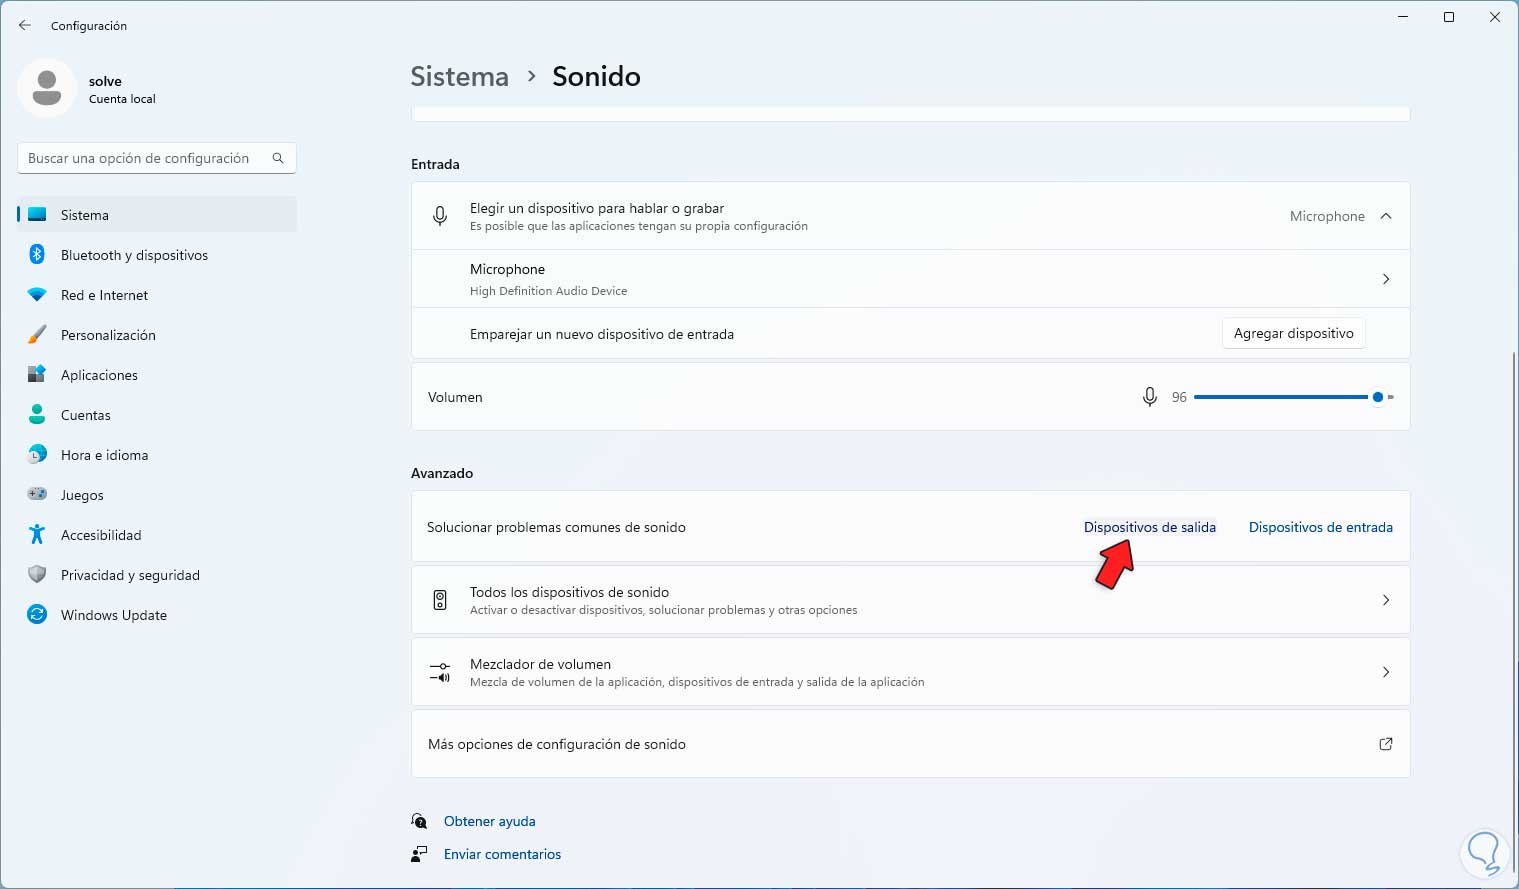
In "Advanced" we click on "Output devices" in "Solve common sound problems":
Step 3
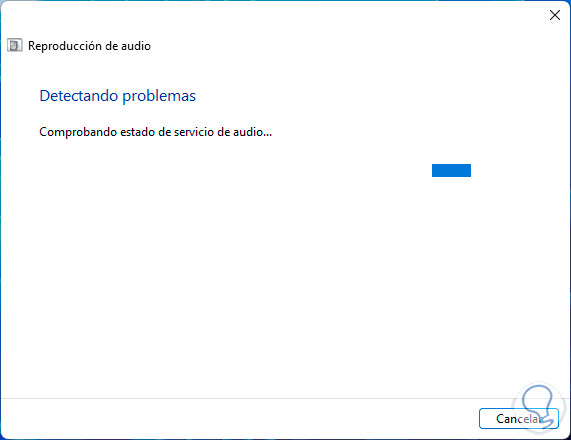
The wizard will open to analyze the various processes and associated services:
Step 4
It will automatically launch suggestions:
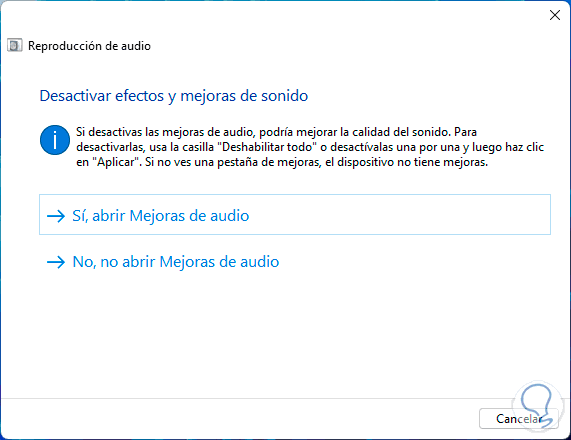
step 5
At the end we will see the following:
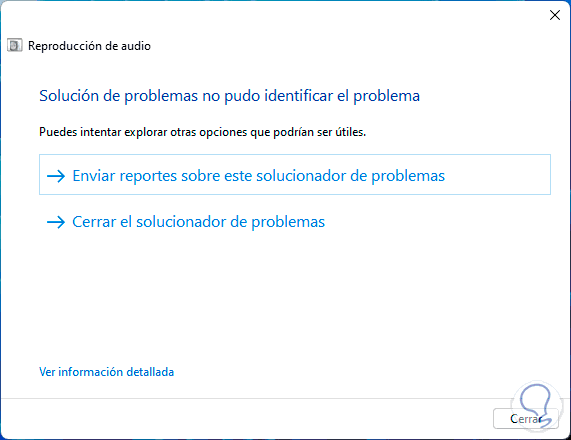
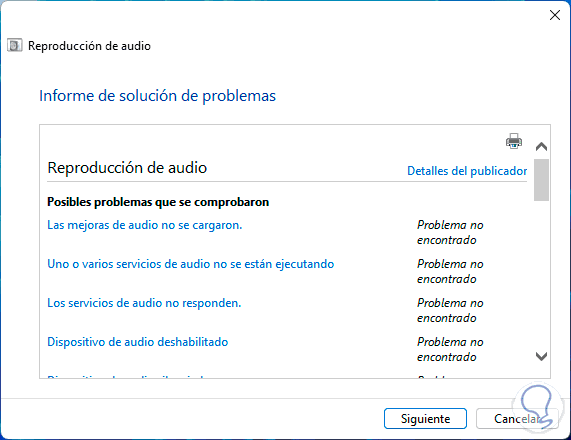
step 6
At the end you can click on "View detailed information" to review the steps analyzed:
We see how sound in Windows 11 goes far beyond just playing sound, there are numerous ways to manage it and enhance its usage options so that each given function can be performed in the most professional manner possible..