Excel 2019 is one of the most complete office applications that Microsoft has developed in order to facilitate the work and control of large amounts of data. Thinking about the security and integrity of many of this data, Excel 2019 gives us the opportunity to protect both the cells and the sheet itself from unauthorized editions. This is a security aid since a vulnerability in the contents of a workbook in Excel or a badly entered data can lead to the fact that the whole structure worked is badly done affecting our productivity and incurring time that can be used for other tasks ..
If we restrict the options of our document within Excel 2019 we can improve the security of our work by preventing other users from modifying what we have done. They are interesting options when it comes to important documents that we don't want to be changed since your information is really relevant. With these protected editing options we will prevent damage to our data and we can transfer it without problem.
TechnoWikis will explain how to add a new protected worksheet in Excel 2019..
To keep up, remember to subscribe to our YouTube channel! SUBSCRIBE
Add a sheet with restricted edition in Excel 2019
Step 1
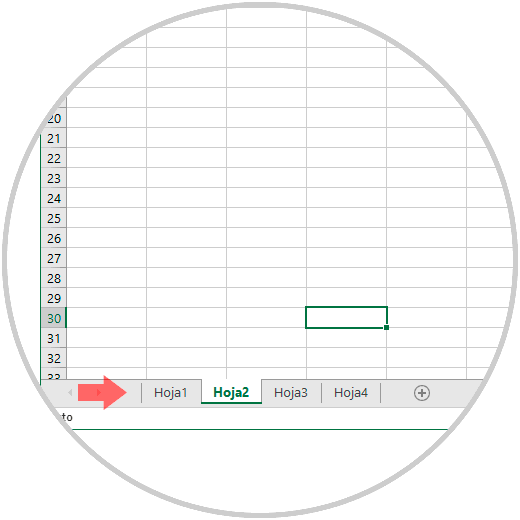
By default, when we work on a new Excel 2019 workbook, the first sheet will be cataloged as “Sheet 1â€, to add more sheets to that book just click on the + sign located at the bottom and more sheets will be added following the Sequence Sheet 2, Sheet 3, etc:
Step 2
We can right click on the available sheets to carry out tasks such as:
- Move or copy it and more actions.

Step 3
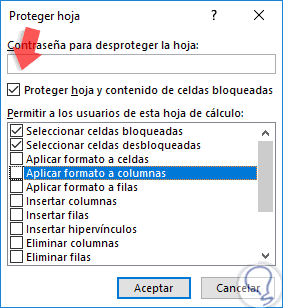
For this tutorial we will focus on the action of protecting the sheet, for this we select the sheet to be edited, right click on it and select the option “Protect sheet†and the following wizard will be displayed:
Step 4
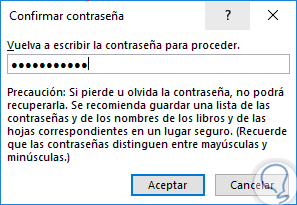
There we must enter the password with which the cell edition will be unlocked in the “Password to unprotect the sheet†field, we must validate that the “Protect sheet and contents of locked cells†box is active and in the other cells we can define the actions that users can carry out on the selected sheet, once defined, click on the "Accept" button to apply the changes and we will need to confirm the assigned password:
Step 5
Again click on "Accept." Based on the actions that we have defined, for example, to prevent the formatting, we can see that if you right-click on any cell of the protected sheet these formatting options will not be active:
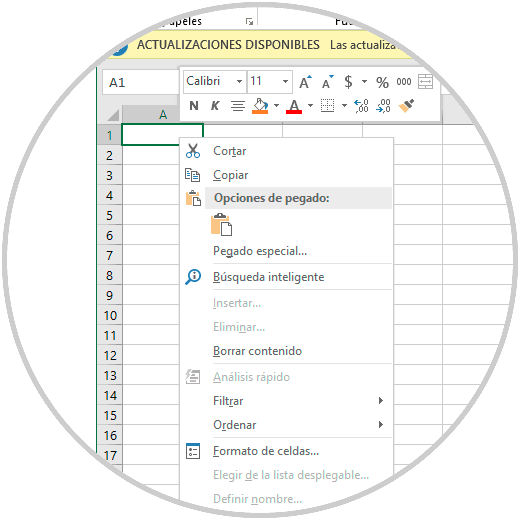
Step 6
Similarly, if we try to make any changes we will see the following message:

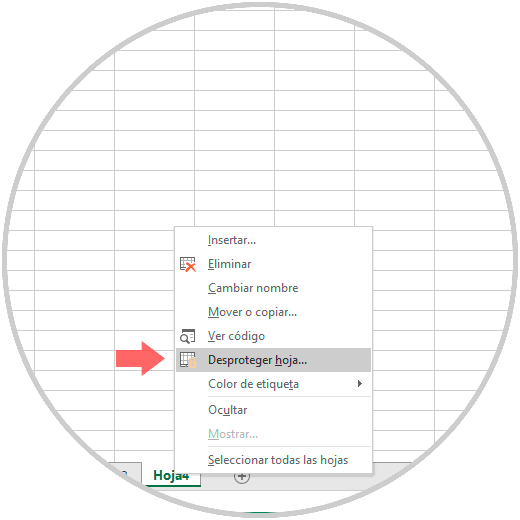
Step 7
To unprotect the locked sheet, we must right click on the protected sheet and there we select the option "Unprotect sheet":
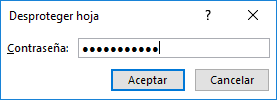
Step 8
Now, in the pop-up window, we must enter the password we have set to complete the process. Click on Accept and in this way the options will be enabled again to carry out the necessary actions in the Excel 2019 sheet.
In this way Excel 2019 gives us the opportunity to add and protect spreadsheets in order to prevent the entry of erroneous information or changes not defined in them.