Among the different administrative tasks that we must carry out in Linux systems, one of the most outstanding is the monitoring of network traffic ; since through it we can transfer much more comprehensive and complete processes , roles and other parameters of the server and a traffic that is being affected will have a negative impact on the entire infrastructure created..
Although there are several tools developed for network monitoring, TechnoWikis will talk about one in particular whose mission is to offer the best network monitoring services such as ntopng.
What is ntopng?
Ntopng has been developed as a utility focused on analyzing network traffic through constant monitoring of network usage. The ntopng utility is based on libpcap and a portable design has been written to be executed on all Unix, macOS and Windows platforms.
Its web interface offers a simple and encrypted solution to access traffic information both historically and in real time..
Ntopng features
Among its most outstanding features are:
- It will be possible to monitor and obtain real-time performance reports, network and application latencies, round-trip time (RTT), TCP statistics with details of retransmissions, obsolete packets or packet loss, and bytes and packets transmitted .
- It will be possible to classify network traffic using various criteria such as IP address, port, L7 protocol, performance, autonomous systems (AS) and many more.
- It displays the real-time network traffic and active hosts of that network.
- Support for MySQL, ElasticSearch and LogStash to carry out export tasks of the monitored data.
- SNMP v1 / v2c support and continuous monitoring of SNMP devices.
- It allows you to identify HTTP traffic using the characterization services provided by Google and HTTP Blacklist.
- Full support for IPv4 and IPv6.
- Stores persistent traffic statistics on disk to facilitate future exploration and access to hosted data.
- It generates several network metrics, including performance and application protocols.
- You can geolocate and superimpose hosts on a geographic map.
- It will be possible to analyze IP traffic and route it according to the source or destination.
- Supports creating network traffic statistics in HTML5 / AJAX formats.
- It has an alert engine to capture anomalous and suspicious hosts thus increasing security.
1. How to install ntopng on Ubuntu 18.04 Linux
Step 1
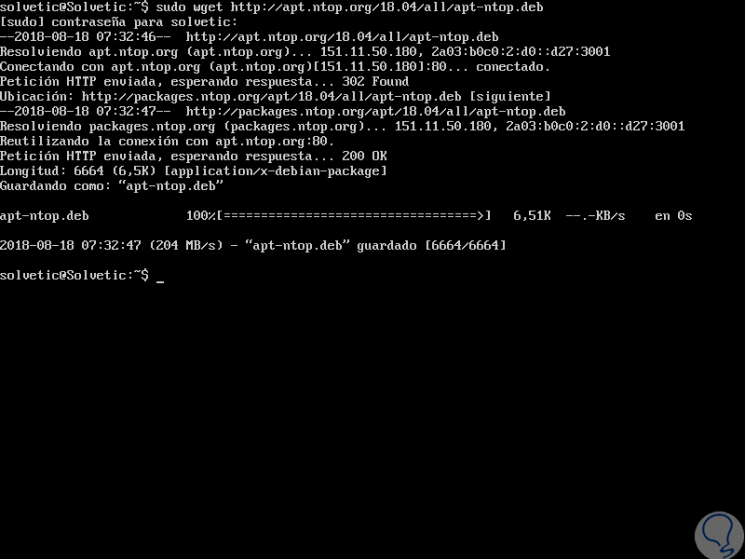
By default, ntopng is not available in the default Ubuntu 18.04 repository. For this reason it will be necessary to install the ntopng repository which can be downloaded and installed with the following command:
sudo wget http://apt.ntop.org/18.04/all/apt-ntop.deb
Step 2
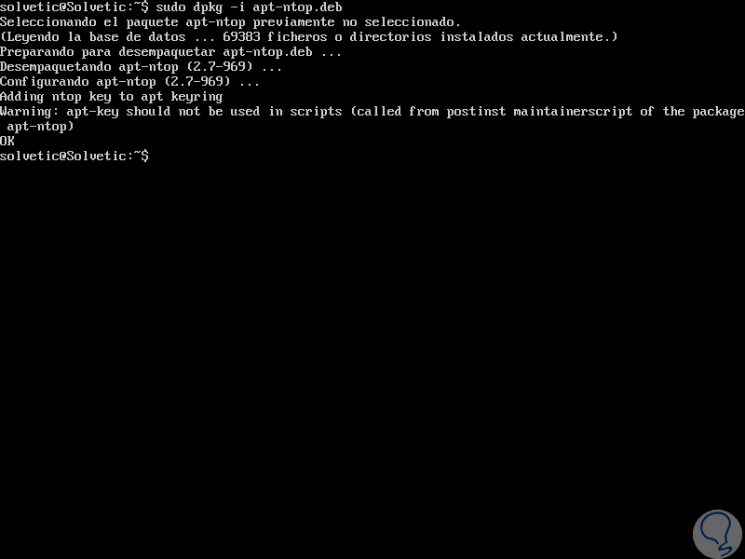
We proceed to its decompression:
sudo dpkg -i apt-ntop.deb
Step 3
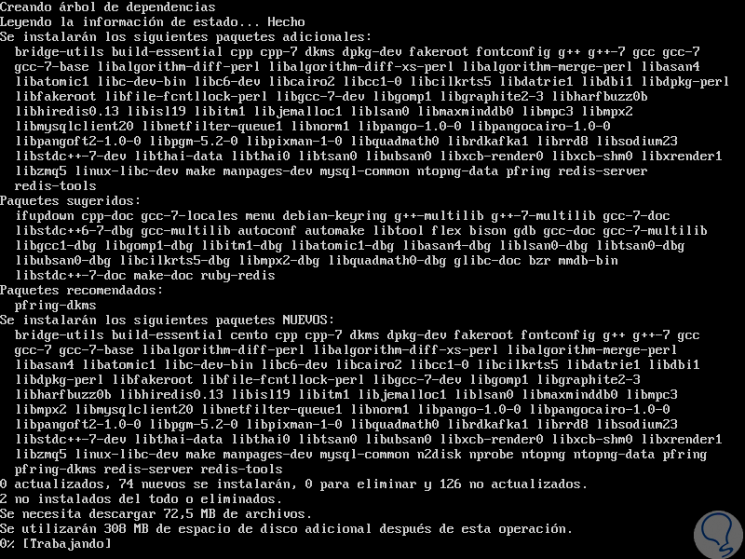
As soon as the repository is installed, we will update the repository and install ntopng using the following command:
sudo apt-get update -y sudo apt-get install pfring-dkms nprobe ntopng n2disk cento -y
2. How to configure ntopng on Ubuntu 18.04 Linux
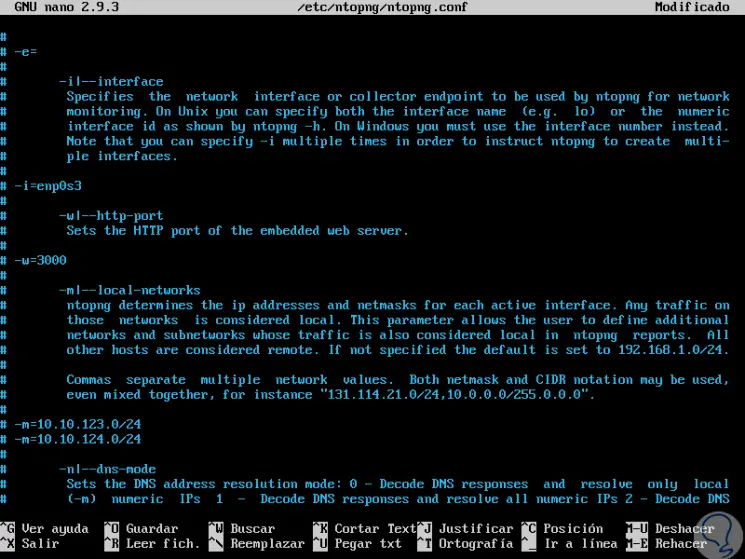
After installing ntopng, we will modify the default configuration file of the utility which is located in the /etc/ntopng/ntopng.conf directory:
sudo nano /etc/ntopng/ntopng.conf
In the open file we will locate the following section:
-G = / var / run / ntopng.pid
In it we define the following:
## Specifies the network interface or collector endpoint to be used by ntopng for network monitoring. -i = enp0s3 ## Sets the HTTP port of the embedded web server. -w = 3000
Note
In the field -i enp0s3 we must enter the name of the current network adapter of each server.
We save the changes using the key combination:
+ O Ctrl + O
We leave the editor using:
+ X Ctrl + X
Step 2
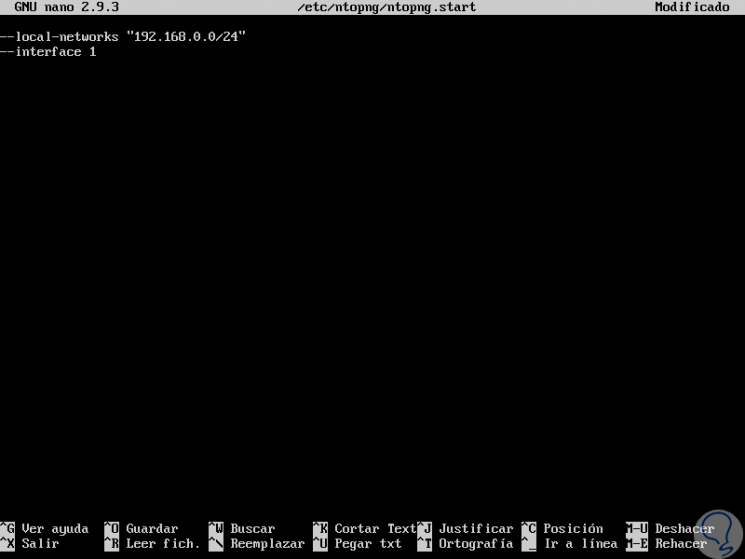
Now, let's create an ntopng.start file:
sudo nano /etc/ntopng/ntopng.start
In it, we will paste the following:
--local-networks "192.168.0.0/24†(Enter the range of IP addresses to be monitored) --interface 1
Again we save the changes using the keys:
+ O Ctrl + O
We leave the editor using:
+ X Ctrl + X
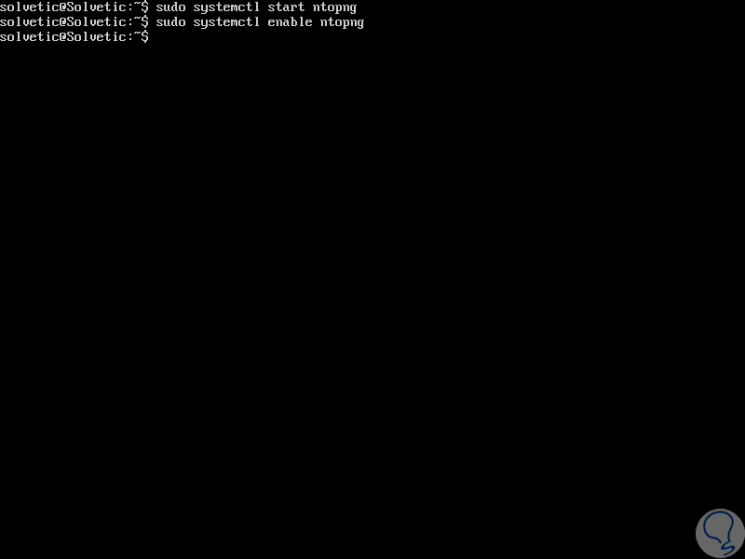
We restart the service and enable it to start from the beginning with the following commands:
sudo systemctl start ntopng sudo systemctl enable ntopng
3. How to access ntopng on Ubuntu 18.04 Linux
Step 1
Now, we will go to a browser and execute the following syntax in the URL bar:
http: // Server_IP: 3000
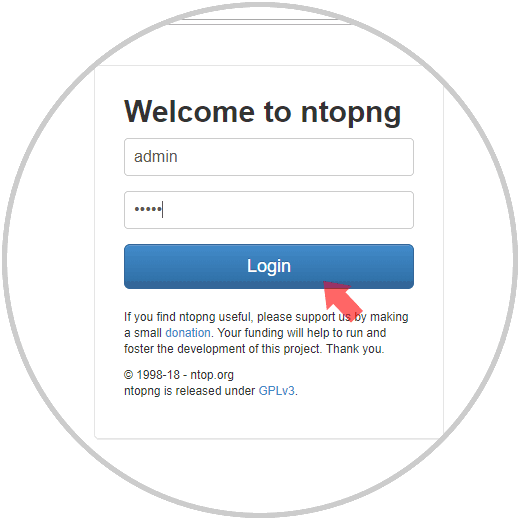
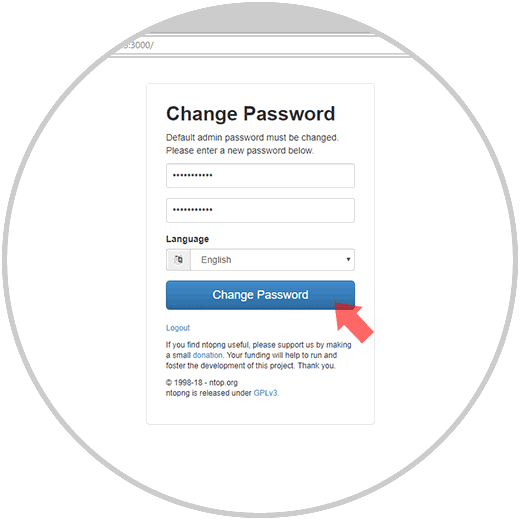
Step 2
There we will enter amine both as username and password, pressing "Login" requires the change of password. Click on "Change Password" to apply the changes.
Step 3
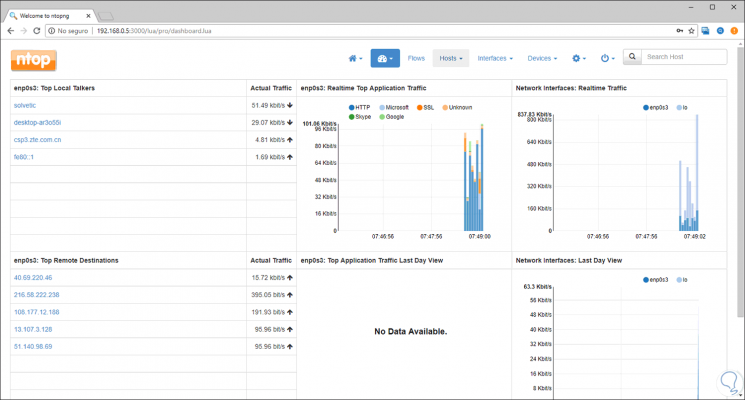
This will be the initial ntopng environment:
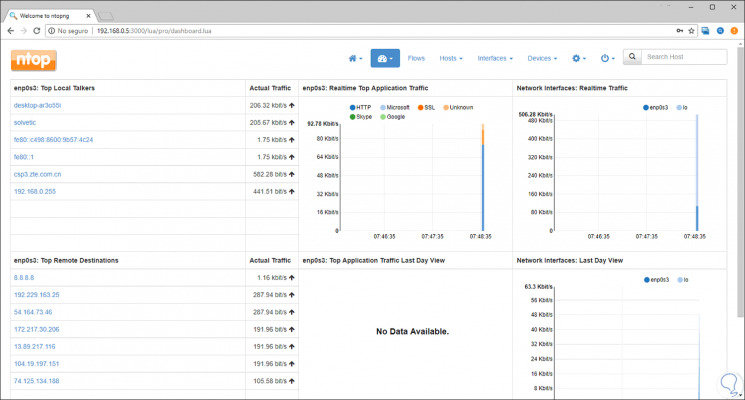
First, we can see details such as:
- Network interface traffic.
- View for days, weeks, etc.
As soon as we start using the network, we can see its use in action:
Step 3
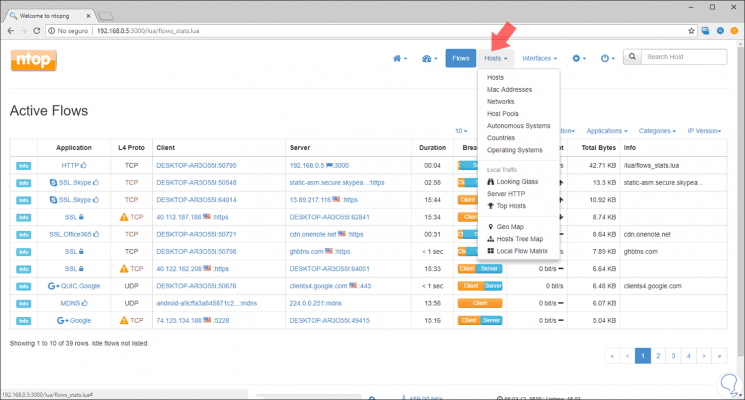
Now, we have some menus such as:
Flows
This menu allows us to access a protocol view where we will see activation details, server, bytes used, general information and more:

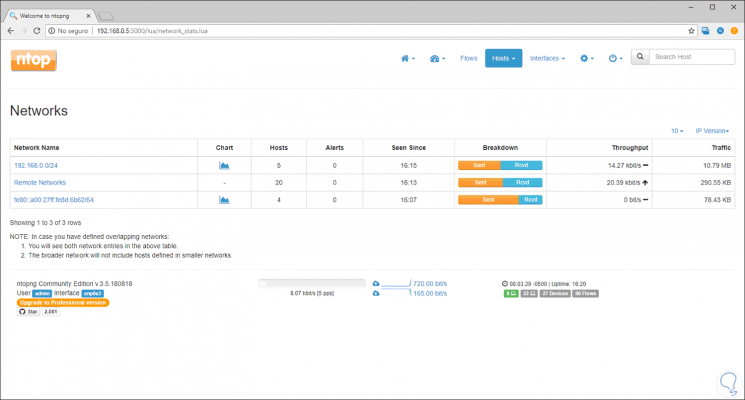
Host
From this menu it will be possible to access detailed information of the equipment in the network, MAC addresses, networks, HTTP servers, events, etc:
When selecting any of these options we will see specific details:
Interfaces
In this menu we find the various network interfaces configured.
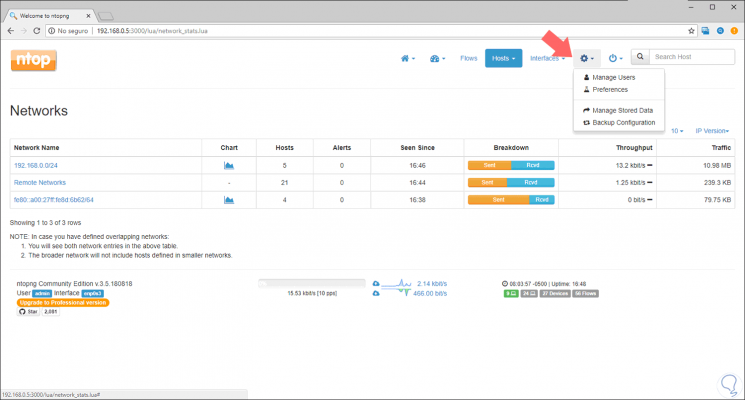
We have a "configuration" menu (gear icon) from where it will be possible to configure language (English, Italian to German), preferences, users, etc:
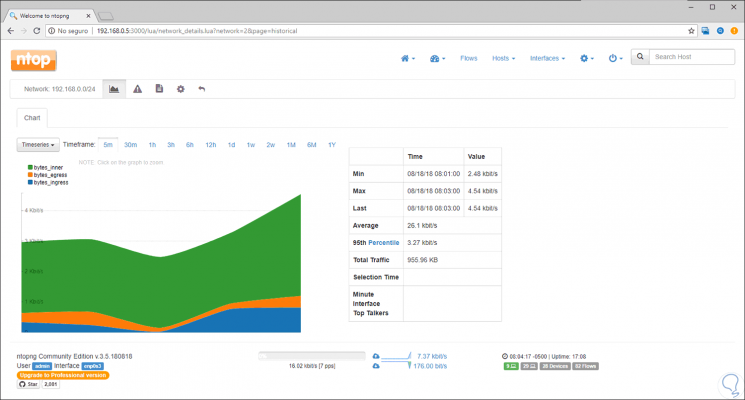
In one of the display options we can click on the graphics to access much more detailed content:
In this way, ntopng is an integral solution for the complete monitoring of network traffic.