As we know well one of the most fundamental hardware elements in any computer and for any operating system is the hard disk , which regardless of its technology (HDD or SDD), play a role far beyond the simple storage of information since they are one of the most important parts and to take into account the computer due to the additional functions of great importance they fulfill and the role they play in the operation of the equipment. Regardless of the version we are running, we will need at some time to do repair work on our disk. If you have macOS Mojave you should know that you have the same procedure to repair disk and repair file system in macOS Catalina and thus avoid having problems on our Mac..
The operating system, applications and programs to be used are installed on the hard disk and this can be used as an element to create backup copies, which increases its current use. It is true that hard disk technologies have been changing over the years, to the point that today we have SDD (Solid State) hard drives which, although they have less capacity, have a power of reading and writing tall. This allows the startup and shutdown of the system to be optimal, that access to the files is ideal and that in general all performance is optimal, but it is true that this is no guarantee that at some point the hard drive is susceptible To some kind of mistake .
Some failures that alert us to the care of our hard drives are
- Some applications close unexpectedly or crash
- A file is damaged without just cause
- Some external device does not work the right way
- The computer does not start or restart itself
In addition, there are many reasons why our hard drives in macOS Mojave can present any symptoms that require our action..
Some associated causes are
- Virus or malware involvement
- Bad administration or configuration of processes and services
- Multiple applications of large consumption of open resources
- General damage to the disk at the hardware level
Now, apart from the hard disk in Mojave, there is another fundamental element for the execution of applications and general system behavior and it is the file system.
File systems in macOS Mojave have the following essential functions
- Provide a way to separate data from the unit into individual elements, which are the files.
- Establish a way to store data about these files with details such as file names, permissions and other attributes.
- The file system generates an index (which is a list of the files of the unit and where they are located in that unit), so that the operating system is able to see what is in the selected unit and thus prevent it from doing a global search on the unit.
Each file system has different ways of managing the information and in the case of macOS Mojave, the APFS file system (Apple File System) has been introduced by default, which comes on solid state drives, has a solid encryption, better Space management, supports snapshots, offers a much faster and more secure directory size change and, in addition to this, its file system fundamentals have been improved..
Each volume within an APFS container has its own APFS format as
- APFS (upper / lower case)
- APFS (upper / lower case, encrypted).
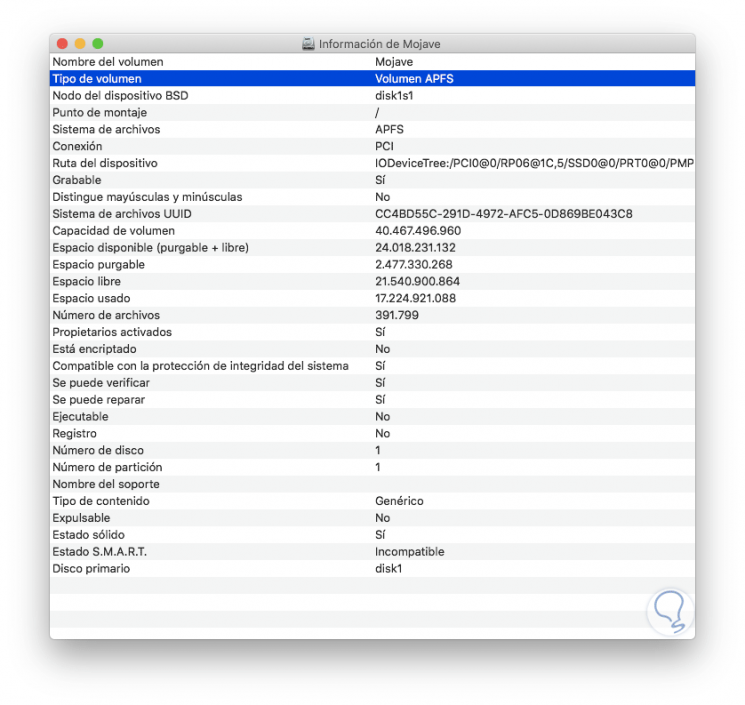
To check the file system in macOS Mojave we will have to go to "Disk Utility" and there click on the "Information" icon
At specific times, it is possible that our file system will present some errors that prevent the optimal use of files and system content in general.
Some of the codes that we can see associated with the file system are:
dsAddressErr
Routing error
dsChkErr
Range Check Error
dsIllInstErr
Invalid Instruction
dsOvflowErr
Overflow error
dsPrivErr
Violation of privileges
dsLoadErr
Segment Loader Error
dsIOCoreErr
I / O core error
dsFPErr
Floating point error
dsBadLaunch
Unable to open a file
dsFSErr
The file system map has been deleted
negZcbFreeErr
Negative ZcbFree value
dsMBarNFnd: System Error
MBDF not found
In addition to this some file system errors will be related to the general behavior of the system.
Fortunately, we have a number of practical options to monitor and repair our hard drives in macOS Mojave before calling technical support which, if we have lost the warranty, can be very expensive and TechnoWikis will analyze them in detail in this tutorial.
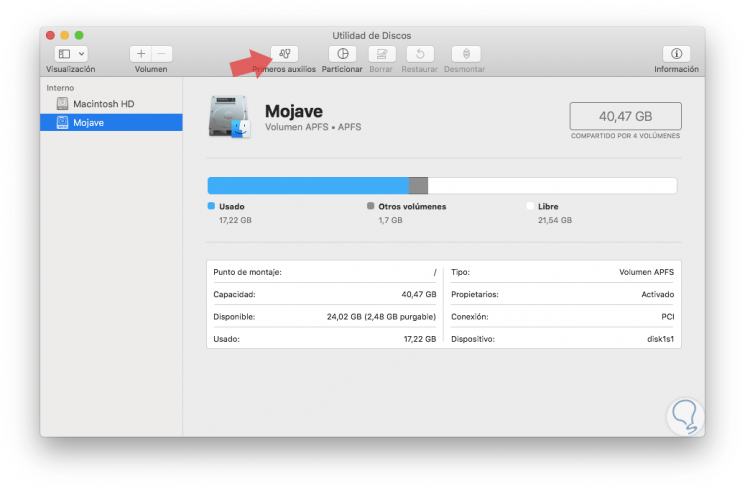
1. Run the "First Aid" option of macOS Mojave to repair disk and file systems
macOS Mojave has a functionality called "First Aid", which we can apply on a hard disk. This First Aid function is part of the Disk Utility and is responsible for checking the partition maps of the selected disk, runs some additional checks, and then takes care of checking each volume.
In case of executing “First Aid†on a volume, Disk Utility will check all the content in that volume currently.
Step 1
To access First Aid in macOS Mojave we have the following options:
Option 2
Entering the term utility in Spotlight and selecting the corresponding option
Option 3
Using the following key combination:
+ ⌘ + U ⇧ + ⌘ + U
In the displayed window select "Disk Utility"
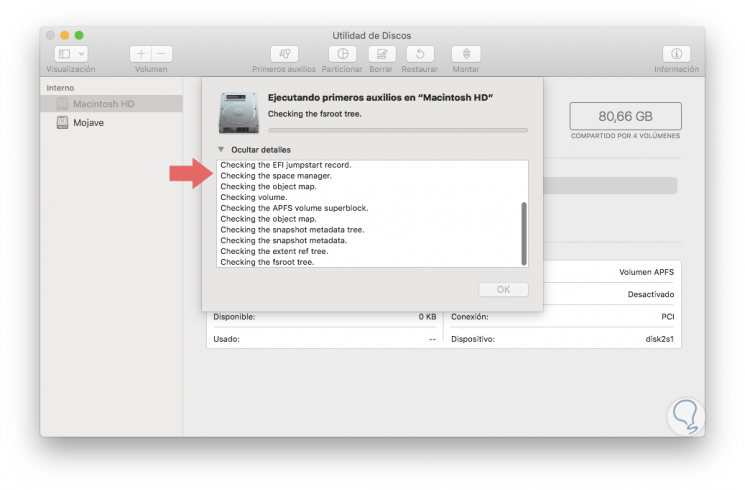
In the displayed window we select the disk or volume to analyze and click on the "First Aid" button located at the top:
Step 2
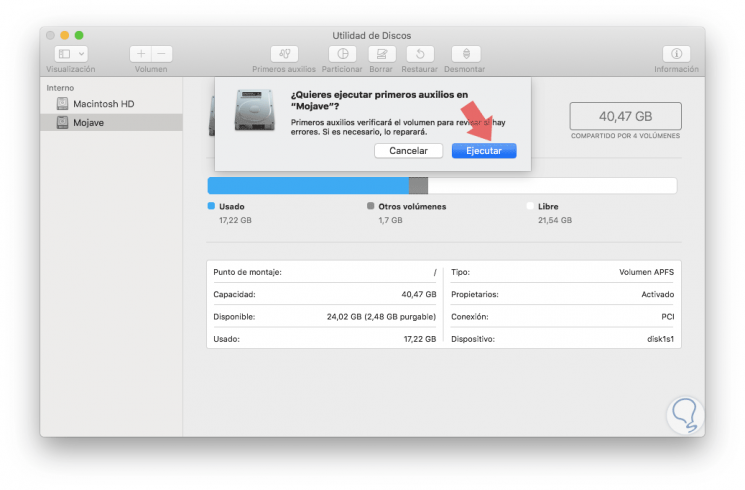
The following message will be displayed, click on the "Execute" button
Step 3
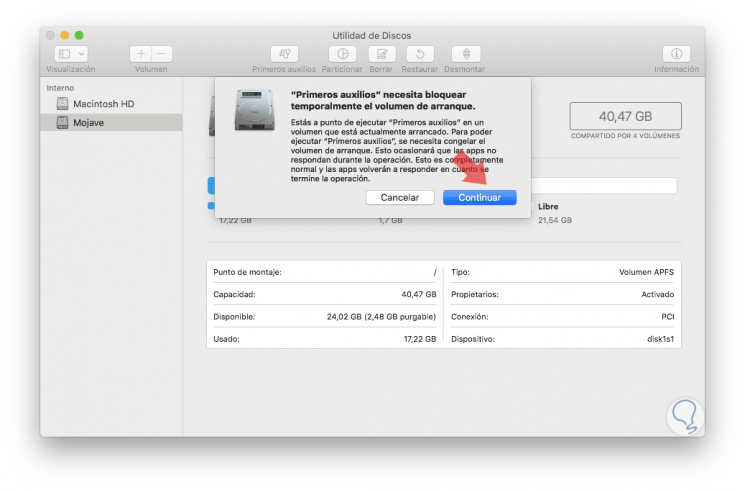
And if we are carrying out this action on the current hard disk of the session, we will see the following message. This implies that during the execution of First Aid we will not be able to use the system.
Normally, if we apply this on another volume than the current one, we can see the step by step actions taken by the utility:
Step 4
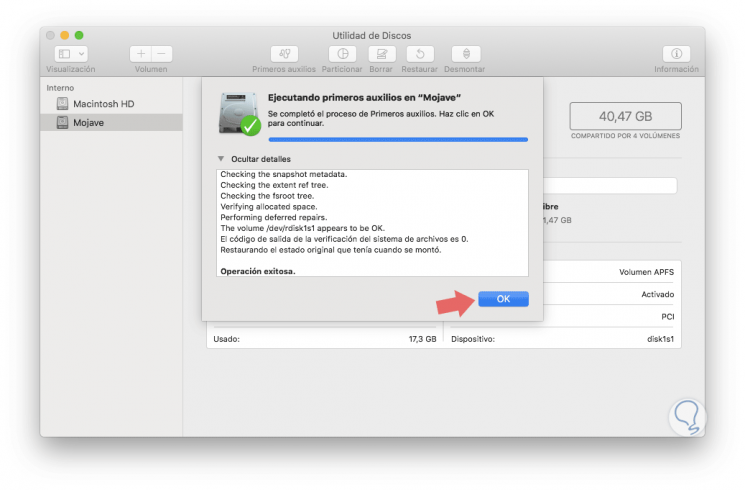
Once the process is finished we will see the following result. As we can see, the state of the disk is optimal and if an error is generated it will be displayed there to take the necessary support measures.
2. How to run First Aid in recovery mode to repair disk and file system in macOS Mojave
In some cases, macOS Mojave does not fully repair errors that are displayed on the disk using the First Aid utility with the normal user session. This is due to the fact that when accessing the macOS Mojave operating system in the traditional way, First Aid is not always in the ability to repair the errors that the disk may have since Mojave processes and services are active.
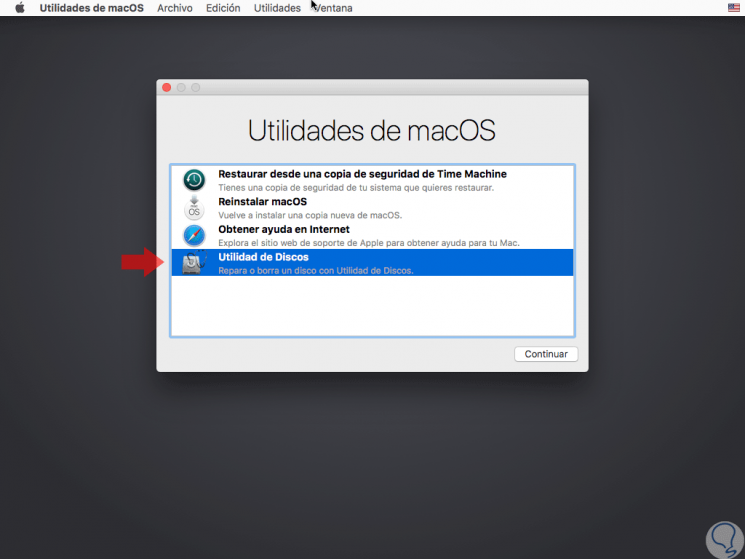
Instead, we have the option of accessing in the "Recovery" mode of macOS, which is an integral part of the system at the level of recovery aspects, with this recovery method we can make use of utilities to recover the system from multiple problems software or perform other actions on the Mac such as running the terminal analyzing the disks, getting online help and more.
To enter this recovery mode in macOS Mojave we must turn on or restart the computer and during this startup process press and hold the following keys:
+ R ⌘ + R
The following window will be displayed. There we select the Disk Utility option and in the window displayed we follow the steps mentioned above.
3. How to repair the hard disk in macOS Mojave using the FSCK command
Thanks to the fsck (File System Check) command it will be possible to perform a complete analysis of the hard disk to rule out errors and errors.
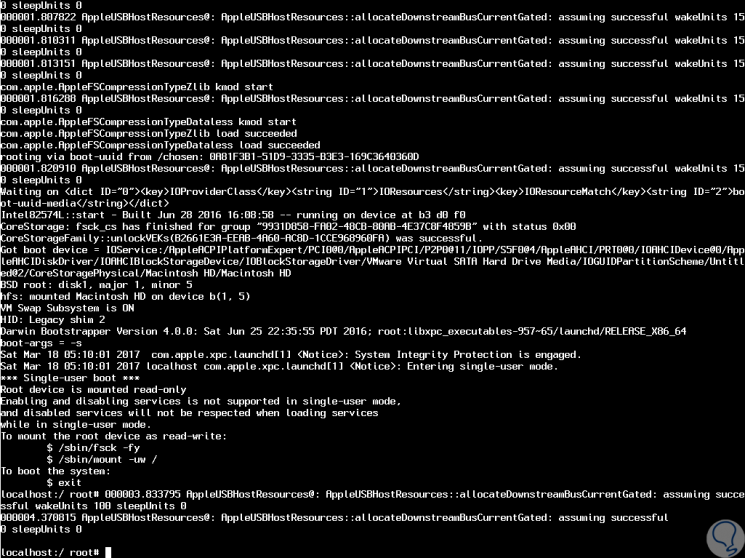
To execute this command in macOS Mojave, it will be necessary to start the macOS Mojave system in single or single user mode by pressing the following keys during the startup or restart of the device:
+ S ⌘ + S
Once we access this mode, we will have the following options to use:
--to
This option automatically repairs errors found in the file system
--n
Report problems without repair.
--c
Find damaged blocks and add them to the list of corrupted blocks of the utility.
--F
Force file system review
--v
verbose, this option generates more information for administration tasks.
--r
Enable interactive mode.
--Y
Confirm all actions to perform
Step 1
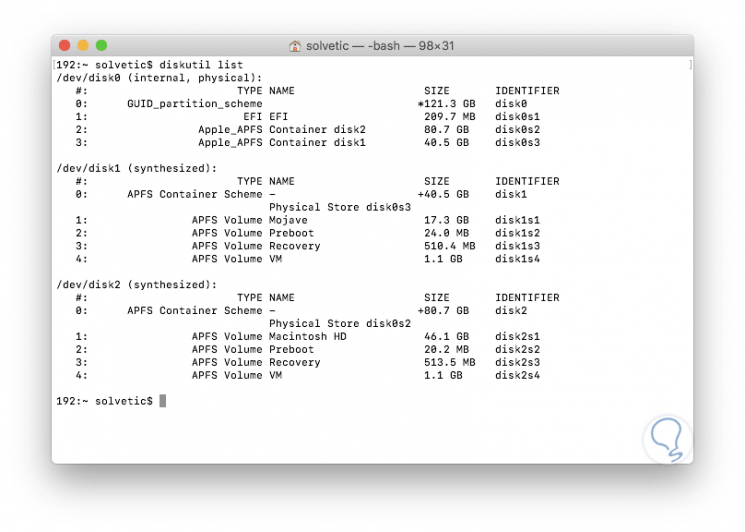
Before accessing this user mode in macOS Mojave, it will be necessary to know with certainty which is the hard disk to analyze, for this we access the terminal and execute the following command:
diskutil list
There we detect the identifier of the hard disk to analyze which has the syntax:
/ dev / disk #.
Step 2
Now we access with the simple user mode and we will see the following:
If we want the fsck command to analyze and repair errors on the macOS Mojave boot disk, we will execute the following command:
/ sbin / fsck –fy
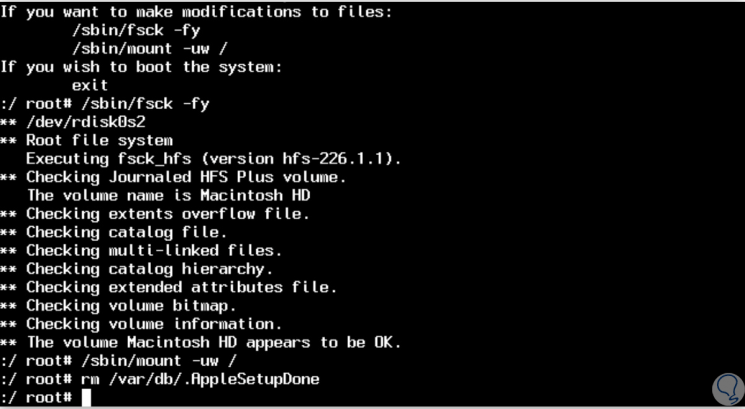
The parameters we have used have been:
F
This option forces you to check the file systems of the selected hard drive
Y
Automatically confirms all FSCK actions to execute
If you want to analyze a particular disk, we will use the following syntax:
/ sbin / fsck_ (File System) -fy / dev / disk #
Example
If we are going to analyze disk 2, we execute the following:
/ sbin / fsck_apfs -f / dev / disk2
Some additional format options are:
fsck_msdos
This option runs on FAT file systems.
fsck_exfat
This option must be used in ExFAT file systems.
fsck_udf
We will use this option in UDF file systems.
fsck_hfs
This parameter can be applied in HFS file systems.
Once the FSCK analysis is complete, we enter the reboot command so that the system is rebooted normally.
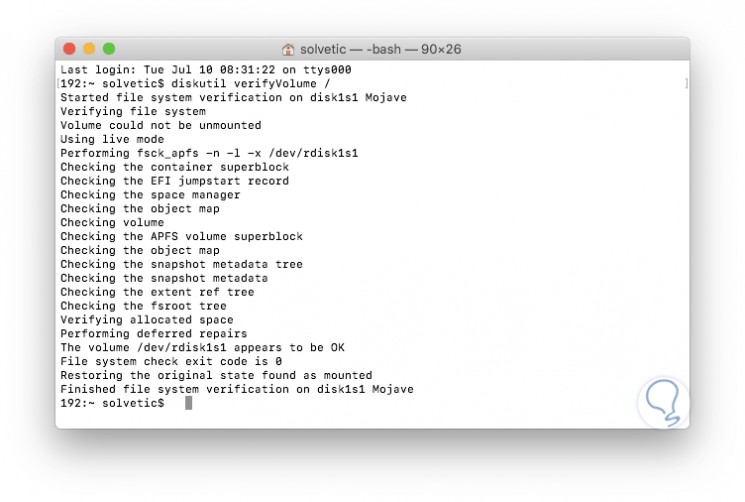
4. How to analyze and repair the hard disk in macOS Mojave using the terminal
This is another alternative offered by macOS Mojave for the analysis and repair of the hard disk.
To do this, we access the terminal using one of the options described above and there we will execute the following syntax:
diskutil verifyVolume [Volume Name]
Remember that the name of the volume is obtained by executing the command:
diskutil list
If we want to analyze the main volume we must execute the following line:
diskutil verifyVolume /
In case any anomaly is detected, we can execute the following command:
diskutil repairvolume /
5. Use third-party applications to repair disk and file systems in macOS Mojave
Another alternative to analyze and repair the disks in macOS Mojave is using special applications for this which provide us with integral solutions for the analysis and correction of errors.
One of these is Stellar Volume Repair which offers a free version at the following link:
Stellar Volume Repair
This application offers us advantages such as
- Hard disk repair and corrupted macOS partitions
- Repair damaged volume directory
- Repair damaged disk permission on boot disk
- Supports repair of damaged or failed encrypted drives
- Allows you to manage journal records in macOS volumes
- Compatible with macOS Mojave
There we select the volume to analyze and click on the "Repair" button to start the process.

6. Use the Internet Help option to repair disk and file systems in macOS Mojave
The macOS Mojave recovery mode called "Get Internet Help" makes use of a combination of code stored in the computer firmware and a network boot image stored on Apple servers in order to start macOS Mojave.
This option works even if we do not have a recovery partition, if that partition does not work ideally or if the unit of the equipment is damaged or not connected.
To make use of this option we must start the equipment and during this process use the following keys:
+ ⌘ + ⌥ + R ⇧ + ⌘ + ⌥ + R
There, an icon with the shape of a world ball and a progress bar will be displayed, when this process is finished it will be possible to access all the macOS Mojave tools available.

With any of the solutions offered by TechnoWikis, it will be possible to recover the optimal and correct operation of our hard drives in macOS Mojave.