Nowadays, connecting to the Internet , either from our PC or from our mobile phone, is a fact that we consider almost essential to carry out many of the daily tasks we perform, whether in our work or daily environment. Checking the mail , searching for information or communicating through an instant messaging service are some of them. This is why Internet networks have taken new directions due to the great growth we see today worldwide of all connections of users and organizations that demand better speeds, more stability and better service quality..
In this world of networking, mobile networks or Wi-Fi are positioned as one of the most used because they are present everywhere: From airports, public transport vehicles, shopping centers and much more, it is difficult to imagine the day of Today a public site that does not have a WiFi network to connect to. This allows all users to have access to connectivity and thus be able to perform their tasks without problems and without the limitation of an Ethernet network.
Mac computers, mostly portable, have Wi-Fi connection as a primary network due to their constant change of location. Connecting to a WiFi network when necessary is something necessary when our computer is not at a fixed point and we need to work with it in different places, but at specific times we can find ourselves before errors that prevent the connection or that, if the connection is established, but of intermittently preventing us from carrying out what we want to do. It is for this reason that today TechnoWikis brings a series of comprehensive solutions to correct various types of Wi-Fi errors in macOS Mojave ..
1. Remove preferences and Wi-Fi networks on macOS Mojave computers to solve WiFi error
By default, by constantly connecting to a Wi-Fi network, macOS Mojave is responsible for establishing and storing it as the preferred network, allowing each time we are in the range of that network, the equipment automatically will connect to her.
This is really useful and practical, but one of the mistakes is that macOS Mojave can host different preferred networks in the system and this eventually leads to an internal conflict since macOS Mojave will try to establish the connectivity process with a network that does not exist Already, your name has been modified or is out of range. To correct this, it will be necessary to remove certain configuration files associated with the preferred W-Fi networks from the system, and thus create a new file of new preferred networks. In this case TechnoWikis advises to create a backup of the system in case any error arises during the process.
Step 1
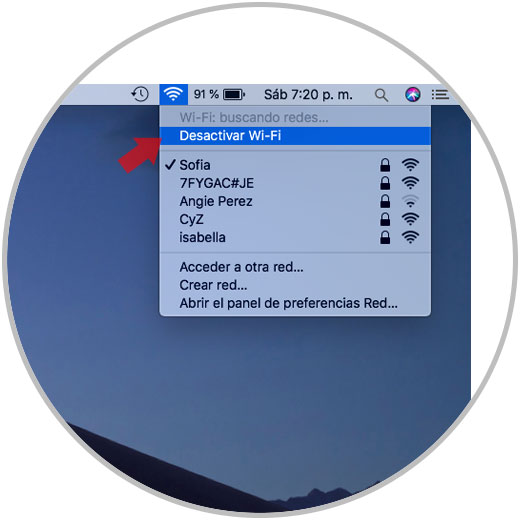
For this we must close any application that is using the network services and then deactivate the current Wi-Fi network by clicking on the Wi-Fi icon located at the top of the screen and in the displayed options select "Disable Wi- Fi ":
Step 2
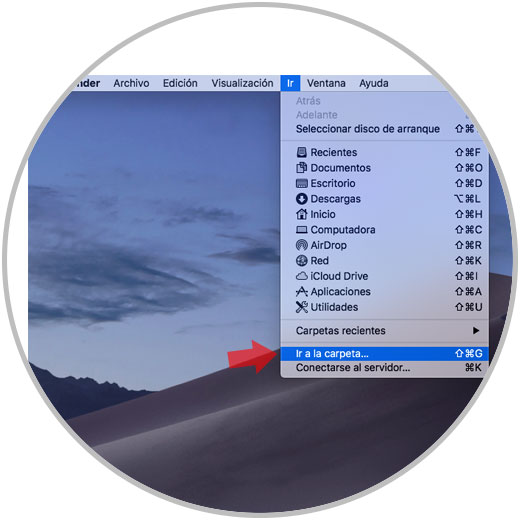
Once the Wi-Fi network is deactivated, we go to the menu:
We can also use the following keys:
+ ⌘ + G ⇧ + ⌘ + G
Step 3
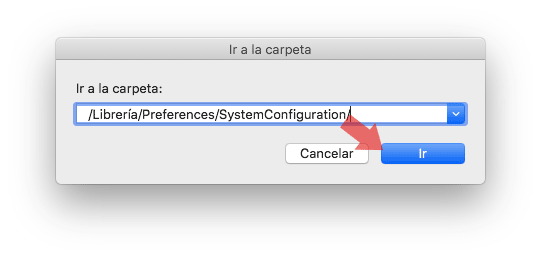
In the displayed window we enter the following:
/ Library / Preferences / SystemConfiguration /
Or we can also enter:
/ Library / Preferences / SystemConfiguration /
Click on the "Go" button
Step 4
In the new window displayed we will find the different Wi-Fi connectivity profiles of macOS Mojave, there we must select and delete the following elements:
- com.apple.airport.preferences.plist
- com.apple.network.eapolclient.configuration.plist
- com.apple.wifi.message-tracer.plist
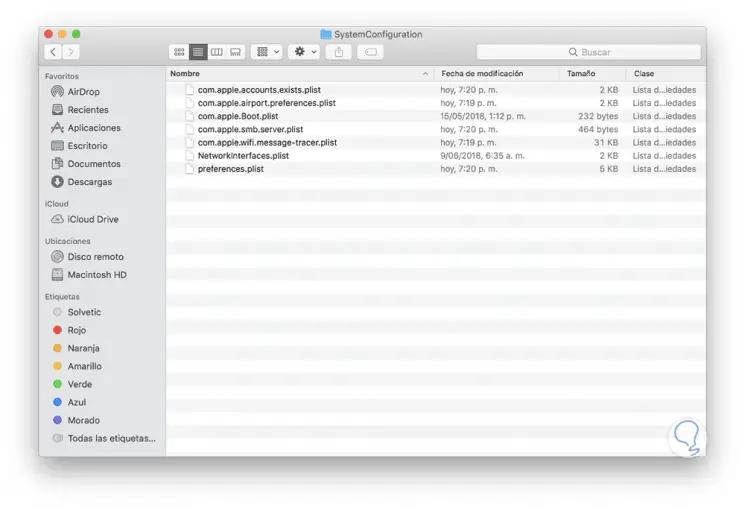
Once this is done we can activate our Wi-Fi network again..
2. Perform a Wi-Fi network diagnosis in macOS Mojave to fix error
macOS Mojave is integrated with a tool that has been developed to monitor the Wi-Fi network for errors and based on these results generate a global result on the state of the network facilitating the detection of errors for subsequent administrative work.
Step 1
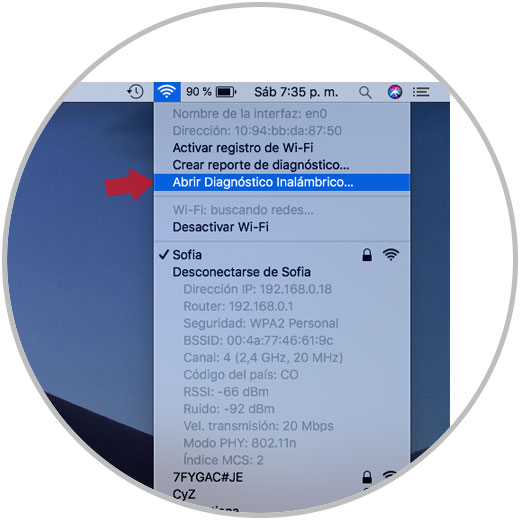
To generate this diagnosis, press the "Option" key and click on the Wi-Fi network icon. There we will select the option "Open Wireless Diagnostics":
Step 2
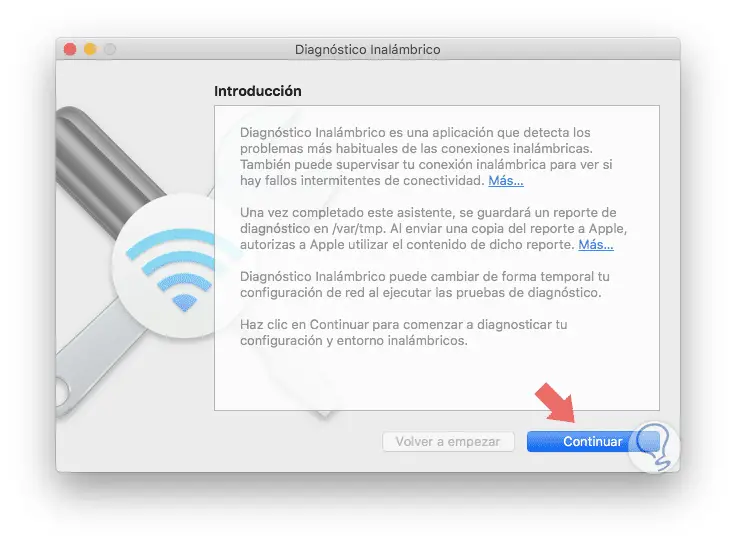
The following wizard will be displayed, click on the "Continue" button:
Step 3
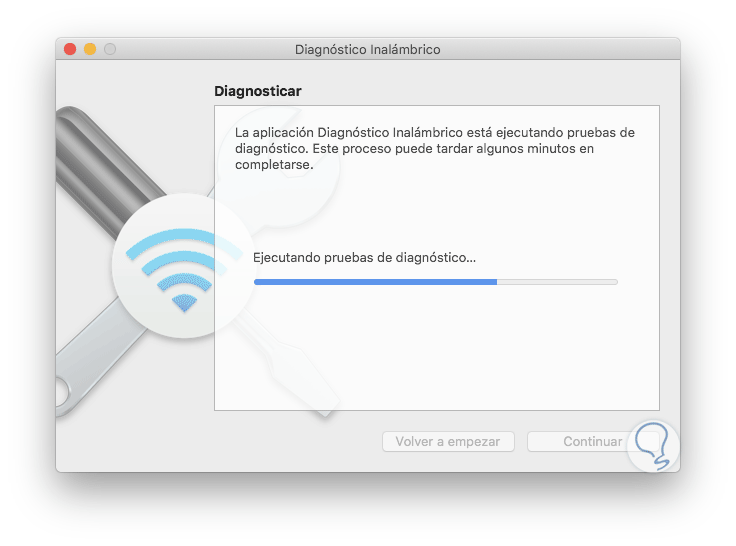
Now you will start a series of tests:
Step 4
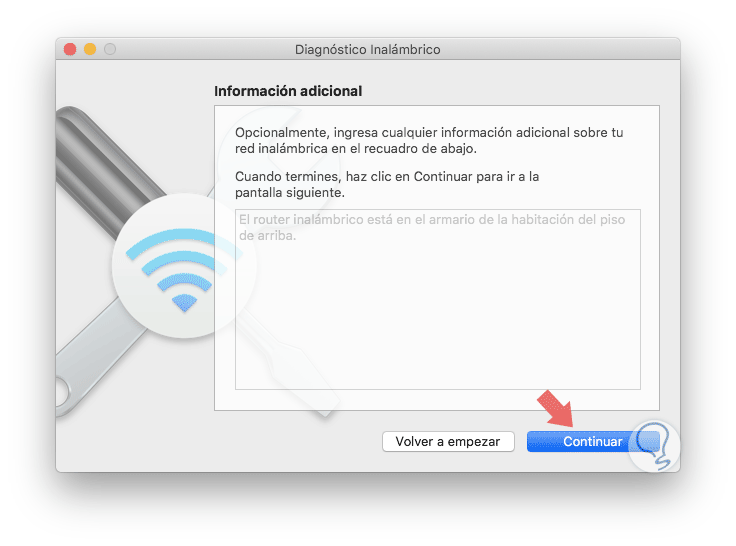
Later we will see the following. There we can add additional information about the network. Click on the "Continue" button
Step 5
The report creation process will begin:
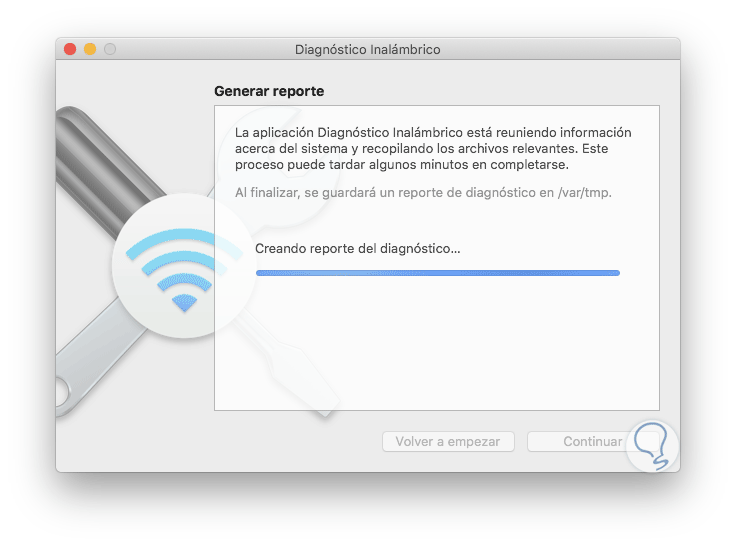
Step 6
Once finished, we will have a series of tips to optimize our Wi-Fi network in macOS Mojave:
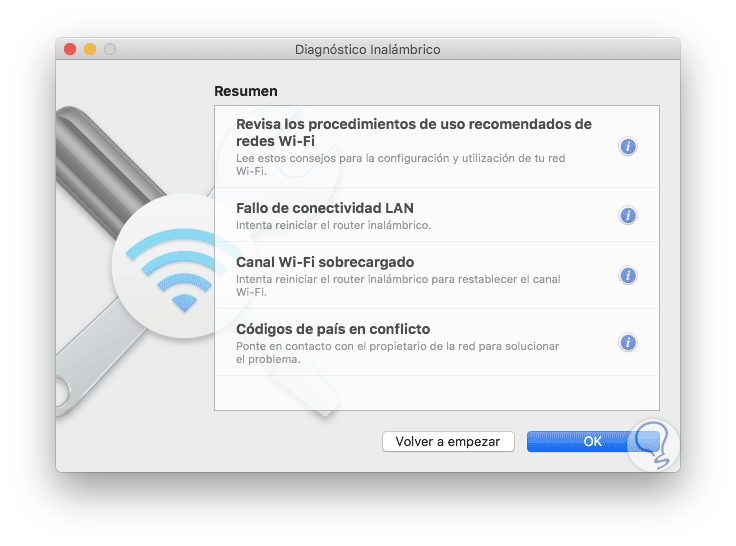
3. Establish a network location by customizing MTU and DNS to solve WiFi error in macOS Mojave
At the network level we can modify some macOS Mojave parameters specifically at the MTU and DNS level with personal values.
What is the DNS?
The DNS (Domain Name Services) is the service through which the names of IP addresses are resolved and the MTU dramatically improves web browsing performance.
Step 1
To configure these elements we go to "System Preferences" where we will see the following. There we click on the "Network" section
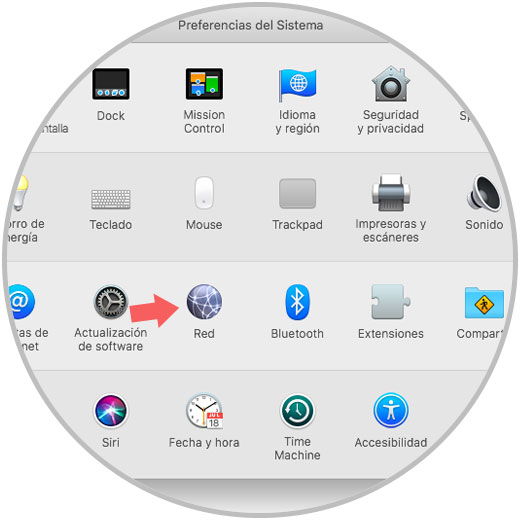
Step 2
In the new window we go to the "Wi-Fi" section and display the "Location" field to select the "Edit locations" option:
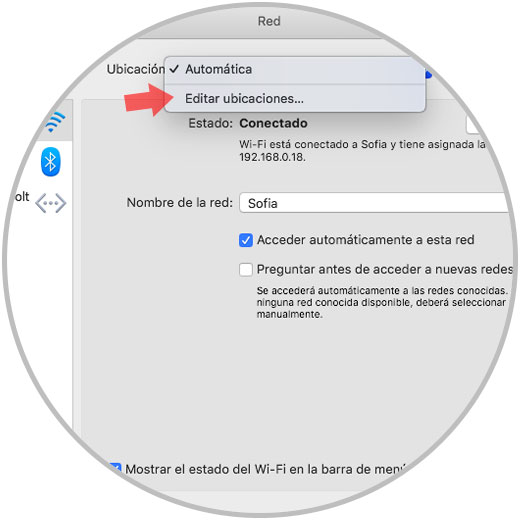
Step 3
In the pop-up window, click on the "+" icon and add the name of the location that we will use in macOS Mojave. Click on the "OK" button to apply the changes.
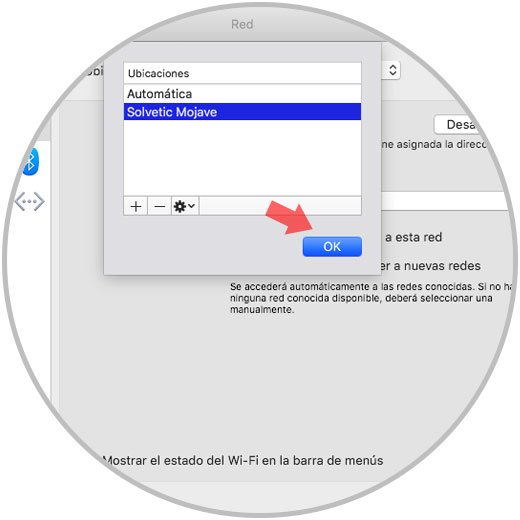
Step 4
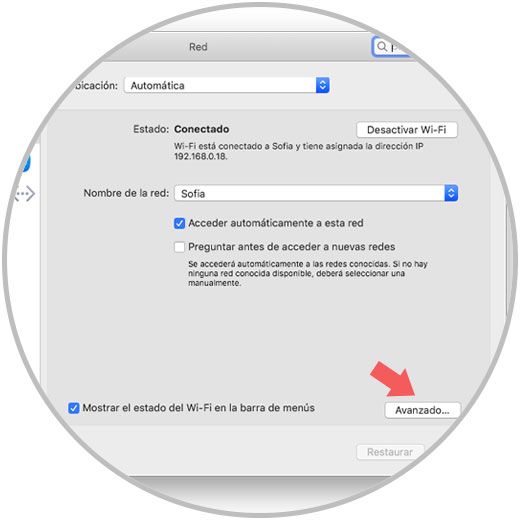
We will see the location created correctly. Now we click on the "Advanced" button located at the bottom
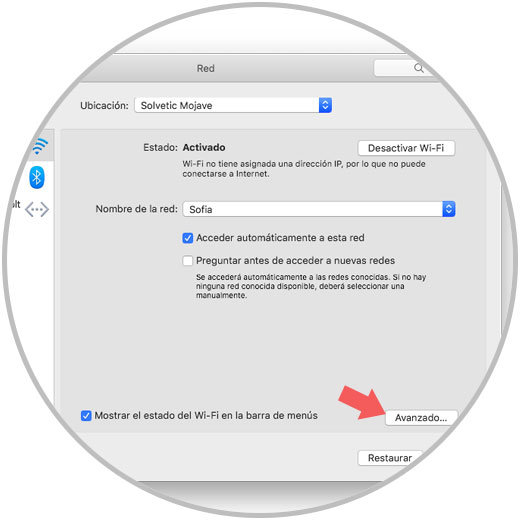
Step 5
In the new window displayed we go to the TCP / IP tab, there we click on the "New DHCP grant" button so that the IP address assigned to our equipment can be renewed automatically and immediately:
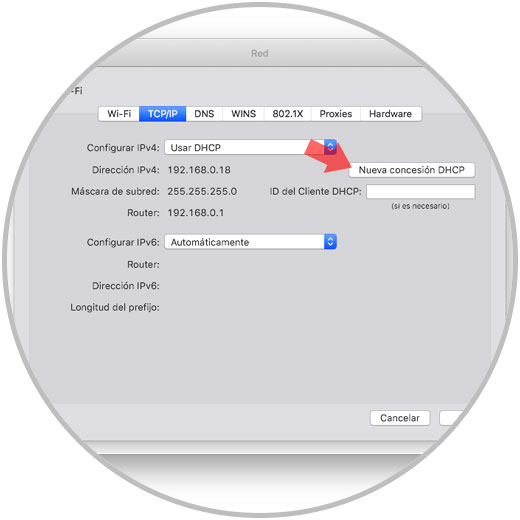
Step 6
Now, we go to the DNS tab and click on the "+" icon and there we will add the following public IP addresses, which are from Google and are enabled to be used for free as DNS servers:
8.8.8.8
8.8.4.4
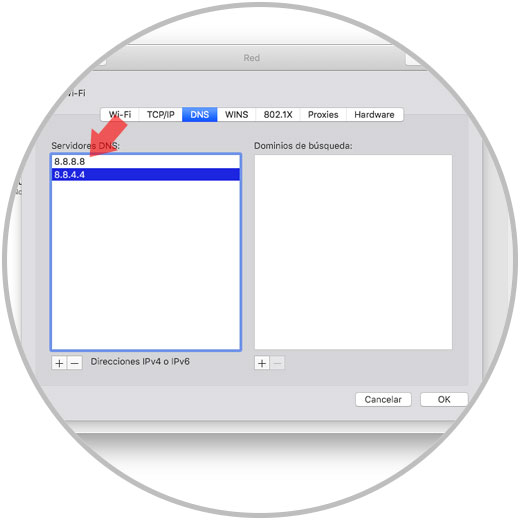
Step 7
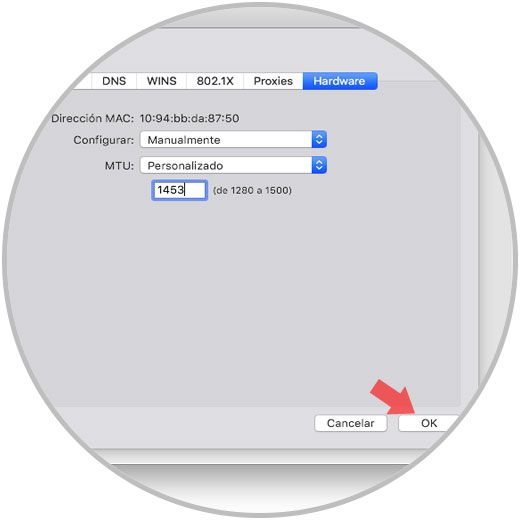
Finally, we go to the Hardware tab and there we configure the following:
- In the unfolded box we insert 1453
Click on "Ok" to save the changes
Note
MTU 1453 has been used to solve connectivity problems of Wi-Fi networks.
4. Require administrator password to access new Wi-Fi networks available to fix error in macOS Mojave
This option works more as a security measure by which the macOS Mojave is enabled to contact the router and thus always request the administrator password when trying to connect or disconnect from any Wi-Fi network.
Step 1
To do this we will:
Click on the "Advanced" button
Step 2
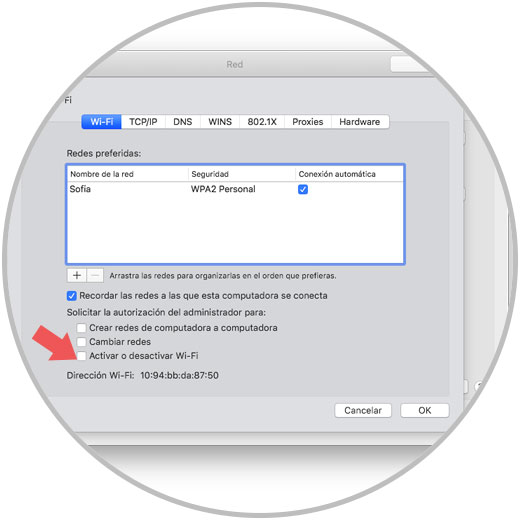
In the displayed window we activate the "Enable or disable Wi-Fi" box located in the "Request administrator authorization for" field. Click on "Ok" to apply the changes.
5. Monitor Wi-Fi network graphics in macOS Mojave to fix WiFi error
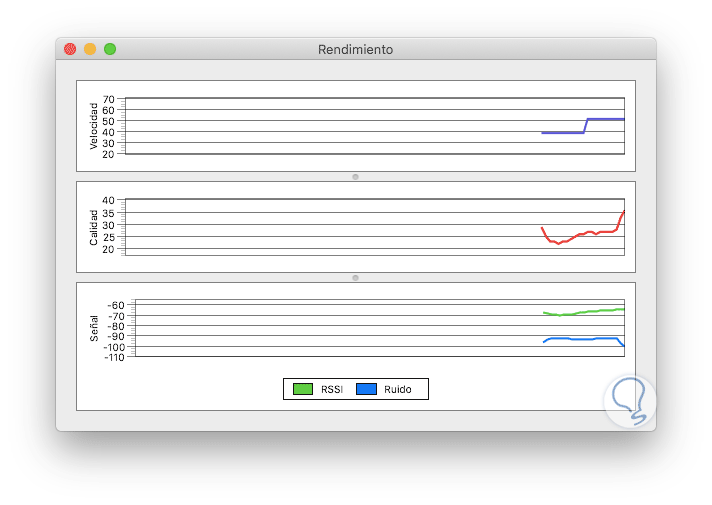
We have seen previously how the Wi-Fi diagnostic report gives us an overview of the network condition, because even beyond this, we have a series of ideal options for better control where the Performance option is one of the best since it allows us to keep a centralized control over three vital aspects in everything related to the stability of the Wi-Fi network such as speed, signal and quality.
Step 1
[/color] + [color=rgb(51,51,51)]
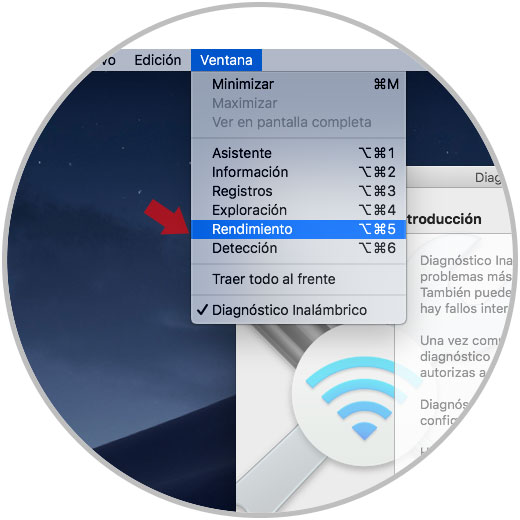
⌘ [/color]+ 5: To access this type of graph, it will be necessary to execute the wireless diagnostic process according to the above-mentioned step, and once the report has been created we go to the "Window" menu and there we choose the "Performance" option or we can use the [color = rgb (51.51.51)]
⌥ [/ color] + [color = rgb (51.51.51)]
⌘ [/ color] + 5 keys:
Step 2
This will generate a real-time graph where we will see the mentioned aspects about the current state of the network divided into two sections such as Noise and RSSI:
6. Reset SMC and NVRAM / PRAM memory to solve WiFi error in macOS Mojave
The PRAM (phase-change RAM) and NVRAM (Non-volatile random access memory) memory are a type of memory whose objective is to control multiple operations within the operating system and its reset It largely helps correct the Wi-Fi network problem in macOS Mojave.
[/color]+ [color=rgb(51,51,51)] ⌥ [/color]+ P + R hasta que veamos el logo de Apple, luego de esto podremos soltar las teclas y de esta forma se ha reseteado NVRAM/PRAM en macOS Mojave. To carry out this process we must turn off the equipment completely and then proceed with the ignition and during this process we must press the keys [color = rgb (51,51,51)] ⌘ [/ color] + [color = rgb (51 , 51,51)] ⌥ [/ color] + P + R until we see the Apple logo, after this we can release the keys and in this way NVRAM / PRAM has been reset in macOS Mojave.
We can also check the following
- Check that our Wi-Fi network is active
- Check the router physically; that your connections are used correctly
- Verify that there is not too much interference between the router and our equipment such as walls, windows or electronic devices
- Updating the system constantly can help correct this error.
- Restart the computer in safe mode to check the connection
With any of these tips we will have a stable and optimal Wi-Fi connectivity as expected.