When we buy a new portable computer we look for relevant aspects such as its memory, its type of disk or perhaps the technology of its screen but very rarely do we worry about an essential aspect such as the battery and its useful life, and that although in theory The life of the battery in a new device must be wide, the constant use of applications of high use of this resource together with internal and external factors can cause a negative impact on this and thus lead to errors that will affect at any time the optimal use of the equipment..
The battery is an essential part of any portable computer because if it fails and we are not near any electrical outlet, the equipment will simply shut down and we will not be able to do anything. It is important therefore that the battery of our portable device is optimized, as this will help us to prolong its use when we cannot connect it to the power. Apple has launched macOS Mojave with a number of new features and improvements seeking to improve all overall user performance, but some have reported battery failures or excessive use on computers such as MacBook, MacBook Pro or MacBook Air.
Perhaps one of the questions that arises is, if Apple has launched macOS Mojave should not be assumed that this system should be more stable and optimize the use of resources ?. Well, when we have updated to Mojave, this system executes various activities and background tasks for its features such as Spotlight indexing, photo indexing or iCloud data management and synchronization, all these background tasks make a Battery consumption without us noticing..
One tip for this case is to leave our portable equipment connected to the power outlet and turn it on for a considerable time, a good practice would be to leave it on overnight and use a screen protector or turn off the screen, with this macOS Mojave will complete the background tasks that are necessary, normally these background tasks must be completed in an average of 1 to 2 days, and thus Mac performance and battery life should be in their best condition.
TechnoWikis will make a complete analysis and a series of tips to see the alternatives as we can improve the life of our battery in macOS Mojave and thus not incur unnecessary expenses due to poor administration or use of the equipment. It is important to be clear about the autonomy of the original battery of our Mac, because the batteries are developed with a limited amount of charge cycles before they become considered depleted, which results in the purchase of a new battery
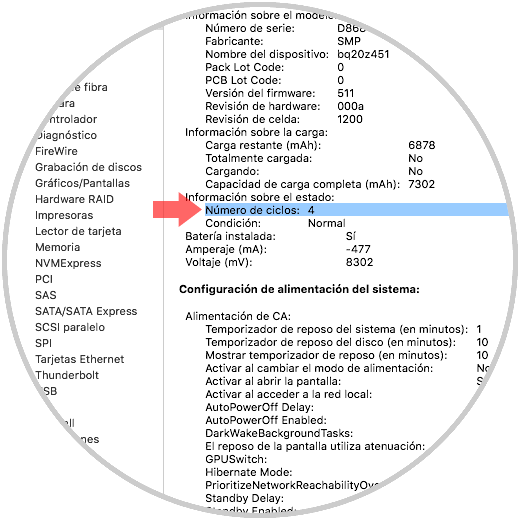
To know in detail the number of current cycles of our battery, click on the Apple icon and select the option About this Mac, then, in the window displayed, click on the System Report button:

Now, in the Hardware section we go to the Power section and in the Battery Information section we find the line Number of cycles:
Now, the maximum number of cycles according to equipment is as follows:
1000 cycles
- MacBook (Retina, 12 inches, 2017)
- MacBook (Retina, 12 inches, early 2016)
- MacBook (Retina, 12 inches, early 2015)
- MacBook (13 inches, mid 2010)
- MacBook (13 inches, end of 2009)
- MacBook Pro (15 inches, 2017)
- MacBook Pro (13 inches, 2017, four Thunderbolt 3 ports)
- MacBook Pro (13 inches, 2017, two Thunderbolt 3 ports)
- MacBook Pro (15 inches, 2016)
- MacBook Pro (13 inches, 2016, four Thunderbolt 3 ports)
- MacBook Pro (13 inches, 2016, two Thunderbolt 3 ports)
- MacBook Pro (Retina, 13 inches, early 2015)
- MacBook Pro (Retina, 13 inches, mid 2014)
- MacBook Pro (Retina, 13 inches, end of 2013)
- MacBook Pro (Retina, 13 inches, early 2013)
- MacBook Pro (Retina, 13 inches, late 2012)
- MacBook Pro (13 inches, mid 2012)
- MacBook Pro (13 inches, late 2011)
- MacBook Pro (13 inches, early 2011)
- MacBook Pro (13 inches, mid 2010)
- MacBook Pro (13 inches, mid 2009)
- MacBook Pro (Retina, 15 inches, mid 2015)
- MacBook Pro (Retina, 15 inches, mid 2014)
- MacBook Pro (Retina, 15 inches, late 2013)
- MacBook Pro (Retina, 15 inches, early 2013)
- MacBook Pro (Retina, mid 2012)
- MacBook Pro (15 inches, mid 2012)
- MacBook Pro (15 inches, late 2011)
- MacBook Pro (15 inches, early 2011)
- MacBook Pro (15 inches, mid 2010)
- MacBook Pro (15 inches, 2.53 GHz, mid 2009)
- MacBook Pro (15 inches, mid 2009)
- MacBook Pro (17 inches, late 2011)
- MacBook Pro (17 inches, early 2011)
- MacBook Pro (17 inches, mid 2010)
- MacBook Pro (17 inches, mid 2009)
- MacBook Pro (17 inches, early 2009)
- MacBook Air (13 inches, 2017)
- MacBook Air (11 inches, early 2015)
- MacBook Air (11 inches, early 2014)
- MacBook Air (11 inches, mid 2013)
- MacBook Air (11 inches, mid 2012)
- MacBook Air (11 inches, mid 2011)
- MacBook Air (11 inches, end of 2010)
- MacBook Air (13 inches, early 2015)
- MacBook Air (13 inches, early 2014)
- MacBook Air (13 inches, mid 2013)
- MacBook Air (13 inches, mid 2012)
- MacBook Air (13 inches, mid 2011)
- MacBook Air (13 inches, end of 2010)
500 cycles
- MacBook (13 inches, aluminum, late 2008)
- MacBook Pro (15 inches, late 2008)
- MacBook Air (mid 2009)
300 cycles
- MacBook (mid 2009)
- MacBook (early 2009)
- MacBook (late 2008)
- MacBook (early 2008)
- MacBook (end of 2007)
- MacBook (mid 2007)
- MacBook (end of 2006)
- MacBook (13 inches)
- MacBook Pro (15 inches, early 2008)
- MacBook Pro (15 inches, 2.4 / 2.2 GHz)
- MacBook Pro (15 inches, Core 2 Duo)
- MacBook Pro (15 inches, bright screen)
- MacBook Pro (15 inches)
- MacBook Pro (17 inches, late 2008)
- MacBook Pro (17 inches, early 2008)
- MacBook Pro (17 inches, 2.4 GHz)
- MacBook Pro (17 inches, Core 2 Duo)
- MacBook Pro (17 inches)
- MacBook Air (late 2008)
- MacBook Air
With this in mind we will analyze a series of tips to optimize our battery on Mac..
1. See battery status menu in macOS Mojave
Step 1
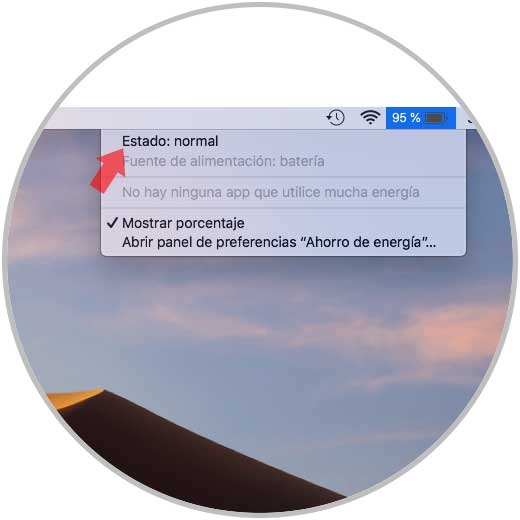
One of the best options we have to see the current battery status is the battery status menu located in the upper right, there we will see how much charge the battery has and if it is currently charging:

The battery status menu also gives us information about whether the screen or any application is using a high amount of energy which allows us to start the administration process.
Step 2
To see the current status of the battery, press the Option key and click on the battery icon that appears in the menu bar, the options that can be displayed are:
Normal
The battery is working normally in Mojave
Change soon
With this state, the battery works normally, but stores considerably less charge than in its initial state, it is recommended to monitor the battery status by regularly checking the battery status menu
Change now
It is a bit more critical state since the battery works normally, but stores much less charge, even so, it will be possible to use the equipment, but if the reduced charge capacity can affect the normal operation of the equipment so it Advise your change.
Repair battery
In this state the battery is not working normally, so to use the Mac safely it must be connected to a power adapter, here it is vital to change the battery.
2. How to check the battery configuration in macOS Mojave
In some cases it may be that the macOS Mojave configuration parameters may be misapplied, resulting in improper use of the battery in the equipment.
Step 1
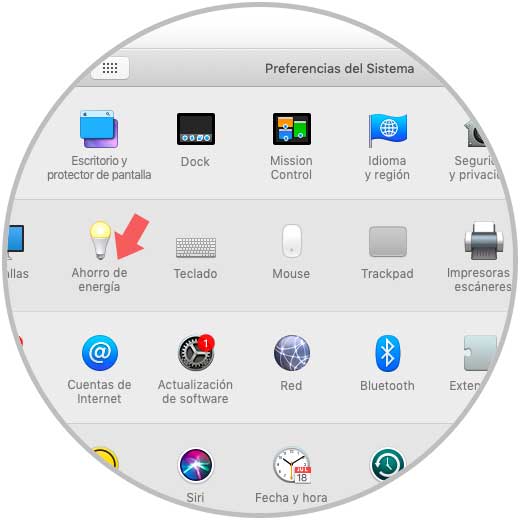
To verify this we can access System Preferences using one of the following methods:
- Click on the icon located in the Dock
- Go to the Apple menu and there select System Preferences
- Use Spotlight to access this
Once we access we will see the following:
Step 2
There we click on the Energy Saver category and the following will be displayed:
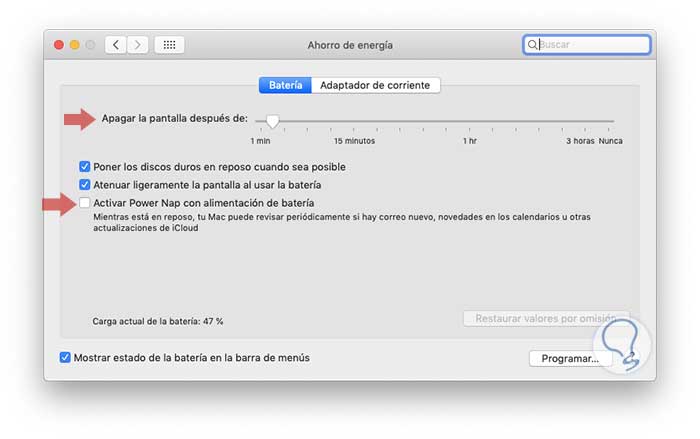
There we must confirm that the Enable Power Nap box is disabled and the option Turn off screen after it is set in a relatively short time on the battery tab. Remember that Power Nap allows our team to execute activities while at rest, some of these tasks are:
Mail application
The Mail application receives new messages
- Notes can be updated with changes made on other devices.
- Contacts are updated as changes are applied to another device.
- The reminders are updated with the modifications made to other equipment.
- Finding my Mac updates the location of the computer to be found even if it is in sleep mode.
- VPN per request continues to work.
- Mobile Device Management can block and delete the Mac remotely.
Connected equipment
In case the equipment is connected to a power outlet it will be possible to run:
- Spotlight index creation.
- Download software updates.
- Background downloads of Mac App Store items.
- Help Center content update.
- The wireless base stations are able to activate the device using Wake on Wireless.
Compatible equipment
The devices compatible with this function are:
- MacBook (early 2015 and later)
- MacBook Air (late 2010 and later)
- Requires OS X Mountain Lion v10.8.2 and later
- MacBook Pro (all models with Retina display)
- Mac mini (late 2012 and later)
- iMac (late 2012 and later)
3. How to view battery behavior from the activity monitor
Step 1
To access this monitor we have one of the following options:
- On the route Go / Utilities / Activity Monitor
- Use the key combination Shift + Command + U and in the selected window choose the option Activity monitor
- Enter the term activity through Spotlight and select the utility there
Step 2
In the displayed window we go to the Visualization menu and activate the All processes option, and in the Activity Monitor window we go to the CPU tab and click on the% CPU column in order to order each application or service that is consuming more resources in the system:
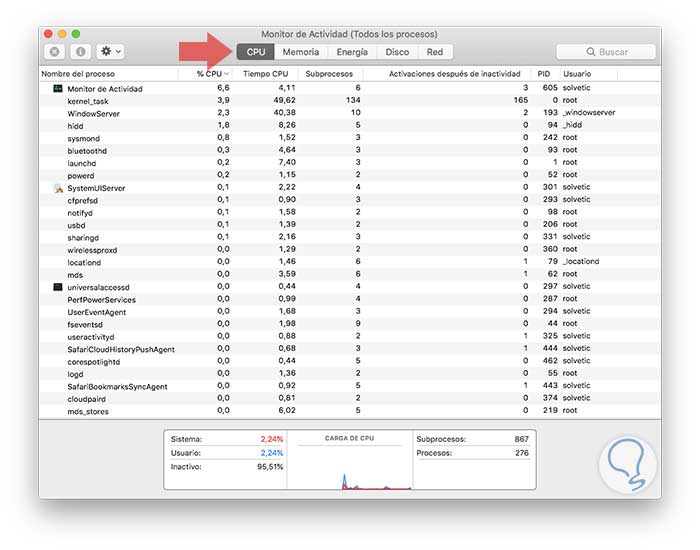
Step 3
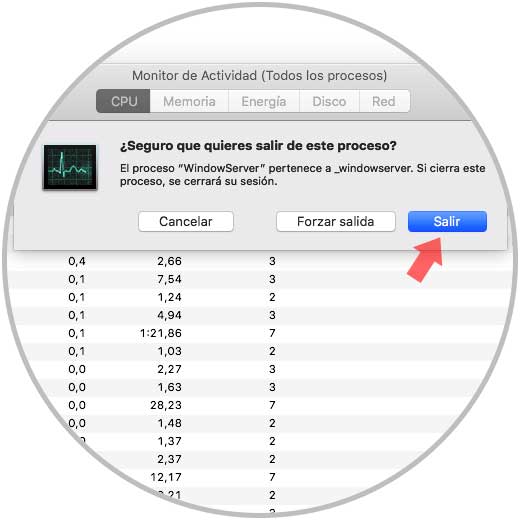
In case of verifying that any application or process is consuming more resources than normal, it will be possible to finish said object by double clicking on it and in the displayed window we choose the Exit option or we click on the X sign located in the upper left and we will see the following warning:
4. How to analyze the energy consumption of macOS processes
Processes, applications and tasks in macOS can be executed both directly and in the background according to their level of importance and configuration, but in some cases it is possible that these processes are making high energy consumption and are not essential for the activity of the system which results in improper use of energy.
To analyze these processes, we must access the Activity Monitor using one of the following options:
- On the route Go / Applications / Activity Monitor
- Using the Shift + Command + A keys and there select Activity Monitor
In the deployed Monitor we will go to the Energy tab and there the processes and services that are currently using the equipment battery will be displayed:
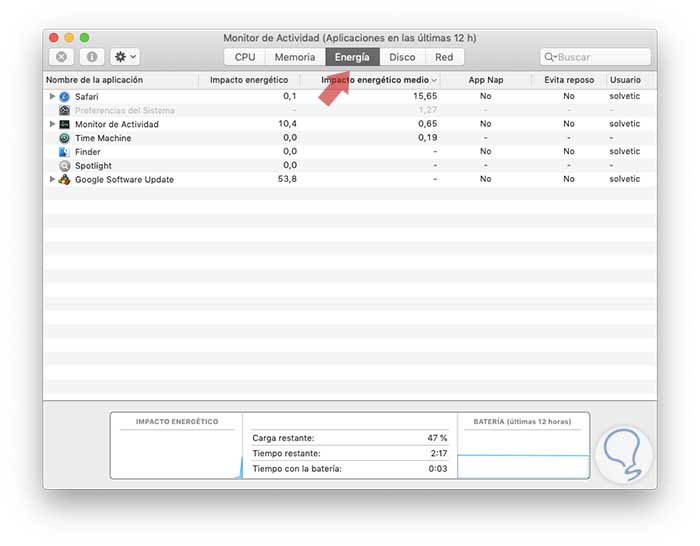
There we find sections like:
- Impact of that application
- Compatible with Power Nap
If any process is using the battery in the wrong way, just select it and press the X sign to close this process.
5. How to verify the consumption of macOS applications
Another of the options that has a negative impact on the macOS Mojave battery are the applications, these are essential for our work, but some of them can make a high use of the battery affecting its duration.
macOS Mojave allows us to access special functionality to see if any of these applications do this.
To visualize this we can click on the battery icon on the device and there we find a special section to see if any application makes excessive use of the battery, in case this does not happen we will see the message There is no app that uses a lot of energy :

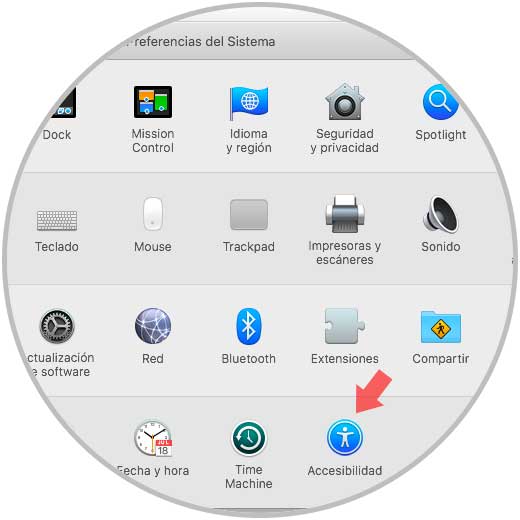
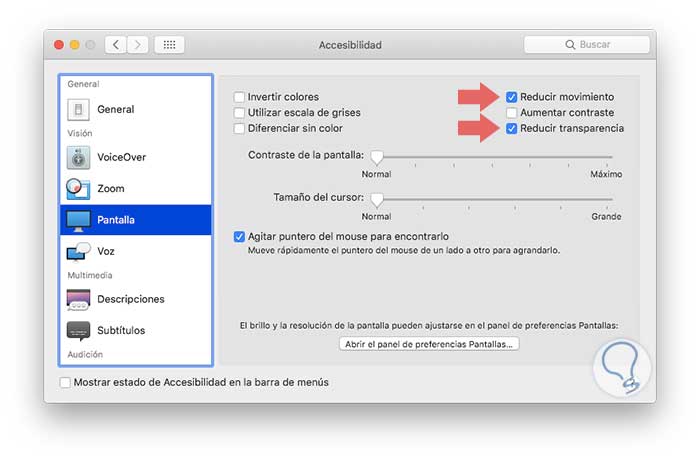
6. How to disable transparencies and motion effects in macOS Mojave
macOS Mojave integrates a series of visual effects with transparent backgrounds and animated movements that have been developed to give a better presentation and design to the system, but also these effects make a high consumption of system resources to render these effects.
To verify this and make a new configuration, we go to System Preferences and select the Accessibility category and in the Screen section we will activate the following boxes:
Step 1
For this configuration, we go to System Preferences using one of the following options:
- Clicking on the System Preferences icon in the Dock
- Go to the Apple menu and select System Preferences
We will see the following:
Step 2
There we click on the Accessibility section and in the new window we go to the Screen category and check the boxes Reduce movement and Reduce transparency:
4. How to activate the Energy Saving option in macOS Mojave
This is a function integrated in macOS Mojave through which we have the opportunity to turn off the screen, which consumes most of the battery, in a period of time, this because many users leave and leave our equipment on and the active screen without doing anything which is to consume the battery in an inappropriate way.
To configure this option, we go back to System Preferences and this time we click on the Energy Saving section and in the new window we can define the time in which the screen will turn off both in battery use and when the equipment is connected:
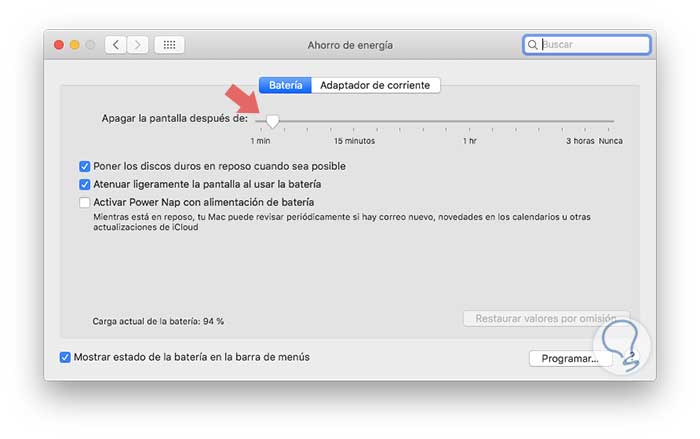
Additional we will have the opportunity to configure the following:
- Stand the disks to avoid power consumption when they are not in use
- Dim the screen when using the battery in order to avoid so much brightness that it is one of the causes of high power consumption in macOS Mojave.
As we see we have an option called Power Nap which allows us to perform useful actions while the equipment is at rest, some are:
- Contacts are kept up to date with changes made to other devices.
- The calendar receives new invitations and updates
- Find my Mac updates Mac location
- The Mail application can receive new messages
5. How to adjust the brightness of the macOS Mojave keyboard and screen
The brightness of the screen is one of the common causes for which the battery in macOS Mojave wears out in a relatively short time, if we choose to reduce the brightness of the screen without doubt that there will be an improvement in the life of the battery from any Mac computer.
It is worth mentioning that in an environment where the light is optimal you can reduce the brightness of the screen to avoid improper use of it.
Step 1
There we must activate the Adjust brightness of the keyboard option in poor lighting conditions in order to allow the keyboard backlight to automatically dim or light up:
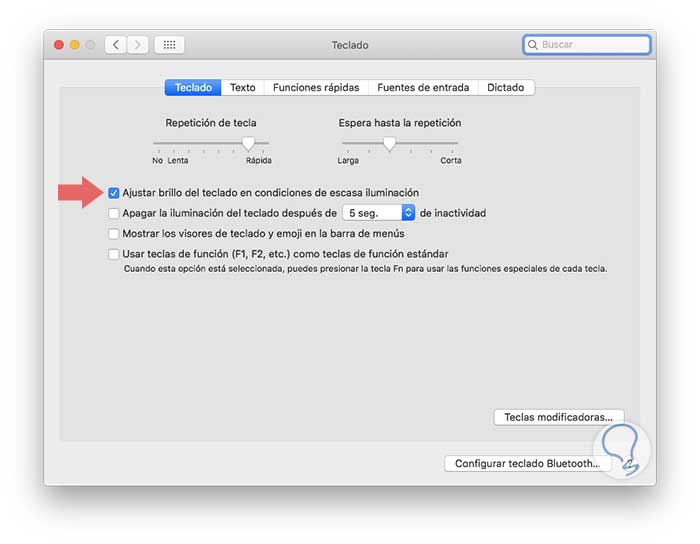
There we can also configure the keyboard backlight to turn off after a period of inactivity which is 5 seconds by default.
Note
We can also use the F5 and F6 keys to manually adjust the brightness of the keyboard.
Step 2
For the case of the screen, we will go to System Preferences and there we select Screens and in the window that is displayed we activate the Adjust brightness automatically box to allow the screen to dim or illuminate depending on the surrounding light levels.
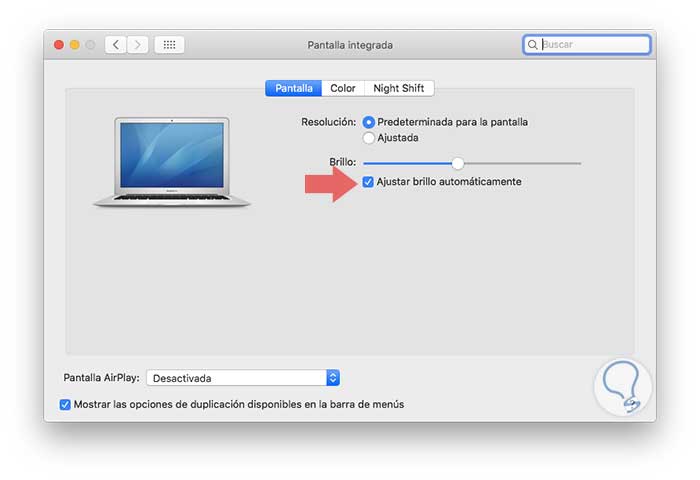
To manually adjust the screen brightness on Mac, we can use the F1 and F2 keys.
6. How to disable Bluetooth on macOS Mojave
By default in macOS Mojave Bluetooth is active to discover devices around it, but if we are not using it it is an unnecessary consumption factor.
For its deactivation we will go:
- There we click on the Disable Bluetooth button

Tips to improve macOS Mojave battery life
Now, a series of practical tips, additional to those already mentioned are:
- Disable our Wi-Fi network when it is not being used
- Do not run several applications simultaneously
- Disconnect any device that is not being used, such as external hard drives, FireWire, Thunderbolt, SD card or USB media
- Set the computer at rest if we leave
- Eject any CD or DVD from the integrated SuperDrive, if the portable computer has one, to prevent the disc from rotating periodically consuming energy
- Make use of the integrated GPU if we have it.
- Turn off Bluetooth if it is not being used.
- Exit applications when they are no longer used.
- Install system software updates when available.
- Reduce the number of open applications simultaneously.
- Disable unnecessary location services.
We can see how there are many practical solutions to prevent the battery of our Mac from falling into excessive consumption carrying money, low performance and preventing macOS Mojave from exploiting all its functionalities.
Let's follow these tips step by step to enjoy our battery for much longer and so that the productivity when using it is as high as possible.