Windows 10 constantly offers us new updates of its operating system with great changes and new features, this we have seen with the new version April 2018 which was released recently..
Unfortunately, throughout this update process it is normal for different errors to arise and one of them is the CRITICAL_STRUCTURE_CORRUPTION error, which is linked to driver failures.
This error is a problem associated with one or more drivers because these are not compatible with Windows 10, and it is normal that this error also occurs when we are going to use some old game, since this type of error is usually also linked to games incompatible with the system.This error results in the famous blue screen (BSOD)
Some additional causes may be
- Damaged or defective hardware
- Drivers that have been deliberately or accidentally modified have changed their kernel codes or data.
This is why today in TechnoWikis we will know some of its practical solutions to solve this error in Windows 10..
1. Update the drivers of our board and chipset to fix CRITICAL_STRUCTURE_CORRUPTION error in Windows 10
The base component in our system is the board and its chipsets, but as every day the operating systems add new functionalities and features. This motherboard may become obsolete and due to this generate the indicated error.
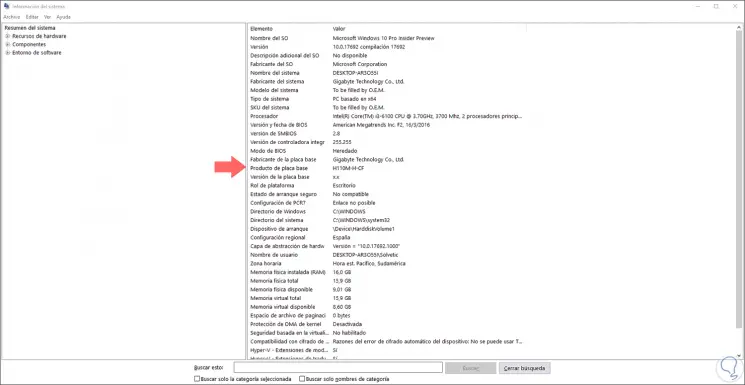
To update these drivers, we must first know with certainty which is the manufacturer and model of our board.
Step 1
For this we will use the following key combination:
+ R
There execute the following command:
msinfo32
Now, we go to the "System Summary" section and there we go to the "Motherboard Product" line to know the model of this:
Step 2
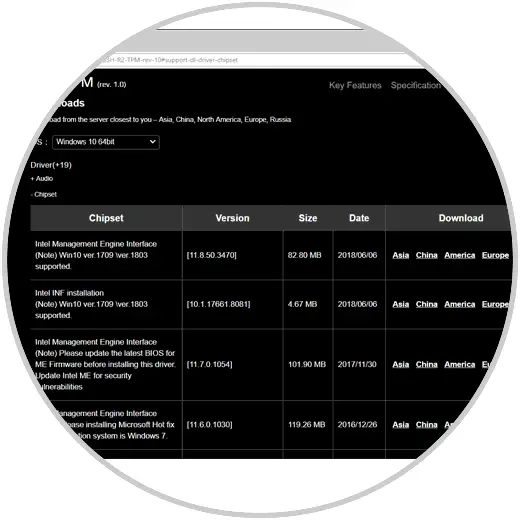
Now, we go to the manufacturer's website and there we go to the "Support" section where we can download the latest drivers available for the system. We can go to the BIOS and Chipset section and download the appropriate driver.
2. Run DISM to fix CRITICAL_STRUCTURE_CORRUPTION error in Windows 10
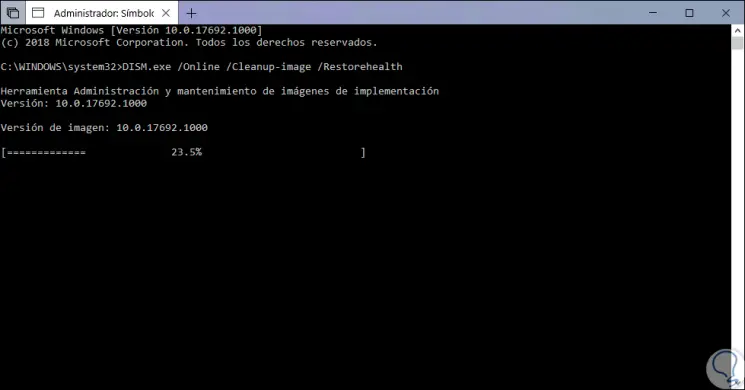
DISM (Deployment Image Service and Management) is a utility integrated in Windows 10 which has been developed to carry out specific tasks on the image of the system at both management and support levels.
When executing this utility, a complete analysis of our image will be carried out and the problems that may be affecting your services will be solved and this is an option to correct the CRITICAL_STRUCTURE_CORRUPTION error..
To run this utility, we access the command prompt as Administrators and there we execute the following line:
DISM.exe / Online / Cleanup-image / Restorehealth
Once the analysis concludes, we will be informed whether or not there are flaws in the system.
In case the DISM tool cannot obtain files online, we can use our USB or DVD installation with the image of Windows 10, for this we insert the media and execute the following command:
DISM.exe / Online / Cleanup-Image / RestoreHealth / Source: X: \ RepairSource \ Windows / LimitAccess
Note
We must keep in mind to modify the path X: \ RepairSource \ Windows with the letter of the DVD or USB drive.
3. Using SFC to fix CRITICAL_STRUCTURE_CORRUPTION error in Windows 10
SFC (System File Checker) is another of the practical utilities that we have in Windows 10 to make a detailed analysis of each aspect of the Windows file system. In this case NTFS is responsible for analyzing and correcting everything that prevents the system from being used normally.
To use it, we access the command prompt as administrators and there we execute the following:
sfc / scannow
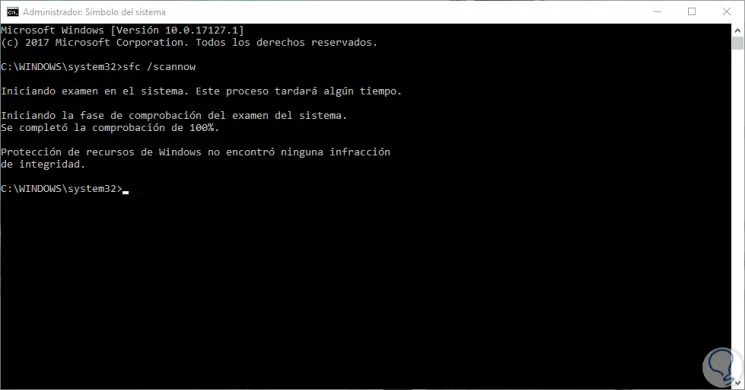
Once the process is finished we can restart the computer to validate its status.
4. Check the hard disk to fix CRITICAL_STRUCTURE_CORRUPTION error in Windows 10
We have mentioned that one of the common errors of this error are hardware failures, so it is worth analyzing our hard drive to rule out that this is the epicenter of the error.
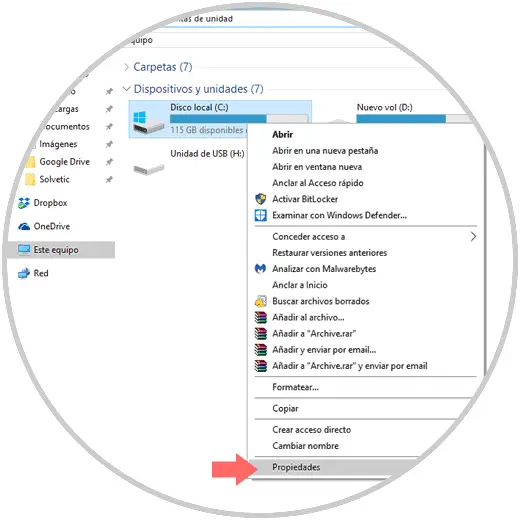
Step 1
To check the hard drive, we go to the "File Explorer" and there we right click on the "Drive C" and select the "Properties" option:
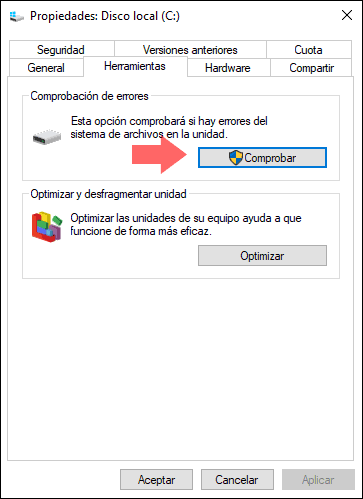
Step 2
In the displayed window we go to the "Tools" section and click on the "Check located" button in the "Error checking" section:
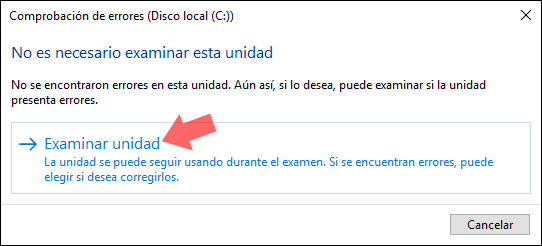
Step 3
In the pop-up window we click on the "Browse unit" option:
Note
Another option to carry out this process is from the command prompt by executing the command:
chkdsk / f C
5. Make use of the Windows 10 memory diagnostic tool to fix CRITICAL_STRUCTURE_CORRUPTION error
Another of the hardware elements that can have a negative impact on the system giving the error cited is the RAM either due to a problem of loading, reading or speed.
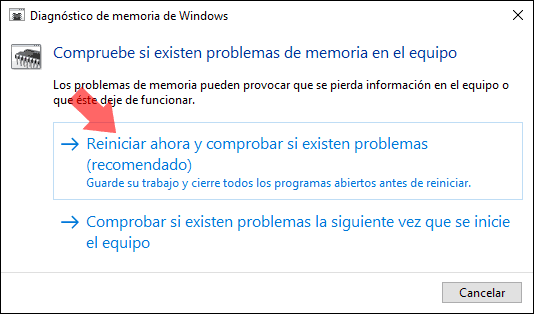
Windows 10 incorporates a utility called "Windows Memory Diagnostic", which is responsible for analyzing in detail all aspects of RAM and thus rule out any errors. To access this utility we enter the diagnostic term in the Windows 10 search box and select the utility which will display the following window.
There we click on the option "Restart now" and check if there are problems in order to execute this process.
6. Run the driver tester administrator to fix CRITICAL_STRUCTURE_CORRUPTION error in Windows 10
This is an integrated Windows 10 utility that monitors Windows kernel mode drivers and graphics drivers in order to detect calls to illegal functions or actions that may damage the system at some time. Driver Verifier rigorously analyzes Windows drivers to a variety of stresses and tests to find incorrect behavior and thus give the best results.
Step 1
For your access, we will use the following keys:
+ R
Now we execute the following command:
verifier
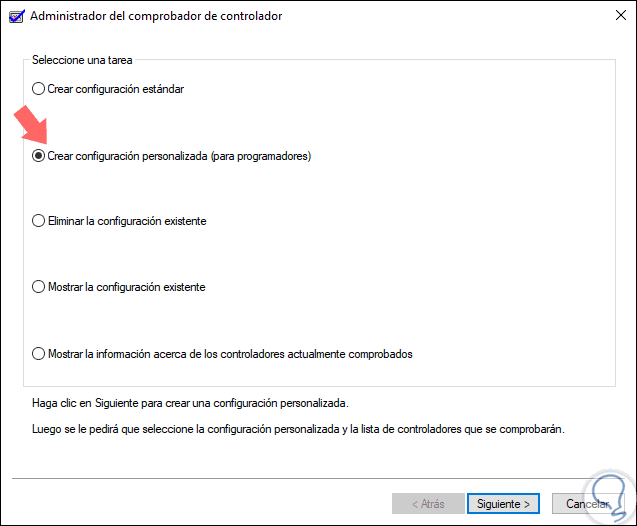
In the displayed window we activate the "Create custom settings" box. It will be possible to run Driver Verifier on several controllers simultaneously or on one controller at a time. There we click on "Next"
Step 2
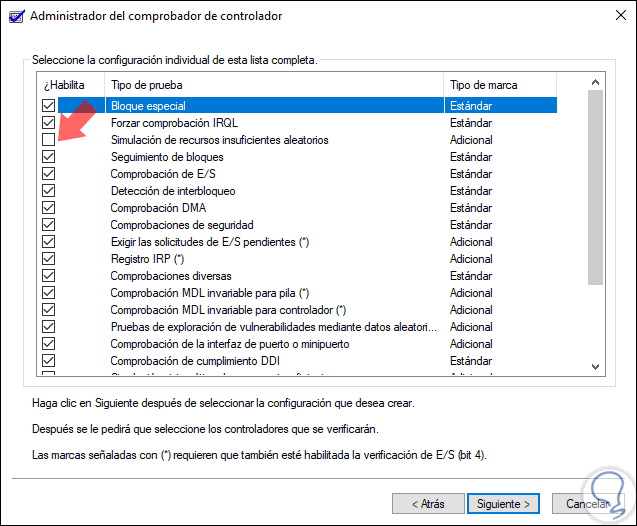
Then we activate all the boxes except "Simulation of insufficient random resources". Again click on "Next"
Step 3
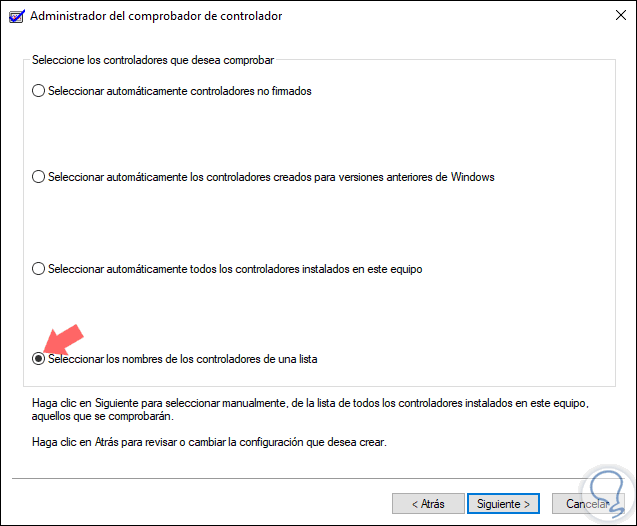
In the next window we activate the box "Select the names of the controllers from a list". Press "Next"
Step 4
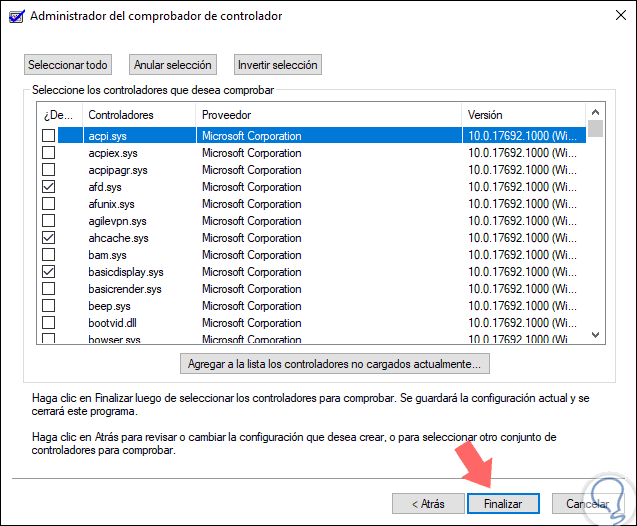
We will select the desired drivers, especially those that are not official Microsoft. Click on "Finish" to run the analysis.
Step 6
Now, we go to the command prompt as administrators and there we execute the following:
verifier / querysettings verifier / reset
We restart the computer to complete the process.
Some of the errors that the Verifier tool can give are:
0xC1
SPECIAL_POOL_DETECTED_MEMORY_CORRUPTION
0xC4
DRIVER_VERIFIER_DETECTED_VIOLATION
0xC6
DRIVER_CAUGHT_MODIFYING_FREED_POOL
0xC9
DRIVER_VERIFIER_IOMANAGER_VIOLATION
0xD6
DRIVER_PAGE_FAULT_BEYOND_END_OF_ALLOCATION
0xE6
DRIVER_VERIFIER_DMA_VIOLATION
7. Restore Windows 10 installation to fix CRITICAL_STRUCTURE_CORRUPTION error on Windows 10
In the event that none of the steps indicated above give a comprehensive solution, a resource is to return to the previous version of Windows 10 or to restore the computer, which implies a new installation.
Step 1
To use any of these options we must go to the following route:

8 . Disconnect all peripherals from the computer to solve CRITICAL_STRUCTURE_CORRUPTION error in Windows 10
The first step we can take is to disconnect devices such as external hard drives or printers, which can create some negative impact on the computer resulting in such error.
For this we must turn off the equipment, disconnect the devices that we consider may be the root of the problem, turn on the equipment and wait a while to see if this message is displayed or not.
There we can decide if we return to the previous version or reset the equipment.
Using any of the methods described, it will be possible to provide a comprehensive solution to this error and thus fully enjoy all that Windows 10 offers us.