Reducing the size of photos or images saved on your Android phone without losing their quality or having it minimally affected is useful if you want to save storage space, send images by email or social networks, or upload them to your website or blog and that visibly look good. Below I show you how to optimize your images on Android without installing anything additional, or in an advanced way through simple and fast apps and online utilities..
Why reduce photo size on Android?
Android phone cameras increasingly offer higher resolution and quality, which means photos take up more space. This generates several problems: the limited storage space is consumed faster, the device's operation slows down, and more mobile data and battery will be consumed. Any large image in general, if for example you want to upload it to a website or blog, will affect its loading time.
Editor Recommended:
- How to take passport size photos: Measurements, APPS and online tools
- How to know the date and time of a photo and change or remove this "metadata"
- 6 basic tips to take good photos with your cell phone
Reducing the size of an image means lowering its resolution or weight, that is, the number of pixels that make it up and the bytes they occupy. Doing this inevitably reduces the image quality, but if we do it right, the difference won't be noticeable. The ideal is to find a balance between the size and quality of the photos, so that they look good but do not take up too much space..
How to reduce the size of photos on Android?

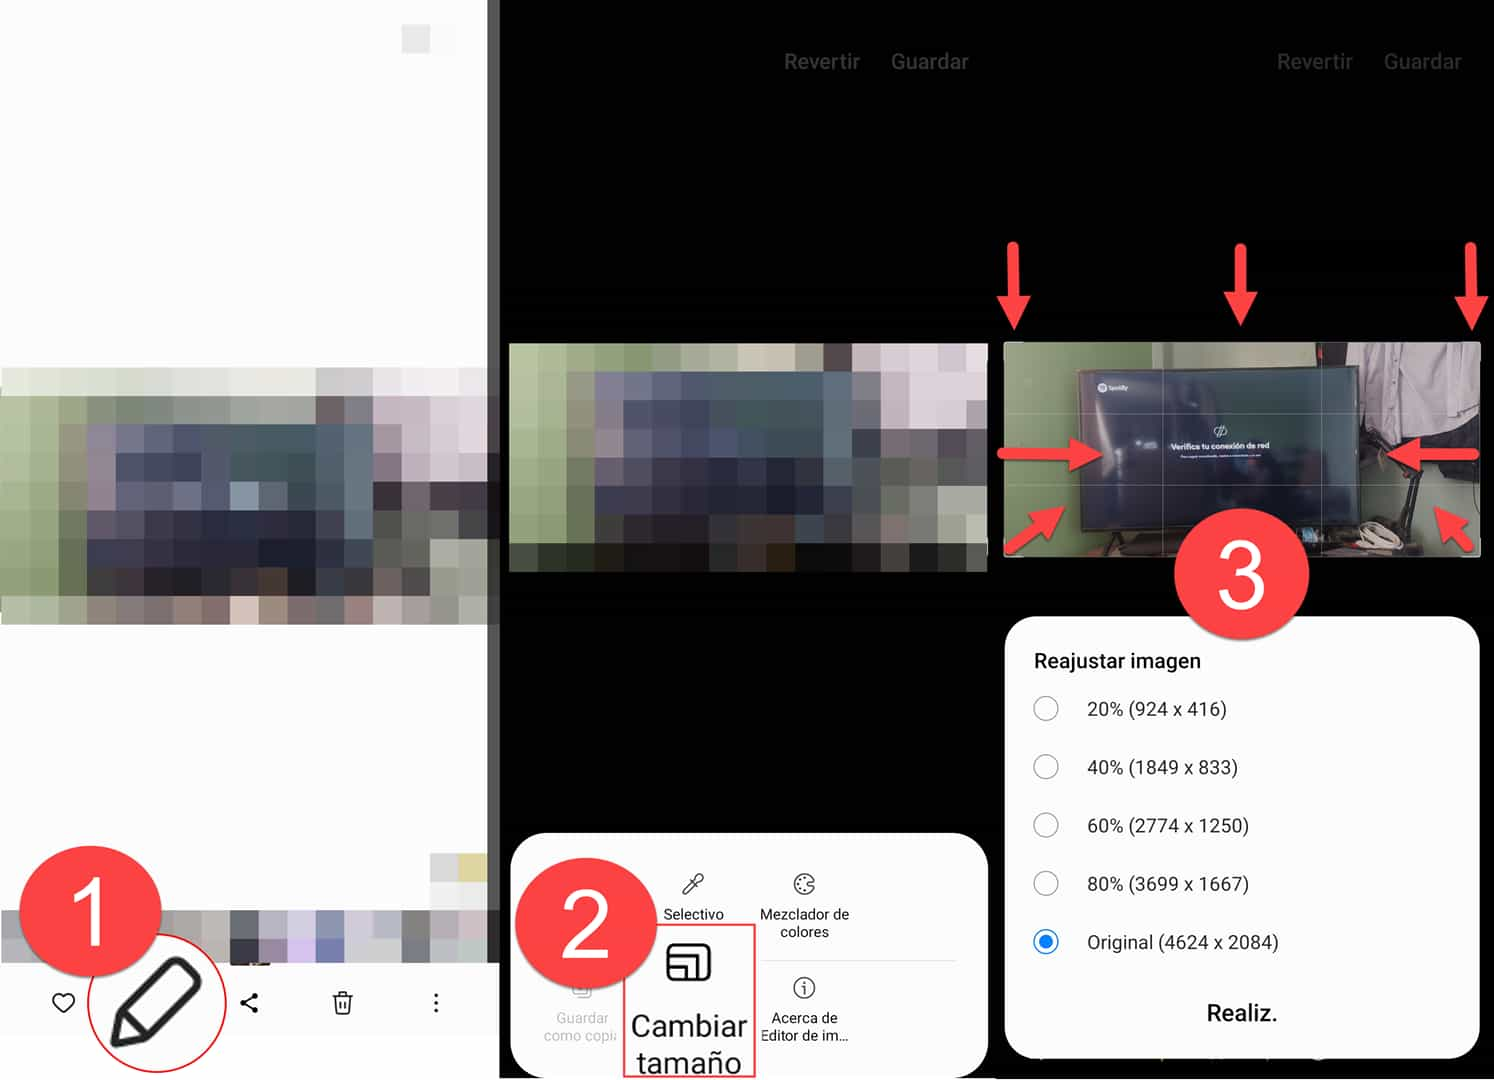
A simple and quick way to reduce the size of photos on Android is to use the Gallery app that is already installed by default on your phone. This application allows you to edit your images and change their resolution. For example, you can reduce the size to 80%, 60%, 40%, or 20% of the original or set a size manually. To do so, you just have to follow these steps:
- Open the gallery app and select the photo you want to reduce.
- Tap the edit icon (a pencil) and then the resize icon (sometimes a square with arrows).
- Depending on the brand of cell phone, you will find default sizes or you can swipe from the edges of the image to alter its size.
- Tap the save icon and that's it.
App to reduce image size
Another way to reduce the size of photos on Android is to use the Photo Resizer app , the best of its kind to change the resolution and weight of your images for everything you need:
- Reduce a photo to 600×600, 200×200 pixels, or any dimension required by Facebook, Instagram, social networks in general, web pages, passport or ID size , etc.
- Reduce the size of an image to 1MB, 500Kb, 50Kb or any size.
- Reduce the size of multiple photos at once.
- Maintain or change the aspect ratio.
- Rotate or crop images.
- Save the reduced photos as a copy or replace the originals to save space.
To use Photo Resizer, just follow these steps:
- Download and install the app from Google Play.
- Open the app, tap the “Select Photos” option and locate the file on your device.
- Tap the “Resize” button below. You can choose the size and weight you want. You can use the predefined values or enter your own.
- The “Resize successful” notice will appear. The modified photo is saved to the Pictures/PhotoResizer folder on the internal storage.
Download on Google Play

Reduce size without losing quality, online and free
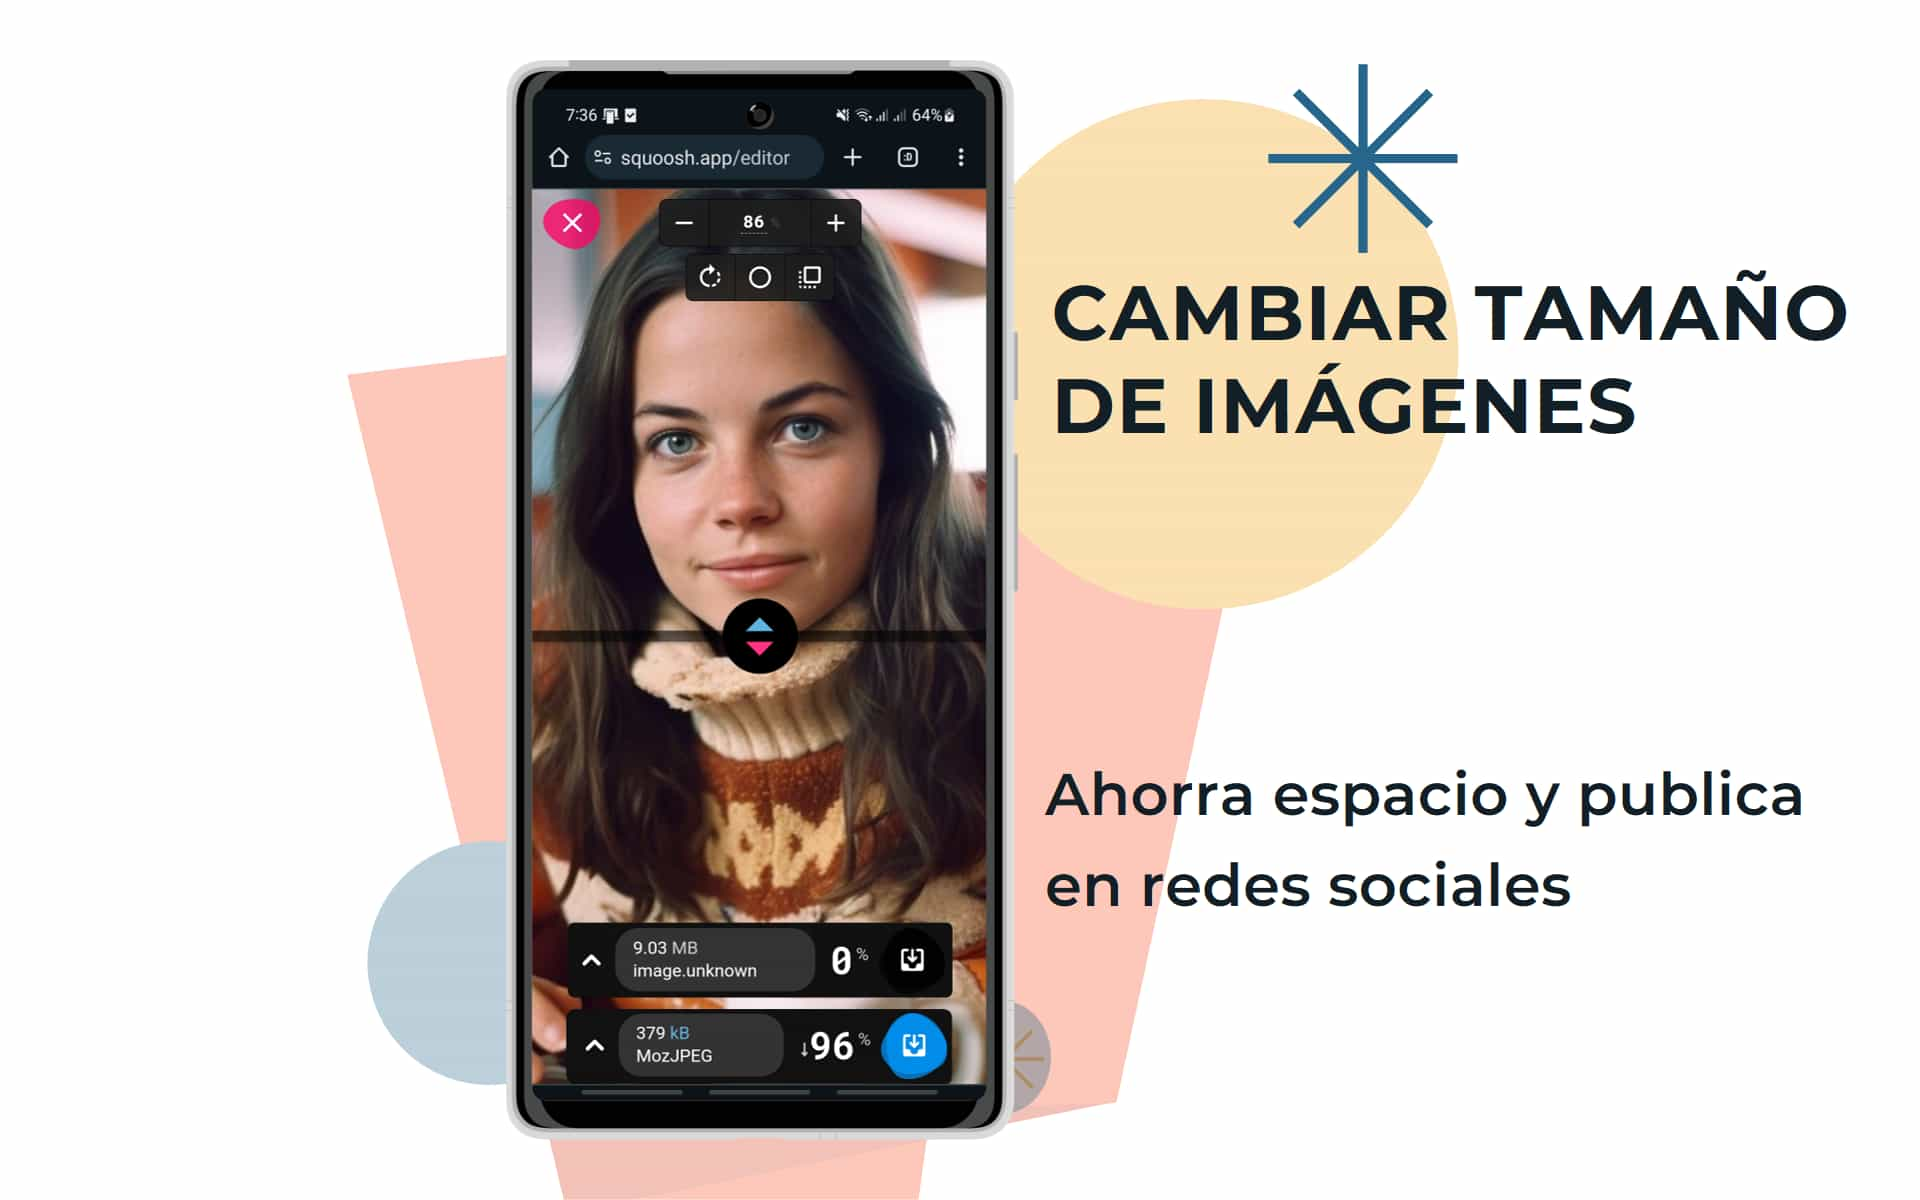
Another way to reduce the size of a photo on Android is online. You upload your image to the Squoosh website and change its resolution and weight, without having to install anything on your phone. This website offers the following:
- Supports jpg, png images and other extensions.
- Reduce the size or weight of photos significantly with different formats and algorithms.
- Compare the original image and the reduced one with a slider.
- Adjust the quality and compression level.
- Download or share the reduced photos.
To use it follow these steps:
- Open your web browser and go to squoosh.app .
- Tap the pink area to select the photo you want to reduce from your device.
- The size or weight of the photo will be automatically reduced. In the central part you will see the original image (above) and the reduced one (below), separated by a slider. You can move it to see the difference.
- Download the result by tapping the blue circle with a down arrow.
If you want, you can play with the quality option to reduce the size even more, but sacrificing image quality (or the other way around). I recommend using the default values to reduce the image size without losing quality. MozJPEG is a widely supported output format and is most optimal. However, you can also choose WebP, PNG, AVIF, and more.
Go to squoosh.app Lower photo resolution on Android
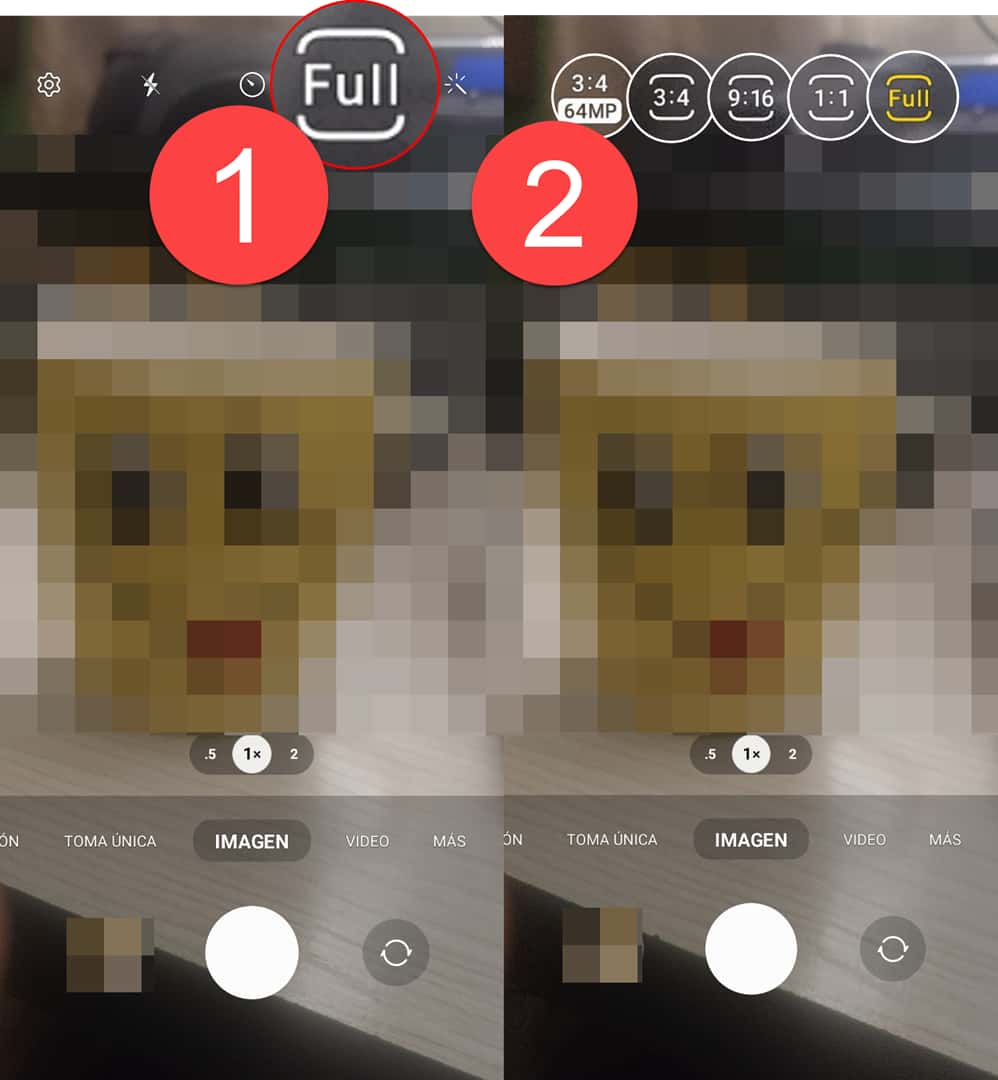
 Full is the option that generates the smallest photo size on my Samsung Galaxy A52. Unfortunately this is the only option to control the output resolution.
 Another preventive way to reduce photo size on Android is to set the camera to take photos at a lower resolution. This way you won't have to edit them later, but they will already be optimized from the beginning. To do so, you just have to follow these steps:
- Open the camera app and tap the settings icon (a gear or three dots).
- Look for the resolution or image quality option and tap on it.
- Choose a resolution lower than the maximum. For example, if your camera has 12 megapixels, you can choose 8 or 6 megapixels.
- Tap the accept or save icon and that's it.
Unfortunately, this feature is not available on all devices. Some, like the Samsung Galaxy, currently only have the configuration shown above, where the “Full” option is the one that generates the smallest photos. They are still 2 or 3 MB photos, but the other options generate photos of even larger sizes..
Conclusion
There are many ways to reduce the size of photos on Android for free. You can use the native gallery app, install a specific app or do it online. Each method has its advantages and limitations, it all depends on your need. It's a matter of trying and choosing the one that suits you best.