File transfer has been one of the characteristics of Windows operating systems since its inception and during this time and the new updates that have been released we have seen how new options have been defined to perform this task from the SMB protocol to the group in home..
Precisely the SMB protocol has been one of the most used and practical to carry out this action due to its functionalities, but with the passage of new technologies these protocols have been updated and certain security flaws have been detected that may put at risk the integrity and information hosted in the system .
The SMB (Server Message Block) protocol has been present for more than 20 years starting with its SMB1 version, but currently we have the SMB3 version with greater security and reliability features..
SMB is a network file sharing protocol also called Microsoft's SMB protocol, this protocol consists of a set of message packets whose mission is to define a particular version of the protocol whose name is dialect, the common system protocol of Internet files (CIFS) is a dialect of SMB.
Functionalities
The main objective of SMB is to share files, but we have some additional features such as:
- Determination of other Microsoft SMB protocol servers in the network or network scanning
- Extended handling of file attributes
- File, directory and shared access authentication in multiple elements
- File and directory change notification
In the traditional OSI network model, the SMB protocol is used as an application layer or a presentation layer protocol, and is based on lower level protocols for packet transport on the network. The Microsoft SMB protocol has been developed as a client-server implementation and consists of a set of data packets, where each one contains a request sent by the client or a response sent by the server..
Types of packages
These packages are categorized as follows:
- Session control packets: This establishes and discontinues a connection to server shares.
- File access packages: is responsible for accessing and manipulating files and directories on the remote server.
- General message packages: This package sends data to print queues, mailing lists and provides data on the status of print queues.
Starting with Windows 10 Fall Creators Update and Windows Server, version 1709 (RS3), the Server Message Block network protocol version 1 (SMBv1) will no longer be installed by default since it was replaced by SMBv2 and other subsequent protocols As of 2007, it is ideal to know that Microsoft publicly declared the SMBv1 protocol deprecated in 2014 for different reasons.
SMB1 Features
Some of the features of SMB1 in Windows 10 are as follows:
- SMBv1 has other interesting features to know in order to take advantage of the client and server. Keep in mind that they can be installed separately depending on the needs of each one.
- The Windows 10 Home and Windows 10 Professional editions no longer have SMBv1 for the client or server by default after a clean installation.
- Another detail to keep in mind is that if you have SMBv1 on client and it is not used for 15 days in total (except when the computer is turned off), it will be uninstalled automatically. It is important to know this so that we are not left behind in it.
- Direct updates and Windows Insider versions of Windows 10 Home and Windows 10 Professional do not remove the SMB1 protocol automatically from the start.
- The features of SMB version 2.02, 2.1, 3.0, 3.02 and 3.1.1 are compatible.
Possible error messages
From now on, when trying to access from a device using the SMB1 protocol we will receive one of the following error messages:
- Unable to connect to file shares because it is not secure. This share requires the obsolete SMB1 protocol, which is not secure and could expose your system to attacks.
- Your system requires SMB2 or higher. For more information on how to solve this problem, we visit the following link:
Microsoft
- The specified network name is no longer available.
- Unspecified error 0x80004005
- The specified server cannot perform the requested operation.
As we see, Microsoft opted to move SMB1 and set SMB2 or SMB3 in Windows 10 for better performance.
The SMBv2 protocol was first included in Windows Vista and in Windows Server 2008 while the SMBv3 protocol was first included in Windows 8 and in Windows Server 2012.
SMB2 Features
When using the SMB2 protocol we will have features such as:
- Broader readings and writes that allow better use of faster networks, even those with high data latency.
- Capitalization request, which allows multiple SMB 2 requests to be sent as a single network request.
- General improvements focused on better network utilization.
- Caching of folder and file properties, where customers keep local copies of folders and files for much faster access to them.
- Support for symbolic links
- Message signing was improved thanks to better configuration and interoperability (HMAC SHA-256 replaces MD5 as hash algorithm).
- Enhanced scalability for file sharing
- Oplock client lease model
- Enhanced energy efficiency for client computers
- Support for previous versions of SMB
Now, one point that TechnoWikis wishes to clarify is that currently some earlier versions of Windows and many other applications running on Android and Linux are not compatible with the latest versions of SMB (2 and 3), so it will be impossible to connect a Windows equipment to such devices if only the most recent versions of SMB are enabled, in this case we must temporarily activate the SMB1 protocol to allow file transfer and now we will see how to activate it and how to deactivate it more ahead of some practical ways .
To keep up, remember to subscribe to our YouTube channel! SUBSCRIBE
1. Activate the SMB1 protocol using Windows 10 features
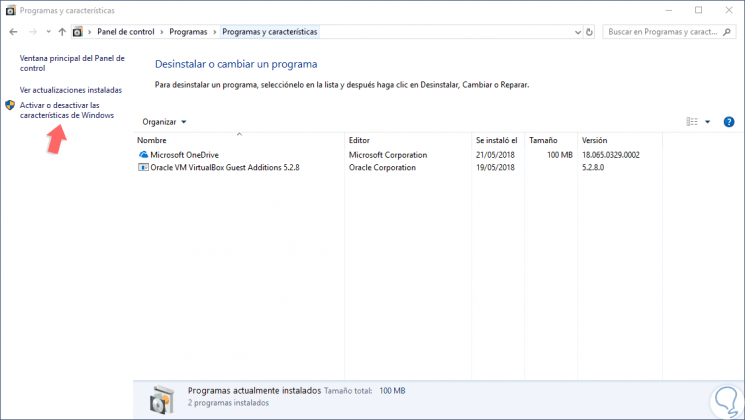
Step 1
To use this method we will go to the next route. There we click on the line "Activate or deactivate Windows features".
- Programs and characteristics
Step 2
Another more direct option to access is using the following keys and run the following line:
+ R
optionalfeatures.exe
Step 3
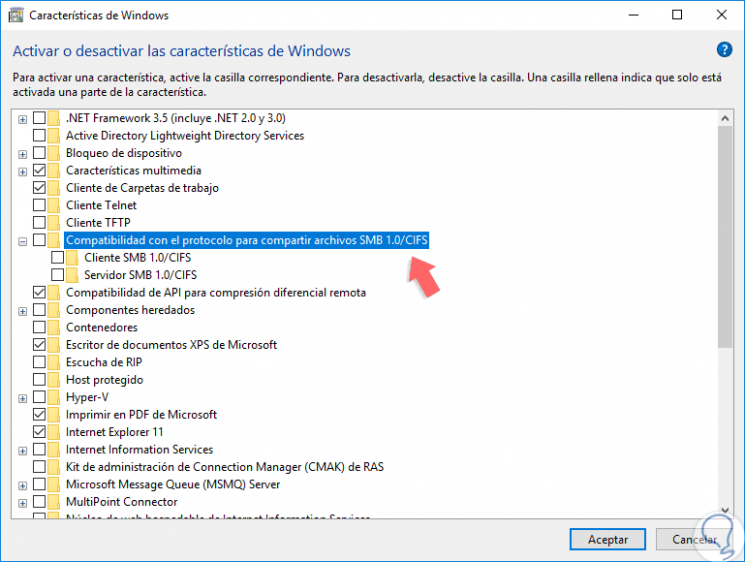
We will see the following window where we will go to the section “Compatibility with the protocol for sharing SMB 1.0 / CIFS filesâ€:
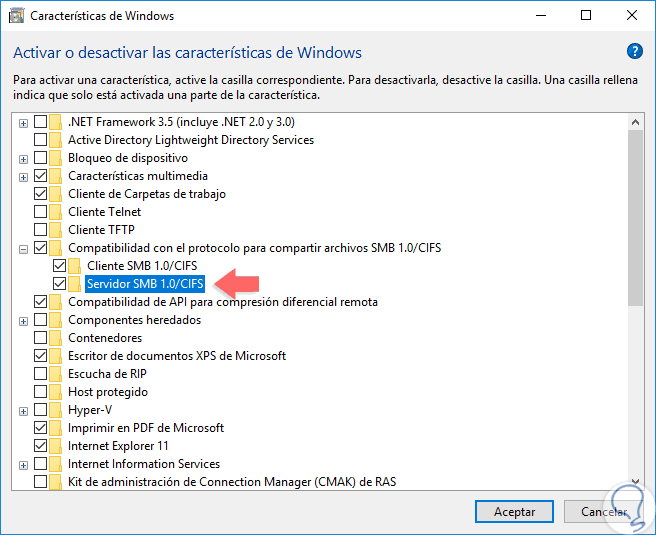
Step 4
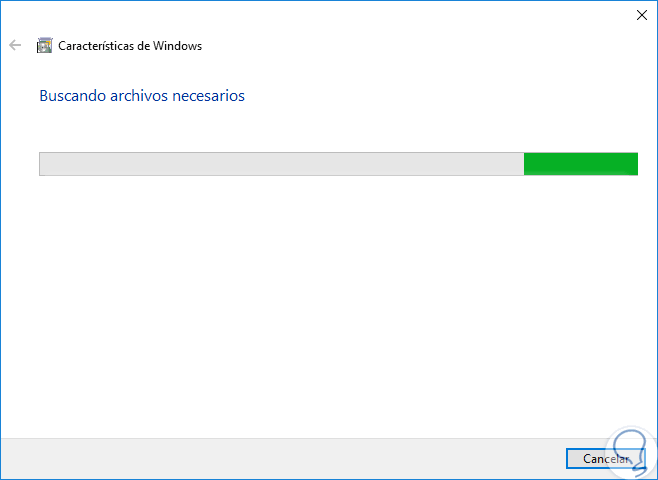
There we activate the “SMB 1.0 / CIFS Client†boxes and optionally the “SMB 1.0 / CIFS Server†box. Click on Accept and the activation process will begin:
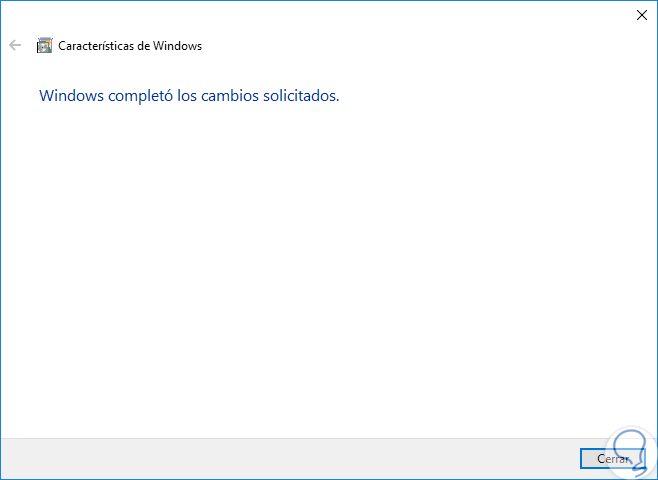
Step 5
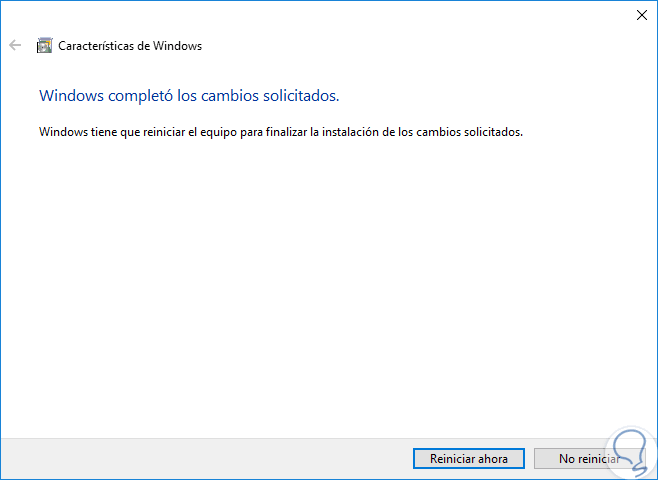
Once finished we will see the following. Click on "Close" to exit the wizard and in this way we have activated SMB1 using the Windows 10 features.
2. Disable the SMB1 protocol using Windows 10 features
Step 1
For this process we will go back to the next route.
- Programs and characteristics
Step 2
There we click on "Activate or deactivate Windows features" and now uncheck the boxes "SMB Client 1.0 / CIFS and SMB Server 1.0 / CIFS" (If it has been enabled):
Step 3
Click on OK to apply the changes and finally we will see the following:
Step 4
Click on the "Restart now" button so that all changes are applied to Windows 10. Remember that the activation of SMB1 must be temporary for compatibility reasons.
3. Activate the SMB1 protocol using Windows PowerShell Windows 10
Windows PowerShell is an ideal option to check, enable or disable these SMB protocols in a secure and fully functional way. For this we must perform all these actions as Windows PowerShell administrators.
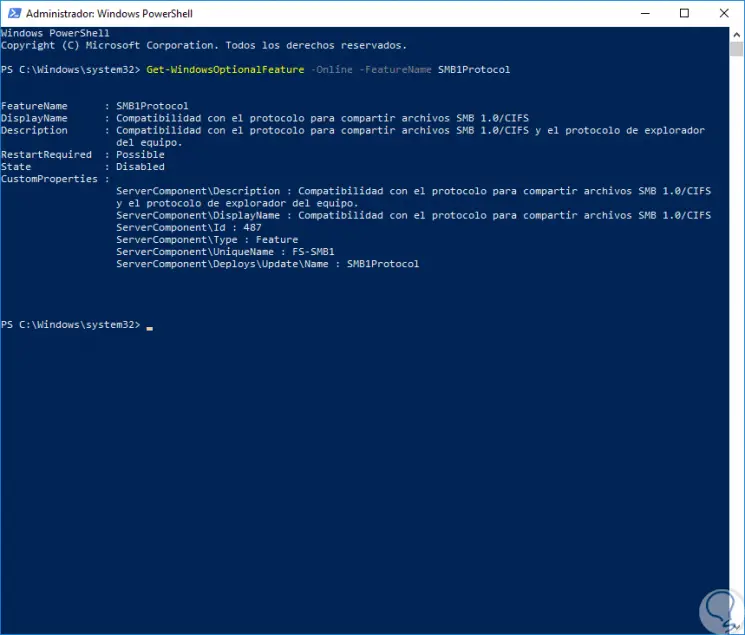
Detect the SMB1 protocol using PowerShell
To carry out this task we will execute the following:
Get-WindowsOptionalFeature -Online -FeatureName SMB1Protocol
The result will be as follows. There is the name of the feature, its description, whether or not it requires a reboot and more.
Enable SMB1 using PowerShell
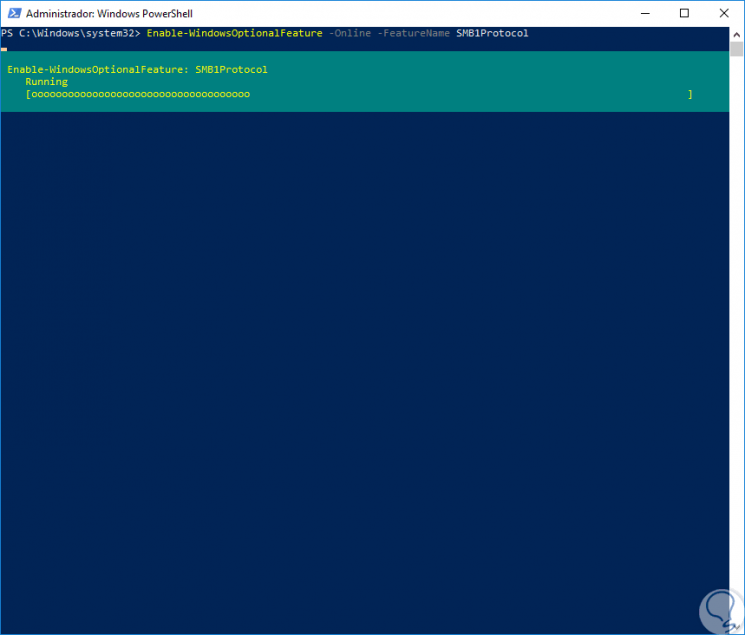
To carry out the process of enabling SMB1 in Windows 10 using this method we will run the following cmdlet:
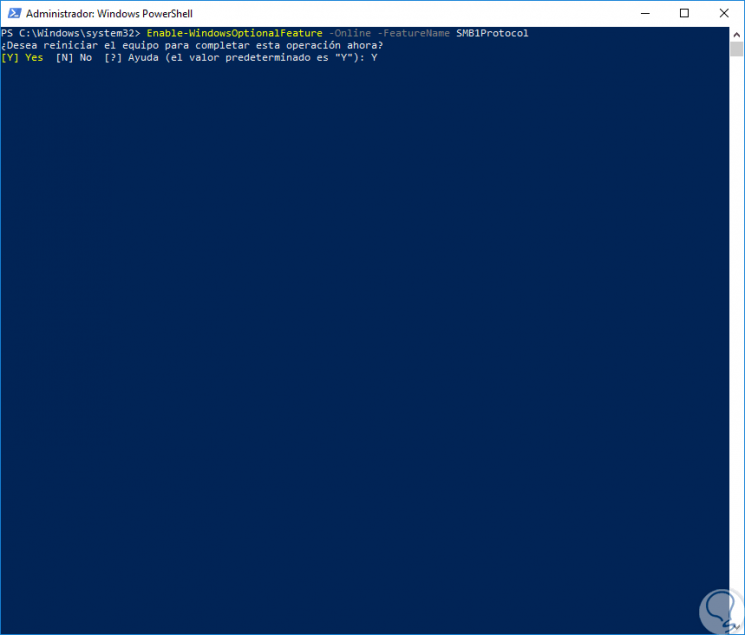
Enable-WindowsOptionalFeature -Online -FeatureName SMB1Protocol
Once this process is completed, the following will be displayed. There we enter the letter Y to restart the operating system and apply the changes.
4. Disable the SMB1 protocol using Windows PowerShell Windows 10
Step 1
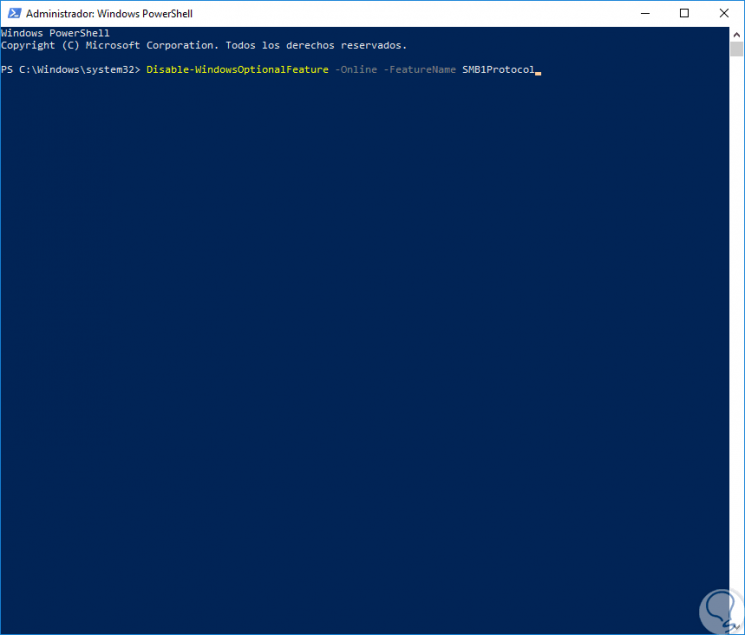
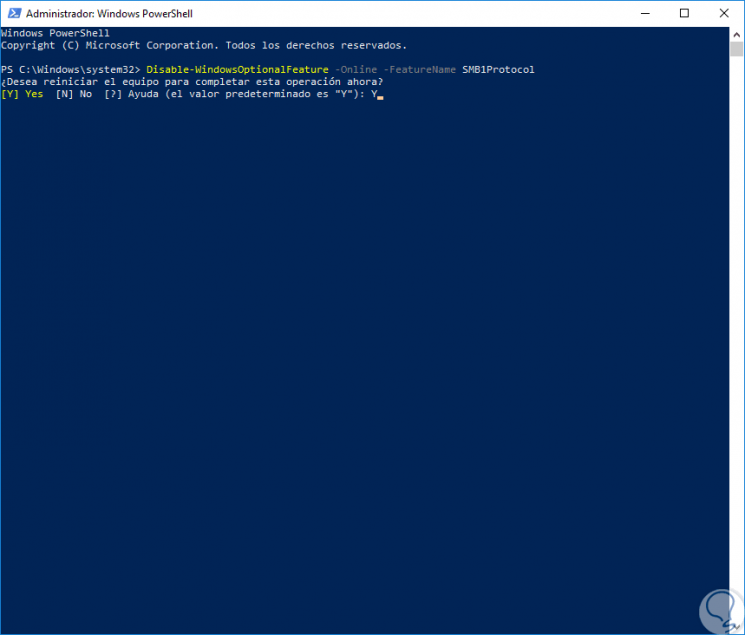
Now, when it is not necessary to use more SB1, we proceed to disable it in PowerShell by executing the following:
Disable-WindowsOptionalFeature -Online -FeatureName SMB1Protocol
Step 2
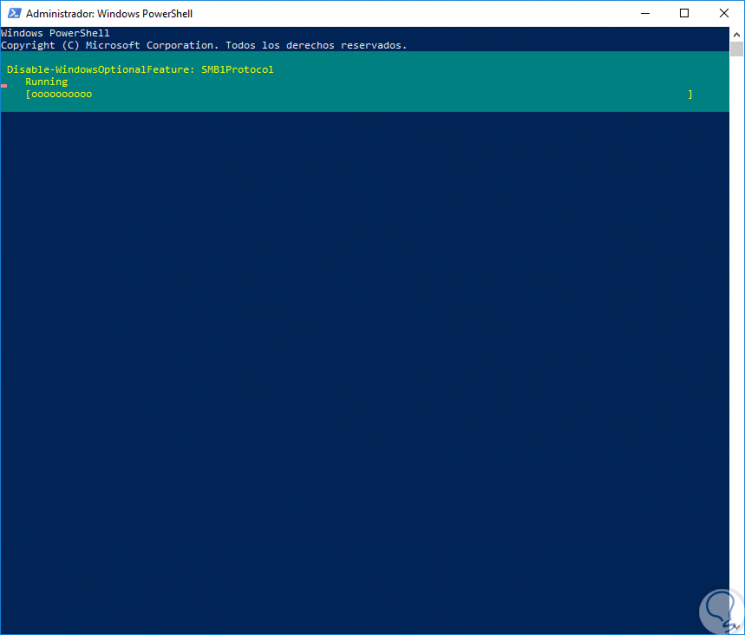
Press Enter and the disabling process will begin:
Step 3
Once finished it will be necessary to restart the system to complete the task. In this way we have managed SMB1 using Windows PowerShell.
5. Activate the SMB2 protocol using Windows PowerShell Windows 10
Now, we will use the PowerShell console again to manage the SMB2 protocol in Windows 10.
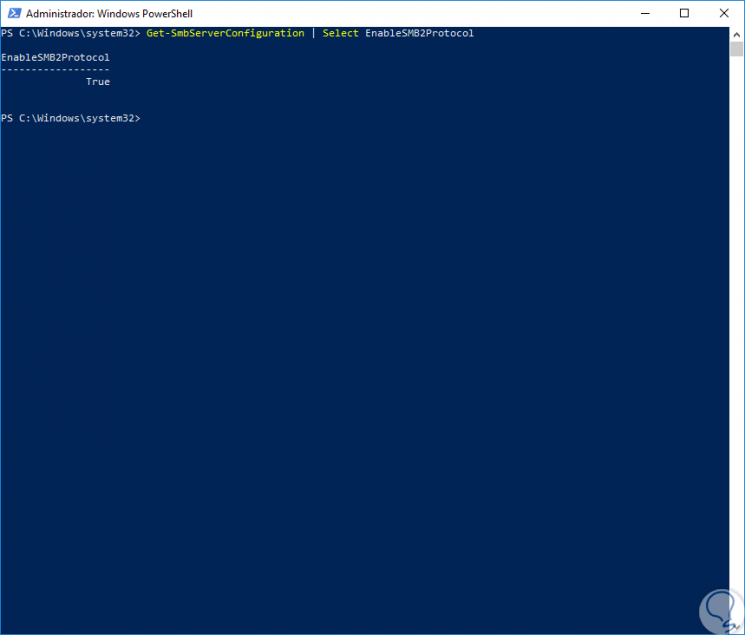
Detect the SMB2 protocol using PowerShell
To perform this action we will execute the following cmdlet. We can see that the result is valid.
Get-SmbServerConfiguration | Select EnableSMB2Protocol
Enable SMB2 using PowerShell
To enable the SMB2 protocol in Windows 10 we will execute the following:
Set-SmbServerConfiguration –EnableSMB2Protocol $ true
There we enter the letter S and press Enter to complete the action.

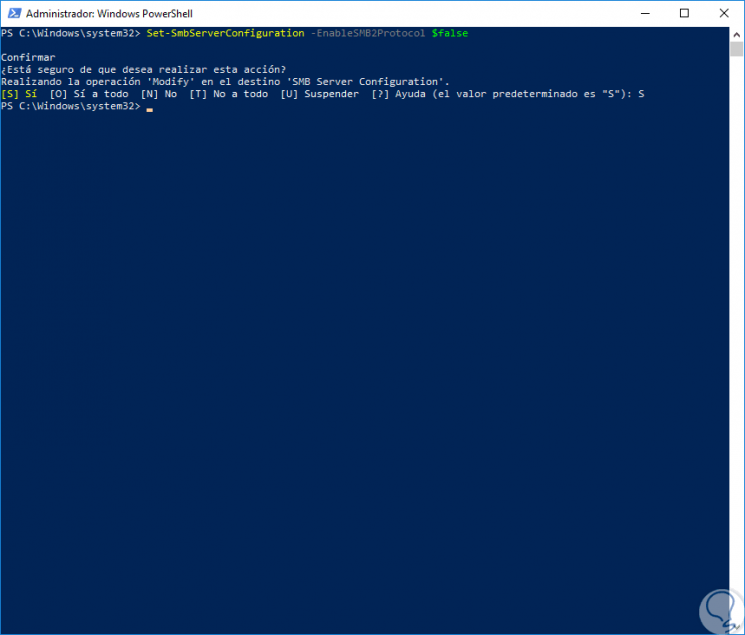
Disable SMB2 using PowerShell
If we want to disable this SMB2 protocol for some reason, just run the following cmdlet:
Set-SmbServerConfiguration –EnableSMB2Protocol $ false
We also enter the letter S to confirm and press Enter. We can see that SMB is composed of two elements that are Client and Server, in this tutorial we have based on the Client which is the ideal for file transfer, but TechnoWikis in its idea of ​​providing the best information will explain some ways to manage SMB at the server level which is used in both Windows 10 and Windows Server.
Detect SMB1 server with PowerShell
To detect the SMB1 server using PowerShell we will execute the following:
Get-Item HKLM: \ SYSTEM \ CurrentControlSet \ Services \ LanmanServer \ Parameters | ForEach-Object {Get-ItemProperty $ _. Pspath} 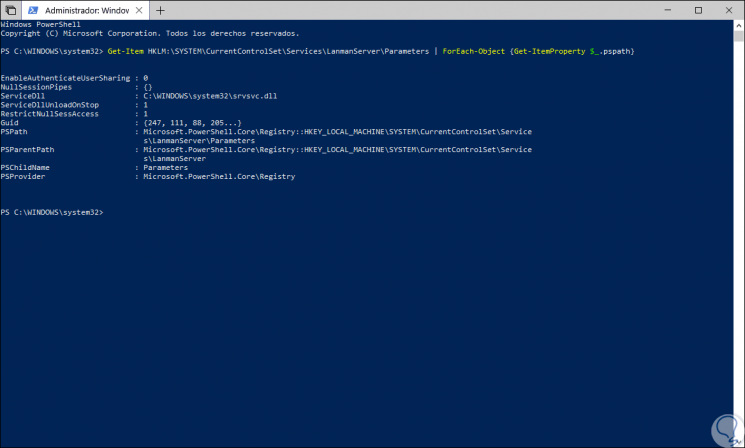
To enable the SMB1 server we will execute the following:
Set-ItemProperty -Path "HKLM: \ SYSTEM \ CurrentControlSet \ Services \ LanmanServer \ Parameters" SMB1 -Type DWORD -Value 1 –Force

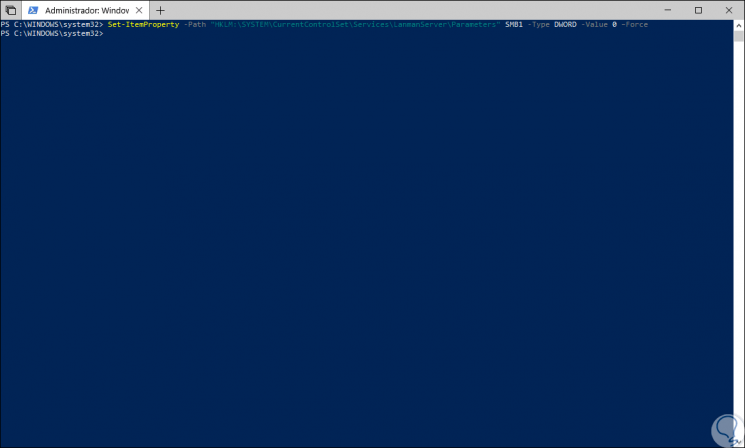
To disable the SMB1 server we will run the following cmdlet:
Set-ItemProperty -Path "HKLM: \ SYSTEM \ CurrentControlSet \ Services \ LanmanServer \ Parameters" SMB1 -Type DWORD -Value 0 –Force
Detect SMB2 or SMB3 server with PowerShell
To detect SMB2 or SMB3 on a server we will execute the following:
Get-ItemProperty HKLM: \ SYSTEM \ CurrentControlSet \ Services \ LanmanServer \ Parameters | ForEach-Object {Get-ItemProperty $ _. Pspath} 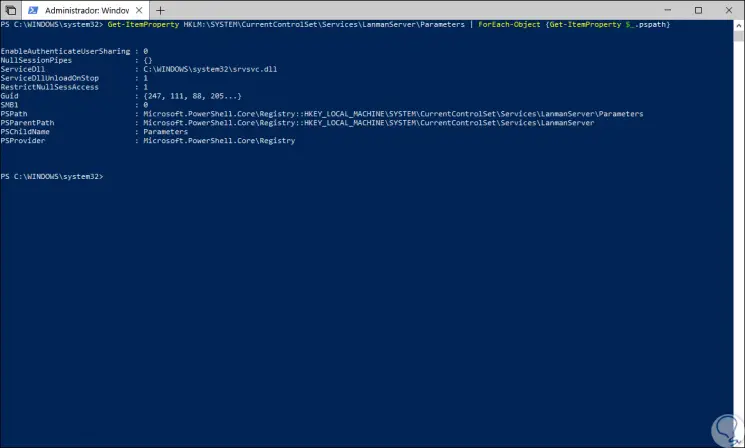
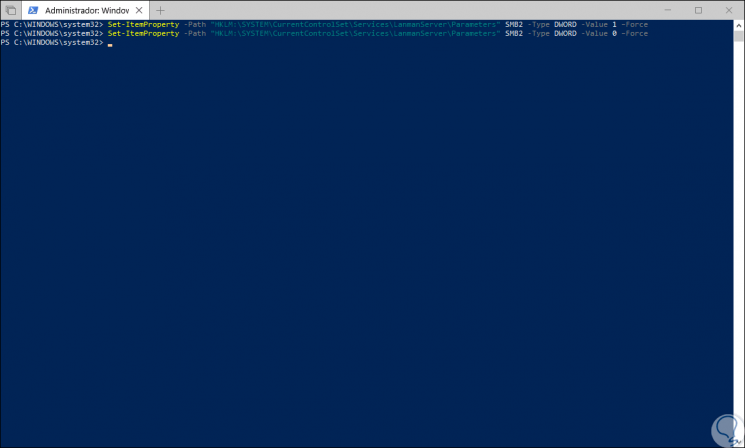
To enable it, we execute:
Set-ItemProperty -Path "HKLM: \ SYSTEM \ CurrentControlSet \ Services \ LanmanServer \ Parameters" SMB2 -Type DWORD -Value 1 –Force
To disable it we will execute. It is recommended to restart the system to apply the changes.
Set-ItemProperty -Path "HKLM: \ SYSTEM \ CurrentControlSet \ Services \ LanmanServer \ Parameters" SMB2 -Type DWORD -Value 0 –Force
6. Enable or disable SMB1 and SMB2 using Windows 10 Registry Editor
Another alternative to enable or disable the SMB1 and SMB2 protocol in Windows 10 and Windows Server is using the registry editor, but it is recommended to create a backup before making any changes to the editor.
Step 1
To access we will use the following key combination and execute the regedit command, press enter and in the displayed window we will go to the following route:
+ R
HKEY_LOCAL_MACHINE \ SYSTEM \ CurrentControlSet \ Services \ LanmanServer \ Parameters
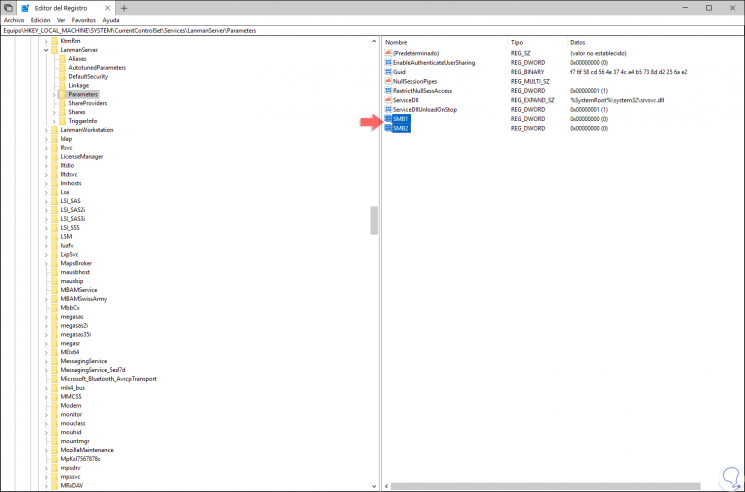
Step 2
There we find the SMB1 and SMB2 values ​​which we can edit by double clicking on them and assigning the following as required in the “Value information†field:
REG_DWORD: 0 = disabled REG_DWORD: 1 = enabled

7. Enable or disable SMB1 and SMB2 using Windows 10 Command Prompt
The CMD or command prompt also becomes an integral solution to manage the SMB protocol in Windows.
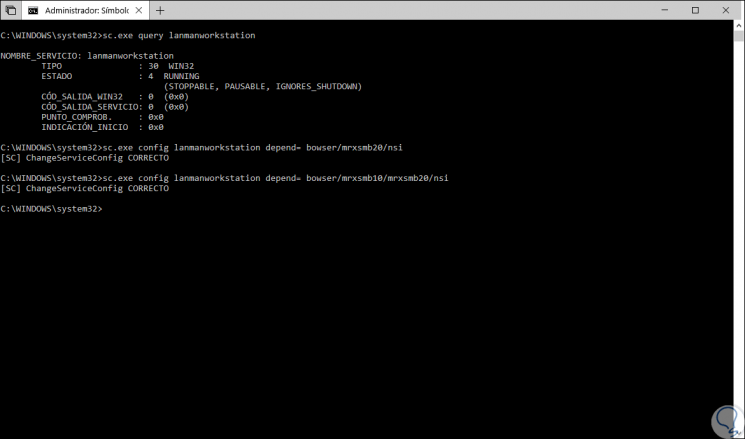
Step 1
In the case of SMB1 we can execute the following in the command prompt as administrators:
Detect SMB1
sc.exe query lanmanworkstation
Disable SMB1
sc.exe config lanmanworkstation depend = bowser / mrxsmb20 / nsi sc.exe config mrxsmb10 start = disabled
Enable SMB1
sc.exe config lanmanworkstation depend = bowser / mrxsmb10 / mrxsmb20 / nsi sc.exe config mrxsmb10 start = auto
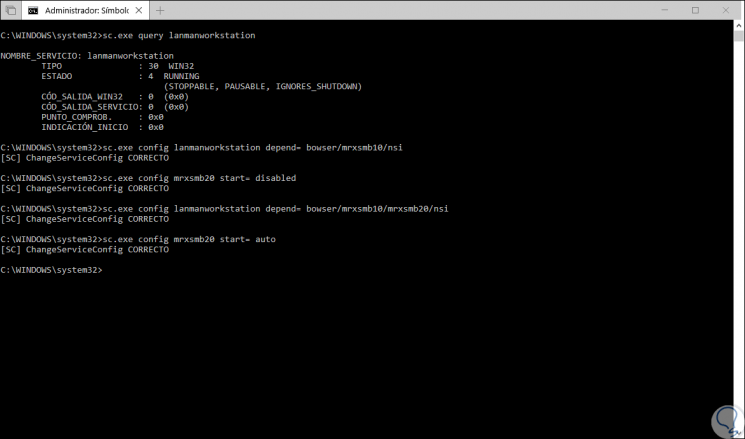
Step 2
In the case of SMB2 we will use the following:
Detect SMB2
sc.exe query lanmanworkstation
Enable SMB2
sc.exe config lanmanworkstation depend = bowser / mrxsmb10 / mrxsmb20 / nsi sc.exe config mrxsmb20 start = auto
Disable SMB2
sc.exe config lanmanworkstation depend = bowser / mrxsmb10 / nsi sc.exe config mrxsmb20 start = disabled
We have tested various methods to fully manage the SMB protocol remembering that SMB1 is deprecated for the reasons already indicated.