Internet networks have had a wide growth worldwide but independent of the capacity of the network, its coverage or its type of technology, there will always be a component that will continue to be present and are the IP addresses ; since they are the identifier of our network card before the world of Internet..
Currently the most used protocol is IPv4. Due to its excessive use, Ipv6 is being implemented to meet the high demand for IP addressing. However, regardless of whether we use an IPv4 or IPv6 address there will always be two types of addresses that are:
Static IP addresses
These IP addresses are set on the network card and are used as a rule in administrative equipment or providing services, such as servers; or in specific equipment where a constant and stable connection is required.
Dynamic IP addresses
These types of addresses are supplied by a provider, server, DHCP which renews said address from time to time and although this process is invisible to the user and the change of the address is not perceived, on computers that require a fixed IP this is a Sometimes serious problem.
Today in TechnoWikis and through this tutorial will explain the process to configure a static or dynamic IP address in Ubuntu 18.04 and thus establish the best option as appropriate.
What in Netplan and how to use it in Ubuntu 18.04
Netplan is a command line utility implemented since Ubuntu 17.10 which has the mission of simply managing and configuring network configurations on all Ubuntu systems.
With Netplan it will be possible to configure a network interface using YAML abstraction and Netplan can also work together with the NetworkManager and networkd network daemons as interfaces for the system kernel.
1. How to know the network interfaces available in the system to configure static IP address or DHCP in Ubuntu 18.04
First of all, it will be necessary that we have knowledge of the network interfaces available on the computer and for this we will execute the following command:
ifconfig -a
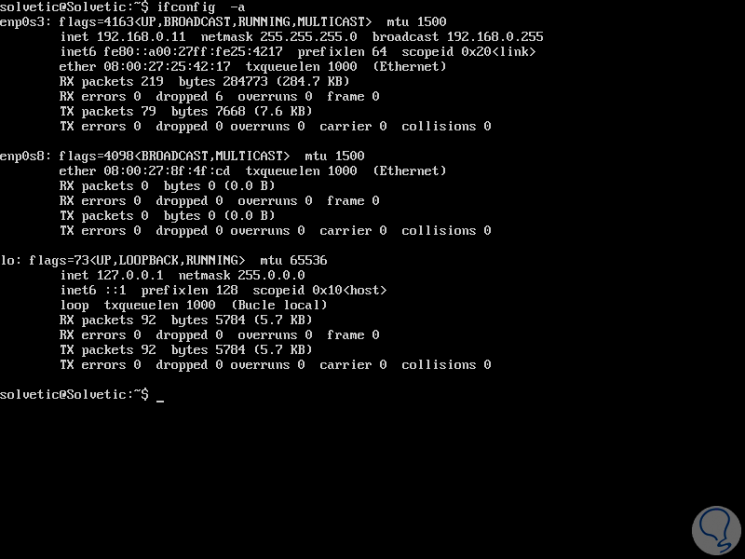
We can see that in this case we have two network interfaces:
The interface serves as an operations backlock.
2. How to set a static IP address in Ubuntu 18.04 (Linux)
Now we are going to configure a static IP address for the enp0s8 network interface.
Step 1
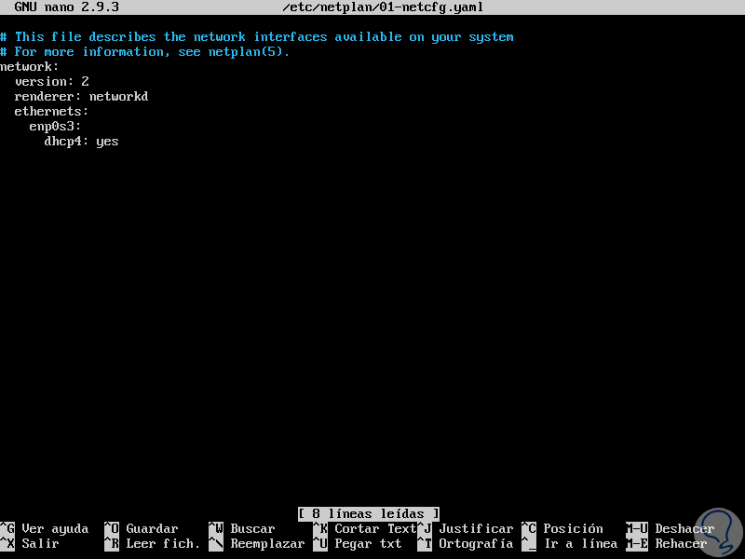
This will require opening the Netplan configuration file using any text editor like this:
sudo nano /etc/netplan/01-netcfg.yaml
Note
If the distribution installer does not create the YAML file, it can be generated with the required configuration for the processors by running the following command:
sudo netplan generate
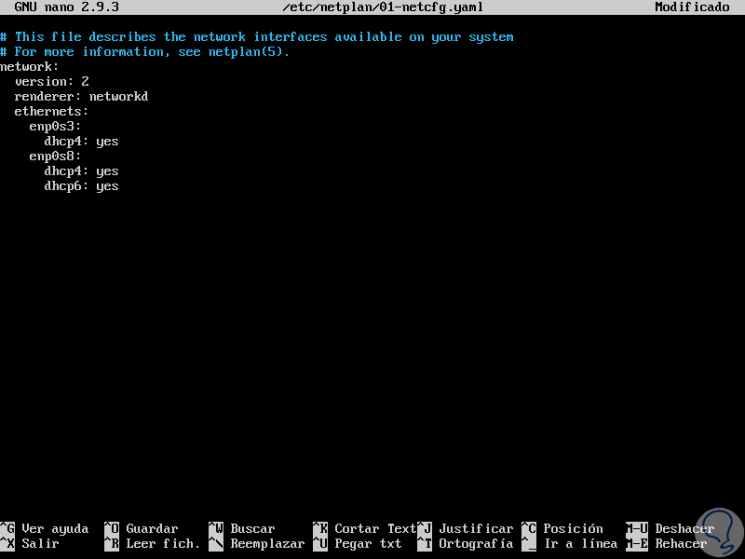
When accessing the configuration file we will see the following:
Step 2
We can see that by default the active network interface is displayed, in this case enp0s3, there we will add the following under the ethernets section:
enp0s8: dhcp4: no dhcp6: no addresses: [192.168.0.20/24,] gateway4: 192.168.0.1 nameservers: addresses: [8.8.8.8, 8.8.4.4]
The fields to complete are:
enp0s8
name of the network interface to configure
dhcp4 and dhcp6
It refers to the DHCP method of an interface for IPv4 and IPv6 respectively.
Addresses
It is the sequence of static addresses for the interface.
gateway4
Is the IPv4 address for the default gateway to use
nameservers
It is a sequence of IP addresses for nameserver.
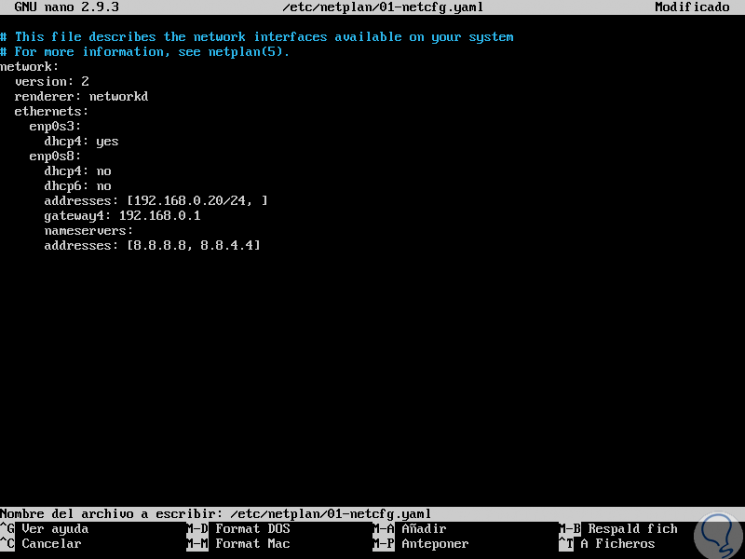
In this case we will use public DNS servers from Google..
Step 3
Once we configure these values ​​we use the keys
We apply the changes using the following command:
sudo netplan apply
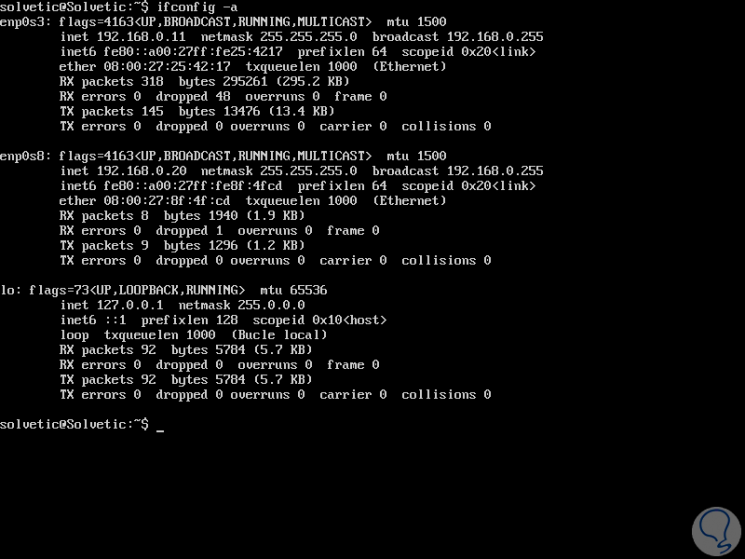
We can execute the ifconfig -a command again to see that the assigned address has been applied correctly:
3. How to configure a dynamic IP address (DHCP) in Ubuntu 18.04
Step 1
To define the IP address by DHCP, simply access the following route again:
sudo nano /etc/netplan/01-netcfg.yaml
There we configure the following:
network: version: 2 renderer: networkd ethernets: enp0s8: dhcp4: yes dhcp6: yes
We save the changes again using the following keys:
+ O Ctrl + O
We left using the key combination:
+ X Ctrl + X
Step 2
Now, we apply the changes by executing:
sudo netplan apply
We can see that a dynamic IP address is assigned by executing:
ifconfig -a

Step 3
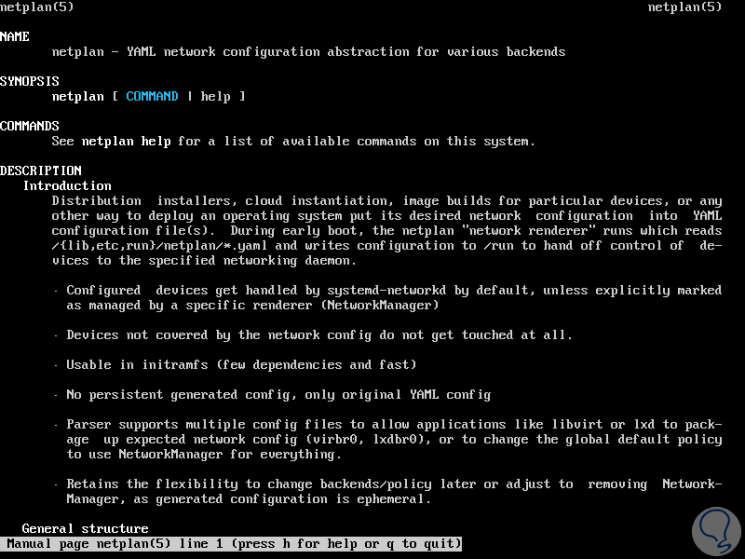
If we want to get help from the netplan command, we can execute the following command:
man netplan
It's that simple to configure an IP by DHCP or static in the new version of Ubuntu.