Nowadays we store a lot of information in our computers , since in these devices we carry out a lot of activities such as searching and downloading information, we store different documents, we send and receive different files, we access our social networks , we manage email or We download different content. That is why taking the necessary and adequate security measures to keep this safe is important for the integrity of our information..
One of the security measures in Windows to protect all the information stored there, is the detection of networks which is activated when we are in a private network environment, but is automatically deactivated when accessing a public network with the in order to prevent our equipment from being exposed and may be vulnerable to attacks or other unauthorized access.
Within the functions of network detection we have the opportunity to configure file sharing with which we can establish a central point for other users to access this type of elements such as documents and printers . This can be very useful since in this way we can easily access different information, establishing this access with other users..
Let's see how to activate network detection and optimally configure sharing in Windows 10.
To keep up, remember to subscribe to our YouTube channel! SUBSCRIBE
1. Enable network detection in Windows 10
It is important that we activate network detection if our equipment is not detected by others on the network or it is not possible to share elements.
Step 1
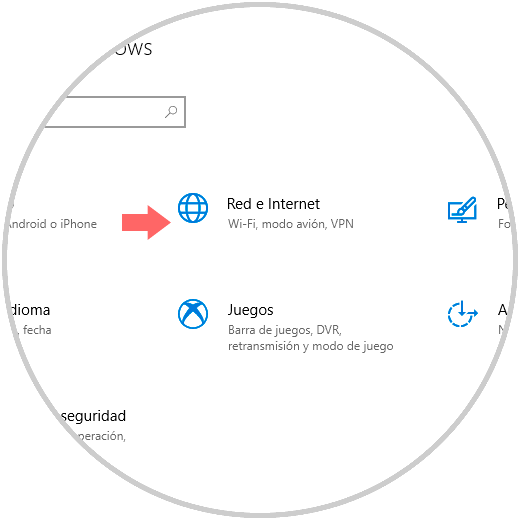
To activate the detection, or verify if it is active, we go to the Start menu and there we select “Settings†where we will see the following:
Step 2
There we select the “Network and Internet†category and go to the “Ethernet†section where we will see the following:
Step 3
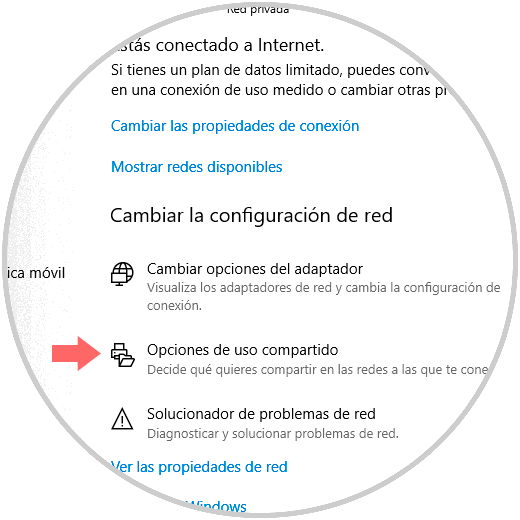
There we click on the “Sharing options†line and in the window we will open, check the box “Activate network detectionâ€. Once this is done, click on the “Save changes†button and then we will leave this window, in this way we have activated the detection of networks in Windows 10.

2. Enable file and printer sharing in Windows 10
This option gives us the opportunity to share folders, files and printers on the local network with other computers and devices on the same network and thus have the opportunity to interact with other users in an integral way.
Step 1
To activate file and folder sharing, we will go to the following path:
- Network and Internet
- There we go to the State section, and we will see the following:
Step 2
Click on the “Sharing options†line and the following window will be displayed:

Step 3
As we can see, there we have 3 options of profiles to use which are the following. We must access the profile that we are using at the moment, it will have in brackets the legend "Current profile", and there validate that the box "Activate file and printer sharing" is selected. Click on "Save changes" and we can exit the assistant.
3. Enable public folder sharing in Windows 10
Step 1
The entire public profile in Windows 10 is found in the following route:
C: \ Users \ Public
Step 2
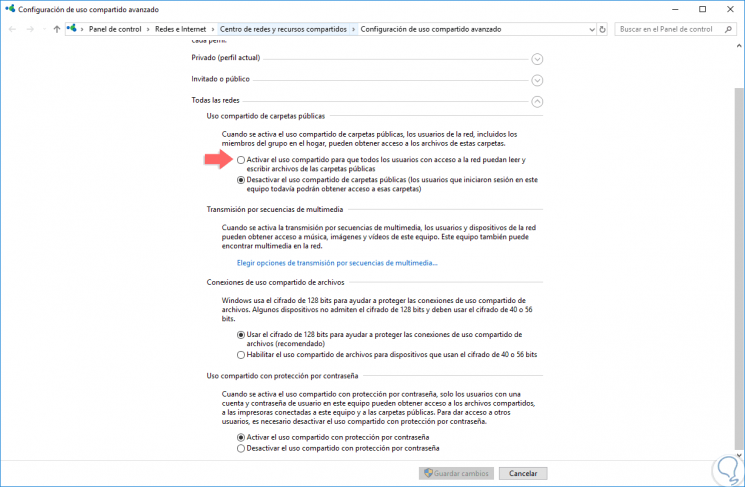
There, all users registered in the system will be able to access and it is a folder where, for security, we should not host sensitive information since access there will be without restriction. For this, we will follow the route of the previous step, and there we go to the “All networks†section and expand it to see the following:
Step 3
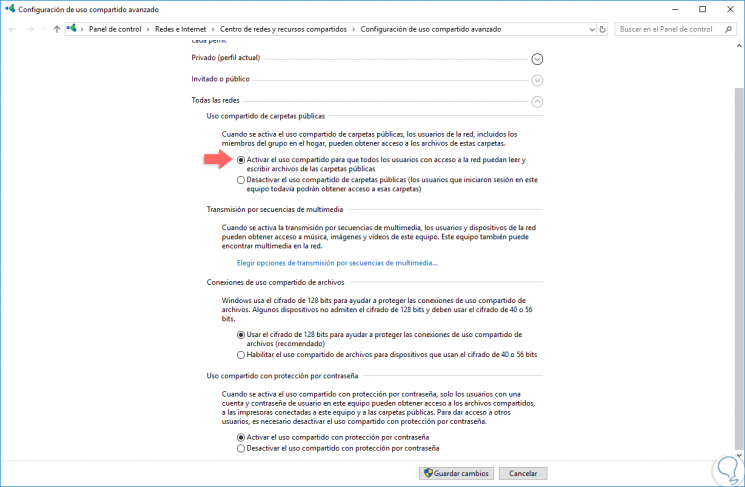
There we must enable the "Enable sharing for all users with network access to read and write files from public folders" box. Click on the "Save changes" button to apply the settings and we can exit this window.
4. How to know which folders are shared in Windows 10
We may have shared different folders with users, but there comes a time when we do not know which are all of them. That is why it is interesting to know all the methods that we have in Windows 10, to know what folders we have shared with other users and thus be able to keep track of this.
The methods to know which folders have been shared are several since we can do it through the command execute, CMD, Windows Power Shell or through the file explorer. That is why we show you a very complete video tutorial in which you will be able to find in detail all these options so that you can use the one that is most comfortable for you..
To keep up, remember to subscribe to our YouTube channel! SUBSCRIBE
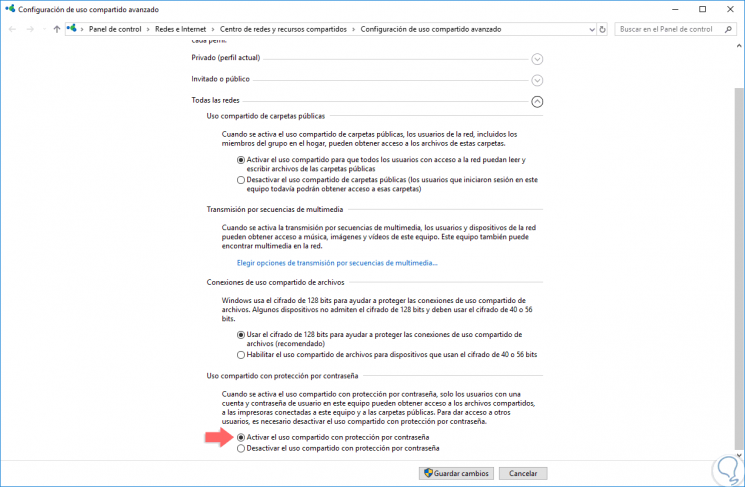
5. Enable password for sharing in Windows 10
One of the best ways to protect access to the content of our data in Windows 10 is to assign a password so that everyone who wants to access the data must enter their credentials.
Step 1
To enable this option, we will go to the previously described route of sharing or access using the following route.
- Center network and sharing
- Advanced Sharing Settings
Step 2
There we will activate the “Enable sharing with password protection†box located in the lower section:
Note
In addition you can also change the level of encryption of sharing, so that the elements are more secure in Windows 10.
To keep up, remember to subscribe to our YouTube channel! SUBSCRIBE
6. How to connect two networked computers
As we have seen, there are different ways to transfer information between Windows computers, but we must not forget that there is also the possibility of connecting two computers with network cable in Windows 10. In this way we will be joining two computers to the local network through Ethernet This allows us to create a stable and reliable connection between both teams.
For this process, it is very important first to determine the type of cable to be used, depending on the devices to be connected. To know all the details about how to select this and how to carry out the process, we show you below a tutorial in which you will find all the steps in detail with this information.
In this way, when a user tries to connect to our equipment, they must enter their username and password for validation, otherwise access will not be possible. It's that simple we can activate and configure file and network sharing in Windows 10.