One of the most necessary and important tasks in Windows 10 is the update of the operating system , since there we have several bug fixes, security patches and improvement of the overall performance of the operating system..
As usually happens on some occasions, certain errors are generated that we do not know its cause and one of them is the error code 0x80240fff, which affects both Insiders and non-Insiders. This error prevents the system from finding the available updates and this is somewhat sensitive for the reasons mentioned.
Now, According to Microsoft, this error occurs if the custom content uses a Product name that matches the existing Category name, that is, it creates a product within SCUP called "Tools." This confuses the system when evaluating the categories since they exist there, since a product called "Tools" and an update classification called "Tools" is available, or another example, is if the product name were control panel when we know very Well, this already exists in Windows 10..
Today in TechnoWikis we will see some practical solutions to correct this error.
1. Pause updates to fix error 0X80240FFF in Windows 10
This option allows us to pause the entire update process for a while while internally correcting this error, but this alternative is only available for Pro editions of Windows 10.
Step 1
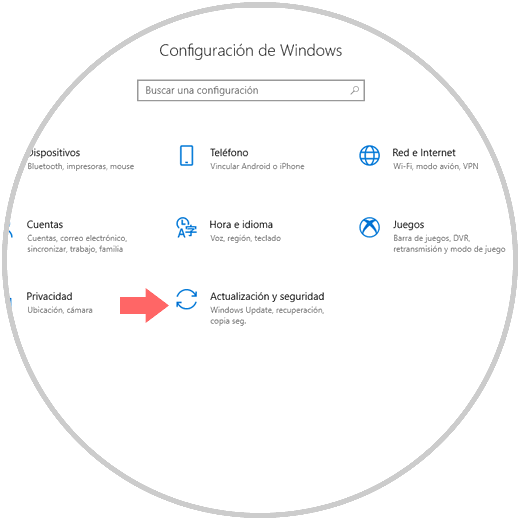
To do this, we go to the "Start" menu and there we select "Settings". There we click on the "Update and security" option
Step 2
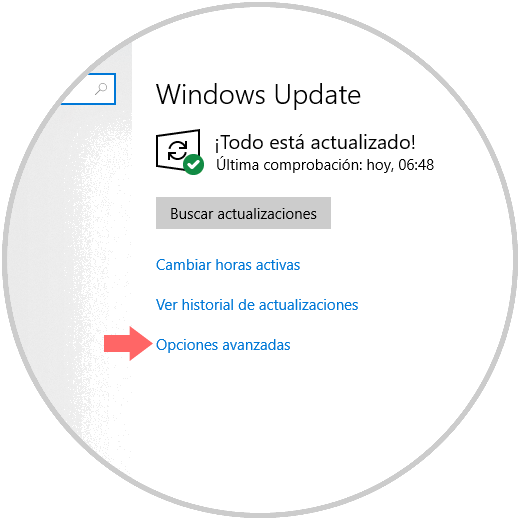
We will see the following. Click on the "Advanced options" line
Step 3
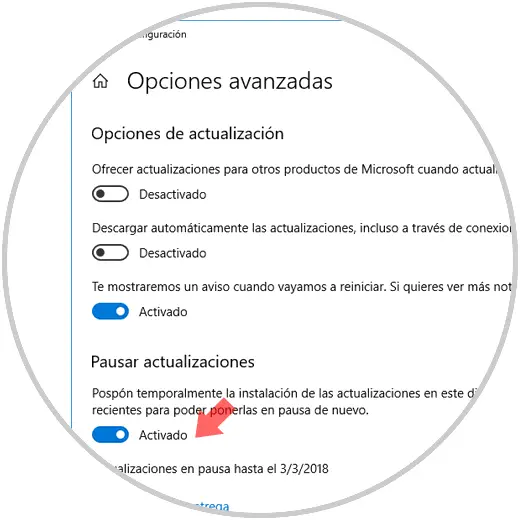
In the new window displayed, we activate the switch of the "Pause updates" section:
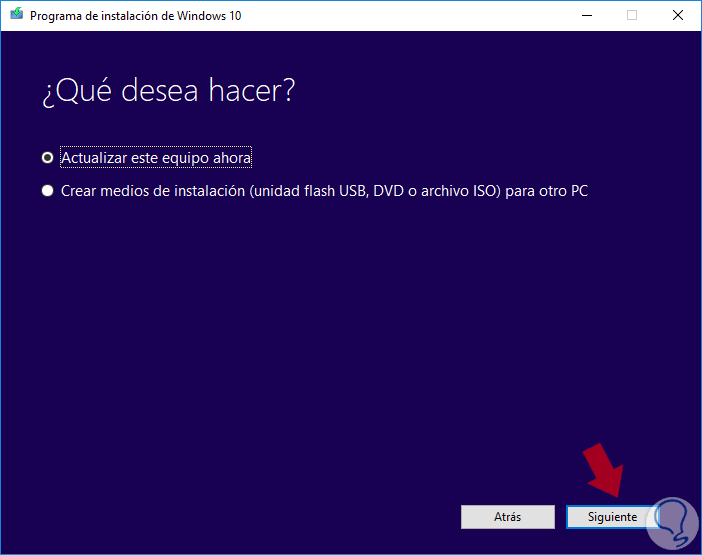
2. Use the Windows Media Creation tool to fix error 0X80240FFF in Windows 10
This option applies to all editions of Windows 10 and allows us to update the operating system by downloading the latest available updates.
Step 1
This tool is available in the following link:
Windows Media Creation
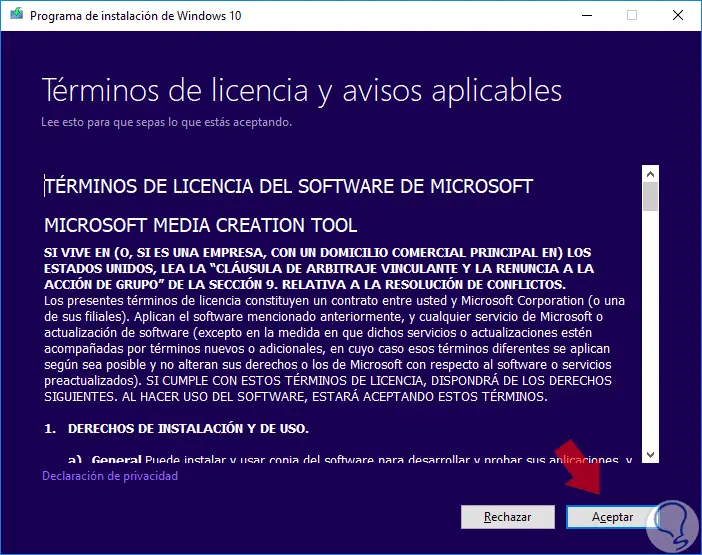
Once we download it, we proceed to its execution and it will be necessary to accept the terms of the license:
Step 2
Then we select the option "Update this equipment" and follow the steps of the wizard:
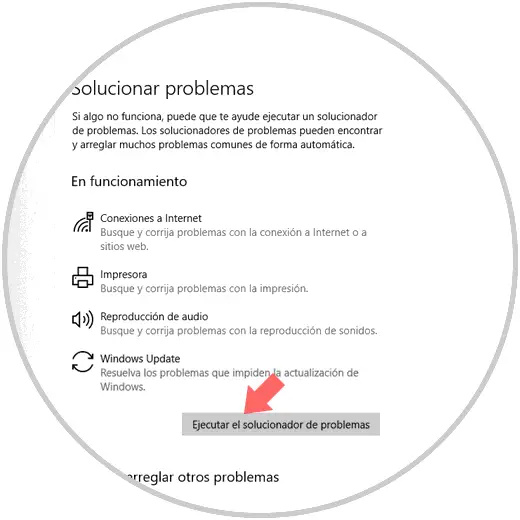
3. Run the troubleshooter to fix error 0X80240FFF in Windows 10
Windows 10 includes a practical tool that gives us the possibility of solving various problems in multiple system elements automatically or providing possible solutions.
Step 1
To access this utility, we go to the menu:
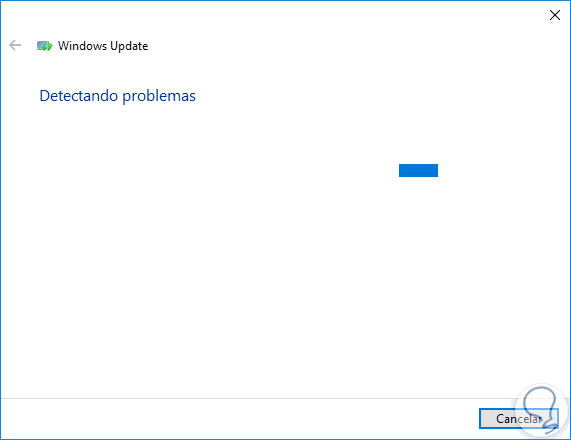
There we will click on the "Windows Update" option and click on the "Run the troubleshooter" button:
It will automatically start the analysis process in search of errors with its respective solution:
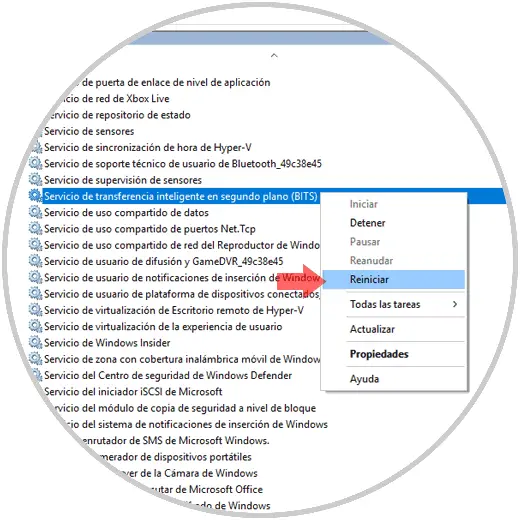
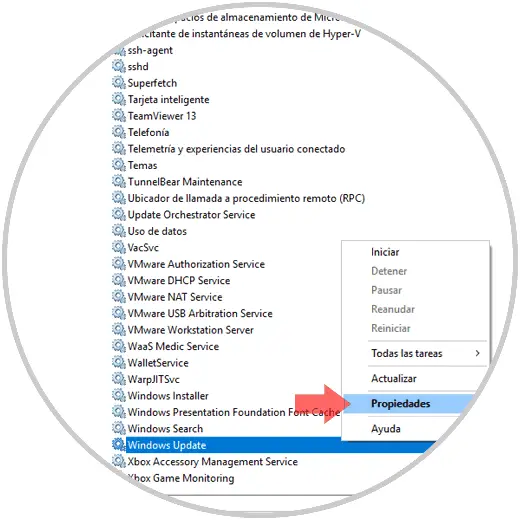
4. Restart the Intelligent Background Transfer service to fix error 0X80240FFF in Windows 10
The Background Intelligent Transfer Service (BITS) transfers files (downloads or uploads) between a client and server and provides progress information related to transfers. In some cases this may be the cause of the download errors in Windows 10 and for this we must restart it.
Step 1
To achieve this, we will use the following key combination:
+ R
Now we execute the command
services.msc
Press "Enter" or "Accept."
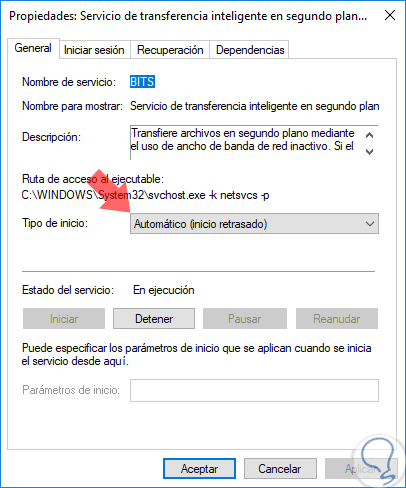
In the pop-up window we locate the service called "Intelligent Transfer Service" in the background (BITS), we will right click on it and select the "Restart" option:
Note
Additionally, we can double-click on it and in the Startup type field we select the Automatic (delayed start) option. Click on "Apply and Accept" to save the changes.
5. Reset Windows Update components to fix error 0X80240FFF in Windows 10
This option gives us the possibility to restore the default Windows Update components and thus validate that updates can be received without problem.
Step 1
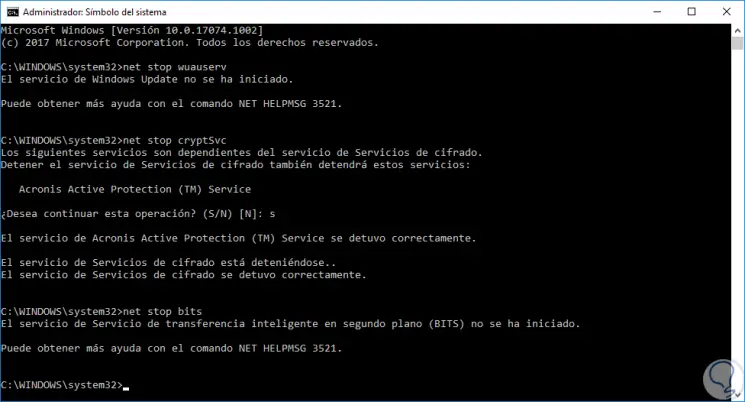
To do this, we must access the command prompt as administrators and there execute the following commands:
net stop wuauserv net stop cryptSvc net stop bits net stop msiserver
Step 2
Then, we will change the name of the "SoftwareDistribution" and "Catroot2" folder by executing the following commands:
Ren C: \ Windows \ softwareDistribution SoftwareDistribution.old Ren C: \ Windows \ System32 \ catroot2 Catroot2.old
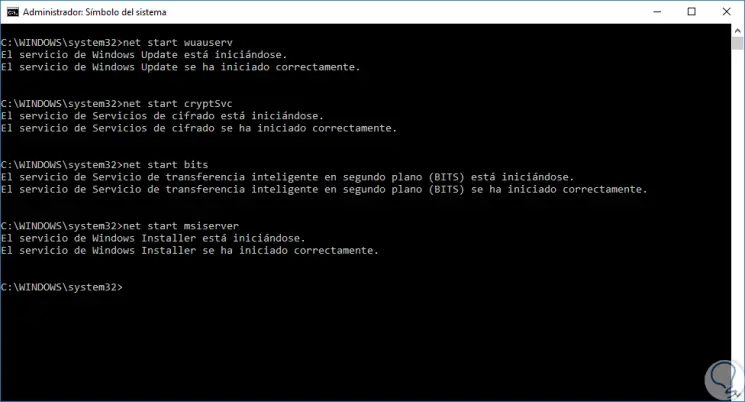
Finally, we will restart all services by running:
net start wuauserv net start cryptSvc net start bits net start msiserver
6. Download updates manually to fix error 0X80240FFF in Windows 10
Microsoft offers us the global catalog utility where we can manually download the updates available for the system, for this we can go to the following link:
Microsoft Catalog
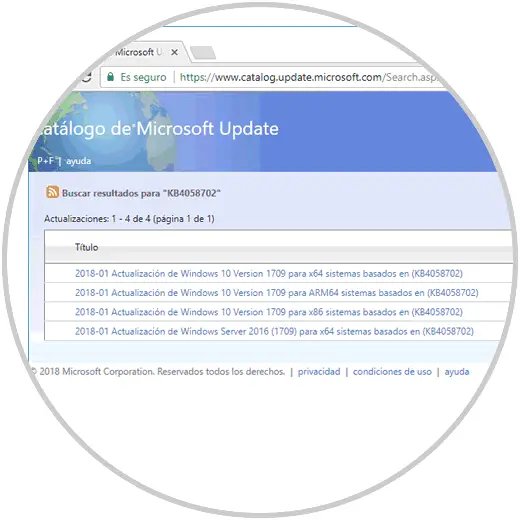
There we will download the updates we deem necessary..
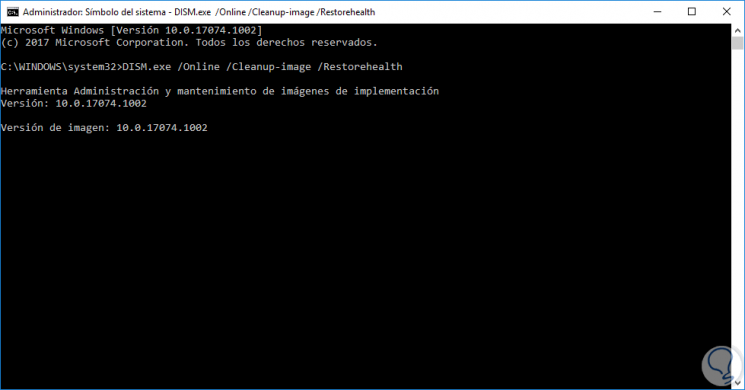
7. Fix errors with DISM to fix error 0X80240FFF in Windows 10
DISM is a utility built into Windows 10 through which you can correct numerous problems associated with the system image.
To execute it, we will access the command prompt as administrators and there we will execute the following:
DISM.exe / Online / Cleanup-image / Restorehealth
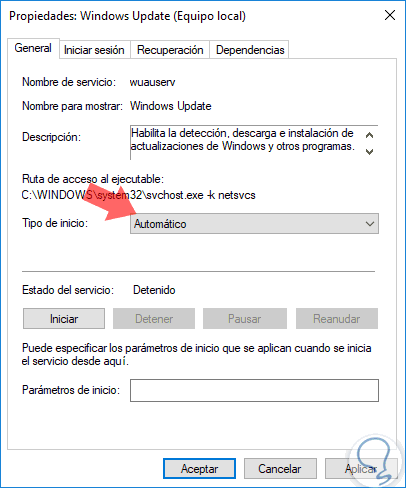
8. Configure the Windows Update service to correct error 0X80240FFF in Windows 10
Step 1
To access this service, we will use the following keys:
+ R
We execute the command:
services.msc
There we locate the service called Windows Update, right click on it and select "Properties":
Step 2
In the displayed window we will configure the following: In the "General" tab, we define the "Automatic" value in the "Startup type" field:
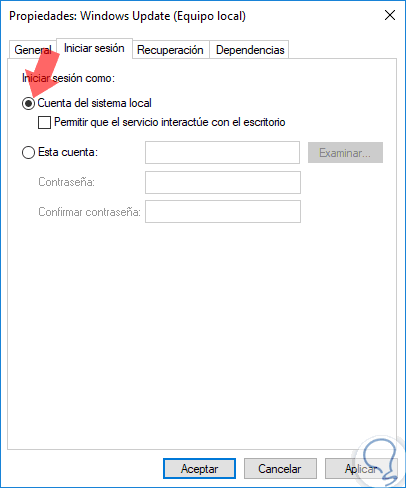
Step 3
In the "Log in" tab, we validate that it activates the "Local system account" box:
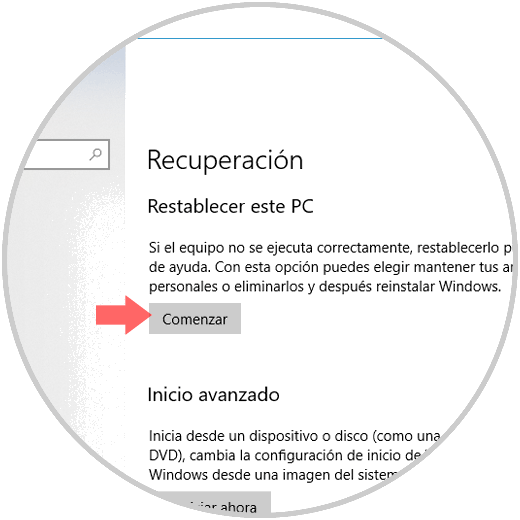
9. Reset Windows 10 to fix error 0X80240FFF
If none of the above steps gives us a comprehensive solution to this problem, we can ultimately resort to reinstalling the operating system and Windows 10 allows us to do it easily.
To do this we go to the menu:
Click on the "Start" button located in the "Reset this PC" field and follow the steps of the wizard.
Thus, we will have varied options to solve this problem of updates in Windows 10.
10. Validate antivirus and VPN software to fix error 0X80240FFF in Windows 10
Both antivirus and VPN software can influence the behavior of downloading updates by restricting your download from the official site.
In this case we must access the configuration of these and from there validate that this does not interfere with Windows Update.