There are currently many operating systems that are developed with a fundamental purpose and it is to allow administration tasks to be much simpler, but at the same time more complete. One of these systems is ClearOS which is an open source operating system which is based on CentOS and Red Hat Enterprise Linux (RHEL)..
ClearOS was intended to be implemented in small and medium-sized businesses with a special function: Be used as a server or network gateway.
Today in TechnoWikis we will see how to install and use ClearOS completely..
ClearOS
ClearOS has an intuitive graphical user interface which is web based and has an application market of more than 100 applications to select, this is useful since we can take advantage of open source software and thus determine what applications we need and Only pay for applications and support that are required without incurring unnecessary expenses.
ClearOS features
Some of its main features are:
- Simplicity of use: Installation and configuration are simple with ClearOS since it is preinstalled on the server by default. The intuitive web-based graphical user interface will give small and medium-sized businesses the ability to navigate effortlessly in the Application Marketplace utility and download and implement the necessary applications for the necessary business processes.
- It does not require additional costs: ClearOS is preloaded on specific intelligent servers focused on SMB protocols and we can also implement it using Intelligent Provisioning. This does not add any additional cost to the platform and later, all necessary updates, patches and corrections will be provided at no additional cost through SMB.
- Focused on needs: ClearOS has an online store with more than 100 applications and services that SMEs can explore and select to install on their server.
On a corporate level, ClearOS is available for preload on HPE ProLiant ML110, ML30 and DL20 servers, allowing servers to be ready for use immediately and HPE is also managing to make ClearOS available for download and installation through Intelligent Provisioning on all ProLiant 300 series servers with which we see the alliance between ClearOS and HP.
In this case we will download ClearOS 7 Community Edition in the following link:
ClearOS
This is because this is the free version and there are other trial editions such as ClearOS Home or Business. Now we will see how to install ClearOS in a simple way..
1. How to configure the computer to install ClearOS Linux
Once we download the ISO image of ClearOS, we will burn it to a bootable CD, DVD or USB memory and we will configure the equipment so that it starts up from there.
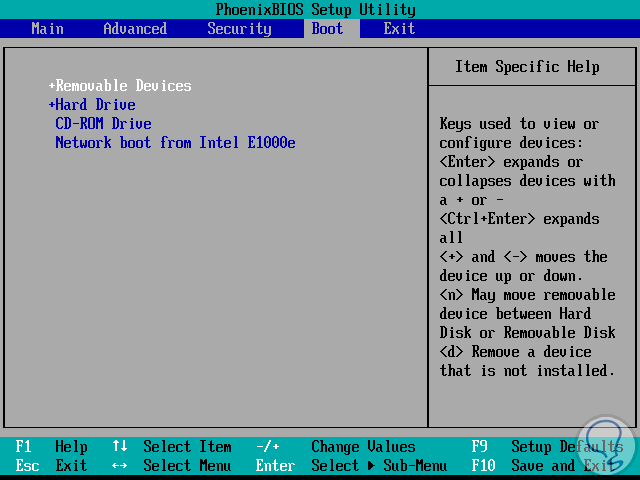
Step 1
For this, we access the BIOS or UEFI and in the Boot section we define the type of medium to use:
Step 2
Once this is configured, we start the boot and we will see the following:
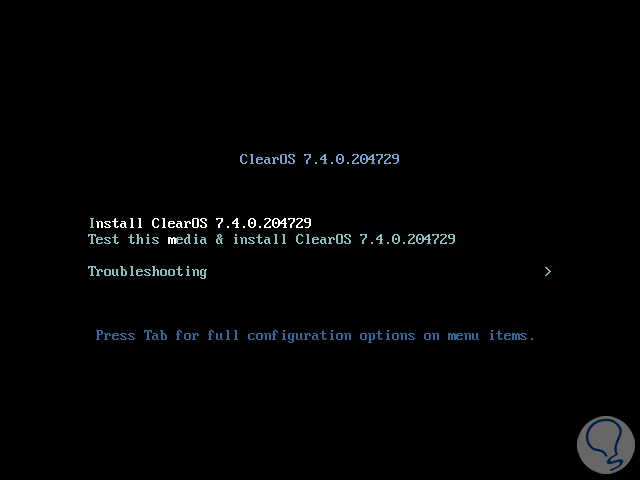
There we have the following possibilities:
Install ClearOS 7.4
It allows us to start the installation process directly
Test this media & Install ClearOS 7.4
This option is responsible for conducting a test that the minimum hardware requirements are met and if so, proceed with the installation
Troubleshooting
Solve problems associated with the installation
Step 3
In this case we will select the first option and then we will see the following window where we will select the installation language of ClearOS 7:

Step 4
Once we select it, click on Continue and there we will see the Installation Summary screen, we can see that there are many options to fully customize the system before installing the system files on the disk:
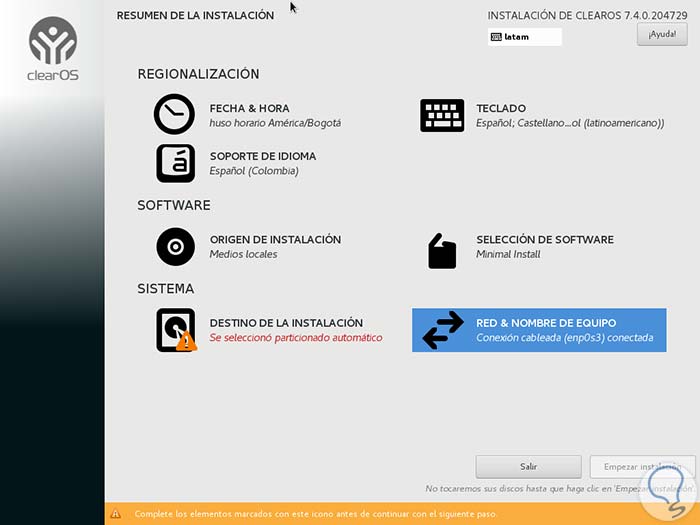
Options
- Date & Time: There we can define the current date and time for the system
- Language support: Here it will be possible to set the ClearOS installation language
- Keyboard: We can add one or more additional keyboards
- Origin of the installation: At this point the origin is defined from where ClearOS 7 is being installed, in this case the medium where we have recorded the ISO image
- Software selection: There we will have the opportunity to select what kind of software we can install additionally
- Network & Device Name: There it will be possible to activate the network and define the values ​​as IP address, gateway and it will also be possible to set the device name.
- Installation destination: In this section we will define the disk where ClearOS 7 is to be installed and we can create partitions if we wish.
Sections that have a warning must be configured before proceeding with the installation. At this point we will click on the Destination of installation section and we will see the following:
Step 5
There we must select the disk where the installation is to be carried out and at the bottom we can define the automatic or custom partitioning. In this case we activate the box I will configure the partitions and click on the Ready button to continue.
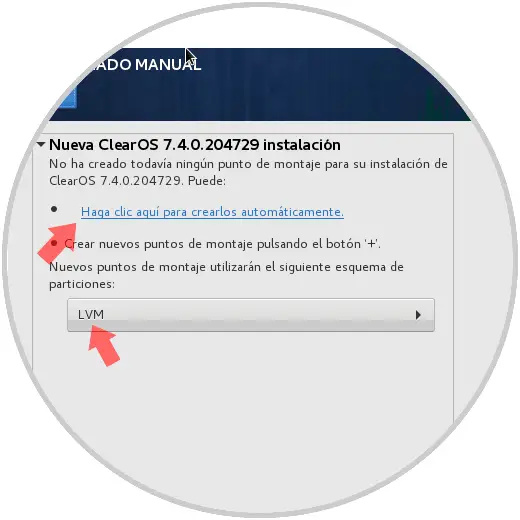
The following will be displayed:

Step 6
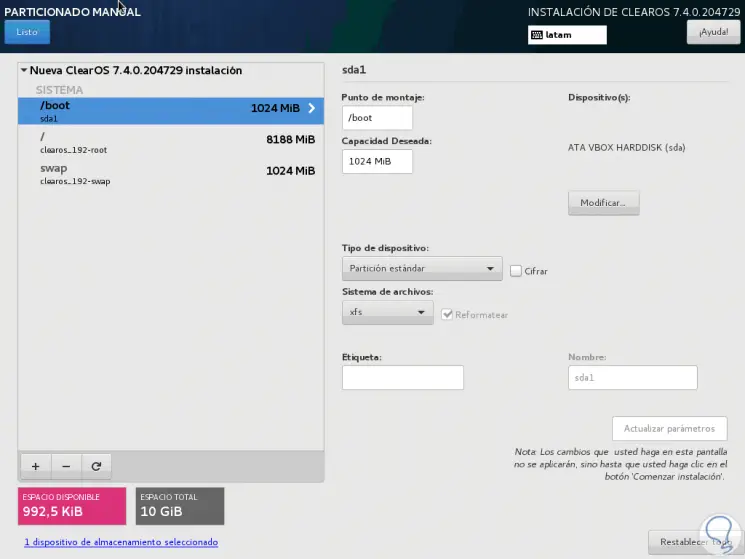
There we will select LVM (Logical Volume Manager) as partition structure and then click on the option Click here to create them automatically, which will create three system partitions using the XFS file system:
Step 7
It will be possible to make changes to the automatically generated values ​​such as adding, modifying or resizing the partition scheme, changing the file system type label, etc.
The following partitions will be created on the hard drive and will be combined into a group of volumes called clearos.
/ boot - Standard partition / (root) - LVM Swap - LVM
Step 8
With this configured, click on the Ready button and the following will be displayed:
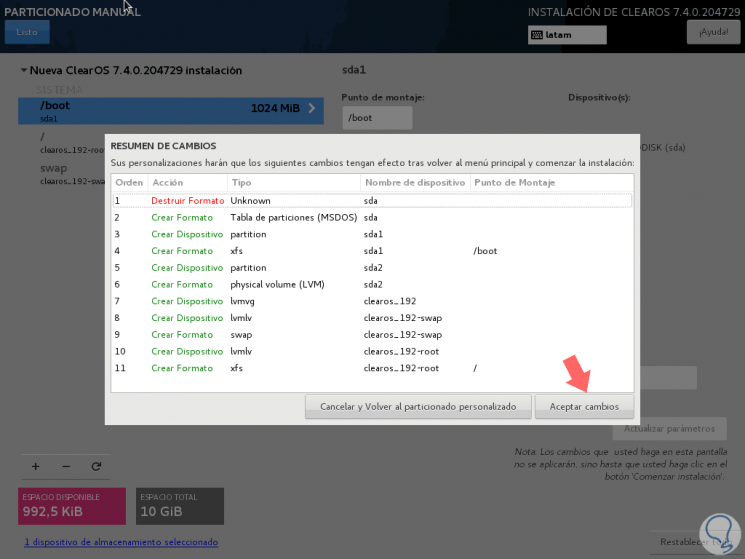
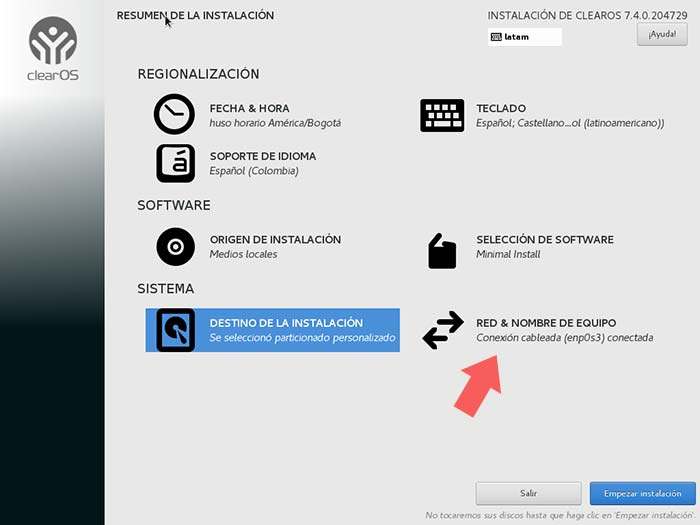
There we click on the Accept changes button and we will see that it is now possible to start the installation of ClearOS. Before clicking on the Start Installation button, we will click on Network & Computer Name where the following window will be displayed and at the bottom we will set the FQDN (Fully Qualified Domain Name) or hostname:
Note
If we have a hard disk with more than 2TB capacity, the installer will automatically convert the partition table to GPT. However, if you want to use the GPT table on disks smaller than 2TB, then it will be necessary to use the inst.gpt argument to start the installer command line to change the default behavior.
Step 9
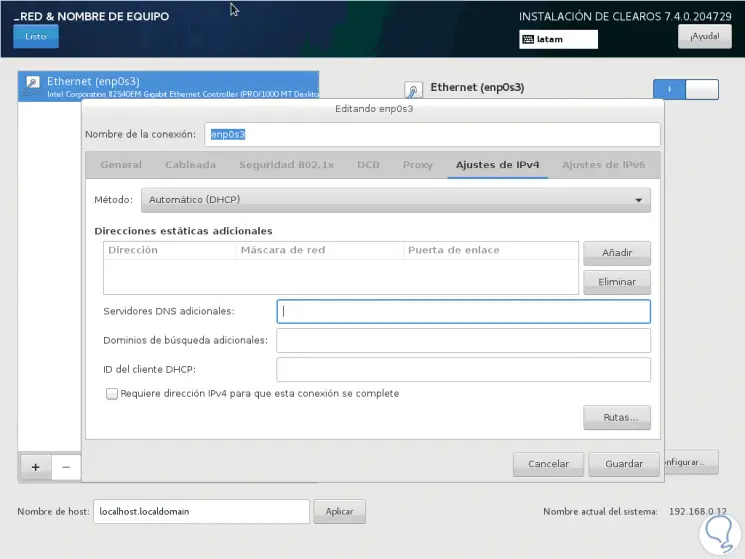
Once the Ethernet network interface button is enabled, in case you have a functional DHCP server in our network structure, it will be necessary to automatically configure all the network options for NIC. However, if you are configuring a single server, it is advisable to configure a static network parameter on the Ethernet network card by clicking on the Configure button and completing the necessary fields:
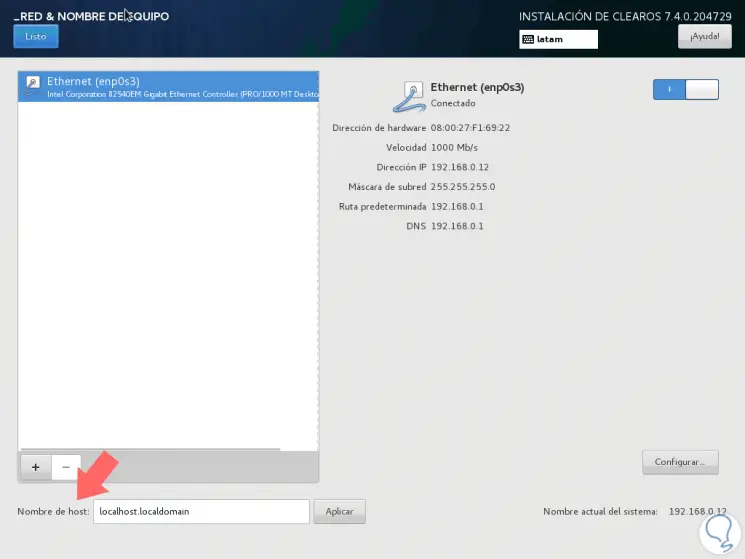
Step 10
Once the IP addresses have been defined, click on the Save button.

Login Join up!