In Devices and printers we can find those equipment connected to us that we can use as a monitor, scanner, keyboard, mouse ... From here we can manage it by connecting new or discarding current ones. To make it even easier for you, today we will show you how to create a custom Shortcut to enter this window..
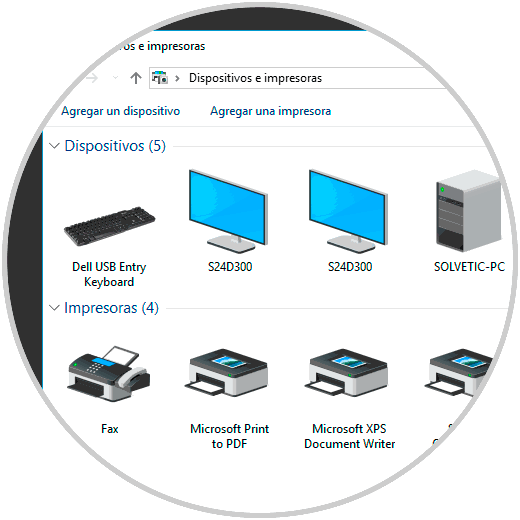
How to create a shortcut for Windows 10 Devices and Printers window
Step 1
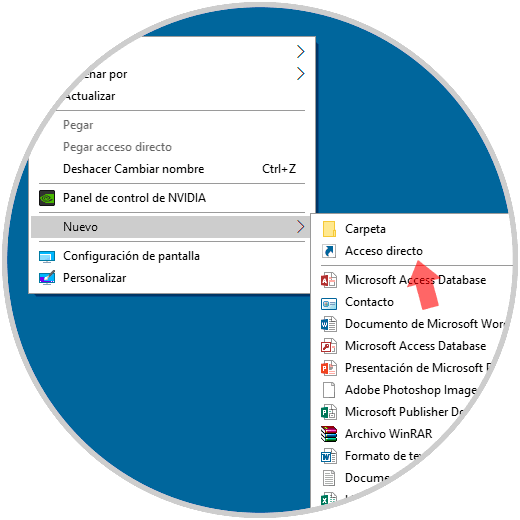
The first thing we will do is go to our desk and locate where there is an empty hole. Now right click - New - Shortcut.
Step 2
A window will appear to create the shortcut and we will copy and paste the following code. We give in Next.
explorer.exe shell ::: {A8A91A66-3A7D-4424-8D24-04E180695C7A} 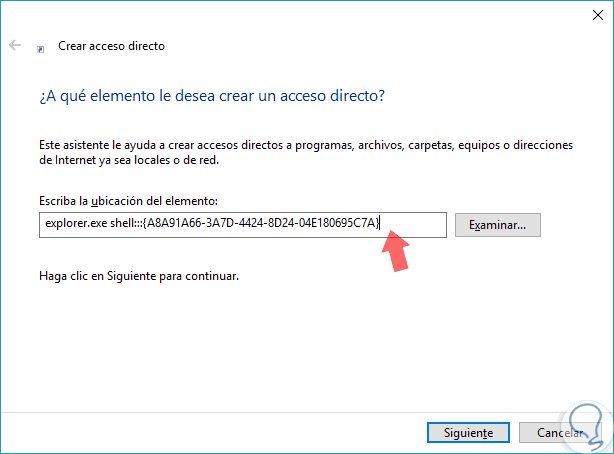
Step 3
This is a special Active X command (CLSID) and there are many others to perform other tasks among which we can highlight the following:
Network connections
shell ::: {7007ACC7-3202-11D1-AAD2-00805FC1270E} Control Panel by icons
shell ::: {26EE0668-A00A-44D7-9371-BEB064C98683} Management tools
shell ::: {D20EA4E1-3957-11d2-A40B-0C5020524153} Chores
shell ::: {ED7BA470-8E54-465E-825C-99712043E01C} Bluetooth devices
shell ::: {28803F59-3A75-4058-995F-4EE5503B023C} Bitlocker encryption
shell ::: {D9EF8727-CAC2-4e60-809E-86F80A666C91} Windows passwords
shell ::: {1206F5F1-0569-412C-8FEC-3204630DFB70} Desk
shell ::: {00021400-0000-0000-0000-C000-000000000046} Devices and printers
shell ::: {A8A91A66-3A7D-4424-8D24-04E180695C7A} Display Settings
shell ::: {C555438B-3C23-4769-A71F-B6D3D9B6053A} Windows backup and restore
shell ::: {B98A2BEA-7D42-4558-8BD1-832F41BAC6FD} File History
shell ::: {F6B6E965-E9B2-444B-9286-10C9152EDBC5} Windows Font Adjustment
shell ::: {93412589-74D4-4E4E-AD0E-E0CB621440FD} Sources
shell ::: {BD84B380-8CA2-1069-AB1D-08000948F534} Record
shell ::: {FF393560-C2A7-11CF-BFF4-444553540000} Language
shell ::: {BF782CC9-5A52-4A17-806C-2A894FFEEAC5} WiFi network settings
shell ::: {1FA9085F-25A2-489B-85D4-86326EEDCD87} My Documents
shell ::: {450D8FBA-AD25-11D0-98A8-0800361B1103} Nets
shell ::: {208D2C60-3AEA-1069-A2D7-08002B30309D} Notifications
shell ::: {05d7b0f4-2121-4eff-bf6b-ed3f69b894d9} Energy options
shell ::: {025A5937-A6BE-4686-A844-36FE4BEC8B6D} Printers
shell ::: {2227A280-3AEA-1069-A2DE-08002B30309D} Recent Folders
shell ::: {22877a6d-37a1-461a-91b0-dbda5aaebc99} Recycle Bin
shell ::: {645FF040-5081-101B-9F08-00AA002F954E} See Desktop
shell ::: {3080F90D-D7AD-11D9-BD98-0000947B0257} Temporary Internet Files
shell ::: {7BD29E00-76C1-11CF-9DD0-00A0C9034933} This team
shell ::: {20D04FE0-3AEA-1069-A2D8-08002B30309D} User account
shell ::: {7A9D77BD-5403-11d2-8785-2E0420524153} Windows Firewall
shell ::: {4026492F-2F69-46B8-B9BF-5654FC07E423} Here you have the complete list available in addition to the most important ones mentioned:
CLSID KEY
Step 3
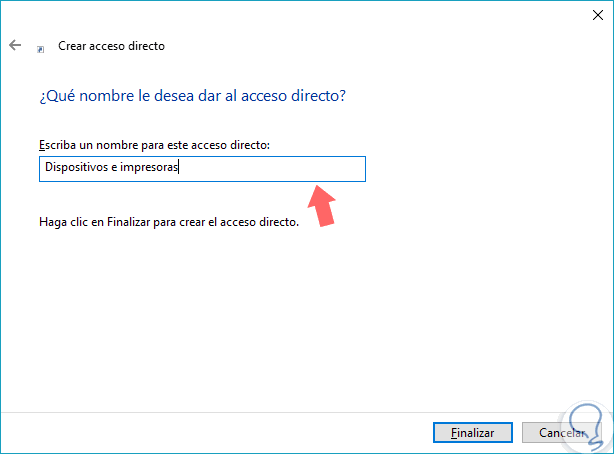
In the next window we will name our shortcut and put the name we prefer. Then click on Finish.
Step 4
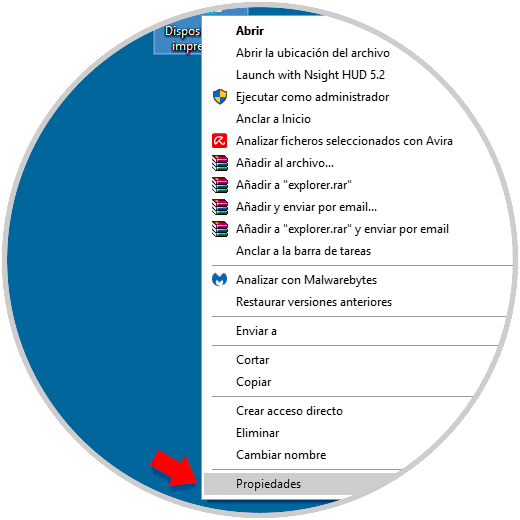
Now we will give an image to our icon. To do this, go to your Desktop and right click on the Shortcut created, then click on properties.
Step 5
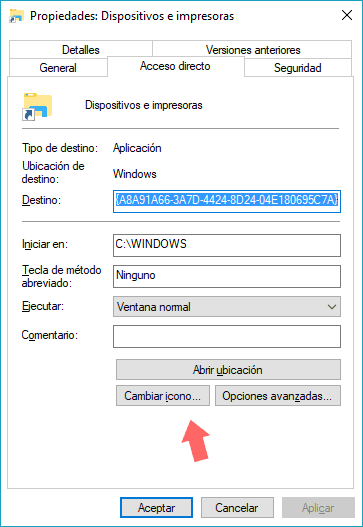
We are located in the Shortcut tab and click on "Change icon".
Step 6
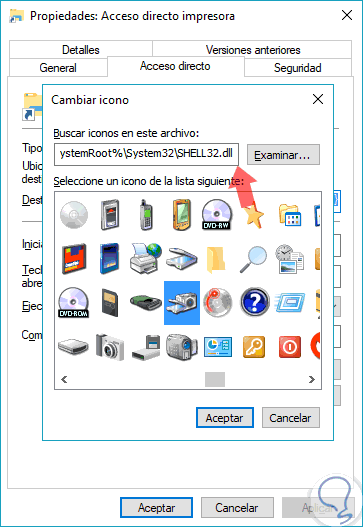
Now we will select the icon that we want or we can use an icon route that we have:
Step 7
We see that we have our Shortcut with the icon that we have selected. When we click on this access we can open Devices and printers directly.
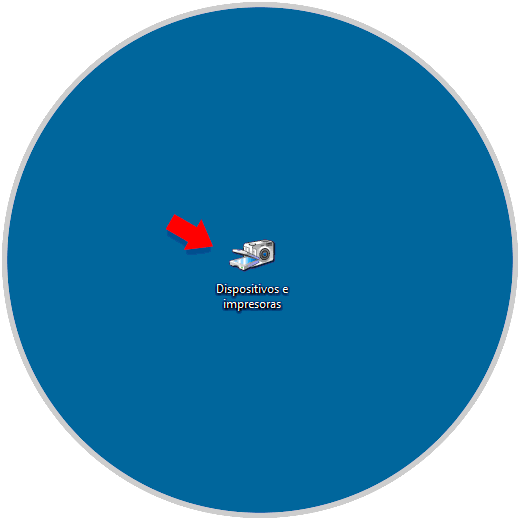
In this way we would have our custom Shortcut that would instantly open the Devices and Printers window in Windows 10.