The clippings tool has been integrated into Windows to allow us to capture various forms of the windows or desktop; either current window, full screen or free areas. Thanks to this utility we will be able to "capture" in a simple way what we are seeing on the screen of our PC and use these images for whatever we need..
Some of the features of this utility are
- It allows to take free forms.
- We can postpone the capture of the selection.
- Send the clipping directly by email.
- Integrate tools such as erasing, pencil or highlighter marker.
- We can open the image captured with Paint 3D.
- We can save the image as JPG, GIF, PNG or HTML
Due to these reasons and many others, it is a tool that should know how to access and use. Since its going to be useful in lots of moments. For this reason TechnoWikis will explain various ways to access this tool in Windows and thus get the most out of it.
For this you will have to follow the steps that we are going to show you in the following video and tutorial that we leave you below:
To keep up, remember to subscribe to our YouTube channel! SUBSCRIBE
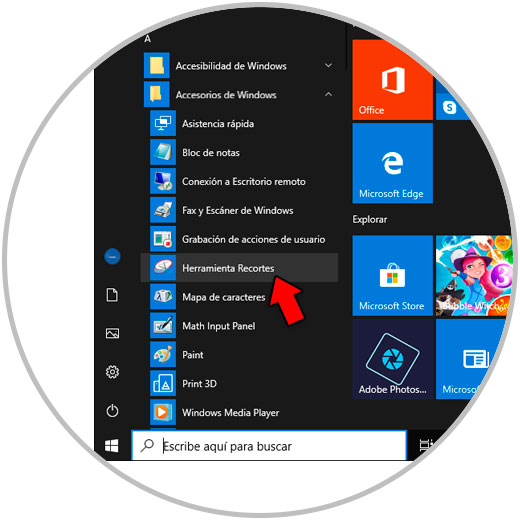
1. How to open the Windows 10 Clip tool from the Start menu
The first method to access this utility is from the Start menu, for this we click there and go to the “Windows Accessories†section and click on “Clippings Toolâ€:
2. How to open the Windows 10 Clip tool from the command prompt or from Windows PowerShell
We have the command prompt console and Windows PowerShell not only to execute various commands but also to access this utility.
To do this, both at the command prompt and in Windows PowerShell, we must execute the following:
snippingtool
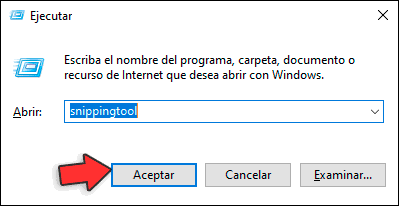
3. How to open the Windows 10 Clip tool with the Run command
The Execute command is integrated in all Windows systems and thanks to it it will be possible to go to utilities, libraries and system tools.
To access Clippings from there, we will combine the following keys:
+ R
We execute the following:
snippingtool
Press the Enter key or click OK to open it.
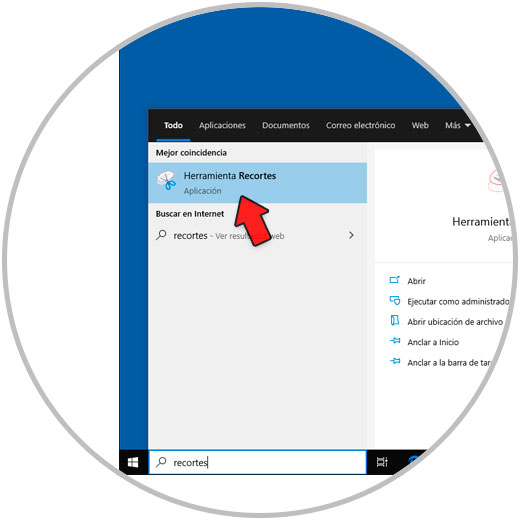
4. How to open the Windows 10 Clip tool from the Start search box
This is another simple method to access this tool, and for this we have to do the following:
Step 1
To do this we enter the term “snipping†or “clippings†in the Start search box (bottom left of the taskbar â€) and in the displayed list we select the utility:
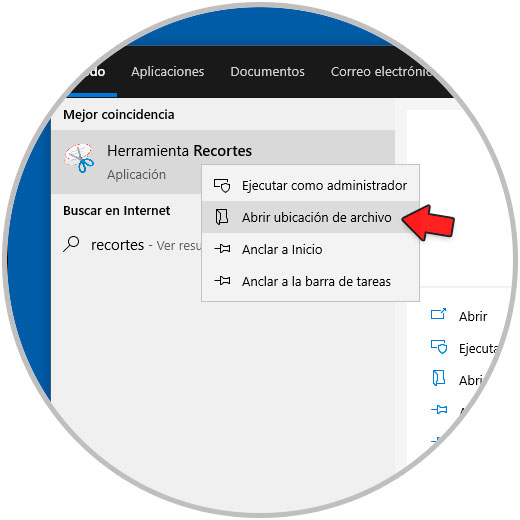
Step 2
From this option we can anchor the Clippings tool to the Start menu for easier access, for this we right click on the application and select the option “Open file locationâ€:
Step 3
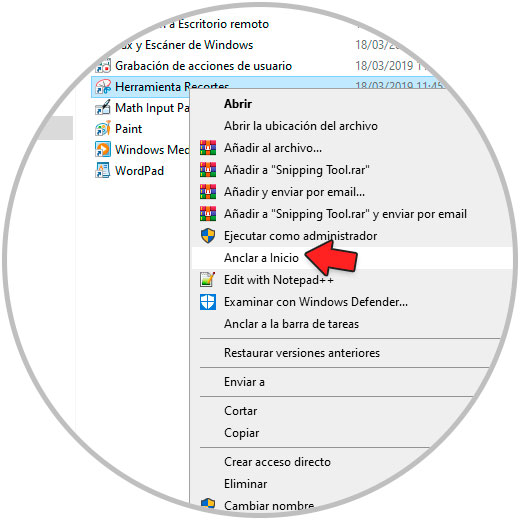
In the open folder, we right click on the shortcut and select the option "Pin to Start":
Step 4
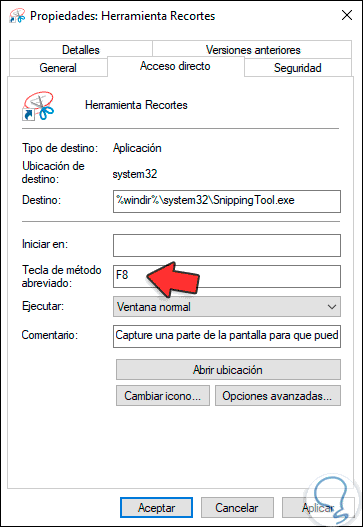
Another option is to create a direct keyboard access, for this we select "Properties" and in the "Shortcut key" field in the "Shortcut" tab press the key (s) directly to be used to execute Clippings. We click on "Apply and Accept" to save the changes. Then we will simply use this key to open Clippings.
We can see that there are several ways to open the Clip tool in Windows 10 and each of them is functional and practical so that we can count on this valuable utility of the operating system..