The data is constantly growing and this is something exponential where every day there are millions and millions of data that are hosted on servers, whether they are local or remote, and these must be backed up with the best security , availability and efficiency measures. In this scenario, Kubernetes comes into play, which is a portable and extensible platform open source available thanks to which it will be possible to manage various workloads and services. In this regard, Red Hat has made Red Hat OpenShift 4.3 available to us, which is a full-featured enterprise-grade Kubernetes platform that we'll cover later..
If security is an issue that reveals to administrators or IT users, there is no need to worry as OpenShift 4.3 is integrated with FIPS (Federal Information Processing Standard) compliant encryption. This means that the data will be more protected by having much more stable encryption controls and with the possibility of monitoring access control to all the applications integrated in OpenShift 4.
TechnoWikis wants to make a special emphasis on the security of this platform and the reason is simple, a confidential data that falls into the wrong hands can have critical consequences for both the user and the organization. That is why when running OpenShift on Red Hat Enterprise Linux with FIPS mode, the OpenShift platform is responsible for managing cryptographic libraries that have been FIPS validated. This makes the different tools available to all Red Hat customers..
To stay up to date, remember to subscribe to our YouTube channel! SUBSCRIBE
In addition to this, the latest version OpenShift 4.3 has support for etcd encryption. This will give additional protection since users will be able to encrypt confidential data stored in etcd directly.
As if this were not enough, OpenShift 4.3 integrates support for NBDE (Network-Bound Disk Encryption) which is a protocol that allows us to automate the remote activation of encrypted volumes LUKS (Linux Unified Key Setup-on-disk-format). This has a final focus on protecting data and information if the computer has been stolen by blocking the active volumes of it.
But security is not only the axis of OpenShift 4.3 since another of its main characteristics is to make the work experience in the cloud as users identical to that obtained from a hybrid cloud environment. This is possible since OpenShift 4 allows us to integrate implementing OpenShift clusters in environments like:
- VPN / VPC (Virtual Private Network / Virtual Private Cloud).
- Subnetted on AWS, Microsoft Azure, and Google Cloud Platform.
- OpenShift clusters can be deployed with private load balancer endpoints, not publicly accessible from the Internet, on AWS, Azure, and GCP.
To manage these aspects of the cloud, when installing OpenShift we will have a configuration API with which we can choose the set of encryption to use as the Ingress controller, the API server and the OAuth Operator for Transport Layer Security (TLS). OpenShift 4 has been developed with an additional focus on improving automation using Kubernetes operators. By using them as clients we will already have access to certified operators that have been created by Red Hat and ISV..
In parallel, when using OpenShift 4.3, we will be ready to use Red Hat OpenShift Container Storage 4. This allows comprehensive storage not only in one but in several clouds for OpenShift Container Platform users. This will facilitate centralized Kubernetes-based control for applications and storage.
Red Hat OpenShift 4 Features
Globally we are going to learn what we will get when using this platform:
- Immutable Red Hat Enterprise Linux CoreOS which gives uniformity and better upgrade options.
- Knative framework integration which is a serverless framework that is ideal for developers to design, supply or launch event-based applications.
- It integrates the operator framework which offers a Kubernetes installation of applications and services, as well as offering automated wireless updates and more Kubernetes functions.
- Access to the OpenShift service network with which we access application support.
- Ability to develop and run tests using an OpenShift cluster created with Red Hat CodeReady Containers.
- OpenShift 4 adds support for languages, databases, frameworks, and tools.
- The processes are installed and updated thanks to the Kubernetes operators.
- The Istio, Jaeger (detection) and Kiali (visibility) service network has been integrated into a business environment with a focus on security.
- Self-service environments that last the entire life cycle of the application are added so that developers can effectively track changes.
- Without further ado we will see how to get to know OpenShift 4 thoroughly and create our cluster.
1. How to download and install Red Hat OpenShift 4
Step 1
The first thing to do is go to the official OpenShift 4 link:
OpenShift 4
Step 2
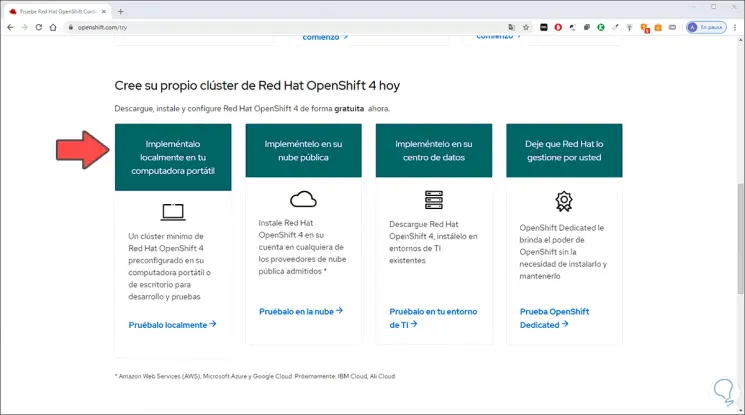
When accessing there we will see different options of use. In this case we select “Deploy it locally on your laptop” and it will be necessary to enter the Red Hat user data or create a new account.
Step 3
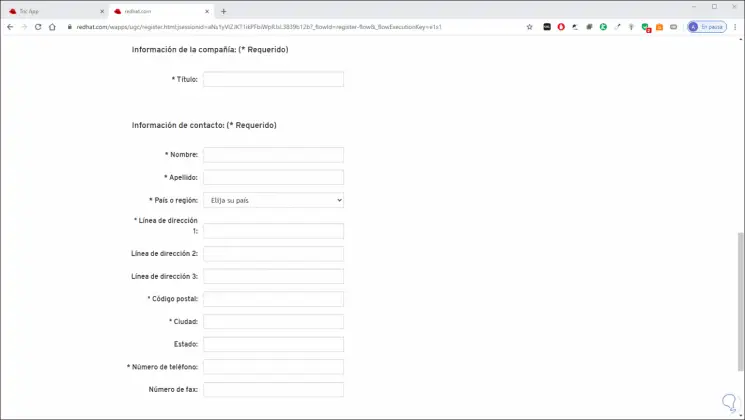
In this case we must complete all the required fields:
Step 4
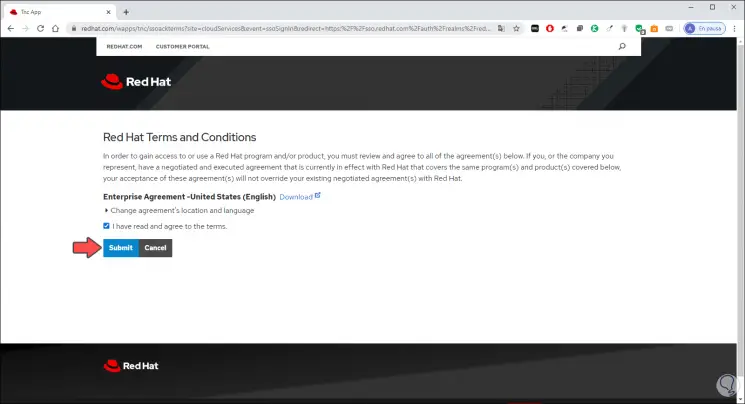
Once complete we upload these data and we will see the following. We activate the license acceptance box and click "Submit" and we will be directed to the following.
Step 5
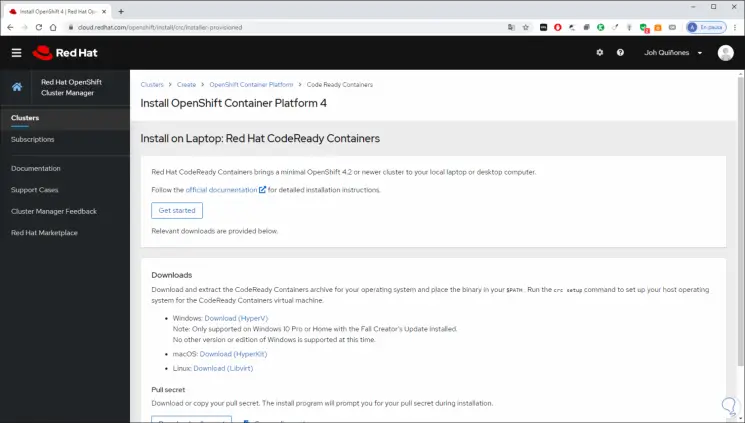
There we download the appropriate version (Windows, Linux or macOS).
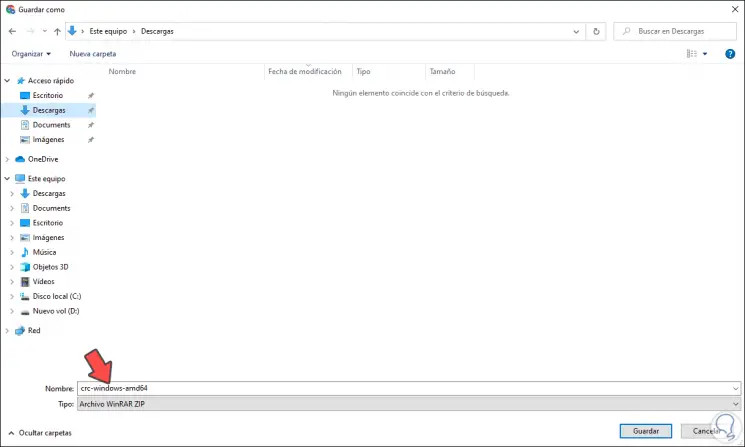
Step 6
In this case we select Windows 10 and we must save the executable:
Hardware Requirements
The hardware requirements are:
In the case of Windows 10:
- Windows 10 Pro Fall Creators Update (version 1709) or higher
For macOS:
- macOS 10.12 Sierra or higher
For Linux:
- Red Hat Enterprise Linux / CentOS 7.5 or higher
- Ubuntu 18.04 LTS or higher
2. How to configure Red Hat OpenShift 4.3
Step 1
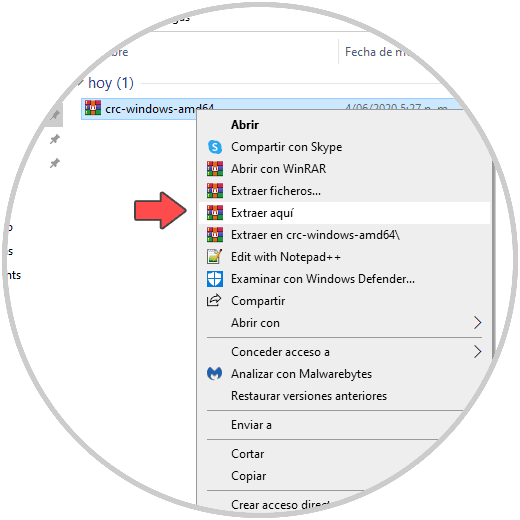
Once the file is downloaded, we must extract the CodeRead and Containers file and set this binary to $ PATH, the first thing will be to extract the compressed file:
Step 2
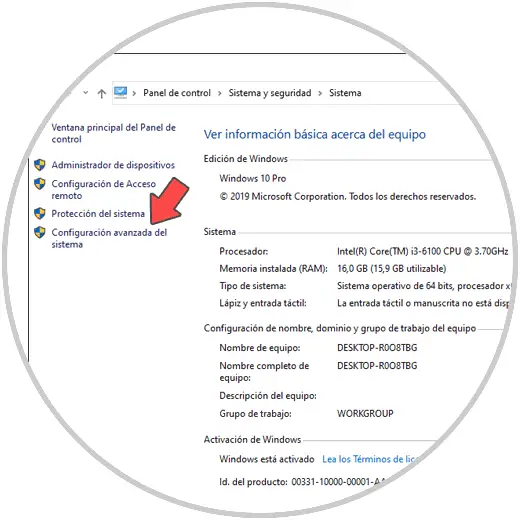
Now we go to the following route:
We click on “Advanced system settings”
Step 3
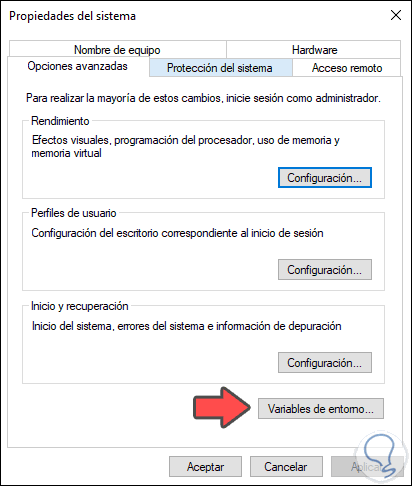
We will see the following. We click on the "Environment Variables" button in the "Start and Recovery" section.
Step 4
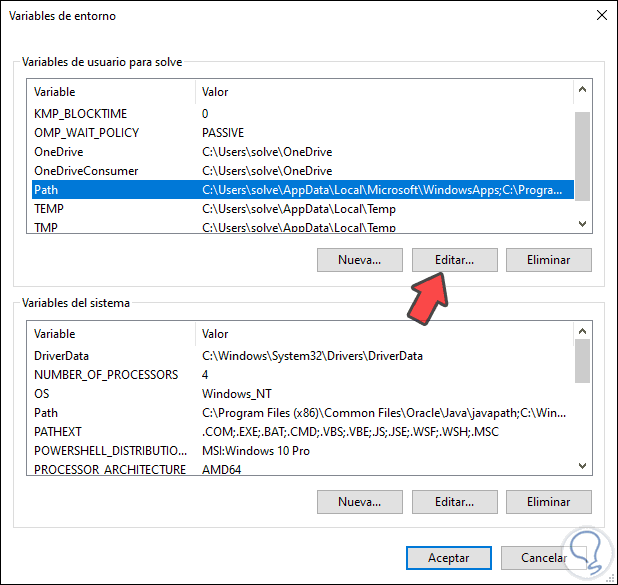
In the next window we select PATH and click on Edit:
Step 5
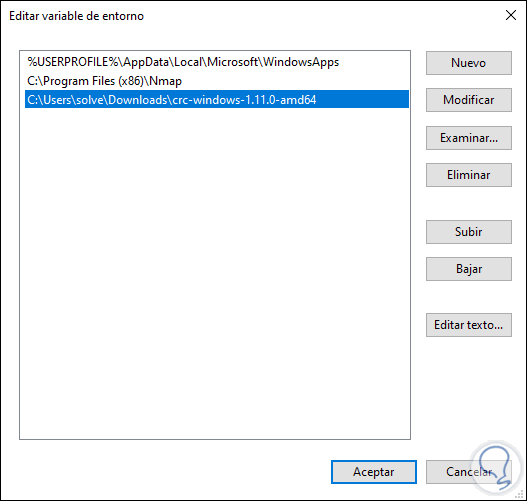
We click on "New" and add the path where the tablet was downloaded. We click OK to save the changes.
Note
crc is CodeReady Containers with which we can create the cluster.
Step 6
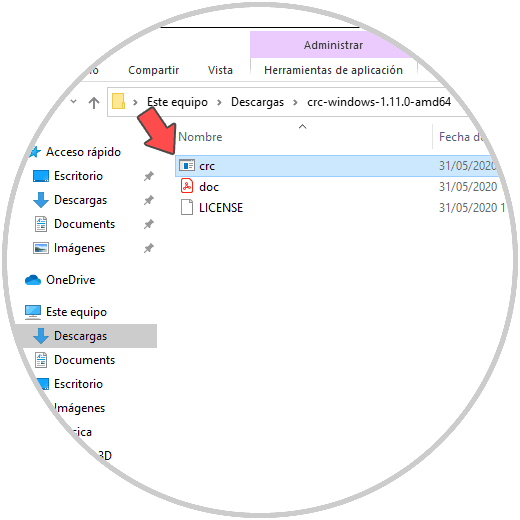
We go back to the extracted file and execute "crc":
Step 7
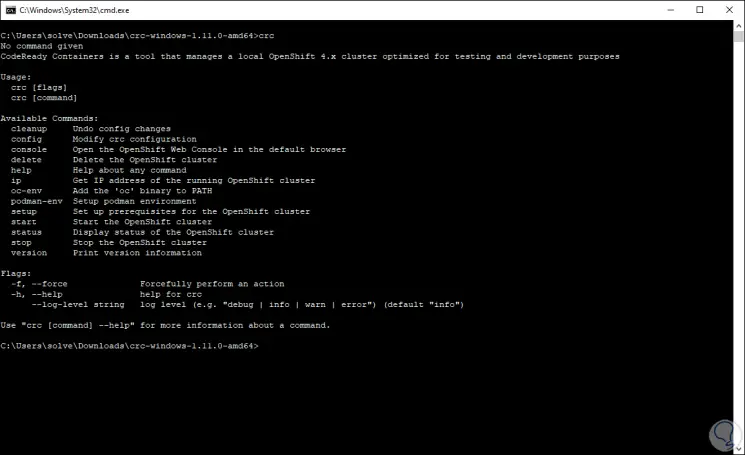
This file must be run in command prompt mode, for this we access the CMD and from there run "crc", we access the different usage options:
Step 8
As we can see, the parameters to use are:
Cleanup
Delete the last changes made
Config
Allows you to make adjustments to the CRC configuration
Console
This option opens the OpenShift web console
Delete
Clear the OpenShift cluster
Help
Access to general utility help
Ip
It allows us to obtain the IP address of the OpenShift cluster
Cc-env
Add the environment to PATH
Setup
Configure the requirements for creating the cluster
Start
Start the OpenShift cluster
Status
Check the real-time status of the cluster
Stop
Stop the OpenShift cluster
Version
It allows us to access the used version of OpenShift
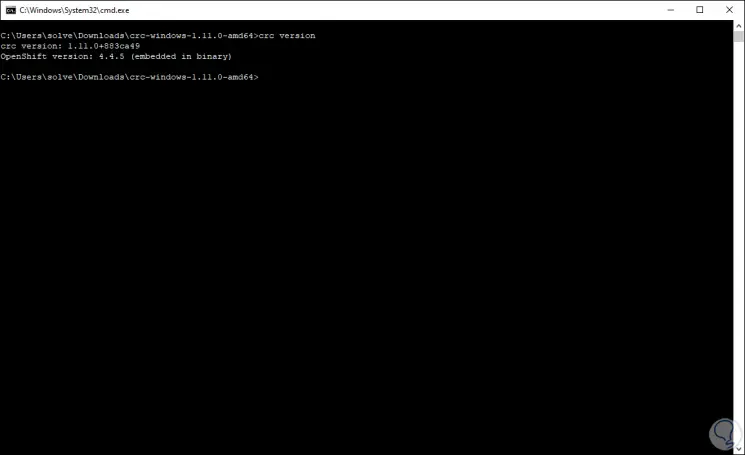
Step 9
A requirement in Windows 10 is that we must have Hyper-V enabled, we can run the command "crc setup" to validate that the team has all the requirements before creating the cluster:
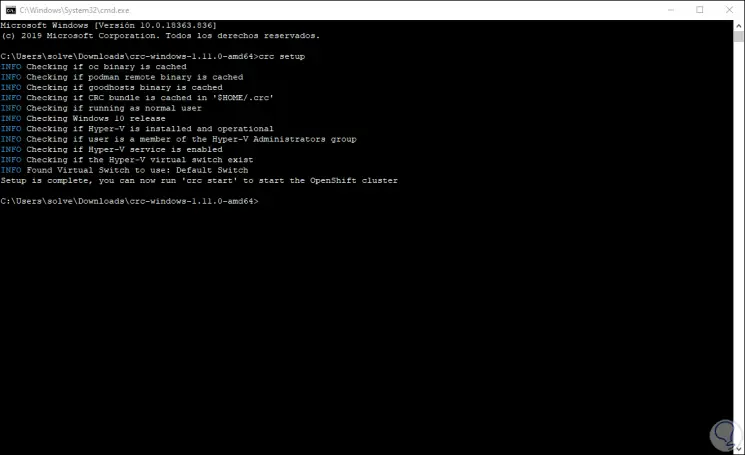
As we can see, all the corresponding analysis will be done and it has been successful.
Step 10
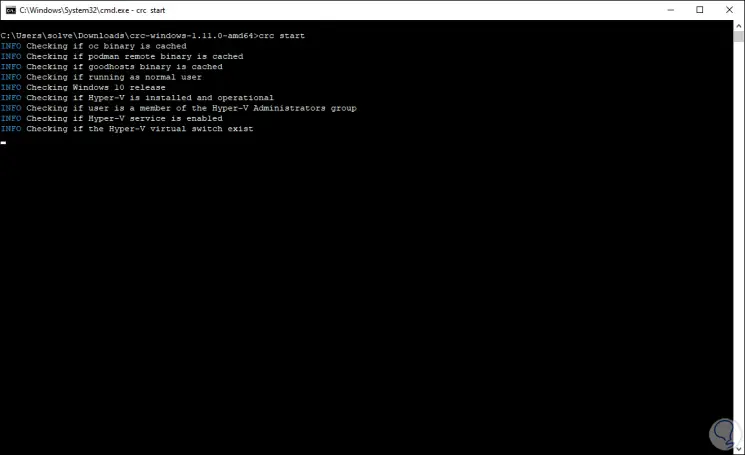
We can create our cluster by executing:
crc start
Step 11
After this we will see the following:
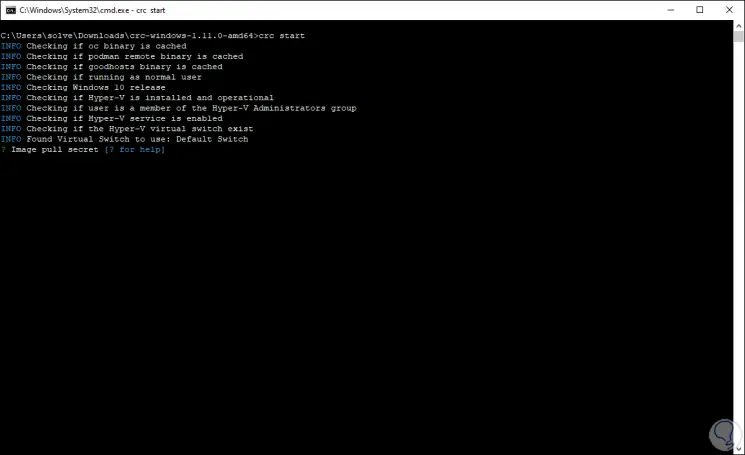
Step 12
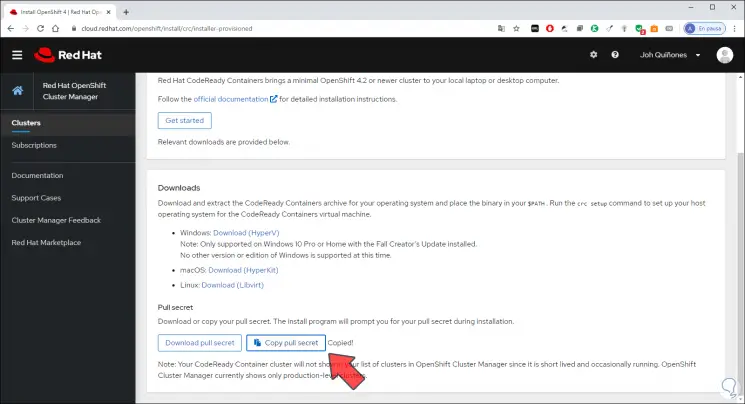
There we must enter the "pull secret", for this we go back to the OpenShift link and we can copy the Pull Secret:
Step 13
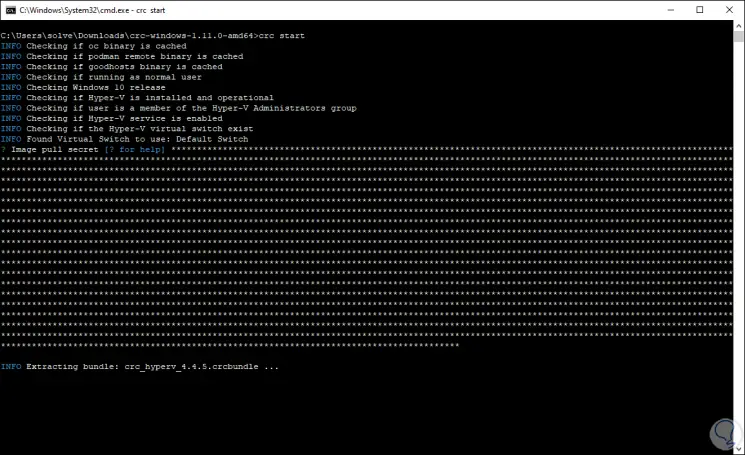
We paste this into the console and the process will follow. This is a small extraction script and requires a Red Hat account.
Step 14
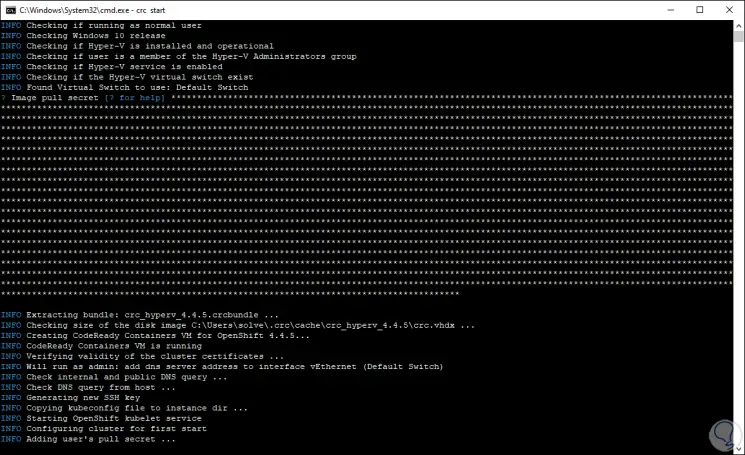
We can see that the process continues:
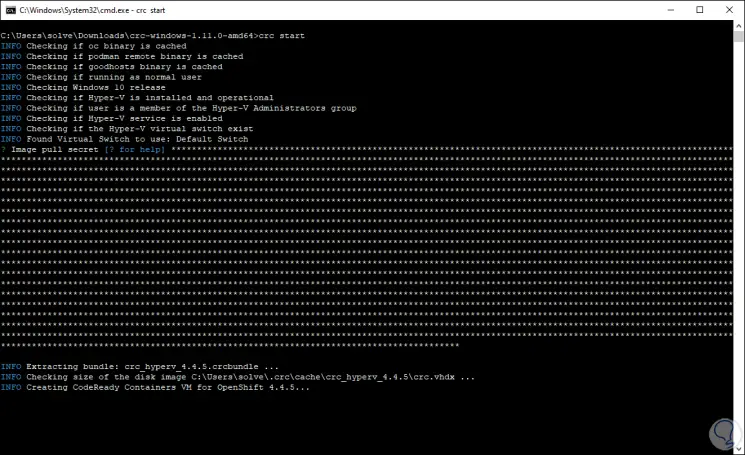
The cluster takes a minimum of four minutes to start the required containers of use.
Step 15
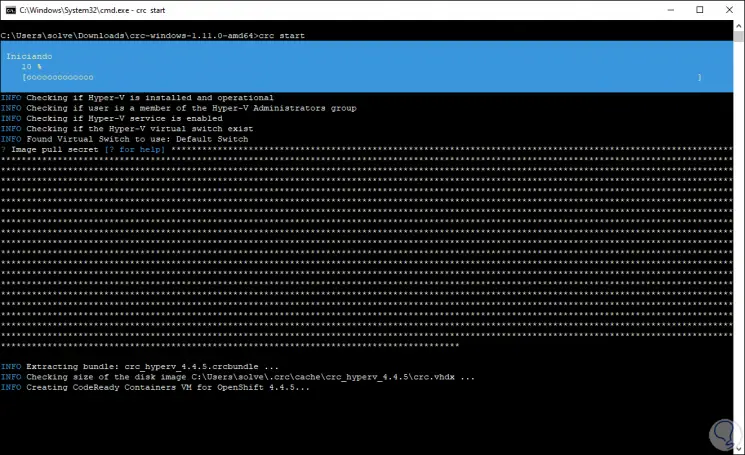
Kubelets services start:
Step 16
The cluster will start in OpenShift:
Step 17
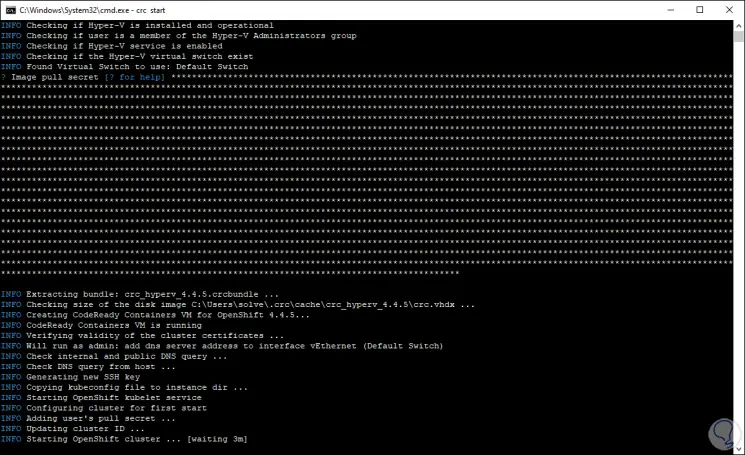
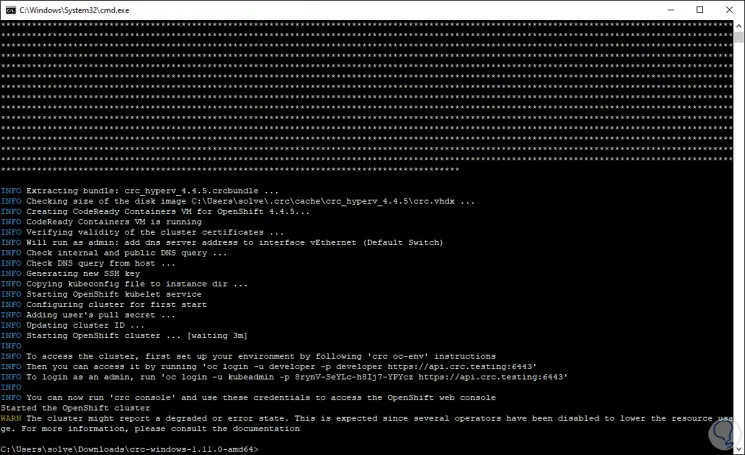
At the end we will see the following. There, the generated password is launched to access the cluster from the web.
Step 18
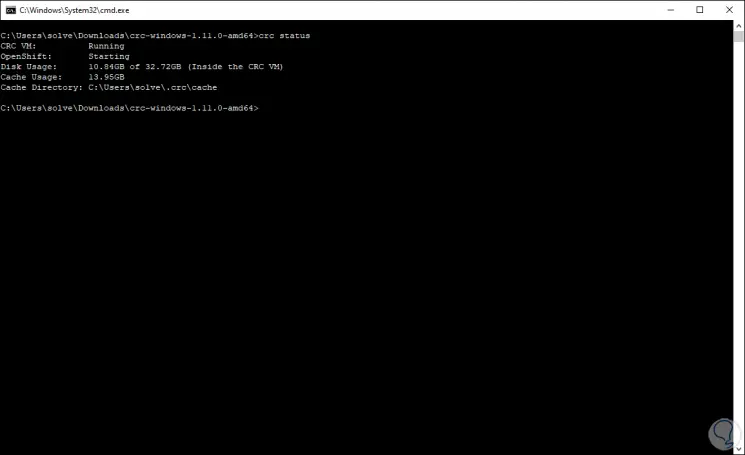
With the command "crc status" we can validate the cluster values as:
Step 19
Access to the cluster
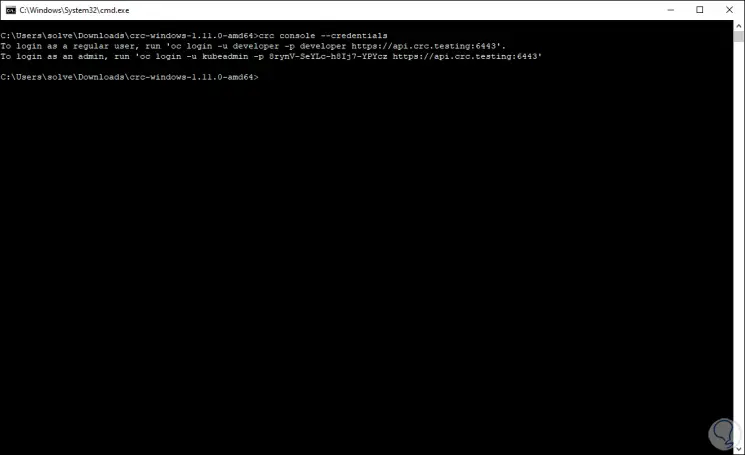
In case you forget the password generated by OpenShift, we will execute the following in the console:
crc console –credentials
Step 20
We access the web console by executing:
crc console
Step 21
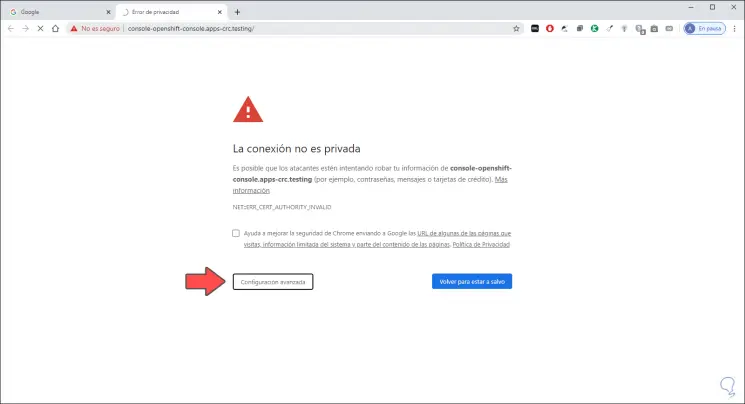
In the browser we will see the following:

Step 22
We click on "Advanced Settings":
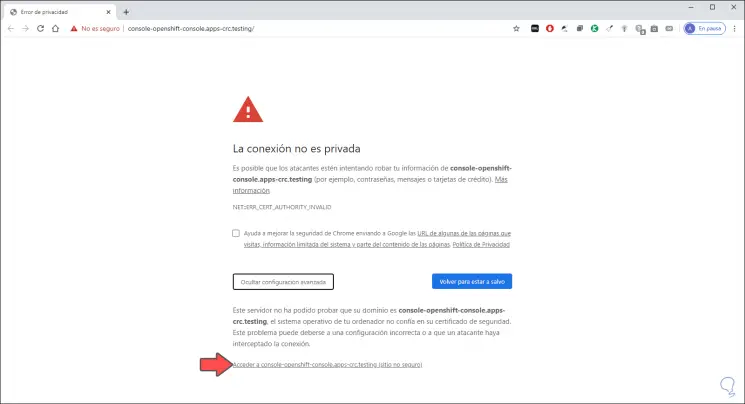
Step 23
We click on the bottom line to continue access and there we must enter the username and password previously generated:
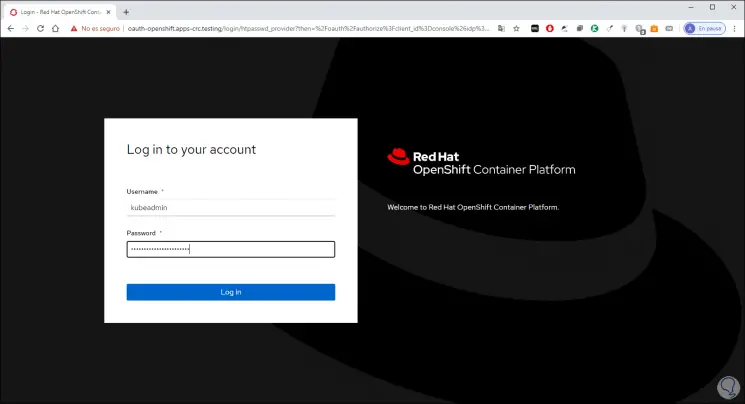
Step 24
We click Log In and we will access the management of the cluster:
On the left side, we access all the OpenShift configuration options as mentioned above.
Step 25
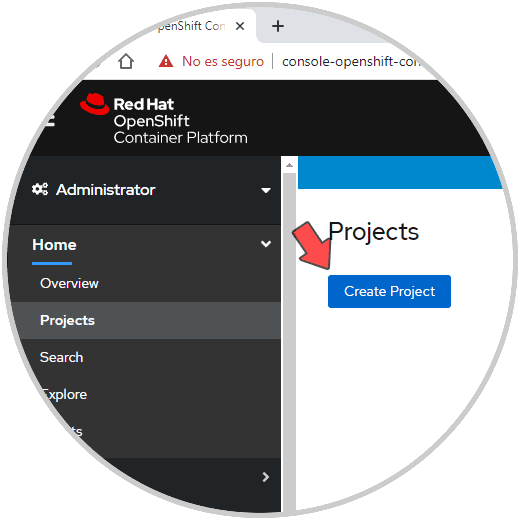
From Projects we can create new projects in the cluster:
Step 26
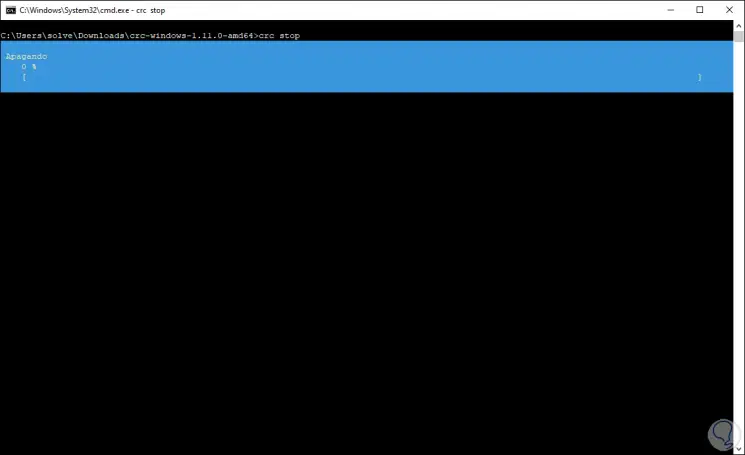
When we do not use the cluster we execute "crc stop" to turn it off:
Step 27
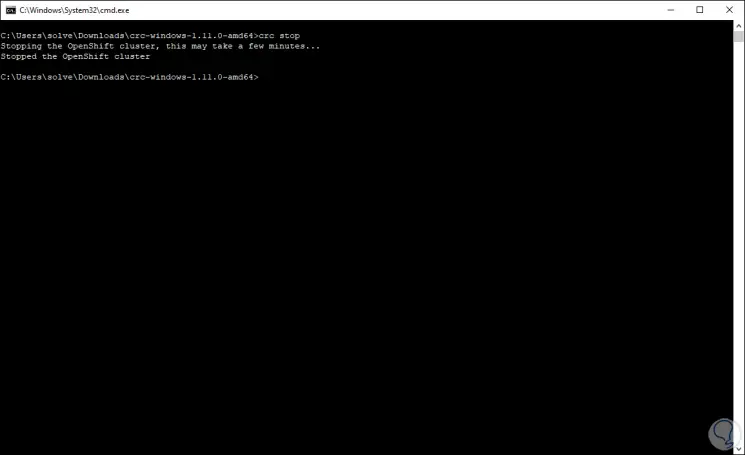
Once turned off we will see the following:
Step 28
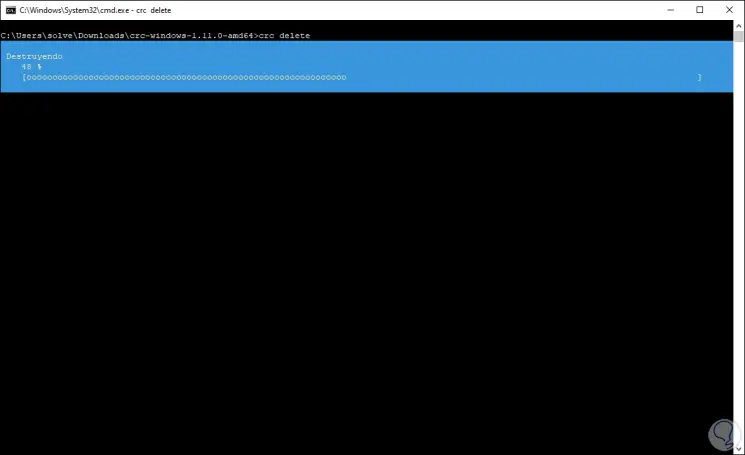
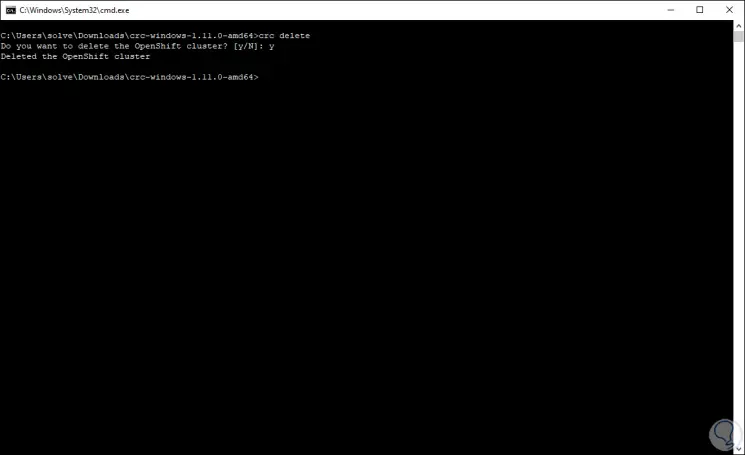
If the cluster will no longer be used, we must delete it with “crc delete”:
Step 29
At the end we will see:
OpenShift is one of the most practical solutions to extend the management possibilities in our organizations, always focusing on data security and integrity.