Every day more people are entering the world of cryptocurrencies such as BTC (Bitcoin), ETH (Ethereum), XRP (Ripple), IOTA etc..
We are not going to explain anything general about Blockchain (Used by the vast majority of Cryptos), Tangle (Used by IOTA) etc. but we are going to focus on this tutorial on how to store cryptocurrencies in a hardware Wallet (a physical wallet), in this case, the well-known Ledger Nano X.
When you start and immerse yourself in making crypto purchases online, it is important to know that you are buying in the so-called "Exchanges". There are many and every time they will be expanding more, offering greater and better security, as known examples we can tell you Coinbase, Binance, Kraken, Bitfinex etc..
As the name implies, fiat currency (€, $ etc.) is exchanged for crypto and exchange operations between them. They are widely used for trading, buying, selling and exchanging cryptocurrencies.
The typical error (in our view) that users usually commit, in many cases due to ignorance, is to make the purchase in an Exchange and leave the crypts stored there without sending them to another site. This is a mistake, because if you do, you are really leaving your cryptocurrencies purchased from private companies that are the ones that store your private keys..
The danger comes when an Exchange bankruptcy for example by an attack received, when you see in the news that a Bitcoin hack has occurred in an Exchange, it means that they have hacked the Exchange but not the cryptocurrency, and have managed to steal multiple Bitcoin accounts from users in that Exchange. There have been cases where many users have lost their crypts because they have been stored in these types of companies, an important case was MtGox.
Therefore it is recommended to buy them in an Exchange, but then send them to an own account where you have the private keys of your Wallet. You can make a private wallet or Wallet at the hardware, paper or software level, where you will be the sole holder and responsible for the storage and custody of your keywords along with passwords of the created BTC, ETH, Cardano, Neo, IOTA, XRP etc. .
The hardware Wallet or physical hardware fulfill this point very well, facilitate its use and security for the experts and also with the newest ones.
What is a Wallet hardware?
A hardware wallet or cryptocurrency physical account are devices that are not connected to the internet and store us the private keys to be able to carry out transactions of our cryptocurrencies that we have stored within them.
The highlights of a hardware wallet are the following points:
- Simple, fast and practical use to perform operations, such as sending, receiving to different accounts.
- Better security and independence having it in your power.
- It is different from a crypto wallet on paper, where you have to save part of the paper the keyword file. In a Wallet hardware such as Ledger you just have to keep your keywords well, which are synchronized with the servers.
- In case of loss, theft or breakage of the USB Ledger Nano you can restore it without problems on another device without losing anything, you just have to keep the keywords well.
- Include password PIN entry.
- The main feature of these new devices is that it allows us to sign bitcoin transactions without the need for our private keys to leave these devices.
To use a hardware wallet we will need a computer and also in some cases smartphone such as Ledger Nano X. You will have to install a software on PC and App on smartphone to be able to perform that key exchange and perform operations.
The big difference that Ledger Nano X offers compared to Ledger Nano S is that the X has its own USB battery, so without plugging it in anything we can turn it on and use it via Bluetooth with an encrypted connection for example to your mobile phone to make operations directly with a Ledger App
Ledger Nano X connect to the PC and Smartphone via USB or Bluetooth cable, we have these two options of use.
To keep up, remember to subscribe to our YouTube channel! SUBSCRIBE
There is another cheaper version earlier that is the Ledger Nano S that focuses on just connecting via USB to your computer to perform operations. In this tutorial we focus on the use and configuration of the Ledger Nano X, but the connection point via cable to PC is the same.
If you still do not have it and want to buy it, we recommend buying it for security from the original Ledger company from the following link:
OFFICIAL LEDGER: Buy Ledger Nano X
From this link on the official Ledger website you can buy Ledger Nano X, with the security guarantee, both in shipping and being the completely genuine product through Ledger, do not buy anywhere else for security.
Buy Ledger Nano X Official
1. How to configure Ledger Nano X for the first time as a new wallet
We assume that you have purchased the device, now what you want is to configure it as new, let's follow the next steps.
Step 1
The first thing to do is connect it via USB to the PC or Mac where you can see that the following message will appear on the device: "Welcome to Ledger Nano X. Press right button to continue".
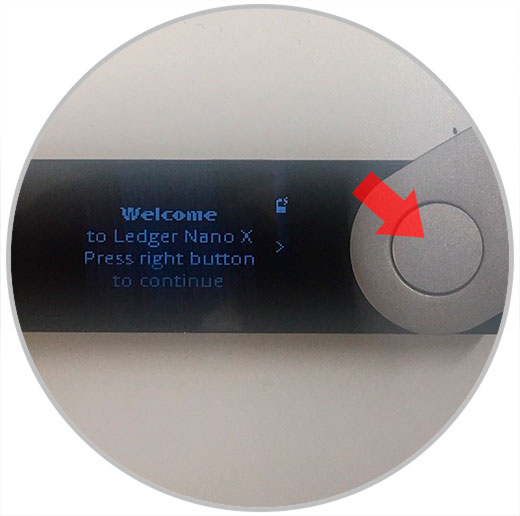
Now what we have to do is press the right button of the device as shown in the image.
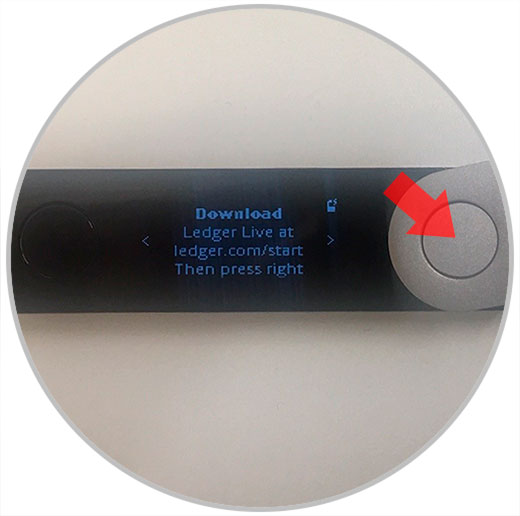
Step 2
Now you must download the " Ledger Live " program from its official website, install it and then press the right button of the USB Ledger Nano X.
Ledger Live Official
Step 3
He will explain several points to consider:
- Press left or right on the buttons to scroll through the Menu.
- You can press both buttons at the same time to tap a selection from the Menu.
- You can press and hold both left and right buttons at any time to access the Control Center or turn off the device.
- By pressing the next Menu, you will see that it asks to start Ledger Live on your PC.
Step 4
Now we will see that we have two options, either the creation of a new device with new keywords or restore by keywords of an account that we have to put it on this device. In this case we will configure a new account, so we select by pressing both buttons (left and right) at the same time the option "+ Setup as new device".
Step 5
Now you will have to choose 4 to 8 digit PIN. It will be the one you will use every time you connect and want to use it.
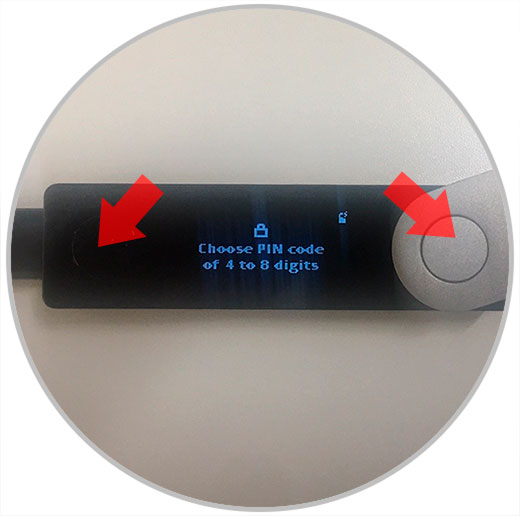
Now you just have to go up or down with the left and right buttons to select the number, and when you have chosen press both buttons one click at a time. So until you set your PIN. You will have to repeat it that they will do it to confirm your PIN that you wrote it correctly twice.
From 4 numbers you select for your PIN you can select the check to finish. You can choose between 4 and 8.
Step 6
Now you will get the "Write down your recovery phrase" Menu, a very important point because words will come out, which will form your order from 1 to 24 in your keywords that you should write on your paper.
It is vital and very important that you keep it well and have this collection of keywords very controlled, since in case of loss, theft or breakage of the USB Ledger Nano X, you can restore it in another Ledge, either the Ledger Nano S or Ledger Nano X without any problem and without losing anything.
Whoever knows these keywords will have access to your cryptocurrencies. Remember this point well and keep that in mind.
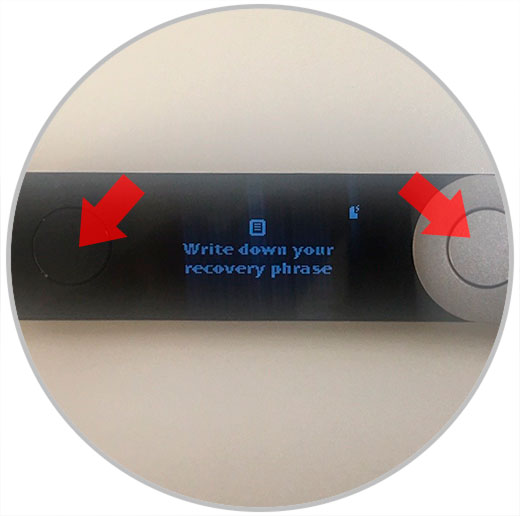
You press both buttons and it will start showing you the keywords one at a time so that you can write them on your paper that comes with your Ledger Nano X.
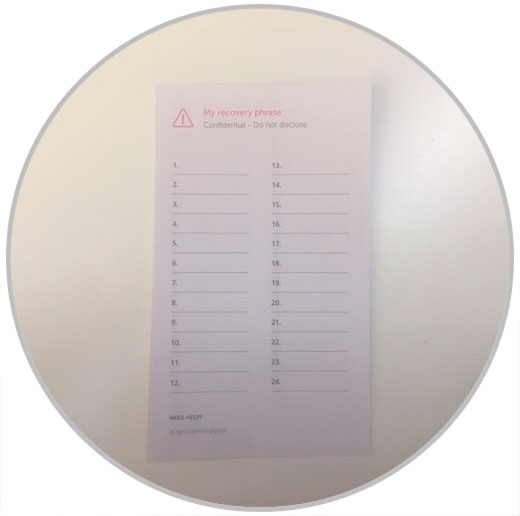
Once you have handwritten the 24 keywords on your paper. You will see that on the Ledger Nano X screen the message you review appears going back to the left that you have well written and in good order all the keywords.
Once you are clear, going to the final part, you will see the message "Press left to verify your 24 words. Press both buttons to continue".
You press both buttons at the same time and we will go to the point where you will ask one by one all the keywords that you have pointed out, look at them on the paper where what you just pointed out and you will select the ones that you are asking for.
This is done by Ledger to confirm that you have them well targeted.
Step 7
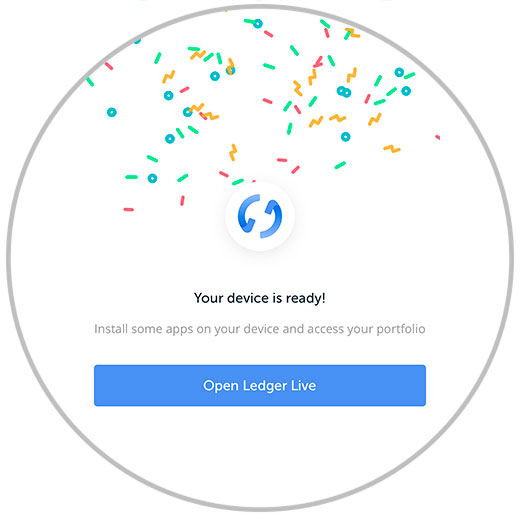
Once the keyword verification process is finished, it will leave you saying that you have the device ready to be used as you see in the image. And you can access the USB Dashboard by pressing both buttons at the same time.
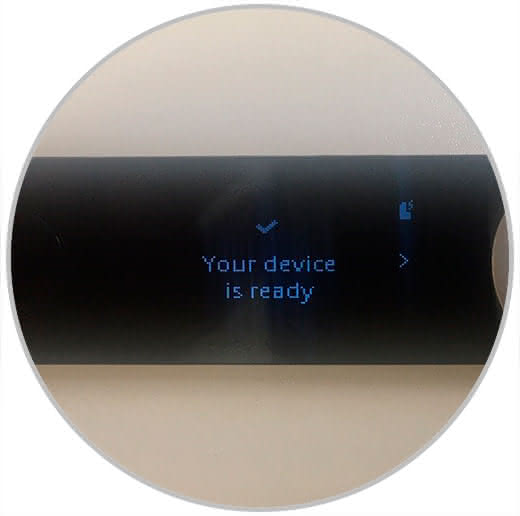
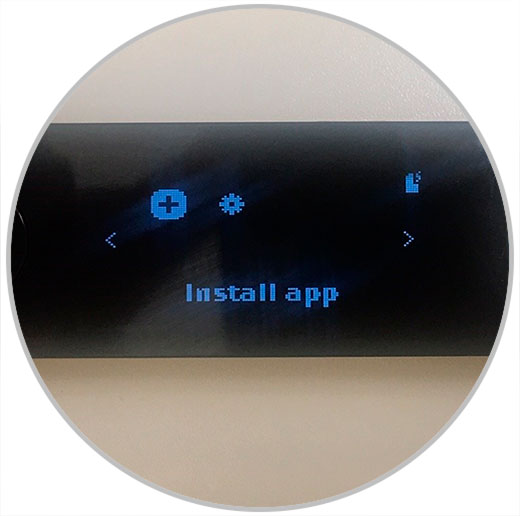
When you click on Install App what it tells you is that you open the software that you have installed on your computer called Ledger Live, and from there you will install the different Apps (wallets - wallet) of the cryptocurrencies that interest you.
You can also enter the "Control Center" or also called "Settings" by pressing and holding both buttons. From there you will see options such as:
- Percentage of battery available in your USB Ledger.
- Turn Bluetooth on or off of your Ledger.
- Turn off your Ledger device.
Now we must go to the next point that is to use our Ledger Nano X with Ledger Live through PC or mobile, these sections are explained below.
2. How to use Ledger Live on PC or Mac
Now what we are going to do is install the critics portfolios in our Ledger Nano X. To do this we are going to do it first through the computer with USB cable. Then we will show you how to do it through your mobile without wires.
Step 1
As we said before you have to have Ledger Live installed on your computer, we leave you the link of the program to download from the official Ledger website:
Ledger Live Official
Once installed with a password to enter the program, we open it and we will see the following menu:
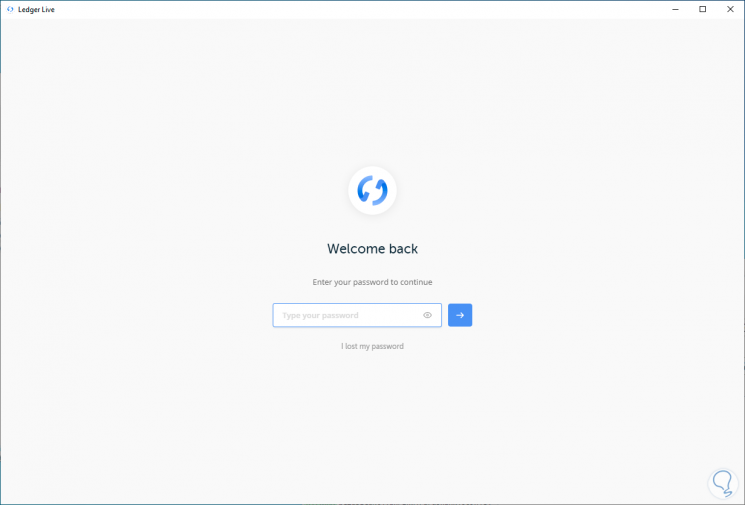
Enter the password created in your installation.
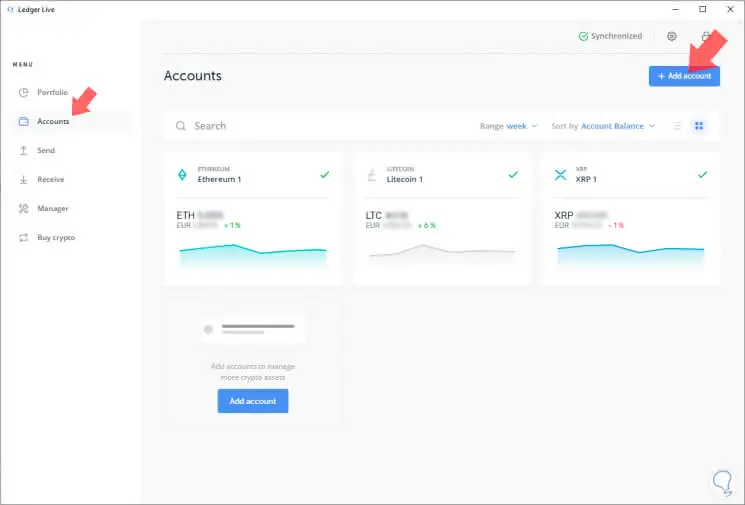
Step 2
Now what you must do is enter "Accounts" which are the cryptocurrency accounts you want to have. In this screenshot you will see that there are 3 already installed, but in your case none will come out. Simply click on "+ Add account" to start installing the ones that interest you. You will do it one by one.
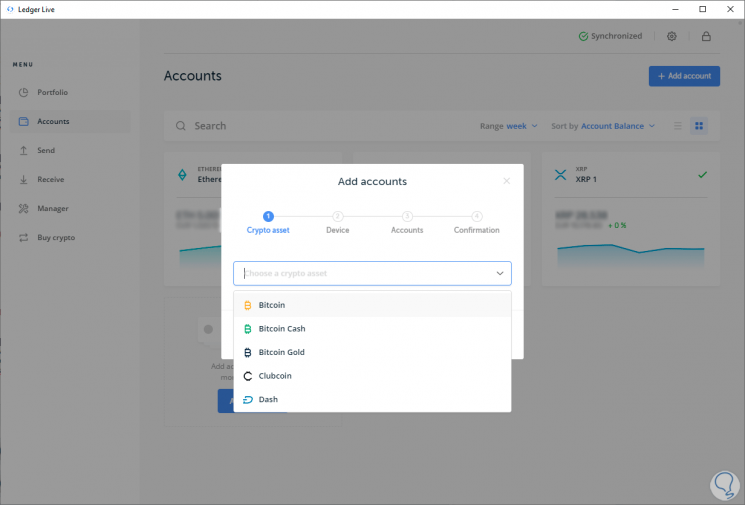
Step 3
As you will see in the following image, you will get a search engine, so you can write the name of the crypto you want to create an account on your Ledger. You have many types and every day they add more. Today many cryptos are accepted, we leave you a link with their compatibility:
Ledger Supported Crypts
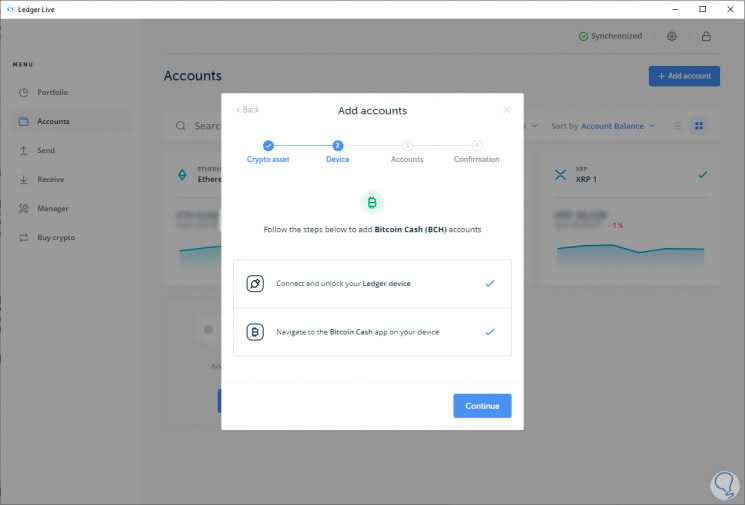
Step 4
Select the one we want to create, in this example we have selected Bitcoin Cash, click on Next and it will start to configure it. He will ask us to enter the account that we have Bitcoin of our Ledger. When entering from our Ledger that we have connected to the PC, the checks will appear on the screen.
Step 5
Click on "Continue" and it will start synchronizing our USB Ledger. Then it will appear what name we want to put to the account.
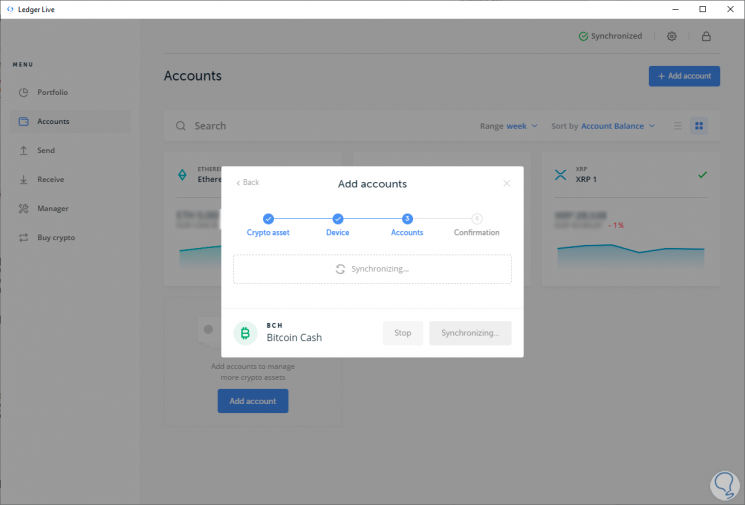
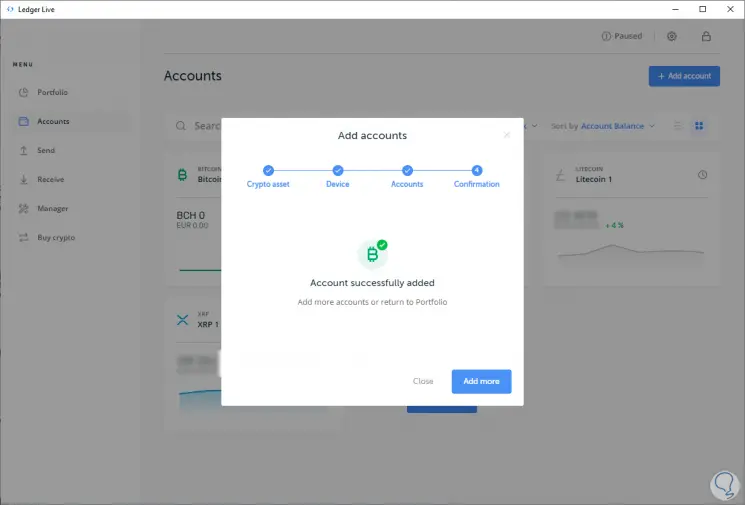
We mark the check that appears next to the name we are going to put. And click on the "Add account" button.

You will get it that has been successfully added to your Ledger Nano and Ledger Live where you can start to perform operations of both sending and receiving cryptocurrencies by clicking on "Send" or "Recieve" (Receive).

3. How to use App Ledger Live with Ledger Nano X on mobile
Now we will explain how to use Ledger Live, but instead of on the PC, we will use it with the Ledger Live App from the mobile to create an account. In the example we use it with an iPhone, but it is compatible for both Apple and Android devices.
The interesting thing about this option is that it allows us to perform operations from our smartphone and also it is not necessary that we connect our Ledger Nano X by cable, since it connects via bluetooth to our smartphone or tablet. We leave it to you first on video and then you have it in graphic mode step by step.
To keep up, remember to subscribe to our YouTube channel! SUBSCRIBE
Step 1
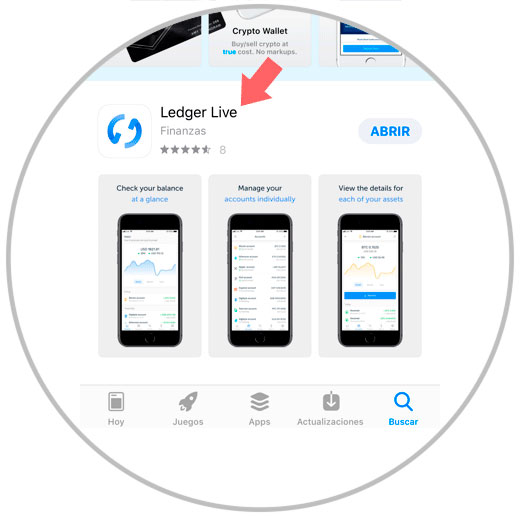
We download the Ledger Live app from the Apple Store or Google Play. We leave the download links here:
Ledeger Live Android
Ledger Live iOS
In this example of iPhone, we enter the Apple Store and look for Ledger Live and download it.
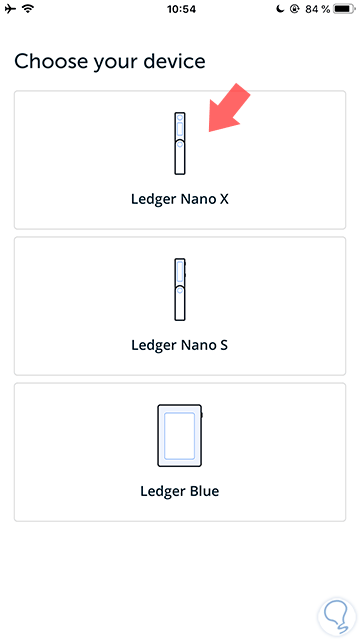
Step 2
Once installed, we proceed to open it, click on "Get started" and select our Ledger. In this case Ledger Nano X.
Step 3
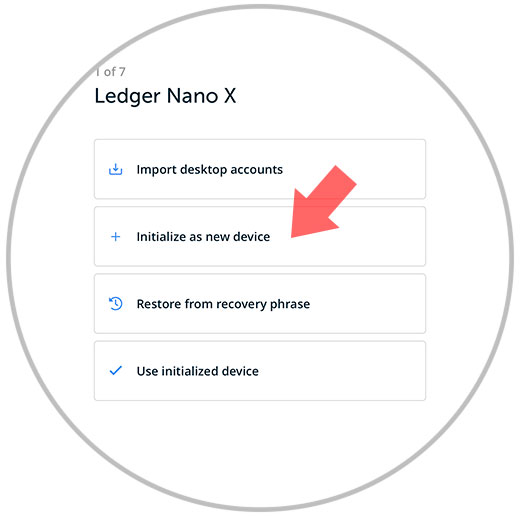
We will see several options to select:
1. Import a desktop account.
2. Start as a new device.
3. Restore from recovery keywords
4. Use device started.
In our case we will use option 2, to start as a device and new account.
Step 4
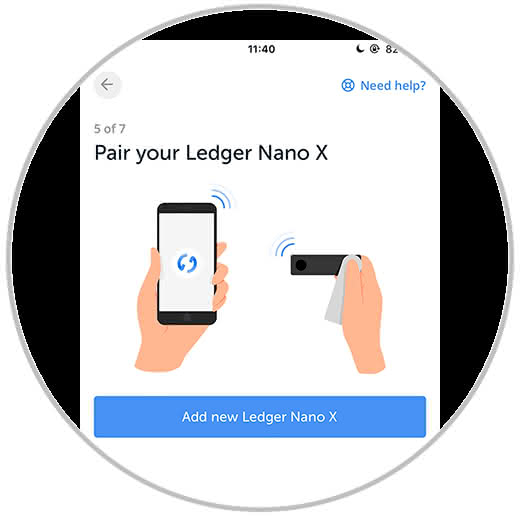
Now there will be options to turn on your Ledger Nano X and perform the steps explained in the configuration explained in this tutorial, it is only informative and is to click on each point until we reach step 5, "Add new Ledger Nano X", which It is to join our USB Ledger to the Ledger Live app.
It will search for devices that are on Ledger, and you will find your Ledger Nano X as you see in the following image.
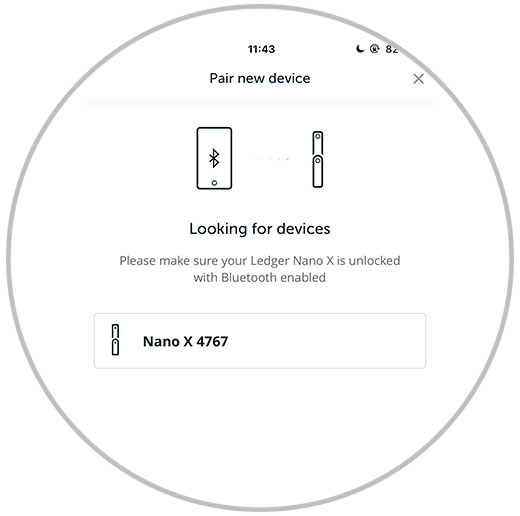
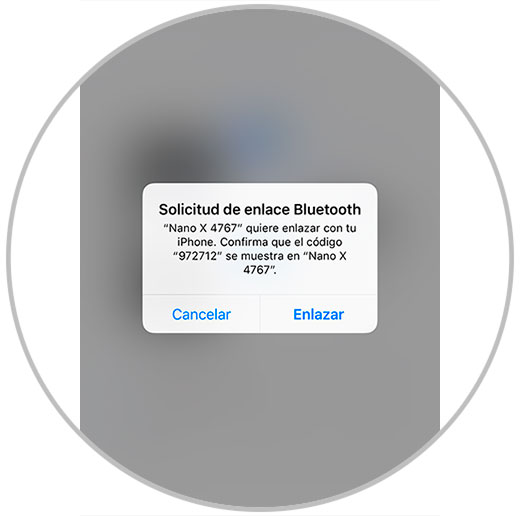
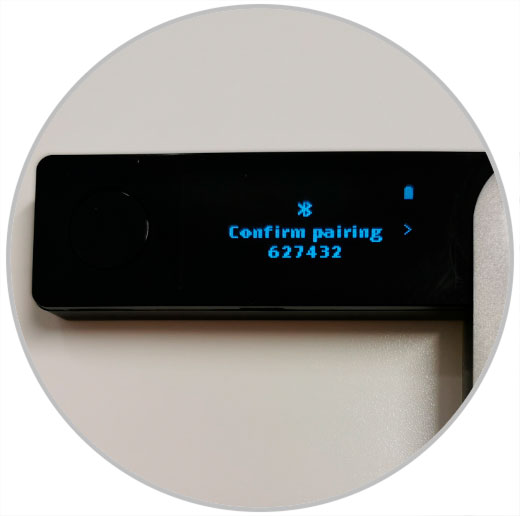
Click on "Link" and then on the screen of our Ledger Nano X a message will appear to confirm the connection with the smartphone. Press the two buttons at the same time as the Ledger and with that we will have it confirmed.
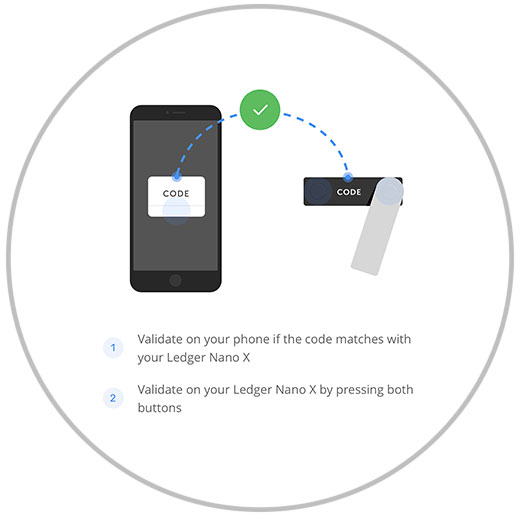
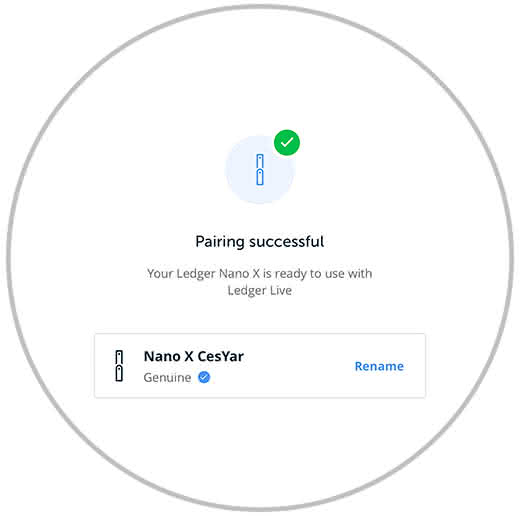
As you can see, we will have our Ledger Nano X synchronized with our mobile phone, in this case with our Ledger Live on iPhone.
Step 5
Now we will proceed to create an entry password in the Ledger Live app where we will manage the sending or receiving of crypto. We can also if we want to activate the Touch ID or Face ID as access password for Ledger Live depending on the phone we have.
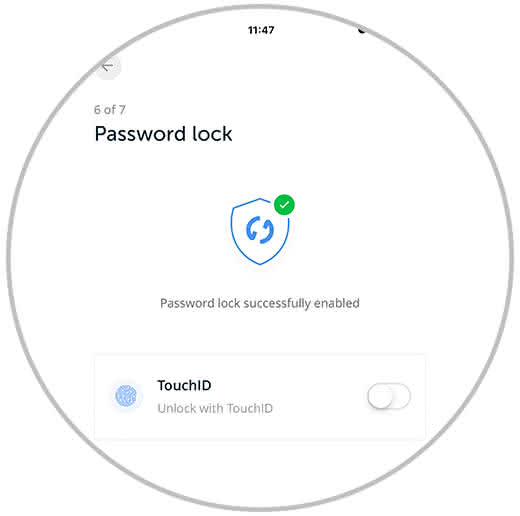
We will have synchronized both Ledger Live app and our Ledger Nano X.
Step 6
Before we can send or receive crypto, we will have to create the cryptocurrency accounts that we want to host in our Ledger Nano X. To do this we must first install the crypto that we want to manage in the "Manager" option. That is by clicking on Download next to the crypto we want to install.
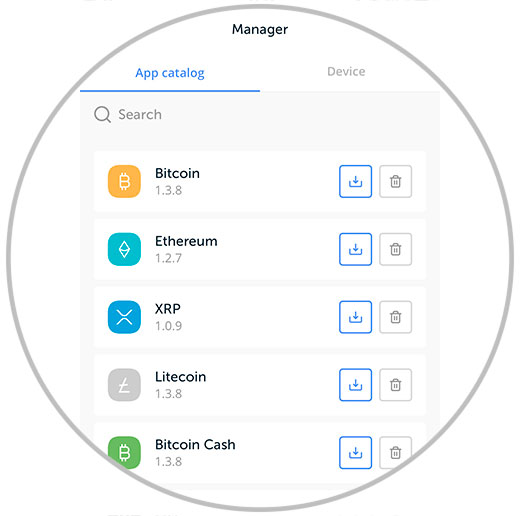
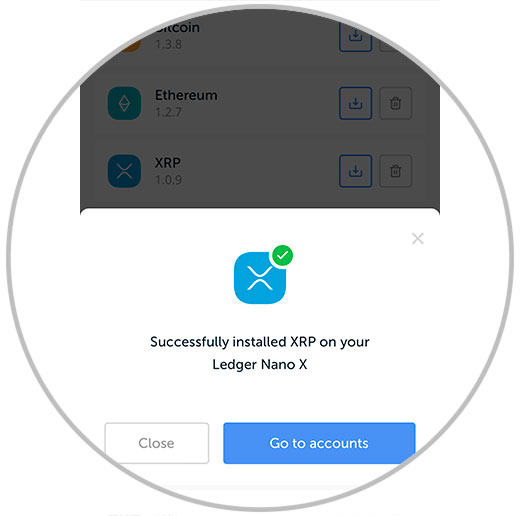
In this example we select the XRP crypto. It will be installed both in the Ledger Live app and in our Ledger Nano X.
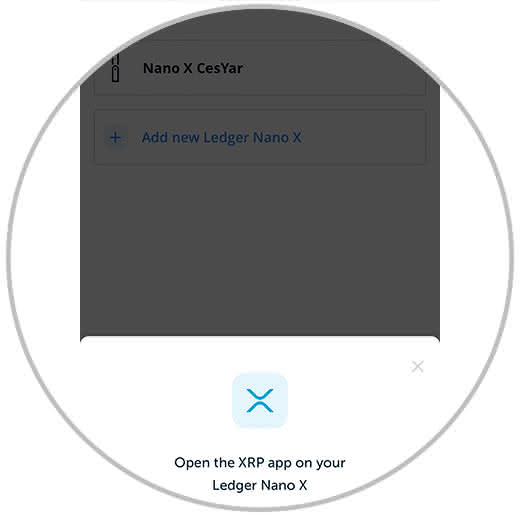
Step 7
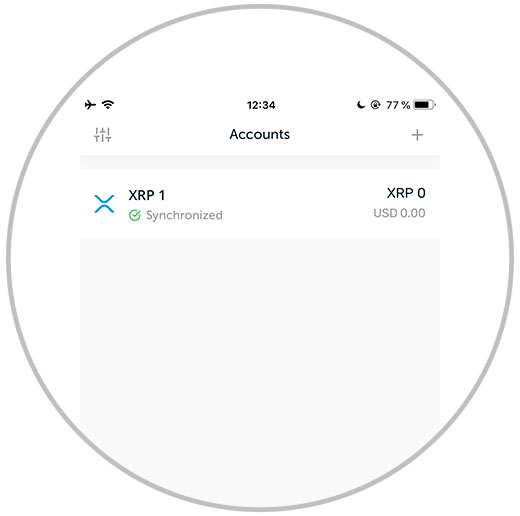
Once installed from the Manager, we can now go to the "Accounts" option where we can create the accounts we want. In this example, since we have only installed XRP, we will create an account to be able to send and receive from XRP.
Simply click on "Accounts". Then click on "+ Add accounts", select your Ledger device and it will ask you to enter the type of crypto that you have installed in your Ledger Nano X. In this example in XRP.
You select the account created with the check. You can change the name and put what you prefer account name. Click on "Continue" and you will have it created.
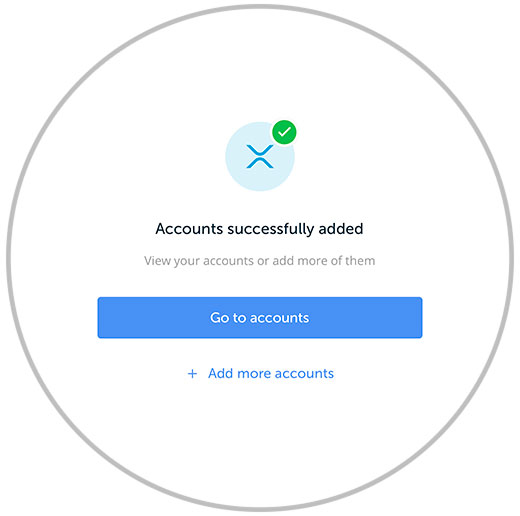
You already have everything ready and prepared to be able to operate without problems through your Smartphone with your Ledger Live App. To send or receive it is done through the menu option called "Transfer". Or by entering accounts and selecting from there from which you want to operate. In this case that we have installed only XRP, only that will be released, ready to receive or send XRP (Ripple).
4. How to update Ledger Nano X Firmware
In case you want to update the firmware of your Ledger Nano X you can do it both from the Ledger Live app of your smartphone, as from the Ledger Live application of your computer. You just have to follow the following steps.
Before installing a new firmware, it is first advisable to uninstall the crypto accounts that you already had installed. This does not put your crypto at risk because when you reinstall new firmware and reinstall the accounts you will see that the crypts you had appear.
To do it from the Ledger Live App:
- You identify yourself in your Ledger Nano X.
- You enter "Manager".
- Select "Device"
- You will see the firmware version
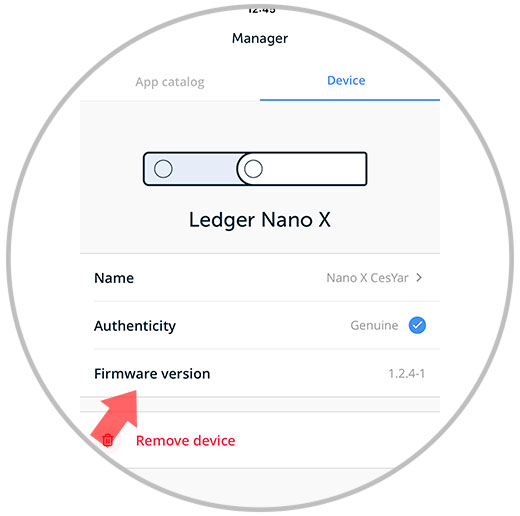
If there is an update, you will get a warning to do it, but no warning appears that you have updated to the latest version.
To perform Firmware update through Ledger Live program from computer:
- You enter "Manager".
- You will see next to the device a blue button to update Firmware, but it appears that you have it updated to the latest version.
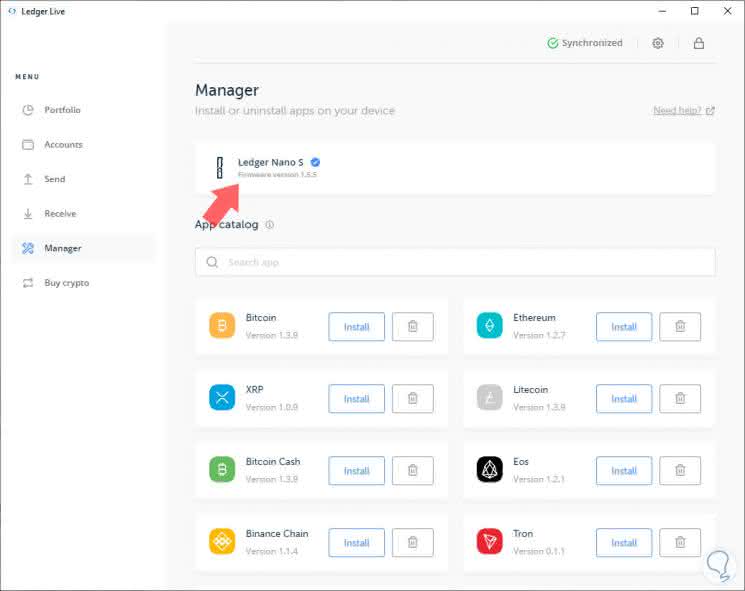
In this case we have it updated to the latest version and it does not appear, but if there is a new Firmware, the warning will appear there to update it if you are interested.
We leave you a video that explains the firmware update procedure, it is official of Ledger, and although it is for the Ledger Nano S, it is very similar in Ledger Nano X. It explains well the following steps, in case of Firmware update.
To keep up, remember to subscribe to our YouTube channel! SUBSCRIBE
As you can see, we have everything explained. We hope you liked the Ledger Nano X tutorial. TechnoWikis will continue to make Blockchain tutorials that you ask us. Who wants to buy a hardware wallet, in this case Ledger Nano X, here you have the official Ledger link, for security buy it from here , not from pages that are not official and may be selling a bad Ledger.
OFFICIAL LEDGER: Buy Ledger Nano X
From this link on the official Ledger website you can buy Ledger Nano X, with the security guarantee, both in shipping and being the completely genuine product through Ledger, do not buy anywhere else for security.
Buy Ledger Nano X Official