The current equipment is a set of elements of both hardware and software that work together so that you and I can enjoy every function and feature of the operating system. But there are more important elements, rather vital, for the system to run correctly from the boot itself . One of them is the hard disk, the same that has accompanied us for years and years and that today we find in various sizes, styles, colors and the most important technology.
If you buy your new equipment you will see that they offer you mechanical hard drives (HDD) or solid state hard drives (SDD) where each one has its own advantages of use and performance, as well, while the HDD hard drive offers greater storage capacity , The SDD disk is safer and provides better read and write times. But regardless of these advantages, we will always be prone to our hard drive presenting some kind of failure and how do you detect it? Well, TechnoWikis will give you some guidelines to identify it:
How to detect disk failures
- System startup failed or slow
- Sudden shutdowns or restarts
- Erroneous readings displayed
Although it is somewhat delicate because if your hard drive has errors in productivity and normal use of the equipment and its applications, it will undoubtedly not be the most appropriate and may affect your stability, patience and life.
That is why TechnoWikis will give you a series of tips that we hope you accept, read and most importantly practice them if your HDD or SDD disc has any symptoms of failure.
Disk damage factors
One point that we must understand is that there are several factors that can affect our hard drives, these can be both internal and external, some of them are:
- Presence of malware or virus.
- Corrupt processes and more.
At present, it must be recognized that HDD discs are more susceptible to errors than SDD discs, but this does not exempt that at some point an SDD disc may be damaged.
Apart from the hard disk, we have a software element that is key so that everything we do on the computer can be recognized and compatible as such. We are talking about the file system which allow the correct execution of the applications and files within macOS Catalina, in this new Apple system the files are defined in an independent partition, and in it we will only have read permissions but not write .
File System Features
Some of the features of the file system not only in macOS Catalina but in any operating system are:
- Configure the scheme on which data should be stored with specific details such as file name, associated permissions, security variables and more.
- Establish the way in which the unit's data will be separated into individual objects which we know as files.
- Create and manage the index so that the operating system can perform a much more precise and accurate search based on the values ​​of each element.
APFS advantages
In macOS Catalina, the APFS file system (Apple File System) is defined by default, which is established on SDD discs with the new macOS distributed computers, APFS gives us advantages such as:
- Better management of disk space.
- Integrate a solid encryption.
- Provides a faster and safer directory size change.
- Compatible with snapshots.
APFS types
APFS gives the administrator various methods to set the file system level with options such as:
- APFS (upper / lower case)
- APFS (upper / lower case, encrypted)
Know my File System
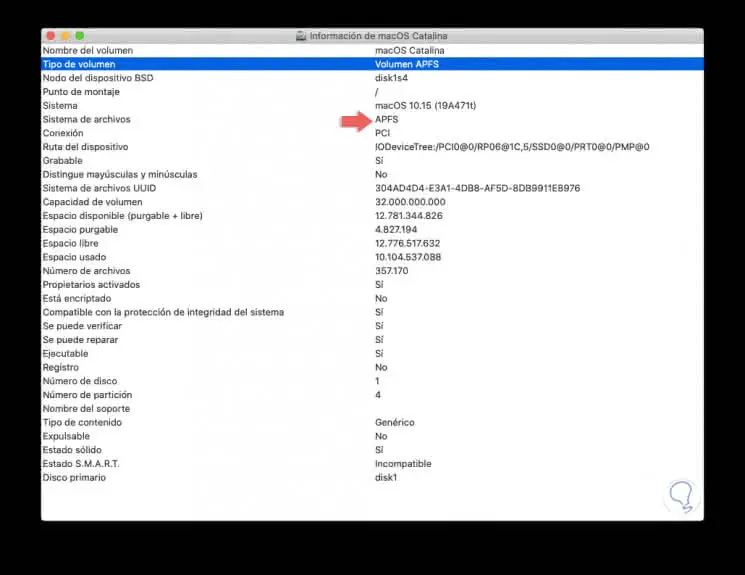
Just out of curiosity, if you want to verify the current file system that has macOS Catalina, are we going to access the "Disk Utility". 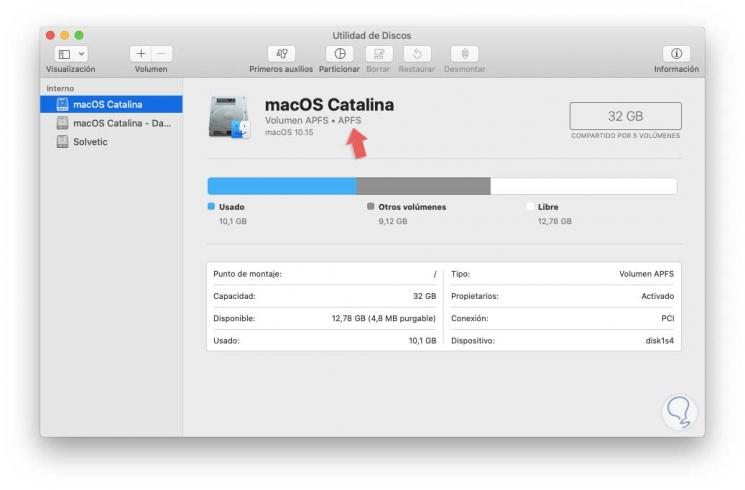
Although there we can already see that it is APFS we can click on the "Information" icon to get much more complete details not only of the file system but also of the disk in general:
File System Errors
There are some errors at the file system level that it is important to keep in mind that it refers to so that you do not lose your mind when you find it, some of these are:
- dsAddressErr: Addressing error.
- dsChkErr: Range check error.
- dsIllInstErr: Invalid instruction.
- dsPrivErr: Violation of privileges.
- dsOvflowErr: Overflow error.
- dsLoadErr. Segment loader error.
- dsBadLaunch: Unable to open a file.
- dsFSErr: The file system map has been removed
- dsIOCoreErr: I / O core error.
- dsFPErr: Floating point error.
- dsMBarNFnd: System error: MBDF is not detected.
1. Repair disk with macOS Catalina First Aid function
It remains one of the support tools integrated from previous versions of macOS with which we can execute it to detect and correct situations such as:
- Boot failures or unscheduled device restarts
- Sudden closures of applications and programs
- Own or system files with errors or corrupted
- Non-recognition of external devices connected to the device
- Extreme slowness when using the system
With Disk Utility integrated in the system it will be possible to repair disk problems, when any of the symptoms mentioned above are detected. The First Aid utility should be our first choice before making other decisions about the disc.
Step 1
For use, we access the "Disk Utility" using one of the following options:
- Using the Go / Utilities / Disk Utility menu
- Entering the term utility in Spotlight and selecting the option corresponding to the Utility
- With the key combination:
⇧ + ⌘ + U
Step 2
We will see the following window where we will select the macOS Catalina disk: 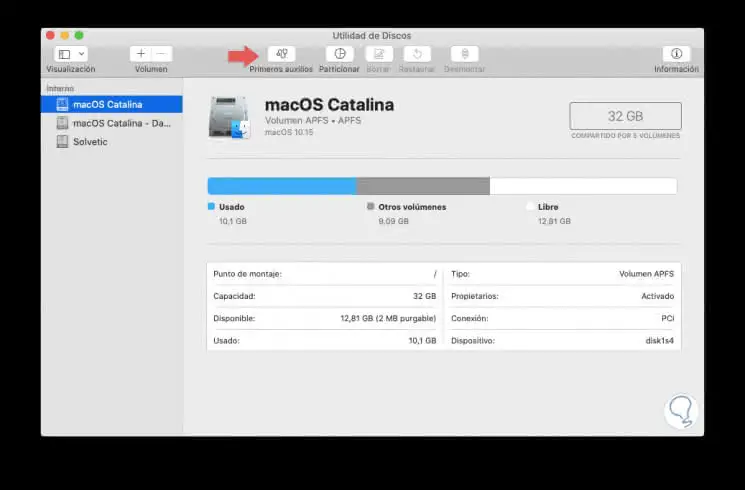
Step 3
We will click on the top button "First Aid" and the following will be displayed: 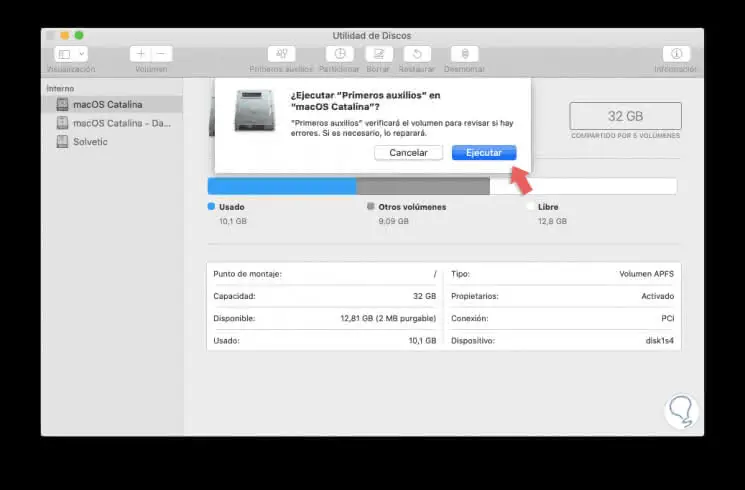
Step 4
We click on Execute and the following warning will be displayed: 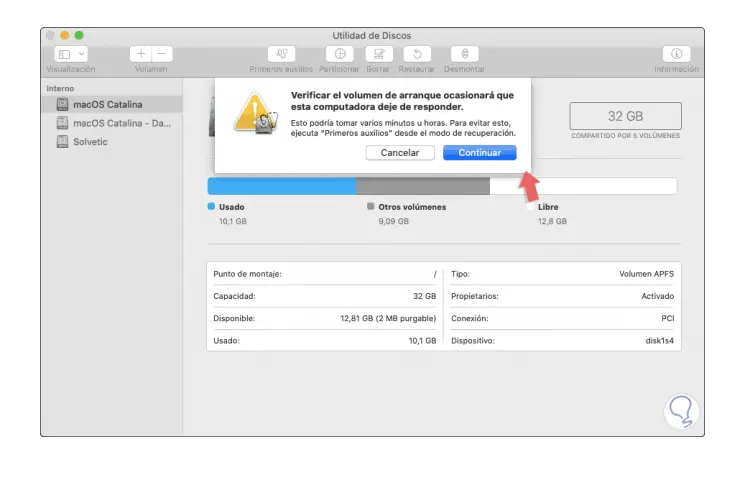
Step 5
We click on Continue and we will see that the hard disk analysis process begins: 
Step 6
When the process is finished the following will be displayed: 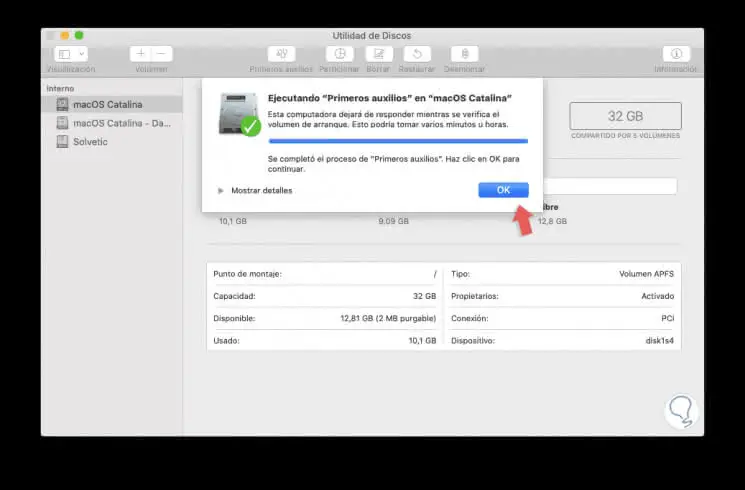
Step 7
To know in detail the First Aid operation, click on the “Show details†line and we will see each process carried out. In case of an error, the utility will take care of its correction. 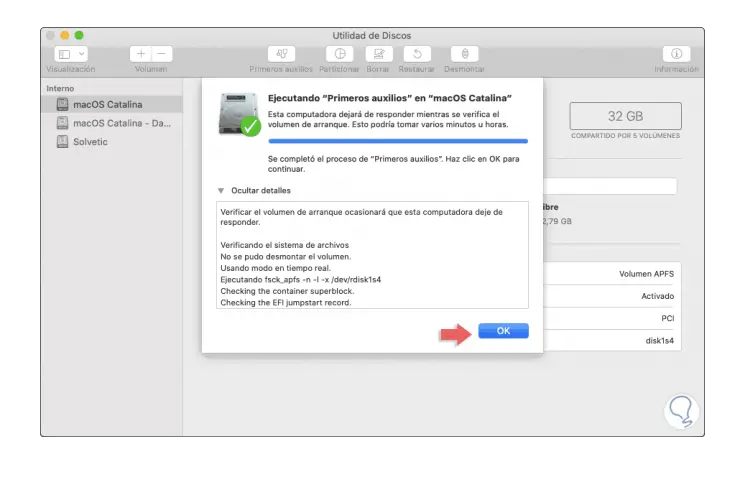
2. Repair disk with First Aid function in macOS Catalina recovery mode
We know that some operating system processes are best performed safely without loading all services and processes and therefore if the previous process does not work or follow hard disk errors, we can access using the recovery mode and execute the function again First aid.
For this, we must turn on or restart the computer. And during the boot process press the following keys where the following window will be displayed. There we select Disk Utility and repeat the process explained above.
⌘ + R

3. Repair disk with FSCK command on macOS Catalina
The fsck (File System Check) command has been developed with the purpose of verifying in detail the macOS file system to detect, repair or alert on errors in said file system.
Step 1
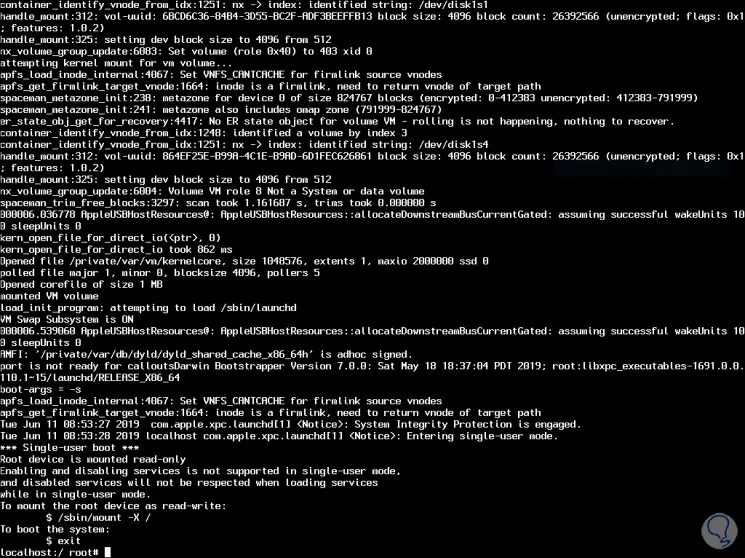
To use this method with the FSCK command in macOS Catalina we will restart or turn on the system and during this we press the following keys.
⌘ + S
Step 2
With the FSCK command we have some parameters such as:
--to
Automatically repair errors in the macOS Catalina file system.
--n
Report problems found without repairing them, that is, informational only.
--c
It analyzes and detects the damaged blocks and then adds them to the list of corrupted blocks of the utility.
--F
Force file system review.
--v
It means verbose, generates more information for its administration.
--r
Enable interactive mode.
--Y
Confirm all actions.
Step 3
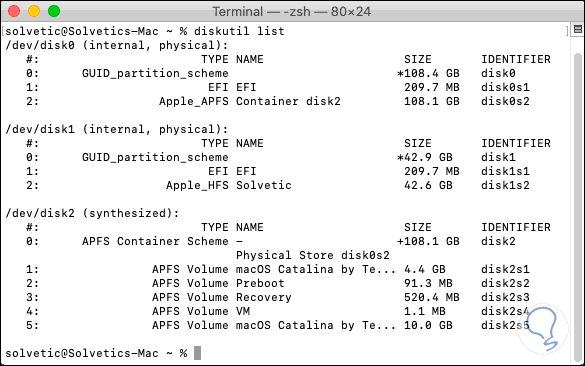
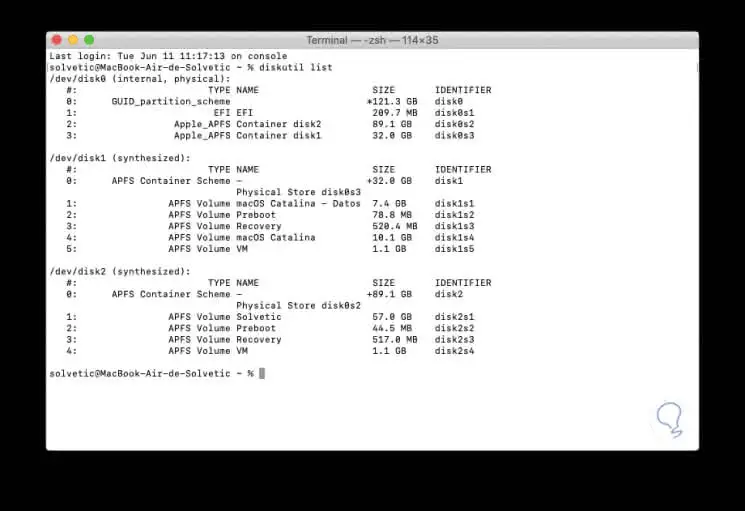
The first step before any action is to know what the ID of the hard disk is, for this, in the active system, we go to the terminal and execute the following. There we identify the disk which has the syntax / dev / disk #.
diskutil list
Step 4
Now if we proceed to restart the system by pressing the following keys and we will be redirected to the following window:
⌘ + S
Step 5
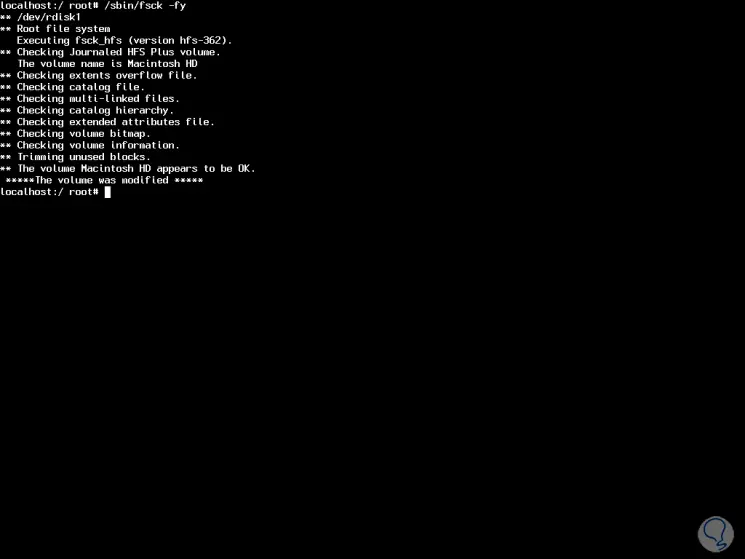
There we proceed to execute the following order if we are going to repair the macOS Catalina boot disk:
/ sbin / fsck –fy
Step 6
The parameters used are:
F
It forces the utility to check the hard disk file systems.
Y
Automatically confirms all actions of the FSCK command.
Step 7
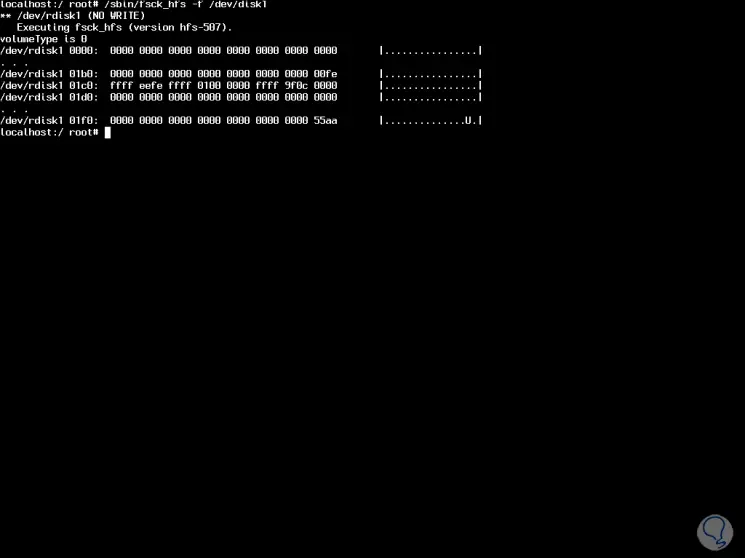
Now, we may want and not necessarily the boot disk, for this we will execute the following syntax:
/ sbin / fsck_ (File System) -f / dev / disk #
Step 8
There we can find one of the differences of macOS Catalina, since before executing this order we saw the following. 
Step 9
In case of having more complex discs we can see the following: 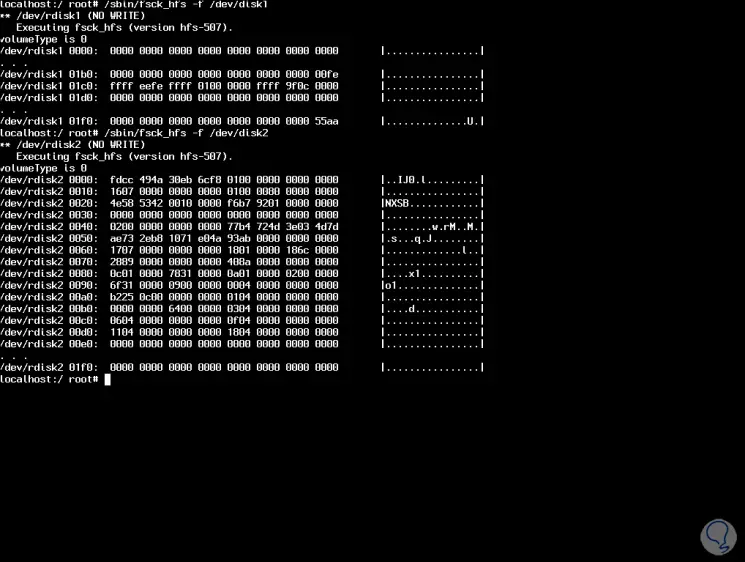
Step 10
We can see that the analysis structure is different with the respective assigned use codes. In this case we can specify the type of file system to analyze as follows. After this we can restart the system by executing the reboot command.
fsck_msdos (Applies to FAT file systems) fsck_exfat (Must be used in ExFAT file systems) fsck_udf (Applies to UDF file systems) fsck_hfs (Useful for HFS file systems)
4. Repair and analyze disk with the terminal in macOS Catalina
Another option available for this purpose is from the terminal to execute the FSCK command for the analysis and repair of the file system.
Step 1
For this we access the terminal and first execute the following command to list the hard drives:
diskutil list
Step 2
Once the disk is defined, if the objective is to analyze the boot disk, we will execute the following:
diskutil verifyVolume /
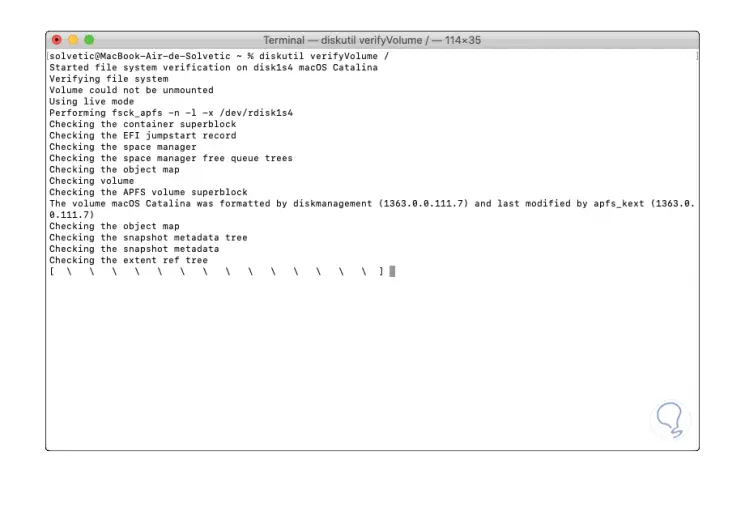
Step 3
When the process is finished we will see detailed information on the results. The code zero (0) means that no anomaly was detected. 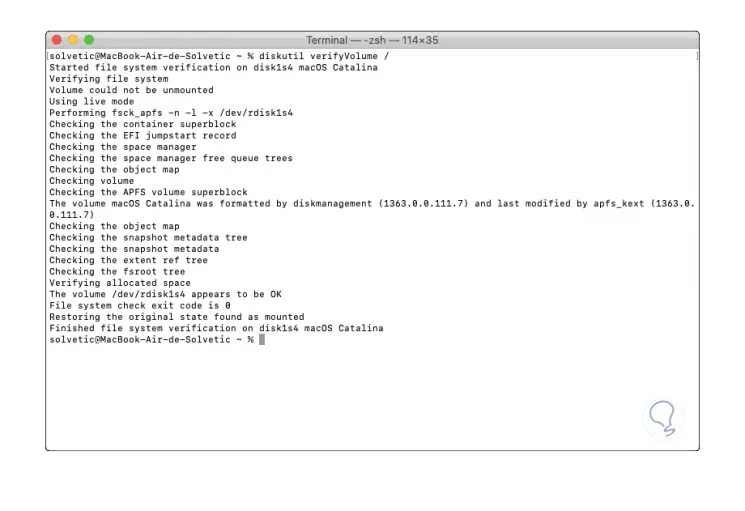
5. Repair disk and file system with Internet Help option in macOS Catalina
In macOS Catalina we have a recovery mode called "Get Internet help" which executes a code stored in the firmware of the local computer, as well as a network boot image which is stored on Apple servers and is linked to macOS Catalina.
To start this method we will use the following key combination and thus give rise to this functionality.
⌥ + ⇧ + ⌘ + U
You can see how not everything is lost and thanks to TechnoWikis solutions your hard drive will be the same in terms of performance and reliability.