Working in databases is one of the tasks that today has taken more and more boom due to everything that they integrate and involve a complete portfolio by developers in aspects of security, scalability, performance, compatibility and work. the more languages.
It is not a secret to anybody that MySQL is the SQL database management system which is distributed by Oracle Corporation, which has one of the widest ranges for everything it adds and offers for all types of organizations.
MySQL is a key part of LAMP ( Linux , Apache, MySQL, PHP / Python / Perl) and makes use of the relational model based on the structured query language for data management.
characteristics
Among the main virtues of MySQL we find:
- MySQL databases are relational
- MySQL is a comprehensive, free and powerful database management system
- MySQL Server works under the client / server structure or in integrated systems
- Data dictionary integration
- Using Atomic Data Definition Declarations (Atomic DDL)
- Security and centralized account management
- Integrated resource manager
- Table encryption management
With all this in mind we will see how to install MySQL in Ubuntu 20.10.
How to update Ubuntu
As always, the first step we will take will be to update the system packages and repositories. For this we execute the following:
sudo apt update

2. How to install MySQL in Ubuntu 20.10
Step 1
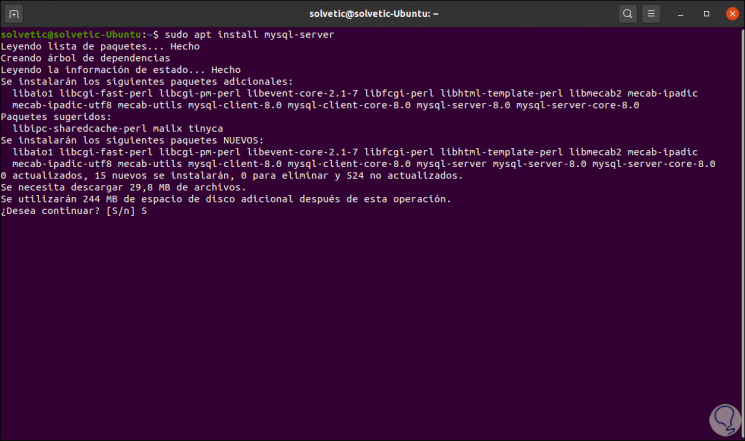
Once the system has been updated we proceed to install MySQL with the following command:
sudo apt install mysql-server
Step 2
We enter the letter S to confirm the download and installation of the necessary packages. When this is finished we will see the following:

Up to this point we have installed MySQL, as we see, it is not requested to establish a password or apply any change in the MySQL configuration.
3. How to configure MySQL
MySQL integrates a security script in the DBMS which allows us to edit the less secure default MySQL options. If we leave it as it is we can be victims of attacks or more situations that put the integrity of the data at risk.
Step 1
To run this script we must execute the following:
sudo mysql_secure_installation
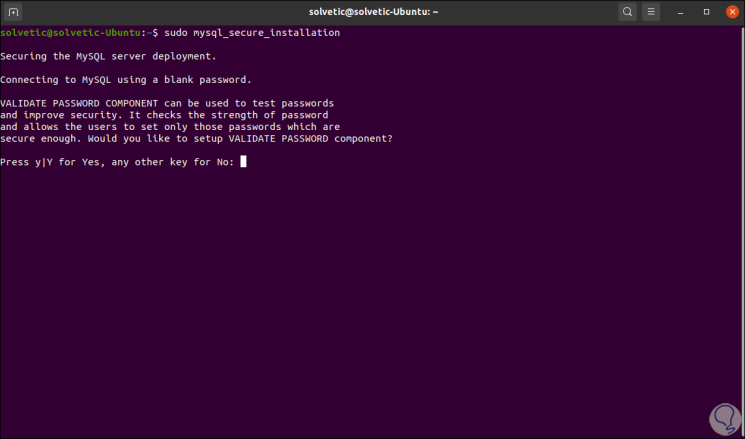
First of all, it is asked if we want to establish a strong password, this allows us to validate the password security for new MySQL users before they are validated in the database. In case of entering "and" we must use the policy level level 2. This level will request that the passwords have at least eight characters in length, as well as that a combination of uppercase, lowercase, numbers and special characters be integrated.
Step 2
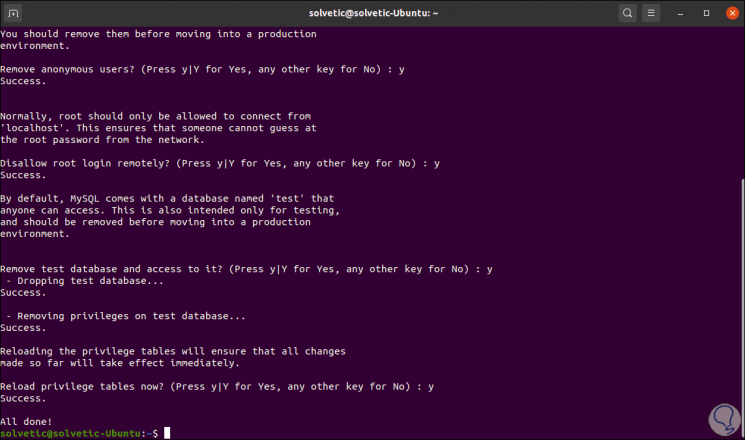
In the following questions we can establish the appropriate answers which for security will always be "Y":
4. How to create users and grant permissions in MySQL Ubuntu
Once we configure the MySQL security policies we will create users. By default MySQL will create a root user account to administer the database. This is a user who has all the privileges on the MySQL server, that is, he has full access to the database, table, user and other elements of MySQL, hence the importance of creating an extra account, in operating systems Ubuntu with MySQL 5.7 (and later versions).
The MySQL root user has been configured to authenticate based on the auth_socket plugin by default instead of using a password. When using this plugin, it is mandatory that the name of the user of the operating system from which MySQL is invoked coincides with the name of the MySQL user entered.
Step 1
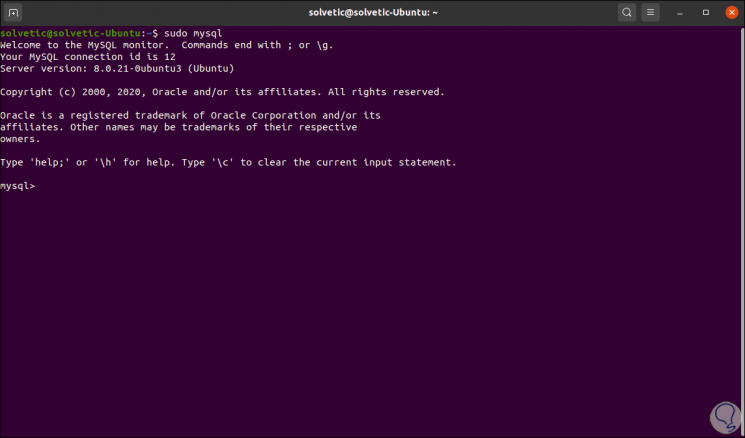
In this case we must access mysql with sudo privileges:
sudo mysql
Note
In case of enabling password authentication for root, we must enter "mysql -u root -p" followed by the user password.
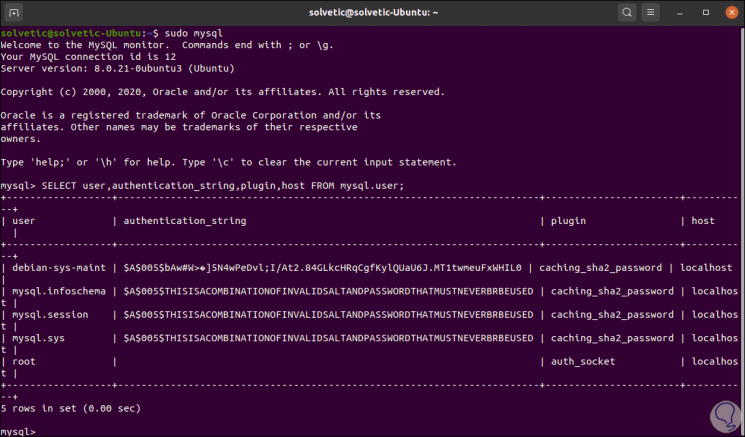
Step 2
We will list the current users with their authentication options with the following command:
SELECT user, authentication_string, plugin, host FROM mysql.user;
Step 3
We can see that the root user uses "auth_socket". We can configure the root user to authenticate with a password. In this case, you must execute the ALTER USER statement and define which authentication plug-in to use:
ALTER USER 'root' @ 'localhost' IDENTIFIED WITH caching_sha2_password BY 'password';
Step 4
After this we apply the changes with “FLUSH PRIVILEGES;”, we check the change with:
SELECT user, authentication_string, plugin, host FROM mysql.user;
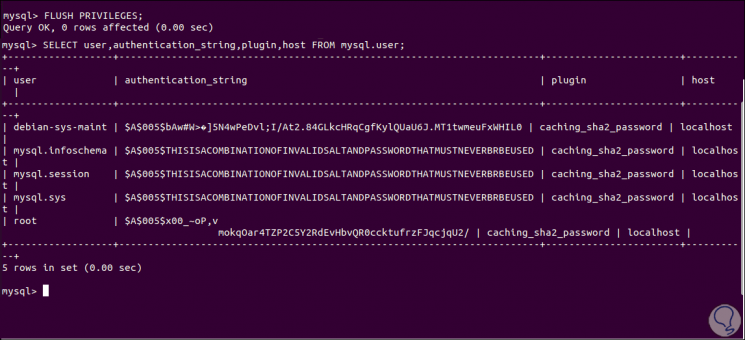
We can see that the authentication plugin has been edited.
The caching_sha2_password plugin is the most widely used authentication plugin in MySQL, this is because it offers much more powerful password encryption.
We exit MySQL with exit.
Step 5
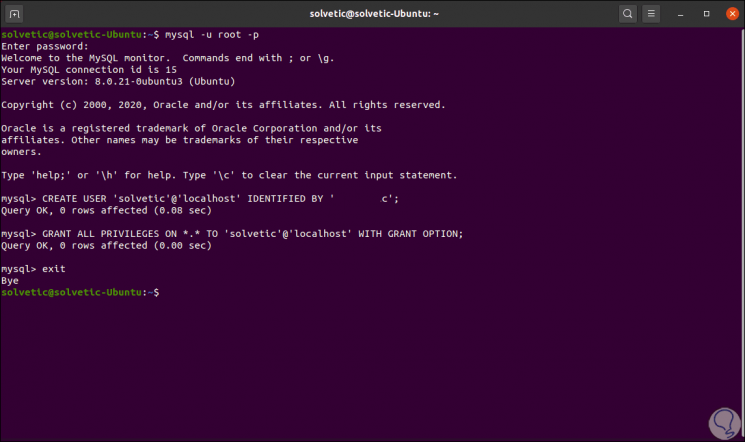
We access MySQL by entering the authentication password:
mysql -u root -p
Now we will create an administrator user with the following syntax:
CREATE USER 'user' @ 'localhost' IDENTIFIED BY 'password';
Now we grant the privileges to that user:
GRANT ALL PRIVILEGES ON *. * TO 'user' @ 'localhost' WITH GRANT OPTION;
We exit MySQL with exit.
5. How to validate the status of the MySQL Ubuntu service
Step 1
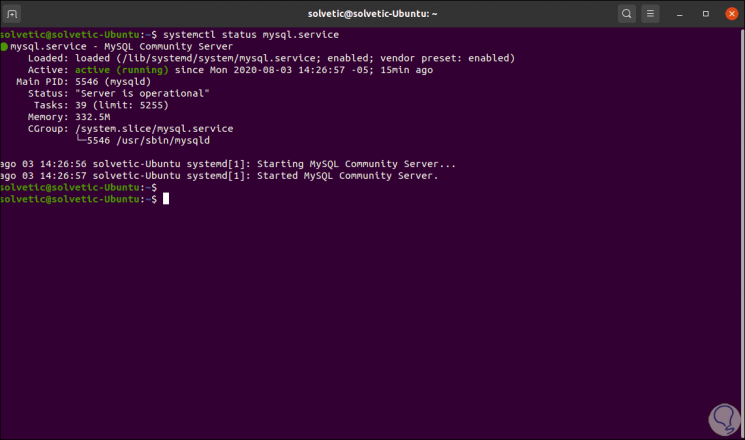
We validate the status of the MySQL service with the line:
systemctl status mysql.service
Step 2
As we can see its status is active and running, now we are going to establish a connection to the database through the mysqladmin tool (it is a client that allows you to execute administrative commands):
sudo mysqladmin -p -u technowikis version
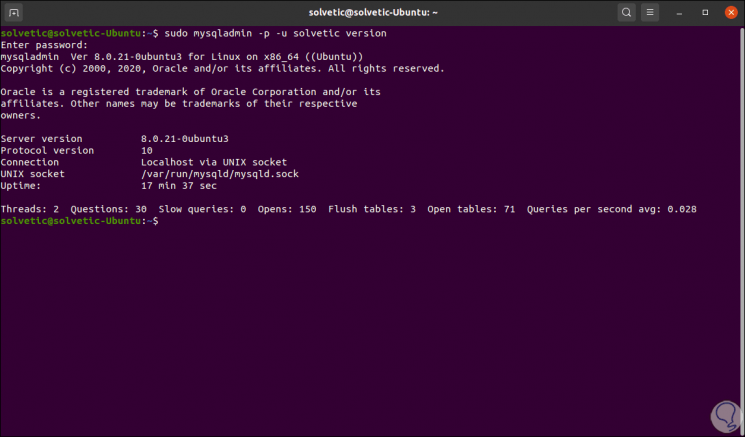
If we see this it means that MySQL is working as expected in Ubuntu 20.10.
TechnoWikis has explained to you how to install MySQL as well as its configuration in a dynamic but totally practical way.