If you are users of a Mac or mobile device such as iPhone or Android mobile phone, you will know that when we take a screenshot of our device you will have noticed that a sound is played every time we take said capture. However, in the case of having a Windows 10 computer, at the time of taking said capture, no sound will be played. Fortunately, if you wish, Windows 10 allows you to activate a specific sound to notify you that a screenshot has been taken.
Related: How to Capture Screen Only of Windows 10 Active Window
Windows 10 allows users to take a screenshot by default, making use of the Windows Key + PrintScrn keyboard shortcut. This feature saves a full screen capture in the Pictures folder. Also when we take a screenshot, you will see how the screen of your Windows 10 computer flickers which is an indication that the screenshot has been taken..
Note: There is an alternative to take screenshots in Windows 10. To do this you just have to press the PrintScreen key, which will save the screenshot to the operating system clipboard that you can paste and save later.
Fortunately, Windows 10 allows you to activate an audible notification that a screenshot of your computer is taken. The only downside is that a sound can only be activated when we take screenshot using the PrintScreen key but NOT for the Windows Key + PrintScreen keyboard shortcut. This, as we have mentioned, when we only use the PrintScreen key, we will have to paste the screen capture in an image editing program such as Paint. Line followed you can save it as an image file..
That said, below we show you specifically how to activate the notification sound when taking a screenshot on your Windows 10 computer:
How to enable screenshot sound in Windows 10.
1. Open the Windows 10 Registry Editor .
2. Once the screen opens, you will have to go to the password:
3. Go to the next key.
Computer \ HKEY_CURRENT_USER \ AppEvents \ Schemes \ Apps \ .Default
4. Click with the right mouse button on the key:. Default
5. In the displayed menu you will have to select: New> Password
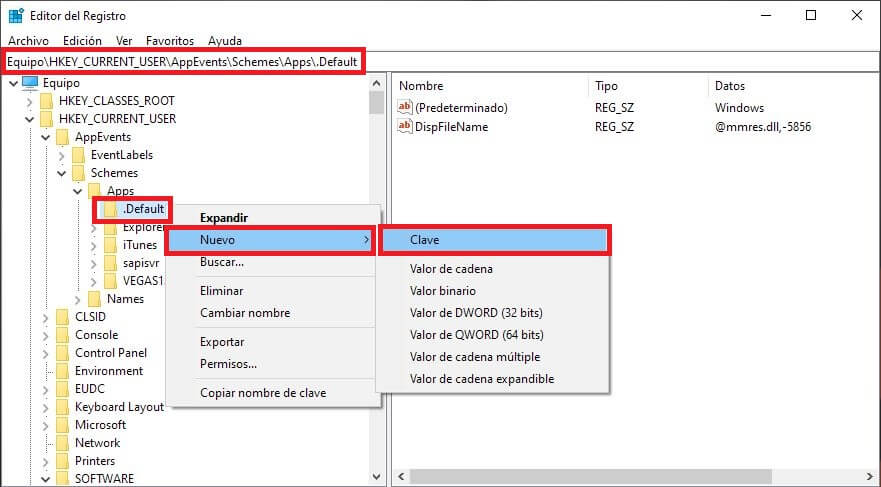
6. This new key should be named as: SnapShot..
7. Now close the Windows 10 registry editor window.
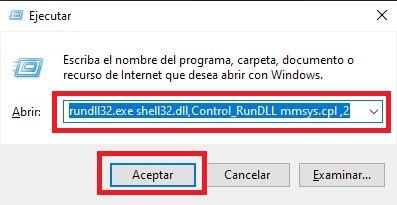
8. Noise line make use of the keyboard shortcut: Windows key + R
9. When the run tool opens, you will have to enter the following command and press Enter.
rundll32.exe shell32.dll, Control_RunDLL mmsys.cpl, 2
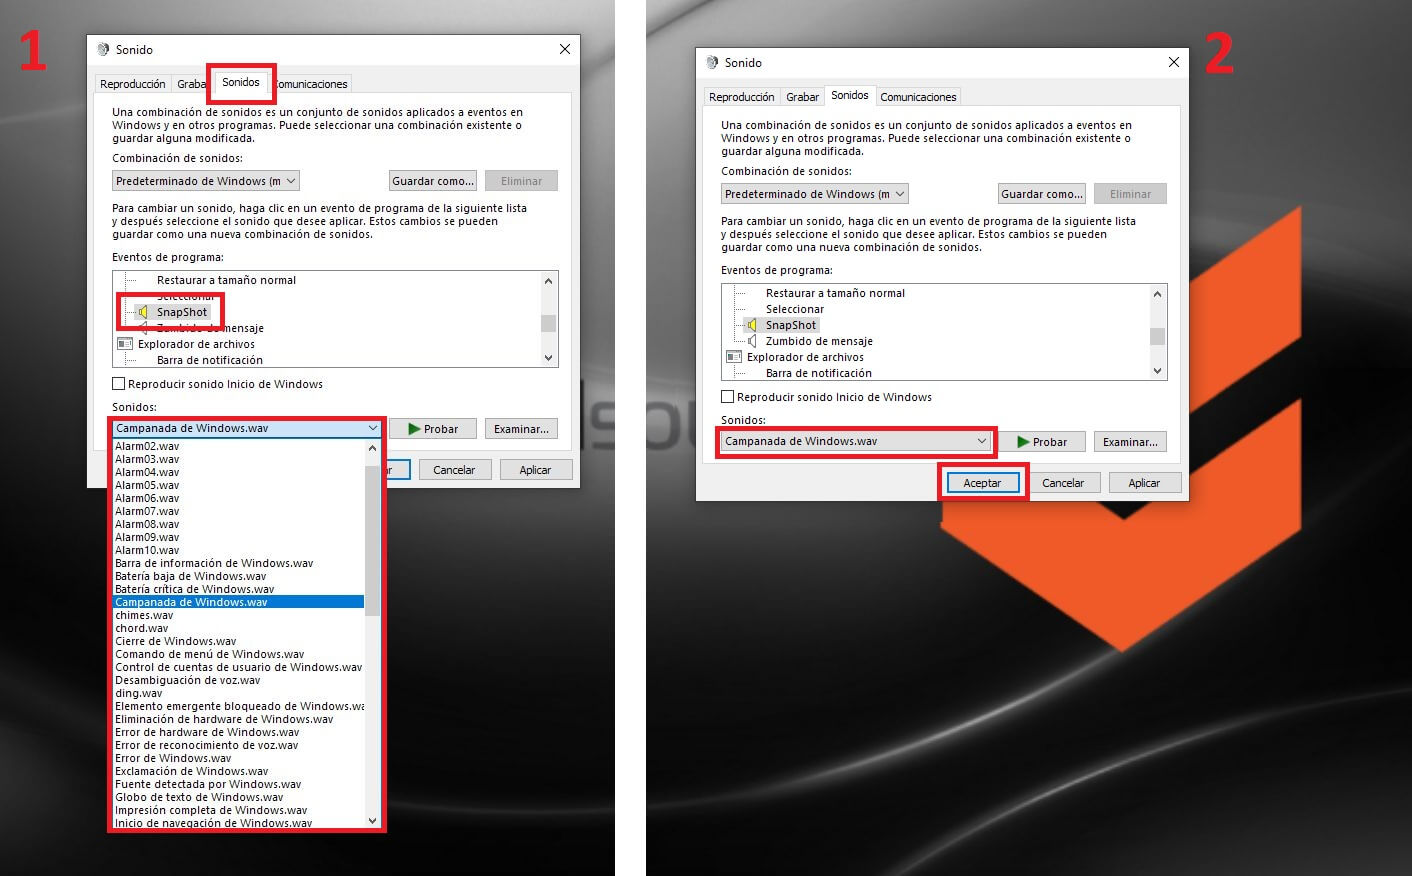
10. Now a new window will open with settings related to system sounds. Here, in the Sounds tab, in the Program Events section you will have to select: Snapshot
11. Here you can select any of the default sounds in Windows 10 from the drop-down menu: Sounds
12. Finally, you only have to click on the accept button to save the new configuration.
13. Done, from now on when you press the PrntScrn key on your keyboard, in addition to taking the screenshot, a sound will also play to notify you that the screenshot has been taken.
How to automatically save the screenshots as if you were using Win + PrntScrn and have the notification sound also sound.
If you want that when you take screenshots using the PrintScreen key and that in addition to playing a sound, it is also saved in the images folder just as it would if you used the shortcut Windows Key + PrintScreen, you can do it by executing a Script previously created by yourself. Here's how to do it:
1. Download and install the free program: AutoHotkey
2. Once installed, open Notepad in Windows 10.
3. When the window is displayed, you must copy and paste the following text into it:
~ PrintScreen :: #PrintScreen
4. Now click File> Save As
5. In the new window you will have to check the All Files option in the box: Type
6. The next will be to write the name: Prntscreen.ahk
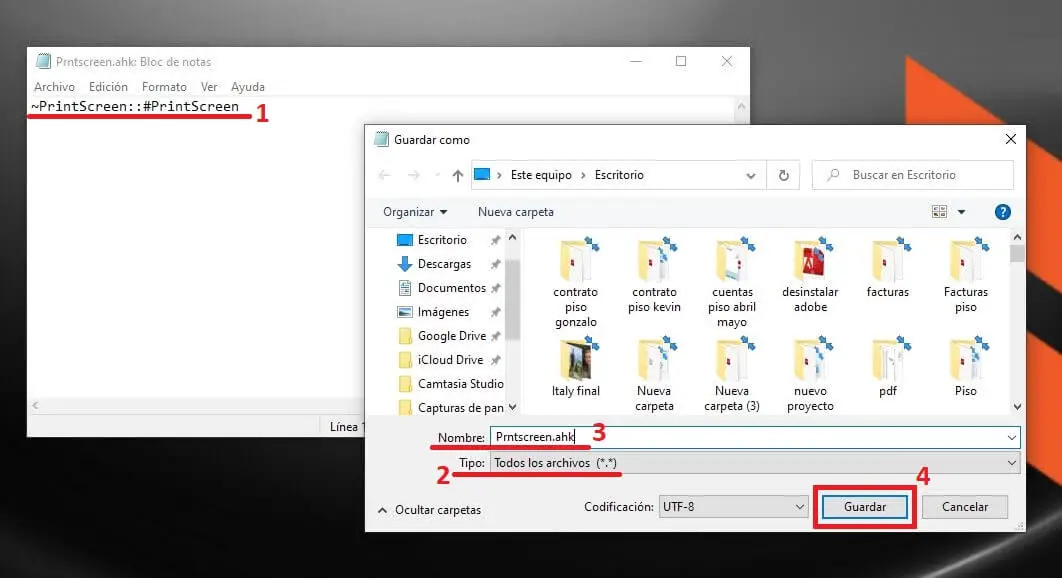
7. Click Save to save it in the specified folder.
8. Finally, you only have to run the Script by double clicking on it.
9. From now on, when you press the Prntscreen key, you will be able to check how the screenshot is taken and automatically saved in the Windows 10 Pictures folder, as well as playing a sound as a notification.