One of the most practical ways to preserve the integrity and availability of information in any operating system and regardless of the size of the organization is by cloning the information. In this case it is possible to clone a single partition or the entire hard disk, so when this cloning system is implemented, another hard disk will receive a copy of all the data from the original drive so that we can use it on any moment if the unit of origin should fail for some reason..
When we perform a disk or partition cloning, we are duplicating our data in order to have a backup. It is advisable to perform this cloning periodically so that the data is as up-to-date as possible. Although cloning storage is a security task , it is good to consider how we should perform a backup from Linux.
Every day we use our PC equipment for both personal and work tasks and there we host large amounts of data and information, some of this very valuable. That is why TechnoWikis asks you a timely question, what would happen if your hard drive failed for some reason? What would happen to your information? These are simple questions that carry a great responsibility since we do not pay attention to a high percentage suitable for a component as fundamental as the hard disk . Regardless of whether we use a mechanical hard disk (HDD) or a solid state (SDD), it will always be exposed to electrical, virus, hardware, factory, etc. failures and if we do not have the backing of our information we can be in serious problems for recovery..
As always, TechnoWikis wants to be a source of solutions and, therefore, we recommend you to create frequent backup copies of the most valuable and sensitive information hosted on your computer. One of the most functional and safe methods to carry out this task is to clone the hard disk completely or a partition of this to another physical medium, which guarantees that the information will always be there or is ideal when we buy a new equipment and We want to transfer all the information from one team to the other.
TechnoWikis will give you some tools so that the cloning of the hard disk does not sound like something complex but quite the opposite, it is a dynamic and functional experience..
1. How to clone disk or partition with the dd command in Linux
The Linux operating system integrates a command which allows us to carry out this process without the need to use third-party tools and this is achieved through the dd command.
What is the dd command
The dd command is a command by which it will be possible to copy a file, converting the data format according to the specifications we assign.
Using the dd command will allow us to clone both partitions and entire hard drives safely.
Step 1
To start this process it is necessary to know what partitions we have in the system, this is achieved with the command “fdisk -lâ€, in this case we have the partitions / dev / sdb1 / and / dev / sdc1 so we can list them running:
sudo fdisk -l / dev / sdb1 / / dev / sdc1

Step 2
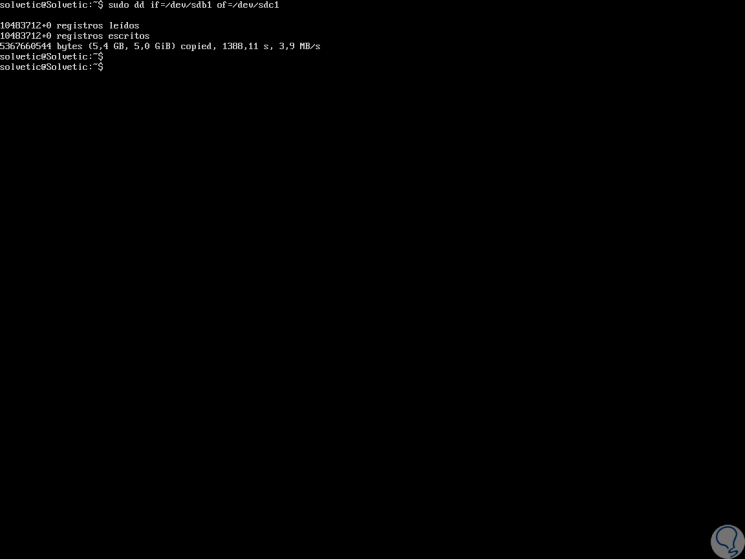
Now, we are going to clone the / dev / sdb1 partition into / dev / sdc1 so that we execute the following:
sudo dd if = / dev / sdb1 of = / dev / sdc1
Step 3
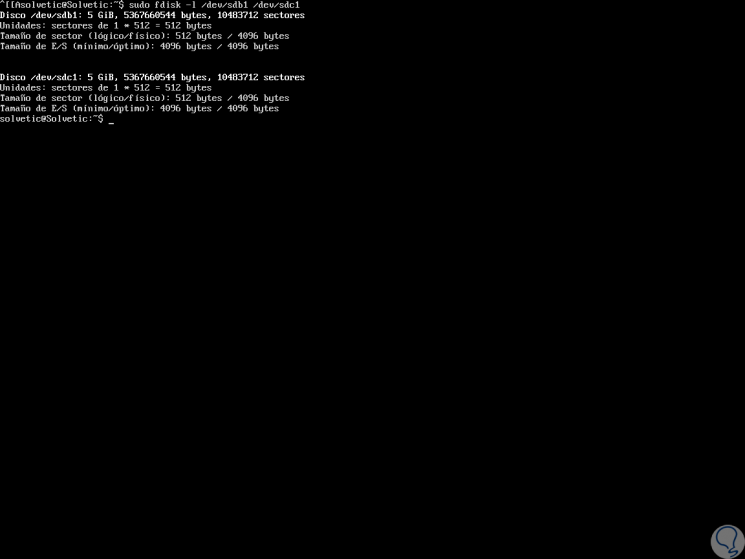
As we can see, after the process is carried out, we will obtain information on how many records were cloned, the time used and the speed used. After this process, it is possible to verify the status of the partitions by running. We can see that both partitions are an exact copy.
sudo fdisk -l / dev / sdb1 / dev / sdc1
2. How to clone disk or partition with the dd command in Linux
In this case, the process is identical unless, instead of specifying the partition to be cloned, we must indicate only the complete drive, as a recommendation, a hard disk drive that is the same size or larger than the source drive should be used for Keep all the data.
Step 1
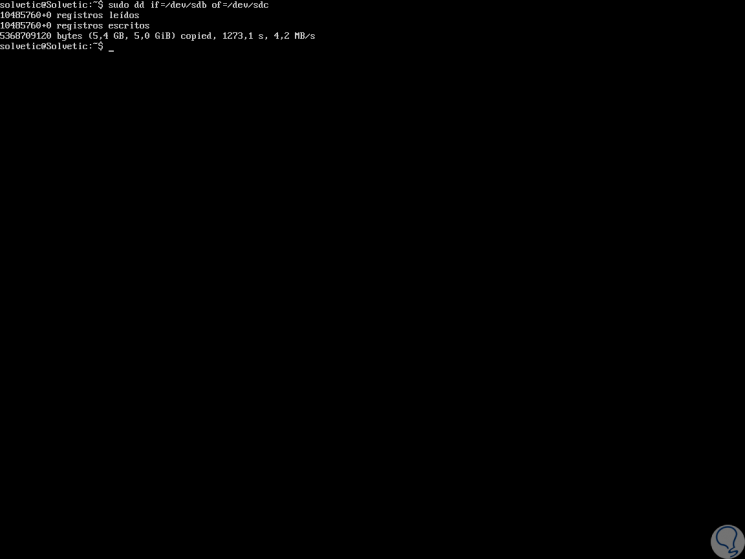
In this case we execute the following to clone the hard drive in another:
sudo dd if = / dev / sdb of = / dev / sdc
Step 2
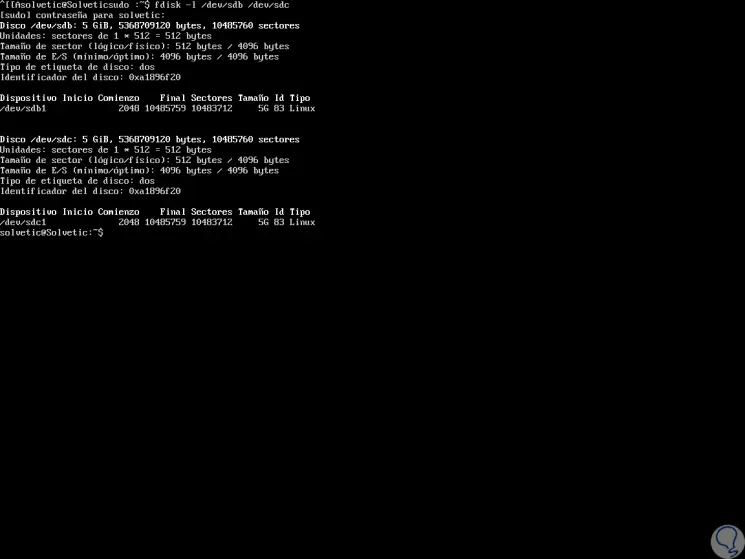
Like the previous process, we will receive the details of the executed task, we can validate that the disk is cloned correctly by executing.
sudo fdisk -l / dev / sdb / dev / sdc
3. How to clone disk or partition with Clonezilla on Linux
Clonezilla is a lightweight utility with which we can create images, clone partitions or complete hard drives if this is the case or the need, so if we are in our company and the cloning of various equipment is required this is a solution that essential since it allows us to clone up to more than 35 computers and the best thing is that it is available in editions such as Clonezilla live, Clonezilla lite server or Clonezilla SE (Server Edition).
Its download is found in the following link:
Clonezilla
Clonezilla features
Some of its most outstanding features are:
- Compatible with the Bittorrent format.
- It can support MBR and GPT boot.
- It can be used with multiple file formats such as ext2, ext3, ext4, reiserfs, reiser4, xfs, jfs, btrfs, f2fs and nilfs2 of GNU / Linux, FAT12, FAT16, FAT32, NTFS s, HFS +, FreeBSD UFS, NetBSD and OpenBSD, minix and VMFS3 and VMFS5
- It has an unattended mode with which the entire cloning process will be done automatically.
- It has the AES-256 encryption system which is one of the best in the world.
Note
In the download link we recommend downloading the Clonezilla ISO image for a more efficient process.
Step 1
Once we download the ISO we can burn it to a DVD or USB media, in the following link we explain some options for this:
Step 2
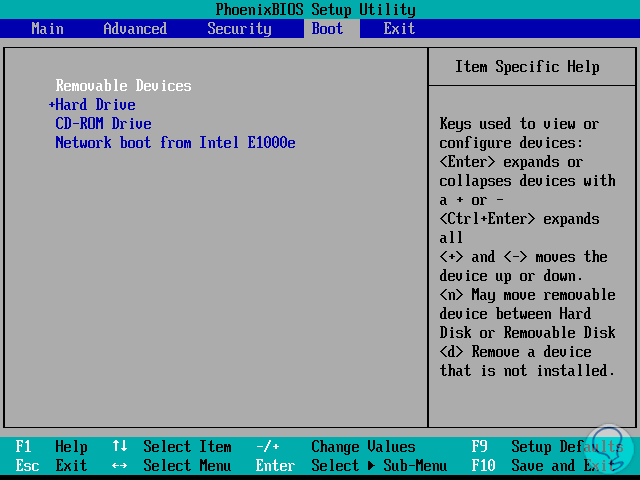
After this it will be necessary to access the BIOS or UEFI of the computer where the disk is to be cloned and configure the boot either from the DVD (CD-ROM Drive) or from the USB (Removable Devices):
Step 3
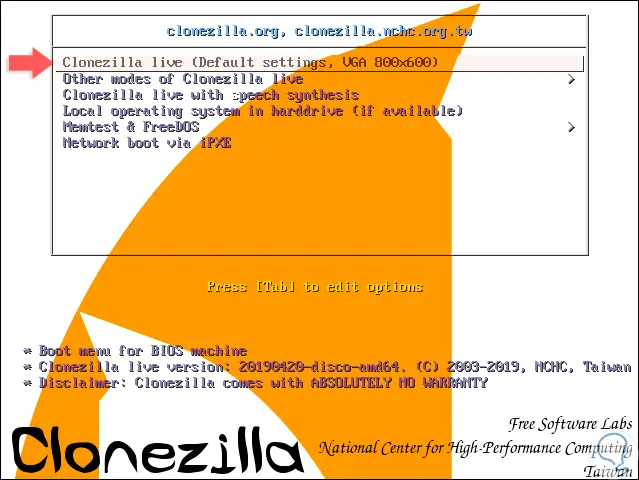
We are ready to use Clonezilla and clone our hard drive in Linux and TechnoWikis saves you in the step by step of this process. Once the system is started with the image of Clonezilla we will see the following:
Step 4
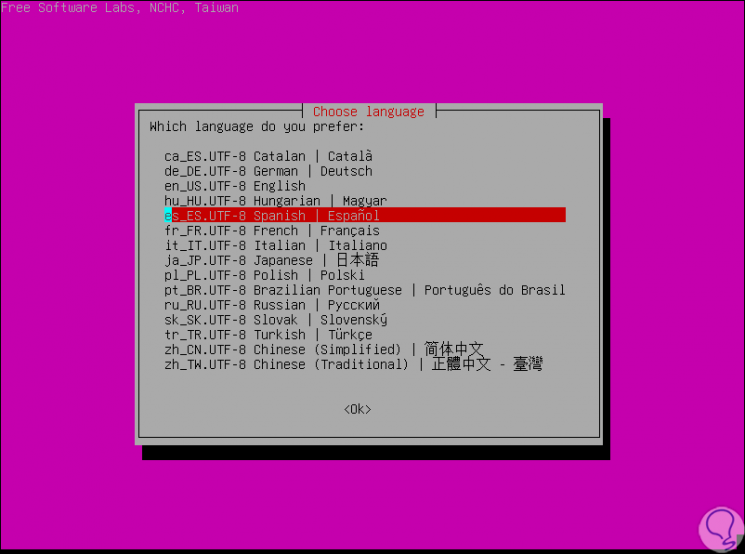
In this case we click on the Clonezilla Live option (Default Settings, VGA 800 × 600) later we will see that Clonezilla is loaded in order to select the language and region of the keyboard to use:
Step 5
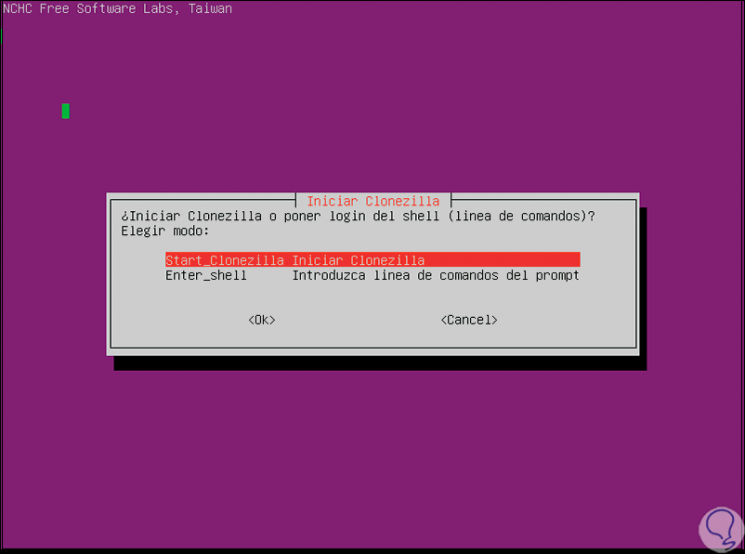
Once the desired language is selected we must configure some more associated to the language. Then we will go to the main window of Clonezilla where we must choose the option “Start Clonezilla Start Clonezillaâ€:
Step 6
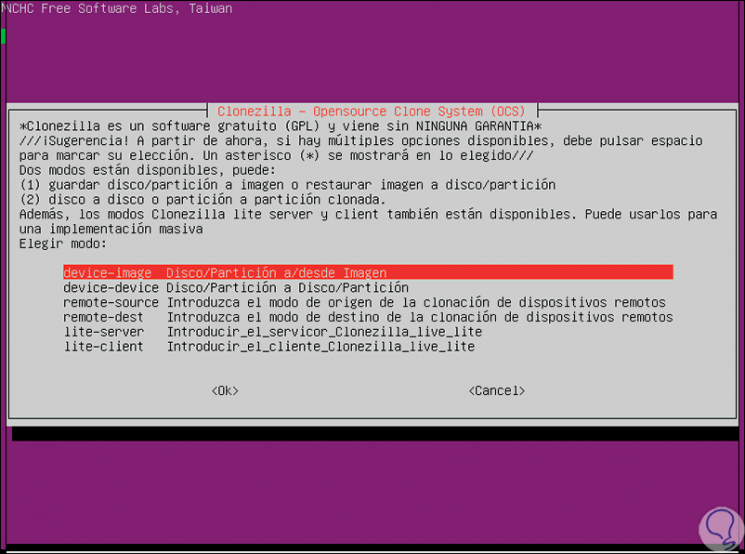
When accessing there we will have the following options where these two are the ideal ones for the hard disk cloning process:
- device-image: thanks to this line it will be possible to create a copy of the device to a disk image.
- device-device: using this option we will directly copy the source disk to another locally installed disk.
Step 7
For our purpose we select the device-device option and press Enter, and then we will select the execution mode, Beginner being the appropriate one if we do not know the utility thoroughly:
Step 8
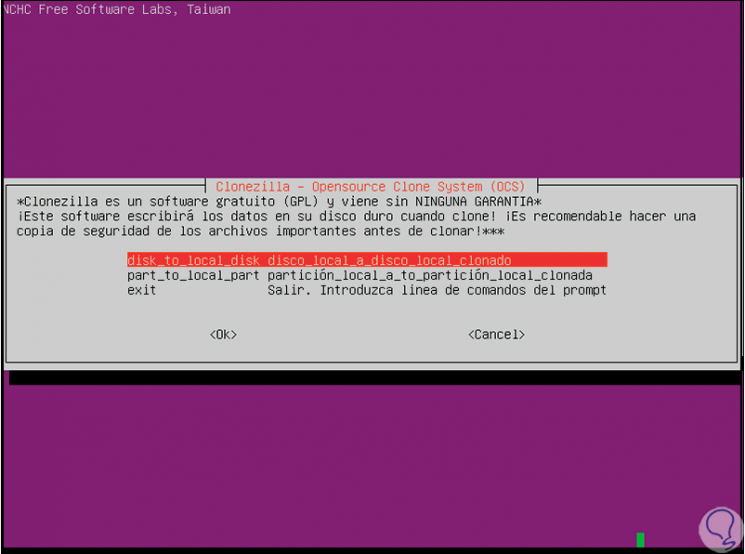
In the next window we will define what we have to clone, the options to use are:
- disk to local disk: this option will clone the current disk to another local disk.
- part to local part: if we use this option we will clone a partition from a disk to another available local disk partition.
Step 9
Select "disk to local disk" and press Enter to see the disks of the device with parameters such as:

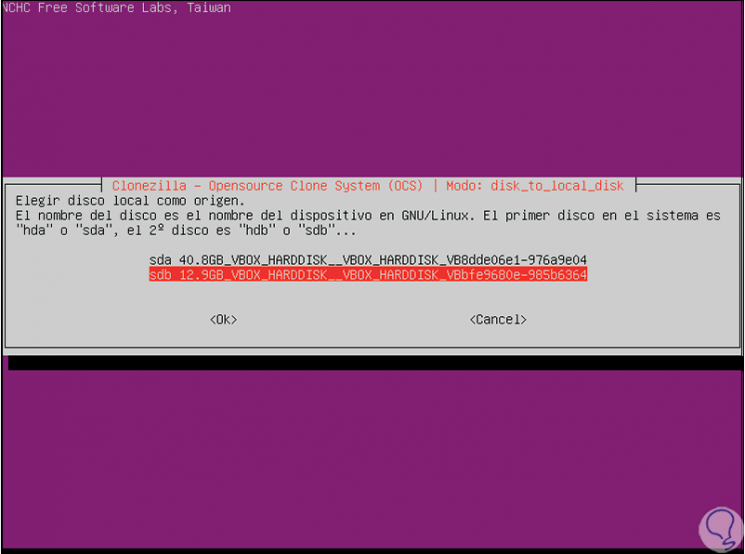
Step 10
Select the disk to copy and press Enter to select the source disk where cloning will be applied:
Step 11
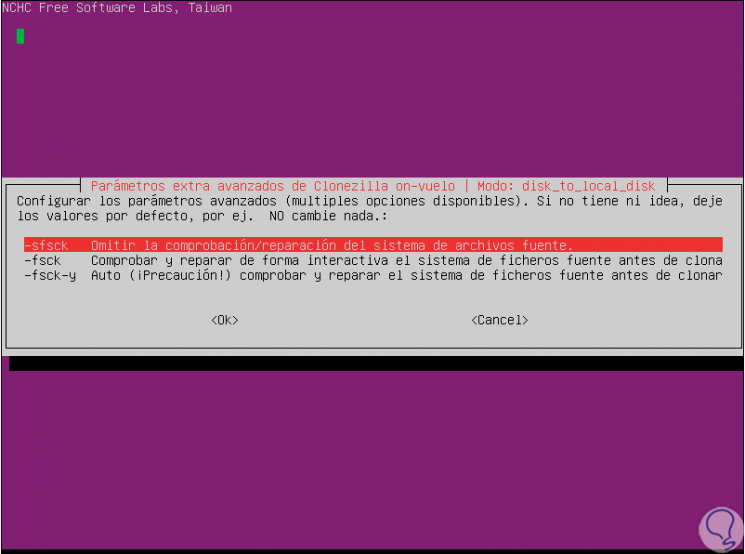
Press Enter again and in the next window it will be possible to perform an analysis of the state of the disk before cloning, if we want the integrity to be 100% we can select any of the options available for it:
Step 12
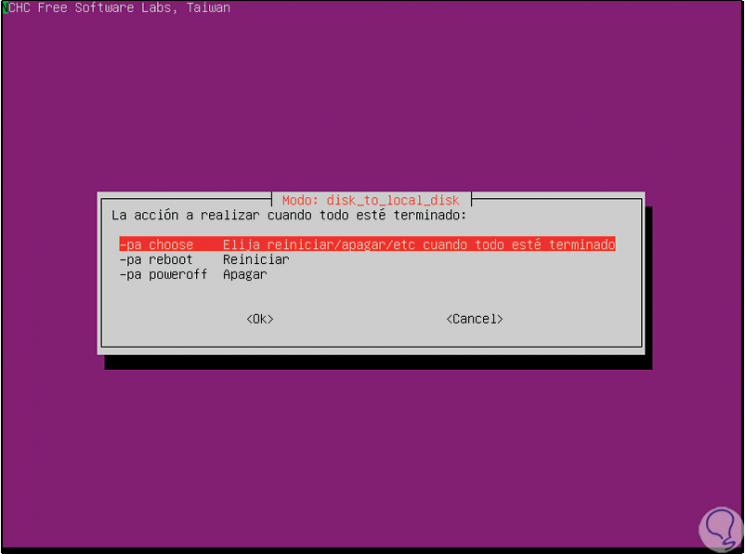
In the following window we can configure what action will be taken when the process is finished, we can shut down or restart the system or also launch the question at the end:
Step 13
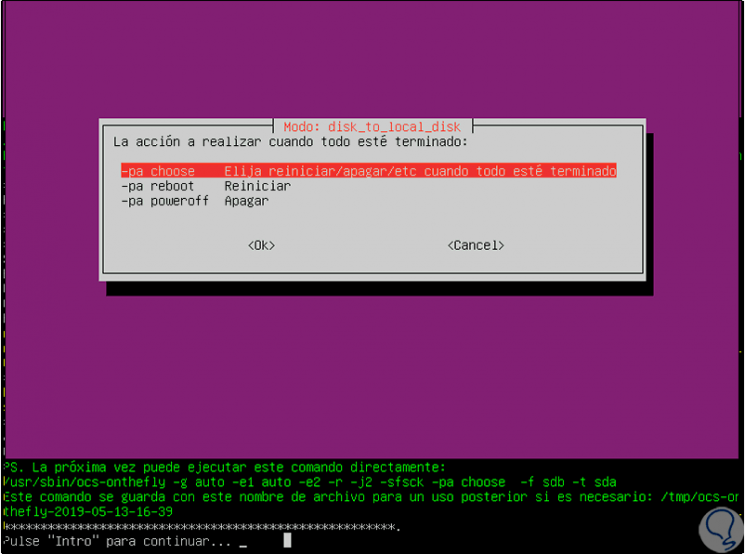
Press Enter on the appropriate option and we will receive the following message:
Step 14
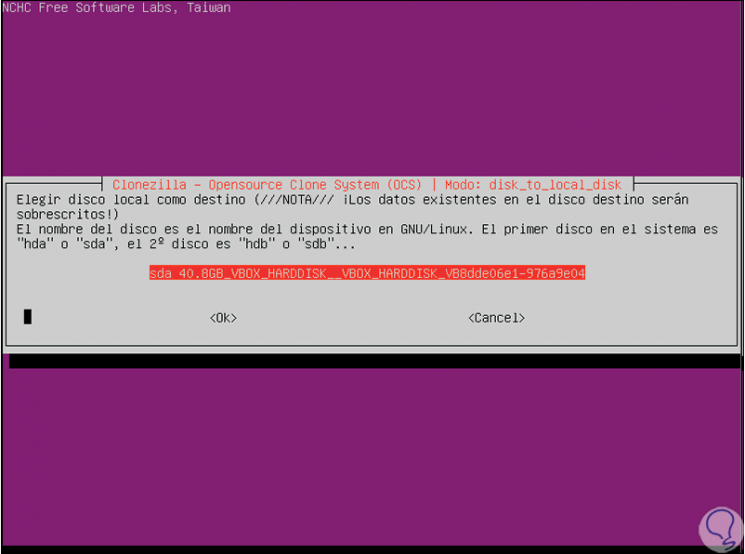
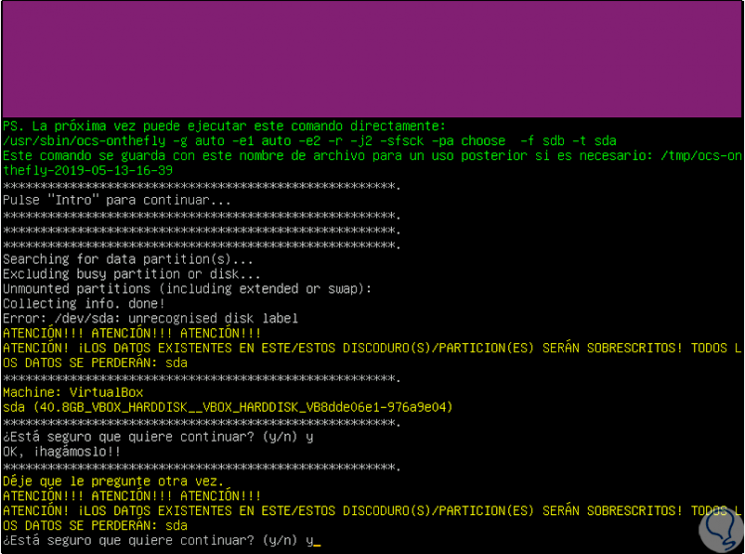
Press Enter to confirm and then we will receive the following message warning that the data on the destination disk will be erased:
Step 15
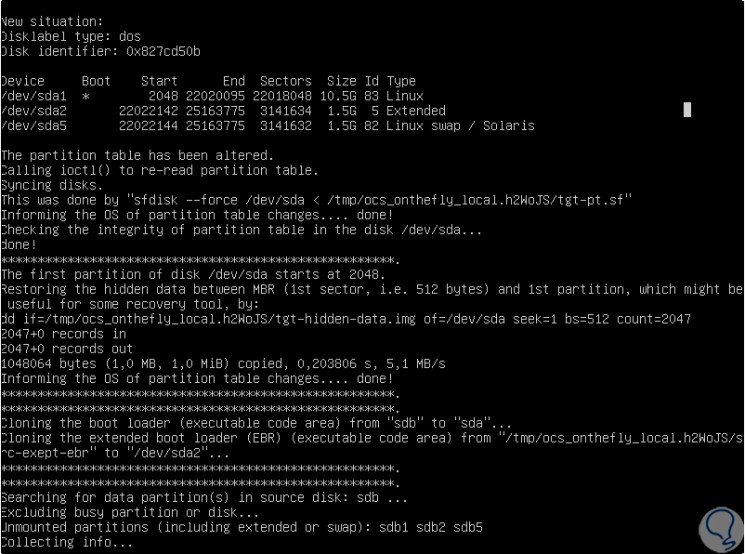
We confirm the action and this will start the process of cloning the hard disk according to the confirmed values:
Step 16
When this process is finished we will select what action to take. With these simple steps, Clonezilla becomes a comprehensive and practical solution to clone a hard drive or partition on Linux.
4. How to clone disk or partition with Partimage on Linux
Another of the utilities available to clone our disks or partitions is Partimage which has been developed as an open source disk backup utility. With it it is possible to store partitions with compatible file systems directly at a point in the sector in a selected image file.
A fundamental point of Partimage is that the created image file can be compressed by hard disk space issues and to improve the transfer time. In addition to this, this utility can be used not only in Linux environments but also in Windows operating systems.
The cloning of our disk or partition can be hosted through the network using Partimage network support, or also through Samba / NFS, which expands configuration and usage options.
One aspect that we must keep in mind is that Partimage can be executed as a utility from the terminal or as a stand-alone mode of the SystemRescueCd live through the configuration of an ISO image.
Partimage Features
Within the characteristics of this utility we find:
- Only the allocation clusters in use are read and stored to optimize their speed.
- Features are available for optimal use of the hard disk cache.
- It offers information integrity since none of the data will be modified.
- Full synchronization between all segments of the disk to be cloned.
- We can create cloning on the same hard disk, on another local disk or in a file attached to the network.
- Deleted files are not recovered.
With this tool we find the following limitations:
- It is not compatible with ext4 or btrfs file systems.
- The file system we are supporting must be disassembled and inaccessible to other programs in the system.
- Individual files or directories cannot be restored.
- It is not possible to execute a defragmentation task in the process of saving or restoring.
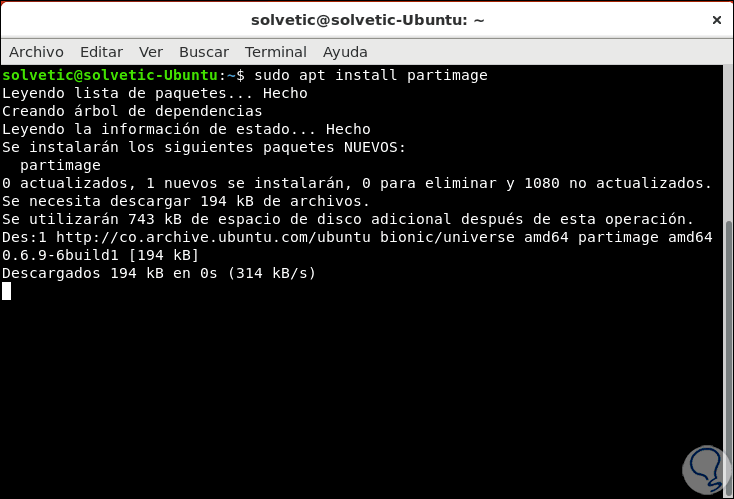
Step 1
Now let's see how this utility works to clone our disk in Linux. The first step is to install the utility by running the following:
sudo apt install partimage
Note
If we want to use the live media we can download the ISO image in the following link:
Partimag
Step 2
Once the utility has been installed we will execute it with the following order:
sudo partimage
Step 3
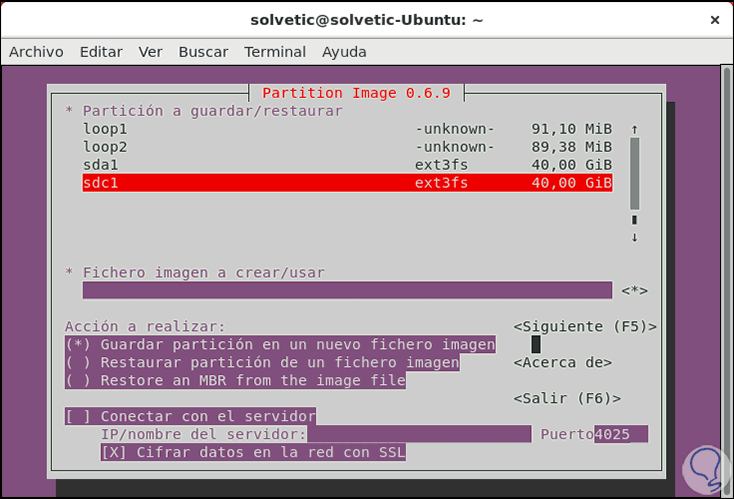
We will access the following environment:

Step 4
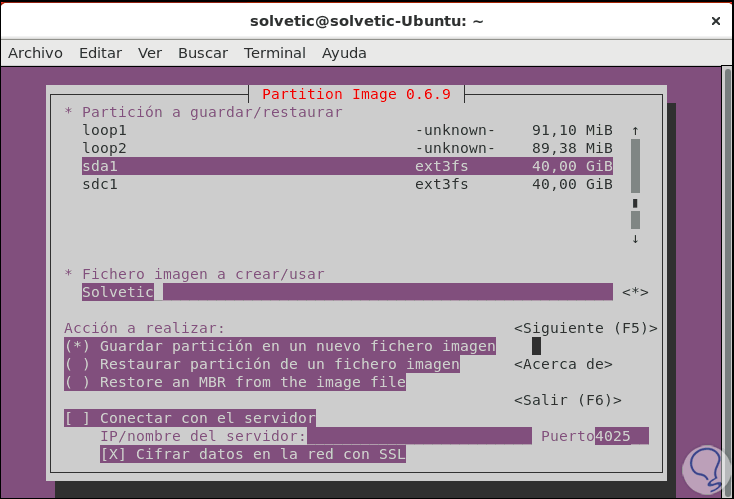
There we will select the disk or partition to clone and after this with the keys of our keyboard we go to the field "Image file to create / use" and there we will enter the desired name of the image, then select the action to be performed in the section Action to take:
Step 5
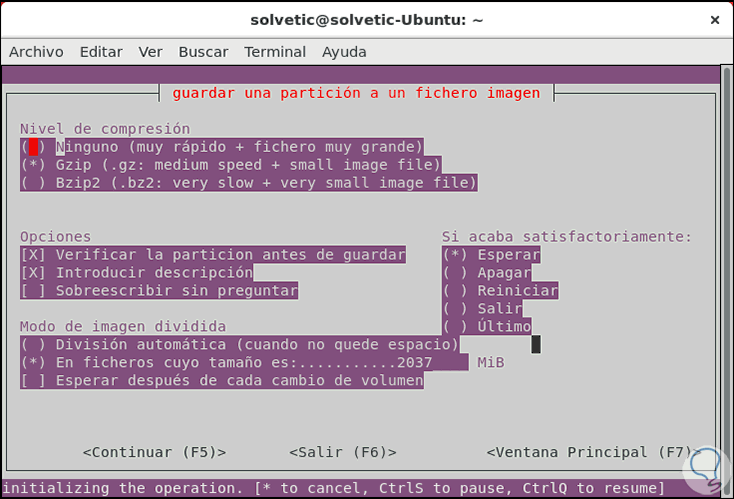
Press the F5 key to go to the next window and then we can define actions such as:
- Define the level of compression to use
- Confirm the action to be taken when the process ends
Step 6
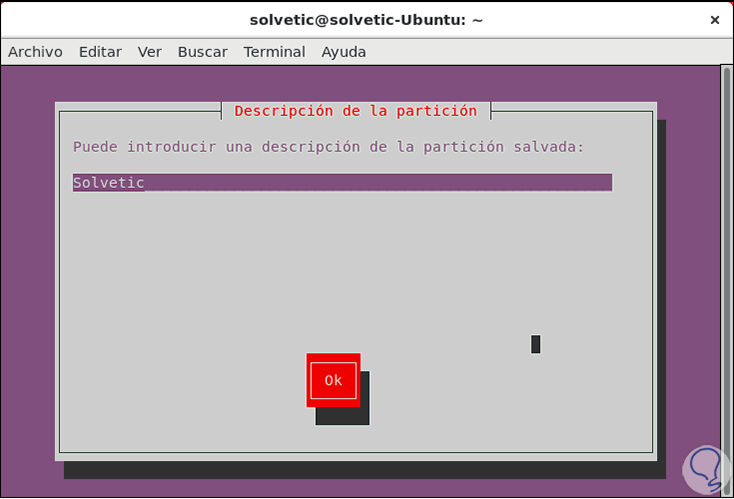
Once this is defined, we press the F5 key and now we can enter a description of the partition:
Step 7
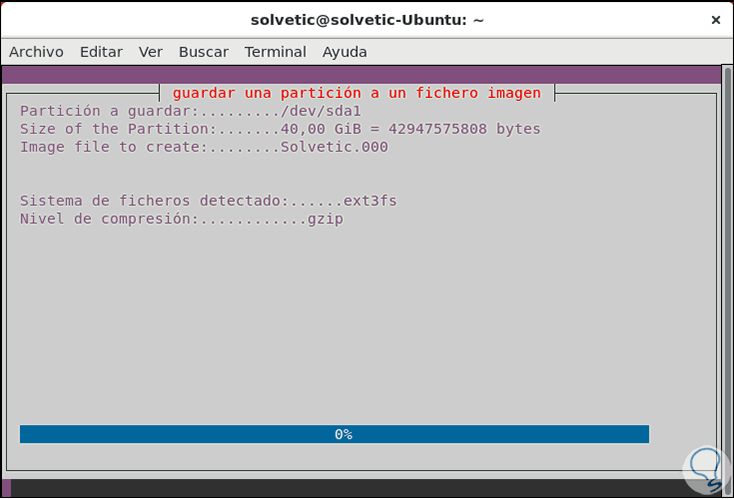
Press Ok and we will see the cloning process of the selected disk or partition. With this method it will be possible to clone the disk with several options.
5. How to clone disk or partition with Partclone on Linux
Like the previous method, this utility has been built to offer us a series of utilities in order to save and restore blocks that have been used in a partition and one of its great advantages is that it has been designed with more system compatibility. files through the use of existing libraries.
Partclone Features
This tool supports file systems such as ext2, ext3, ext4, hfs +, reiserfs, reiser4, btrfs, vmfs3, vmfs5, xfs, jfs, ufs, ntfs, fat (12/16/32), exfat, f2fs, nilfs, for this type of systems we must use the following variables:
- partclone.ext2, partclone.ext3, partclone.ext4
- partclone.fat32, partclone.fat12, partclone.fat16
- partclone.ufs (with SU + J)
- partclone.vmfs (v3 and v5)
Step 1
The first step will be to install the utility by running the following. Enter the letter S to confirm the download and installation process of Partclone.
sudo apt install partclone
Step 2
Now, for its execution we will use the following syntax:
partclone. [fstype]
Step 3
The fstype field refers to the file system to be used, for example, if we execute the following line an image of the disk one will be created like this:
partclone.ext3 -c -d -s / dev / sda1 -o sda1.img
Step 4
There the cloning process will begin, now, to restore this image we execute the following:
partclone.extfs -r -d -s sda1.img -o / dev / sda1
Partclone parameters
Recall the usage options for the file system to use:
- ext2, ext3, ext4: partclone. [ext2 | ext3 | ext4]
- reiserfs 3.5: partclone.reiserfs
- reiser 4: partclone.reiser4
- ufs | ufs2: partclone.ufs
- hfs plusfs: partclone. [hfs + | hfsplus]
- fat12, fat16, fat32: partclone. [fat12 | fat16 | fat32]
In addition to this we can use other parameters such as:
- imgchk: Verify the image file
- imginfo: list the image header information
- restore: restore a created image
- ntfs reloc: manages NTFS file system headers
- vmfs type: get the vmfs type
This way we can clone both a hard disk and a partition quickly with the dd command from Linux. The options are wide and each of them offers a great solution for the cloning process of a total hard disk or only one partition which allows us to have the information stored.