We know that there are two types of Internet network in the domestic and professional world where each one has its respective functions, security parameters, scope and availability. These two possibilities are LAN (wired) networks and Wi-Fi (wireless) networks..
The function and task of both networks is to give us connectivity in the global Internet network . But let's face it, we know that every day the threats are more visible and that information thefts, unauthorized access, security vulnerability and more obscure functions cause the direct harmed ones to be us. Therefore, there are a series of good practices to take into account to improve security levels, one of these tasks is to hide our SSID from the global network search.
Next we will see the process to be able to establish a WiFi network as hidden in Windows 10..
1. How to view WiFi network SSID in Windows 10
Parameters hidden WiFi network
Some parameters that come into play when connecting to a hidden Wi-Fi network are:
- The name or SSID of the hidden wireless network to which we wish to connect.
- The password assigned for that Wi-Fi network.
- The type of encryption of the Wi-Fi network which indicates its degree of security, this can be WEP, WPA-PSK or WPA2-PSK.
All of us at some point in our lives have connected to a Wi-Fi network, for this we click on the Wi-Fi icon and choose the desired network to connect:
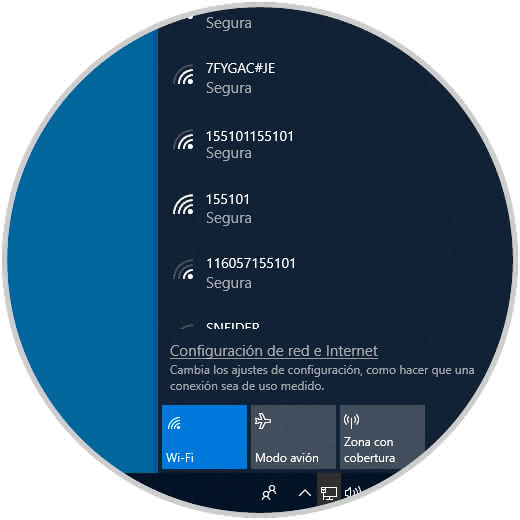
The SSID are all the names of the network available for connection, now perhaps you wonder about why hide the SSID of the Wi-Fi network, because the elementary answer (as we suspect) is security.
When we hide the SSID of our network, we are running the process of hiding the name of the network in the modem so that it is not transmitted publicly (open to all), what we seek with this method is that the SSID is not visible when a user searches for Wi-Fi networks in their coverage range regardless of whether the network is available for the connection..
The Wi-Fi network can cover distances from 500 meters to about 1 kilometer and if our network or any other network is visible it can be a candidate to be attacked with the appropriate tools for this and if we add an unsafe password (123, abc, etc) no doubt that the attack can be safe.
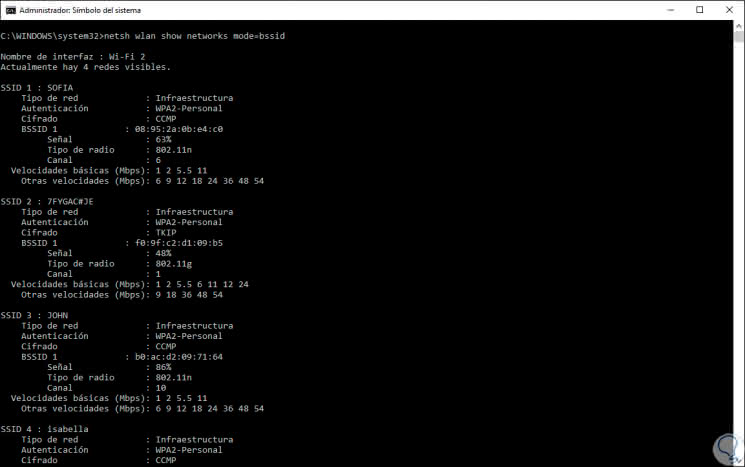
To see how this works, if we use Windows 10 we can go to the command prompt and execute the following:
netsh wlan show networks mode = bssid
This will give us in detail the networks in our coverage with very specific technical details:
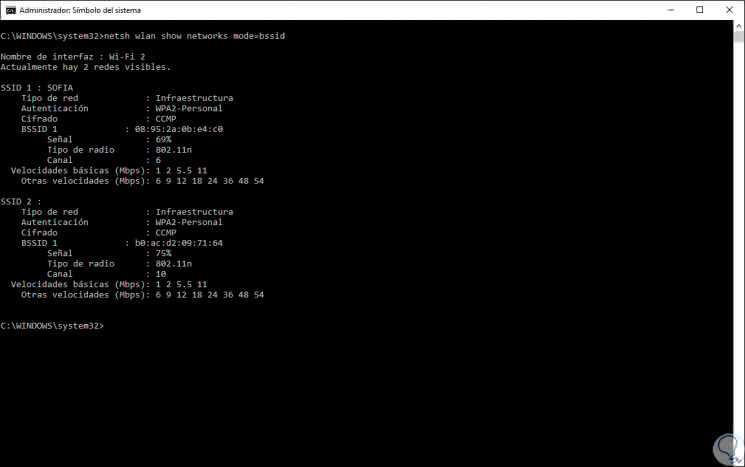
Now, when there is a hidden network we will see that in the SSID field its name is not visible but its characteristics:
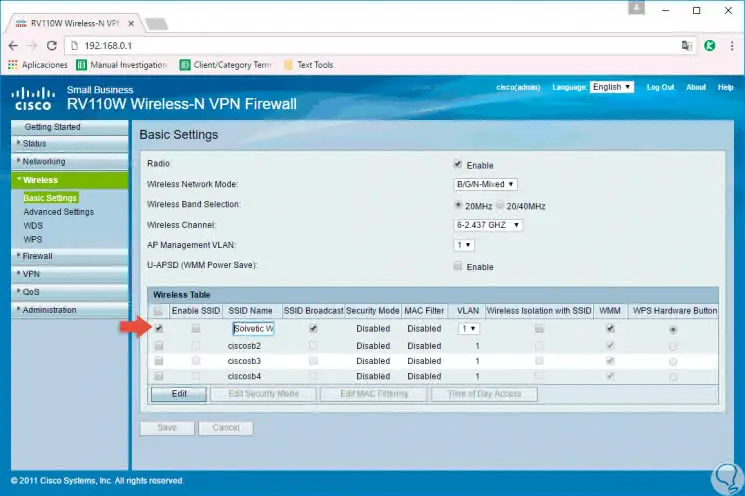
Although hiding the SSID is not 100% safe to suffer some kind of attack because this will only hide the name of the network but not its integral configuration. But if we consider hiding our SSID, we must access the configuration of our router, go to the Wireless section and, based on the router model used, deactivate the "Enable SSID" box located right next to the name of the Wi-Fi network. Fi. Once we do this, we click on the Save button to apply the changes.
So far it is more or less clear, well, as we mentioned, hiding a Wi-Fi network only hides its name from our eyes but it will still be possible to establish a connection to it and this is what TechnoWikis will explain in detail from this moment.
2. Connect to a hidden Wi-Fi network using the Windows 10 taskbar
Step 1
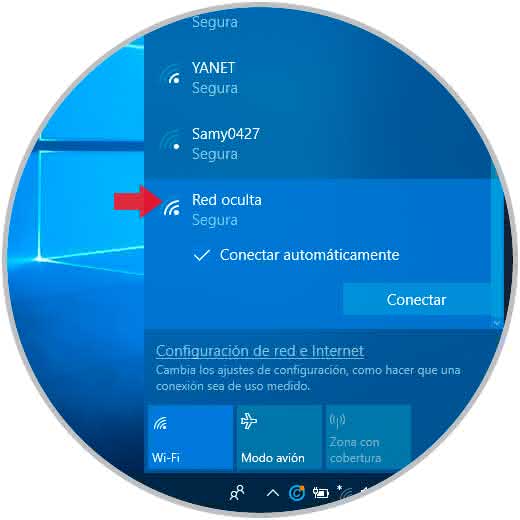
This is the method most used by all of us since it will be possible to access all the Wi-Fi networks available in our area from the taskbar, for this we click on the W-Fi icon located there and all the SSIDs will be displayed available:
Step 2
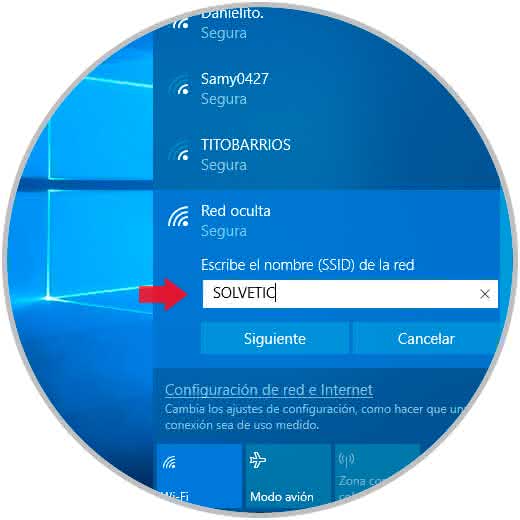
As is clear, we found a network called default "Hidden network", this means that we can access it knowing the credentials. Clicking on this rule will activate the "Connect" button and if we wish we can activate the "Automatically connect" box for future connections, once we click on the "Connect" button, Windows 10 will ask us to assign a name to said connection since it is hidden:
Step 3
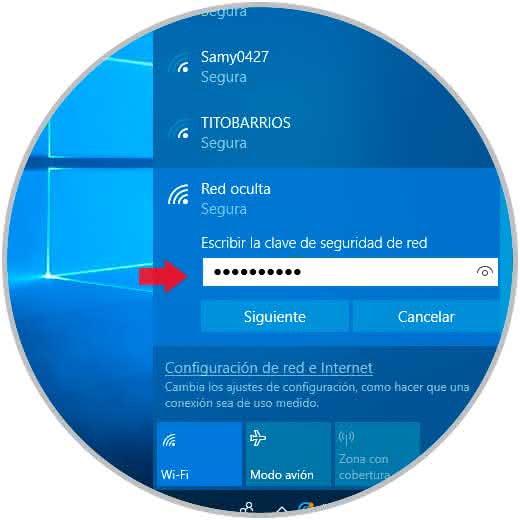
Enter the desired name and click Next, now enter the password for said Wi-Fi network:
Note
In case of not being sure to enter it correctly, we can click on the right icon to display the password entered.
Step 4
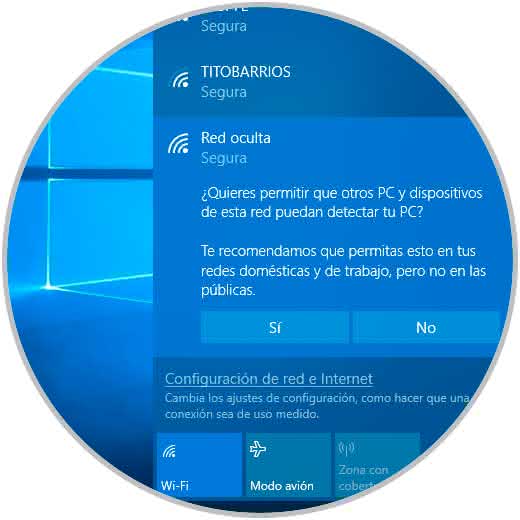
Once we carry out this process, again we click Next and this time we will see the following message. If we see this message TechnoWikis congratulates you, you have successfully connected to the selected network, this message allows us to configure the location, the profile of the network and the configuration of shared network for files and printers.
Thus, through the available networks we have added and connected to a Wi-Fi network.
3. Connect to a hidden Wi-Fi network using Settings in Windows 10
Windows 10 integrates the Configuration utility which is a central console from which we can configure and manage various system values ​​both at the hardware and software level and without a doubt that the networks do not escape this configuration.
Step 1
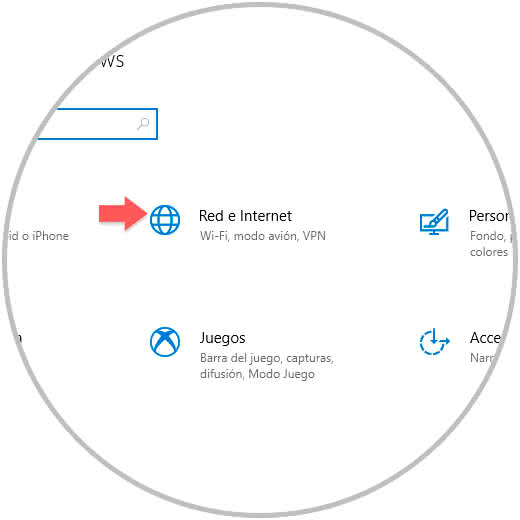
To use this method, we will go to the Start menu and there we go to the "Configuration" utility where we will see the following:
Step 2
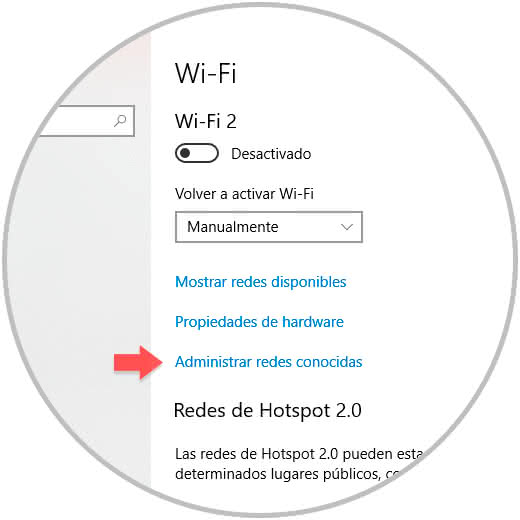
There we will go to the category "Network and Internet" and then we go to the Wi-Fi section where we will see the following:
Step 3
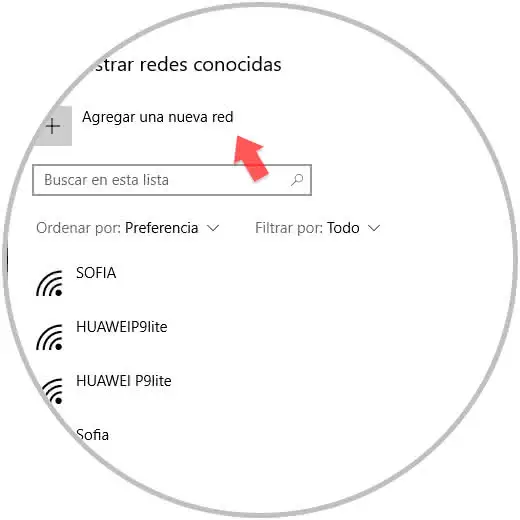
There we click on the line "Manage known networks" and we will be redirected to the following window where we will visualize the networks to which we connect frequently:
Step 4
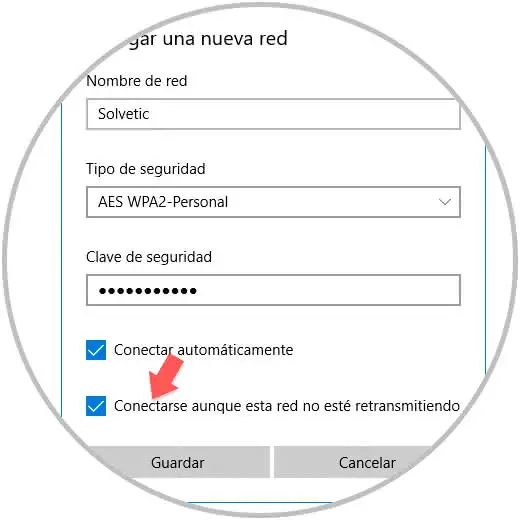
We click on the option "Add a new network" and in the pop-up window we will enter the following information:
- Name of the hidden Wi-Fi network
- In the field "Type of security" we select the option AES WPA2-Personal, this is based on the medium used by the hidden network.
- In the Security key field, we will enter the password associated with the network to be added.
- If we want to connect to the hidden network automatically, we activate the "Automatically connect" box.
- If we check the box "Connect even if this network is not transmitting", it allows Windows 10 to search for the hidden network when it is not connected to a network, even if the hidden network is not in the range of physical coverage.
Step 5
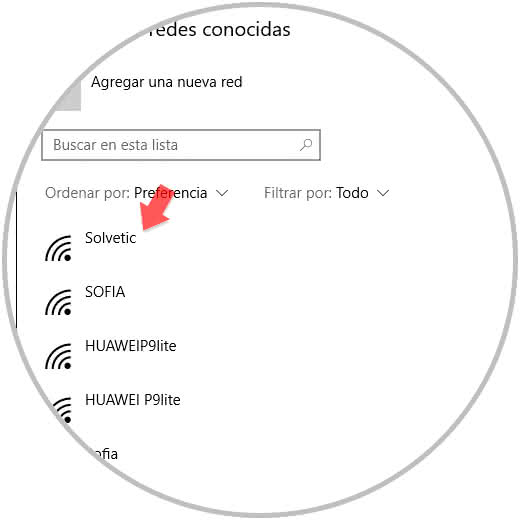
To apply the changes, click on the Save button and we will see that the network has been integrated into the known Windows 10 networks:
4. Connect to a hidden Wi-Fi network using Control Panel in Windows 10
Another of the traditional Windows tools that have taken us out of more than one hurry is the Control Panel, through this we have numerous administration and support options including the use of hidden networks.
Step 1
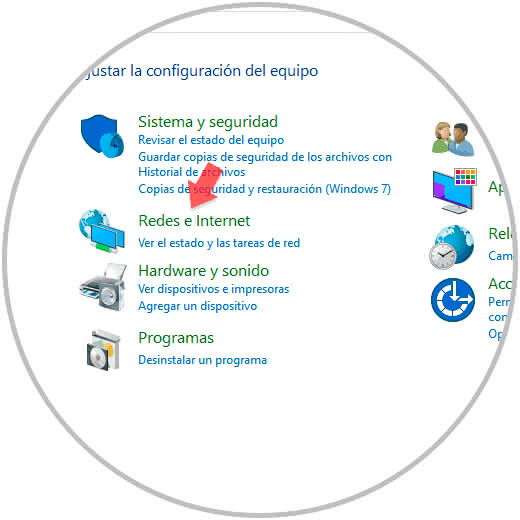
For this we access the "Control Panel" where we will see the following:
Step 2
There we go to the section "Networks and Internet" where we will see the following:
Step 3
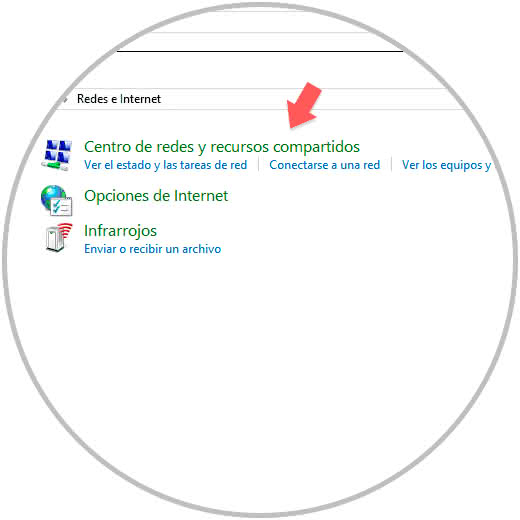
We go to the option "Center of networks and shared resources":
Step 4
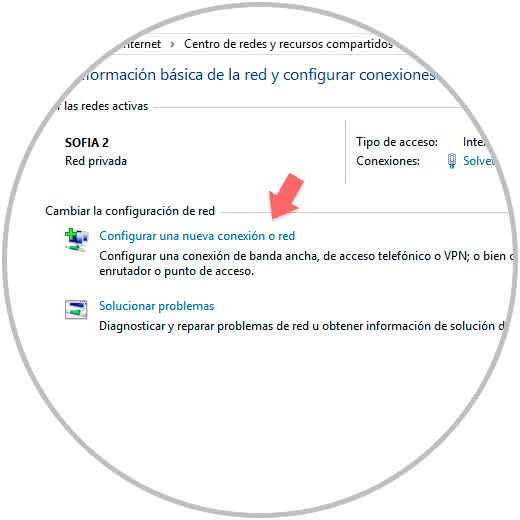
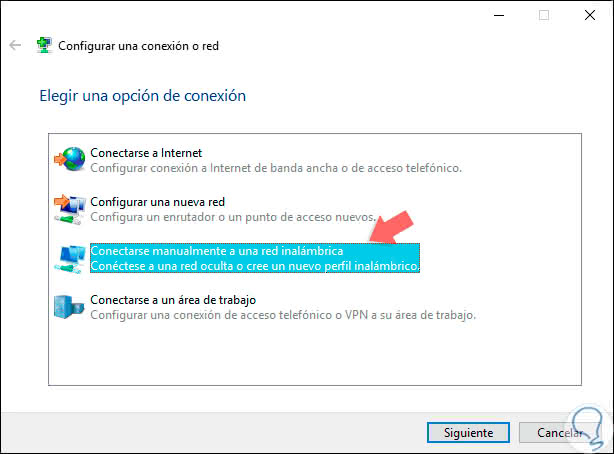
We click on the line "Configure a new network connection" and the following wizard will be displayed where we select the option "Manually connect to a wireless network":
Step 5
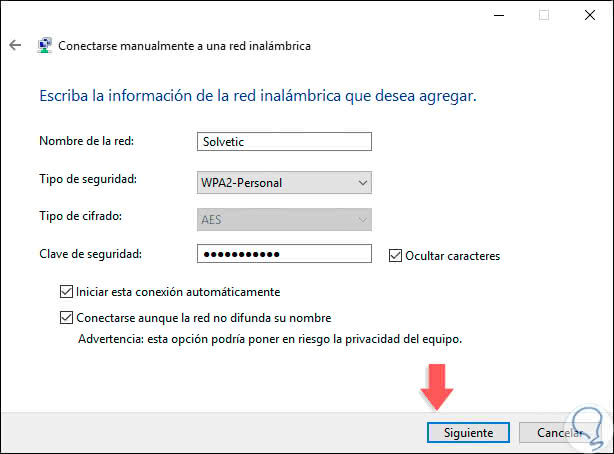
We click Next and enter the following data:
- Name of the hidden network
- Security type of the selected network
- Encryption type (if applicable)
- Password to access the Wi-Fi network
- Activate the option "Start this connection automatically" to avoid entering the values ​​manually in each connection
- We can check the box "Connect even if the network does not broadcast your name" which allows the search of the network even without coverage of it
Step 6
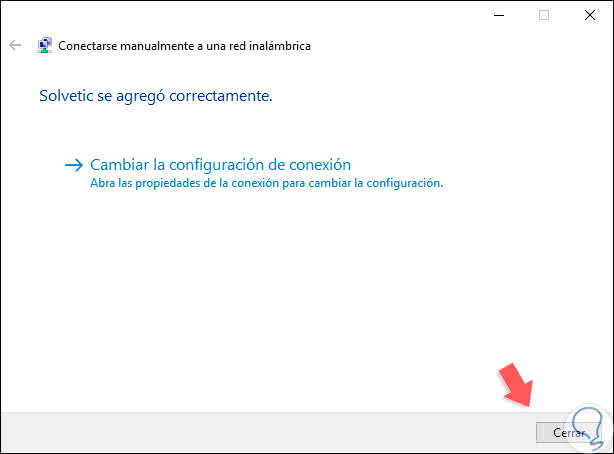
We click on Next and we will see that the network has been added correctly in Windows 10. Click on Close to exit the wizard.
Although hiding the SSID of the Wi-Fi network is not a guarantee of total security, it will have a positive impact on improving access to it.