Microsoft Azure is a cloud platform developed by Microsoft, through which it will be possible to access the creation and administration of hundreds of resources such as virtual machines or applications from both Microsoft and some of Ubuntu ; allowing this type of resources to be not only available, but that your environment is safe and available at all times and from any place with the support of Microsoft..
Apart from the resources that we can create and manage, Microsoft Azure offers us a series of tools and utilities to facilitate the work in this environment and one of these is the Azure Security Center, thanks to which we are in a control center to monitor and supervise any anomaly that the system may present and thus act accurately avoiding any type of attack that may occur.
It is for this reason that today TechnoWikis will explain what the Azure Security Center is and how we can implement it in Azure..
What is the Azure Security Center?
Azure Security Center has been developed and integrated into Azure as a unified security management option, which provides advanced protection against threats with the objective of workloads in the cloud.
Some of the advantages we have when implementing this Azure function
- Possibility of applying directives in order to ensure compliance with safety standards.
- Supervise the security of workloads both local and in the cloud.
- Ability to search and correct vulnerabilities before it is late.
- Option to use advanced analysis tools and threat intelligence to detect attacks on the network.
- Possibility of using access controls and application to block unreliable activity in the system.
When we choose to implement Azure Security Center, it will be possible to have access to a unified and centralized view of the security of different local and cloud workloads. It will also be possible to automatically detect and incorporate new Azure resources and apply security policies.
The use of this integrated Azure tool facilitates the task of monitoring the security of both machines, networks and Azure services thanks to the security assessments integrated in it which display the necessary data to fully carry out the required information..
Azure Security Center is available in two types of access:
Free
With this version we have access to:
- Security directive, evaluation and recommendations.
- Connected partner solutions.
Standard
This gives us access to:
- Security directive, evaluation and recommendations.
- Connected partner solutions.
- Search and collection of security events.
- Access to CM Just-in-Time.
- Adaptive application controls.
- Advanced threat detection.
- Integrated and personalized alerts.
- Information about threats.
Now, if we opt for the standard version, the usage prices per resource will be:
Virtual machines
€ 0.017 / server / hour, Data included - 500 MB / day
App Services
€ 0.017 / instance of App Service / hour
SQL DB
€ 0.018 / server / hour
MySQL (Preview)
€ 0.009 / server / hour
PostgreSQL (Preview)
€ 0.009 / server / hour
Storage (Preview)
€ 0 / 10,000 transactions
In summary, Azure Security Center allows us to identify various problems associated with the configuration of virtual machines and detect security threats redirected to them. This analysis group includes virtual machines that do not have network security groups, unencrypted hard drives and brute force RDP attacks.
1. How to access Azure Security Center
Step 1
To access Azure Security Center, first, we must go to the following link and register with the respective credentials:
Azure Portal
Once there, we go to the side menu and click on the Security Center section:

Step 2
By clicking there, the following window will be displayed. As we can see, by default the Security Center is deactivated. There we find a brief summary of their actions and to activate it click on the "Start" button.
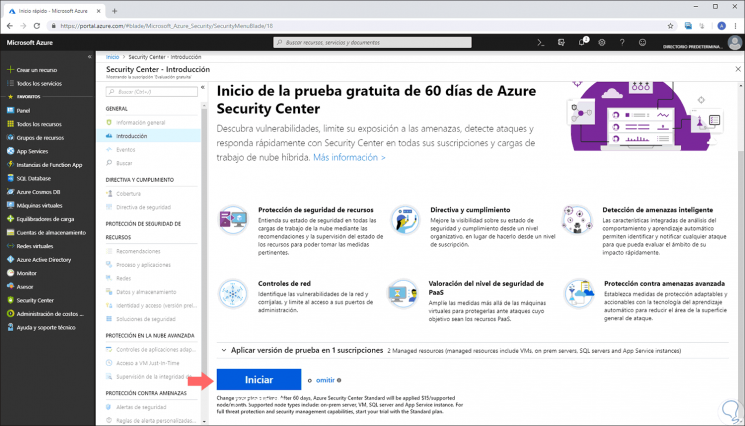
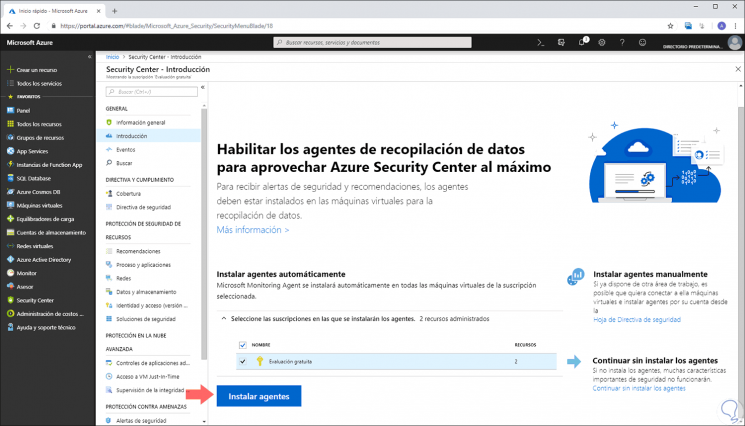
Step 3
Then we will be redirected to the next window. At this point we must install Security Center agents which allow us to receive security alerts about changes and threats in virtual machines, click on the "Install agents" button to continue the process.
Step 4
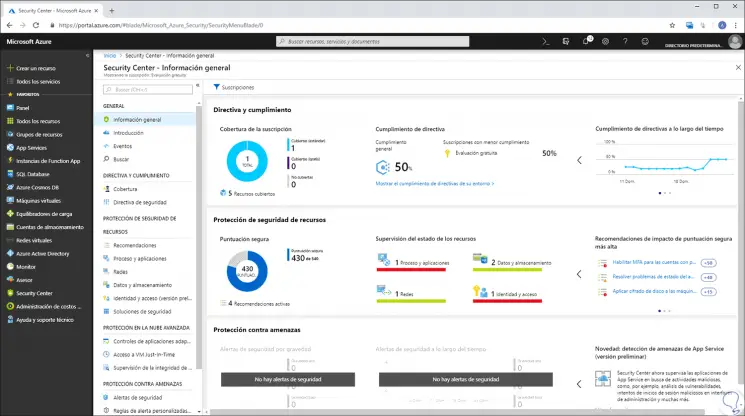
Once this is done, we will see the following environment directly in the "General Information" section:
There we find details like:
- Number of directives implemented and their respective compliance.
- Status of active resources in Azure.
- Score level assigned by Azure on security issues.
Step 5
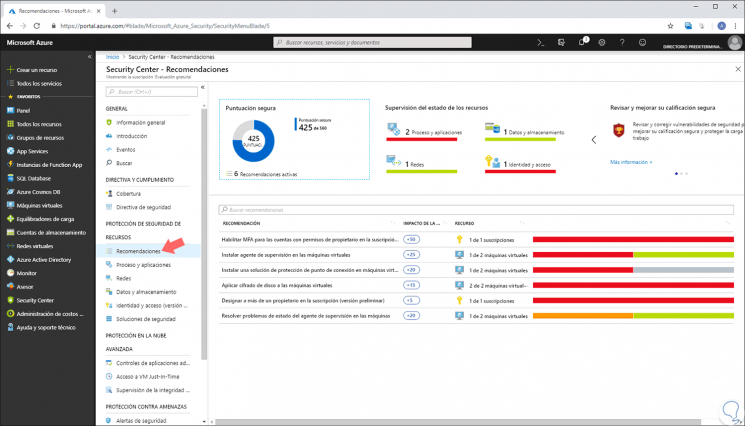
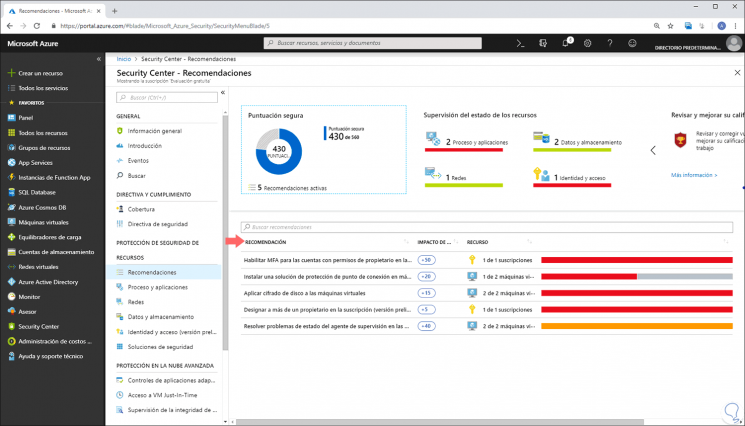
One of the advantages of this utility, is that Security Center is not limited only to the detection of data in order to generate recommendations, but if some resource, being virtual machines one of the most used, is not with any of the Security parameters, such as subnets or security groups, automatically Security Center is responsible for creating a recommendation with the respective steps for correction. We see this in the "Recommendations" section:
In this section we find these aspects
- Detailed monitoring of resources.
- Description of the recommendation generated.
- Impact of the recommendation.
- Type of resource affected.
2. How to set up data collection in Azure Security Center
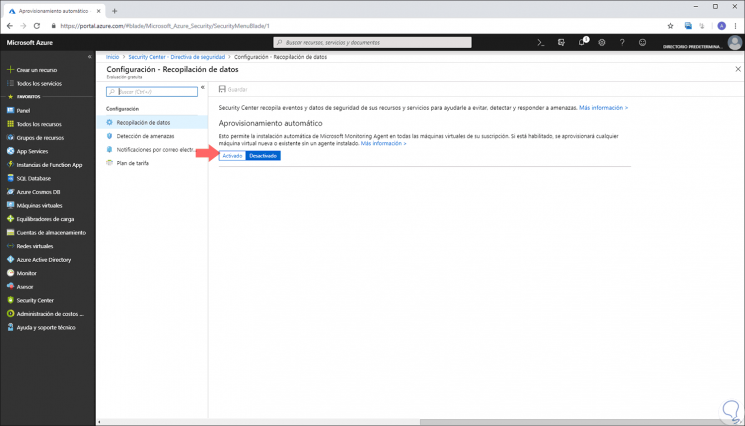
In order to access the security settings in the virtual machines, you must configure the data collection of the Security Center utility, for this you must activate the data collection which automatically installs the Microsoft Monitoring Agent on all virtual machines created in the subscription used.
Step 1
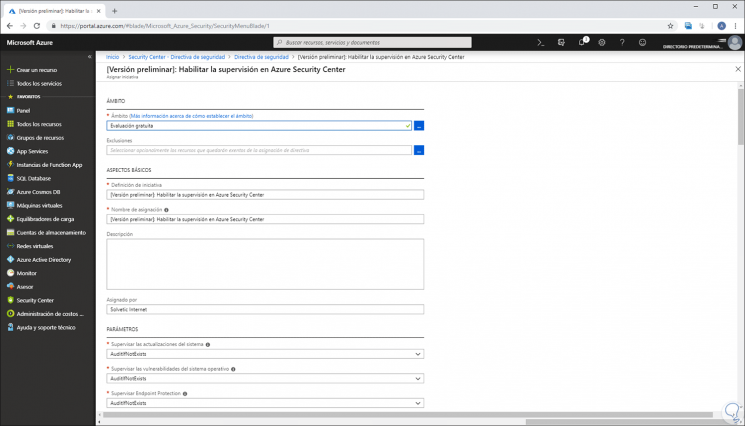
To activate this data collection, we will go to the "Security Center" panel and there we must click on the "Security Policy" section and we will see the following. There the active subscriptions will be displayed, now we must select the subscription to edit.

Step 2
In the next window we will click on the "Assign security policy" button:

Step 3
The following window will be displayed where we must assign the parameters that we consider necessary. Once this is complete, we click on the "Save to apply changes" button.
Step 4
Now, in the main window we must click on the "Edit configuration" line and we will see the following. There we click on the "Activated" button.
Step 5
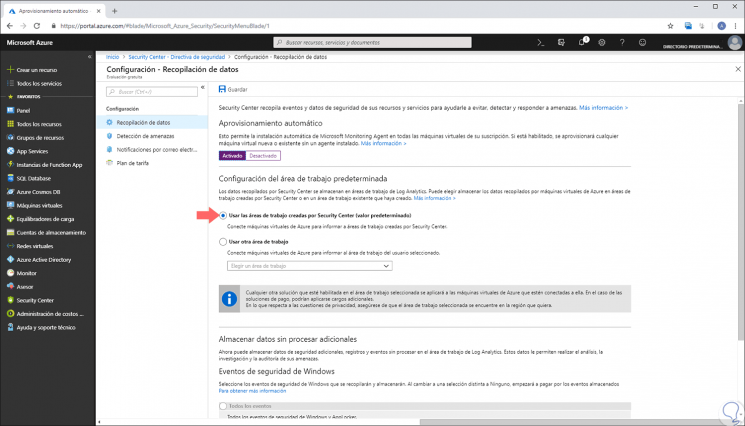
The following series of options will be displayed where we configure the following:
- In the "In Default work area settings" field, we select the "Use work areas" box created by "Security Center" (default)
- In the "Security events" field we activate the default option "Common".
We save the changes by clicking on the "Save" button.
3. How to configure a security policy in Azure
Security directives have been developed to define the elements with which Security Center can collect data and based on that generate recommendations. It is possible to apply different security policies to multiple sets of Azure resources, and by default Azure resources are evaluated with respect to all elements of the policy.
To configure these directives, we must go to the section "Security directives" and there activate or deactivate the elements of the directive to which you want to apply to the subscription.
4. How to view the configuration status of a virtual machine with Azure Security Center
When we have carried out the activation process of data collection and a security policy has been defined, the Security Center utility will start the process of generating alerts and recommendations. Thus, when virtual machines are implemented, the data collection agent is automatically installed and after this Security Center will be completed with the data of the new virtual machines.
To the extent that the data is collected, it will be added to the status of the resources of each virtual machine and of the associated Azure resources and these will be represented in a graph useful for administration tasks.
The various recommendations available in Azure are:
Enable subscription data collection
This allows you to enable data collection in the security policy for each of the subscriptions and for all the virtual machines in the subscription.
Enable encryption for the Azure Storage account
This recommendation indicates that we enable Azure Storage service encryption for data at rest. Storage Service Encryption (SSE) acts through data encryption when it is written to Azure Storage and decryption before recovery. SSE is only available for Azure Blob service and can be used for block blobs, page blobs and annex blobs.
Correct security settings
This recommendation allows you to manage the ISO settings with the recommended configuration rules.
Apply system updates
It recommends implementing critical security and system updates on virtual machines.
Application of access control to Just-In-Time networks
This recommendation indicates that access to the Just-In-Time virtual machine must be applied. The Just-In-Time feature is still in preliminary version and is available at the standard level of Security Center.
Restart after system update
Indicates that a virtual machine must be restarted in order to complete the process of applying system updates.
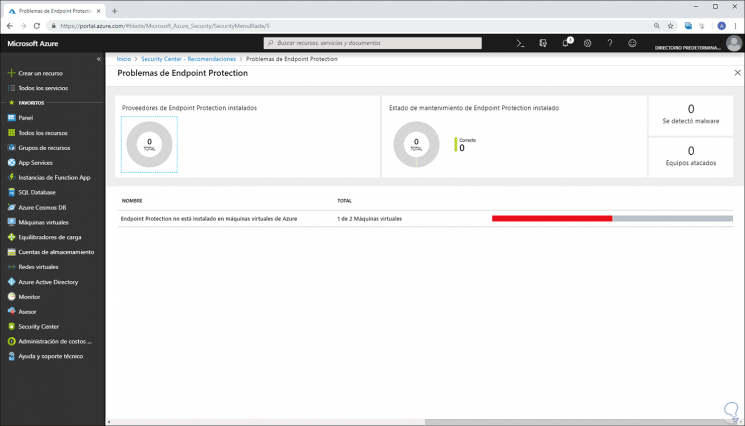
Endpoint Protection installation
It is recommended to provision anti-malware programs to virtual machines (only applies to Windows virtual machines).
Enable Virtual Machine Agent
This recommendation indicates that the VM Agent should be implemented. The virtual machine agent must be installed on virtual machines to provision hotfix detection, baseline detection and antimalware programs.
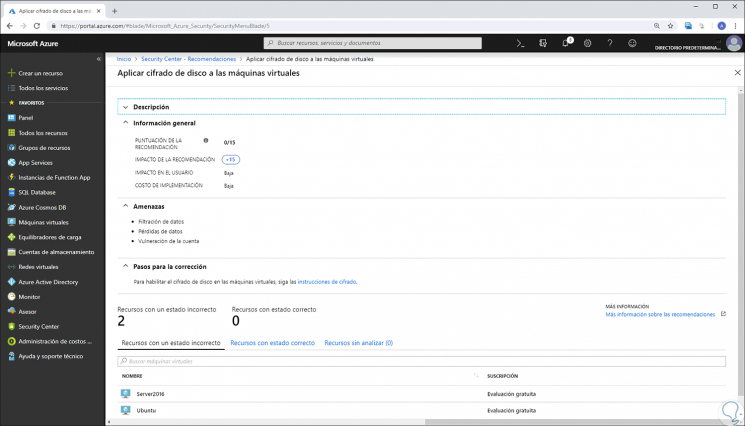
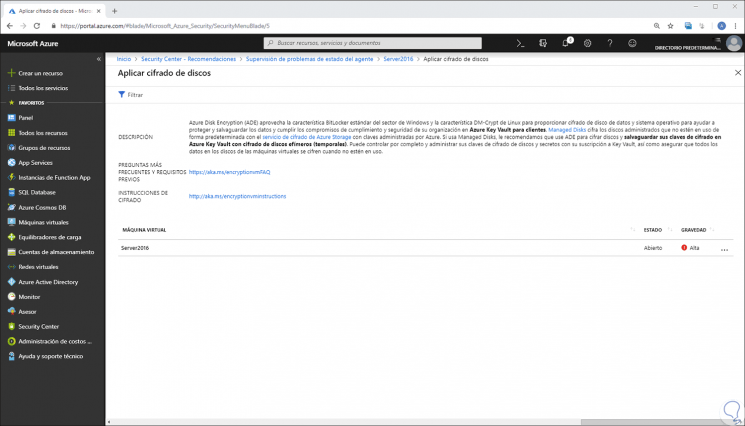
Apply disk encryption
This message indicates that the virtual machine disks must be encrypted using Azure Disk Encryption (Linux and Windows virtual machines), for security it is recommended to encrypt both the data volumes and the operating system volumes in the virtual machine.
Update operating system version
It recommends updating the version of the operating system for the cloud service to the latest version available for the family of the operating system used.
Vulnerability Assessment Not Installed
Through this recommendation it is requested to install a vulnerability assessment solution in the virtual machine.
Vulnerability Correction
This recommendation allows you to see the vulnerabilities of both the system and the applications where the vulnerability assessment solution installed in the virtual machine has been detected.
Using the latest compatible version of Java for web applications
It is recommended to make use of the latest version of Java for the latest security classes.
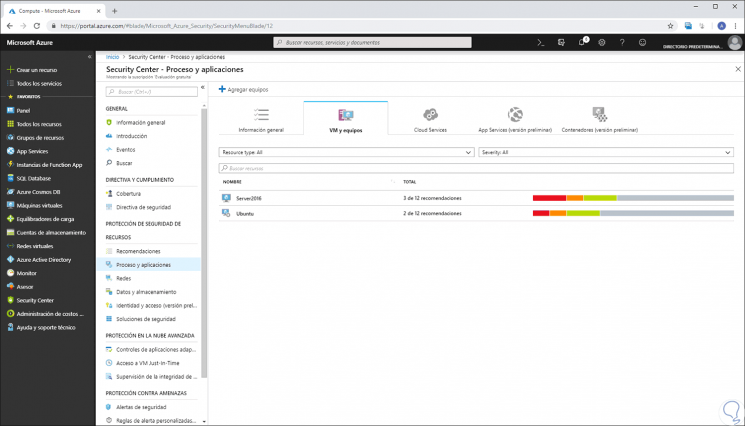
Step 1
To see this type of information in Azure, we must go to the Security Center panel and there go to the "Process" and applications section, in the next window we go to the "VM and computers" tab where we will see the following. There we will see a summary of the configuration status of all virtual machines created.
Step 2
We can click on any of them to access more complete information:
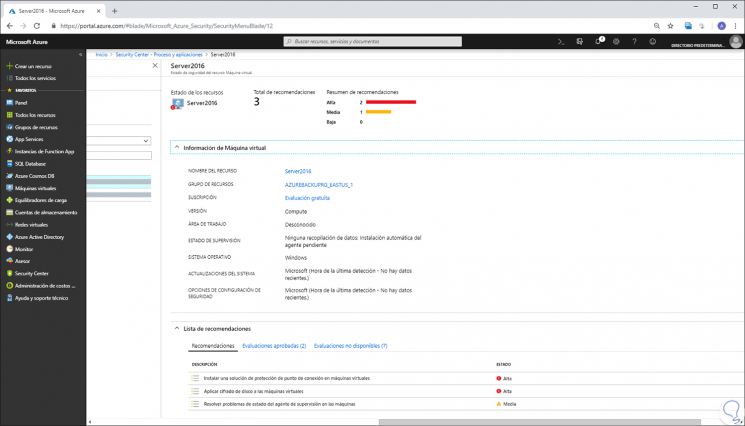
Step 3
Based on the type of recommendation we can see a different environment. Through this panel we can proceed to execute the Azure recommendations.
Step 4
By clicking on any of them we will see, in this case, the following:
Step 5
In other types of recommendations we will see the following:
Step 6
By selecting the affected virtual machine we will have the opportunity to correct this error and thus guarantee a better score at the security level:
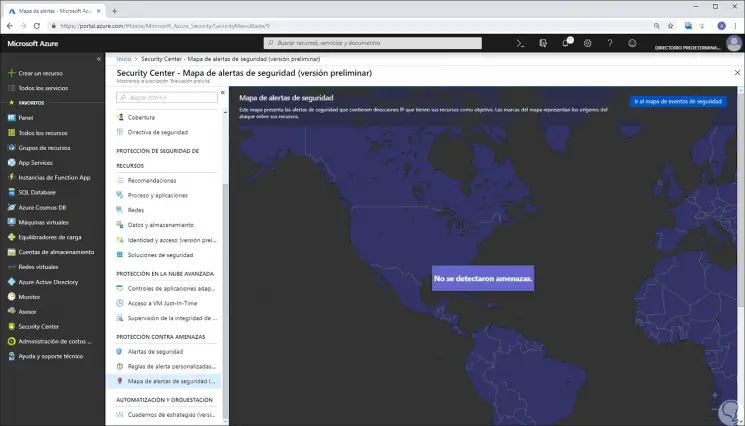
5. How to view threats detected with Azure Security Center
Security Center can display threat detection alerts with which, as administrators, we can have an additional management resource. This security alerts feature is responsible for adding the data collected from each virtual machine, the Azure network logs and the associated partner solutions in order to detect security threats from Azure resources.
This feature uses three basic parameters that are:
Integrated threat information
Which searches for malicious elements that use global information about threats from Microsoft products and services, the Microsoft Digital Crime Unit (DCU), Microsoft Security Response Center (MSRC) and other external sources.
Behavior analysis
With which known patterns are applied to detect malicious behaviors.
Anomaly detection
Which makes use of the generation of statistical profiles to create a historical reference base.
Some of the threats that Azure can detect are
- Execution of suspicious processes.
- Lateral displacement and internal recognition.
- Hidden malware and exploitation attempts.
- Hidden malware and exploitation attempts.
To activate this function, we must go to the Security Center and there go to the "Security Policy" section, then we go to "Configuration" and there we select "Rate Plan" where we will see the following. Select the "Standard" plan and click on "Save" to apply the changes.
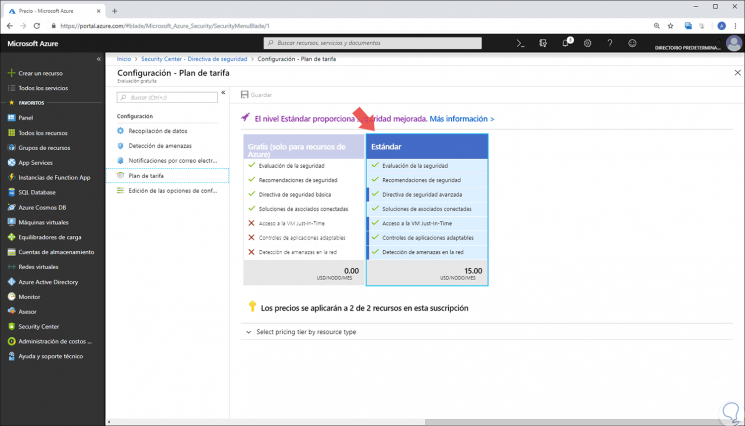
When the rate plan has been changed, the security alert chart will begin the process of filling alerts as security threats are detected.
In this way, Azure Security Center is a comprehensive and complete solution for all security management and control tasks in Azure resources, facilitating the administrative actions of any type of organization.