The use of web browsers is a task that we carry out daily; both mobile devices and desktops and laptops. These browsers give us access to everything the Internet offers us, unfortunately this includes viruses, malware and other threats..
Within the malware category we find a section called adware . Adware is basically a program that has been designed to show advertising on our team, redirect search requests to multiple advertising websites and collect commercial data about us such as preferences or websites visited. This is in order to show personalized notices, which 100% of the time is annoying as users.
The adware spreads through:
- Removable devices and more.
The adware focuses on browsers such as Google Chrome, Firefox, Opera and other applications , in order to massively distribute ads during the web browsing process. Among the various adware threats, a special one called Hbpix has emerged; which, once it is integrated into the system, will be responsible for spreading pop-ups, banners and even new browser tabs, totally affecting normal web browsing.
What is Hbpix?
It is a new type of adware, which does not add or change any extension of the affected browsers, but has all the potential to hide in browsers such as Chrome, Firefox or IE, and from there launch your windows or pop-up ads.
At this point we must mention that the function or objective of an adware is not to cause harm as malware does. For example, the WannaCry virus affected thousands of computers in the world asking for money to recover the information. Hbpix instead is responsible for redirecting requests to various advertising sites or as we have said, launching windows with ads which take time to close them or worse, when trying to close them open more..
Logically we must keep in mind that although Hbpix is ​​not a threat in itself, but that it can be the door for real threats to access the equipment and carry out its actions both in the documents and in the system services. This is because when we unintentionally click on any of the pop-up ads, we can unleash viruses like Trojan Horses or Ransomware, since the code in these ads can lead to virus-infected sites or an automatic software download. .
We mentioned at the beginning that one of the adware tasks is to launch ads based on our browsing tastes and this is achieved thanks to Hbpix can monitor, in the background, all the activity that we carry out as access sites and type of information to which we access; and taking these variables, it will launch pop-ups to further captivate the victim's attention and thus facilitate her to click on those ads. Hbpix is ​​able to keep track of activities including the camera and microphone of the equipment..
Something delicate with Hbpix, is that this adware can have a negative impact on the performance of the equipment especially in those that do not have great hardware performance. This is due to the fact that with its source code constant monitoring tasks of the user's activity are carried out, which implies an increase in the use of disk, CPU or RAM preventing more critical tasks from being executed with simplicity.
Now, we may wonder how we have been infected with Hbpix. There are several reasons, but one of the most common is through traditional software packages, which are often combinations of programs such as genuine software and adware. Unfortunately these appear to be harmless and at the time of download, adware spreads in the system affecting everything we have mentioned; But the first step to take depends on us since this software requires our permission to be installed, so we must analyze very well where these packages come from.
To take into account, Hbpix is ​​installed together with a free or low-cost application, so software download sites are the preferred way for those who wish to embed their malicious code in the victims' system.
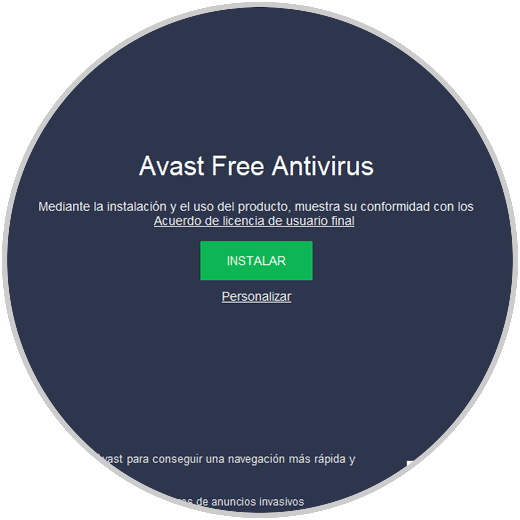
Therefore, it is good to note that some applications allow us to customize the installation, for this example we have taken Avast. When executing the downloaded file we will see the following. Initially we see that at the bottom the box "Yes, install the Avast Secure browser" is activated, many applications by default enable the installation of adware without realizing it by not carefully reading the installation wizards.
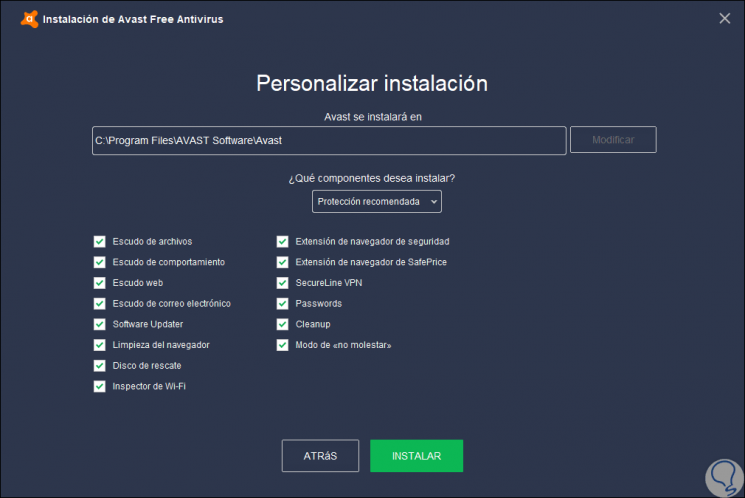
Now, if we click on "Customize" (many downloaded apps have it), we can see in detail what elements have to be installed on our computer and by default all are active. If you see any abnormal or unknown, it is recommended to deactivate it so as not to integrate Hbpix into the device.
When Hbpix is ​​downloaded we will see something similar to this:
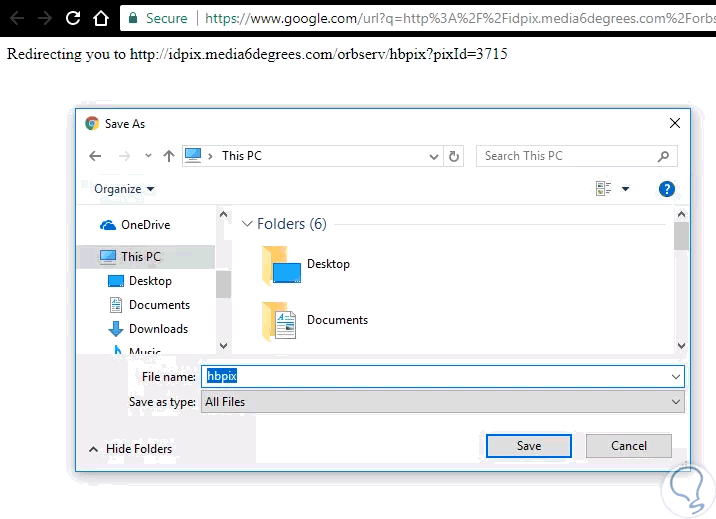
There we can see that it is an executable with an assigned URL like:
http://idpix.media6degrees.com/orbserv/hbpix?pixId=3715n
It is for this reason that today TechnoWikis will give a series of tips to eliminate this virus from the system and from Chrome and Firefox browsers in particular.
1. Review hidden system files to remove HBPIX file in Chrome or Firefox
Option 1
To carry out this process it is recommended to start the system, in this case Windows 10, in safe mode. For this we have the following options:
There we click on the "Restart" button now located in the "Advanced Start" section.
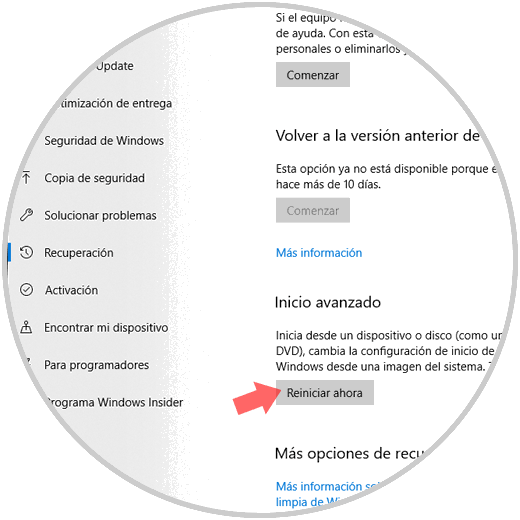
Then, after the restart, we will:
Option 2
Another option is to use the following keys:
+ R
Execute the following command:
msconfig
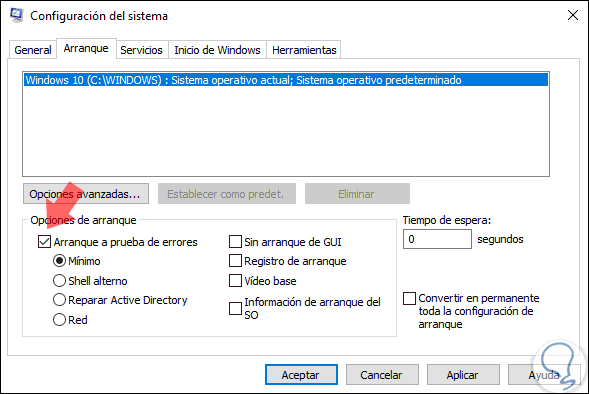
In the displayed window go to the "Startup" tab and there activate the "Safe start" box:
Option 3
Another option is to go to the "Start" menu, press the Alt key and click on the system reset button to enter the advanced mode and follow the instructions in the first point.
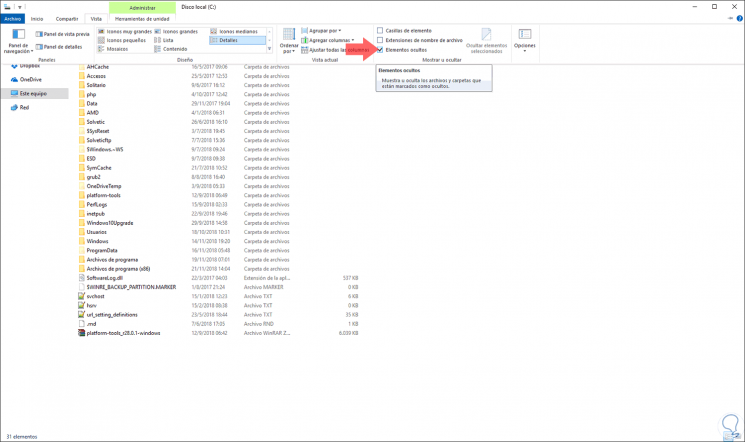
Now, once we log in, we will go to the "File Explorer" and there we go to the "View" menu and activate the "Hidden elements" box. This will allow all the elements to be visible since it is probable that Hbpix is ​​hidden so as not to be eliminated, there depends on performing a specific search to detect it in the units of the equipment.
2. Review system startup services to delete HBPIX file in Chrome or Firefox
Step 1
For this option we must use the following keys:
+ R
Run again:
msconfig
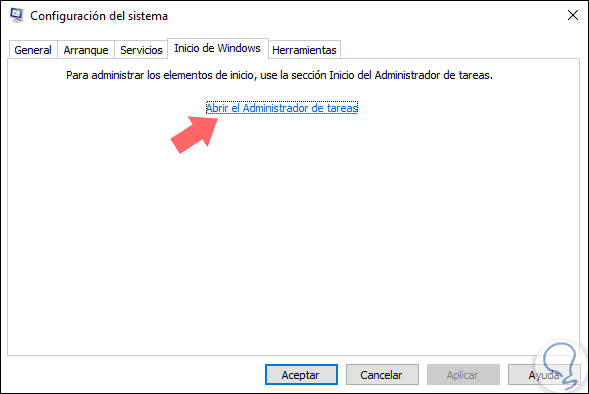
And this time go to the Windows Start tab where we will see the following. There we click on the "Open Task Manager" line.
Step 2
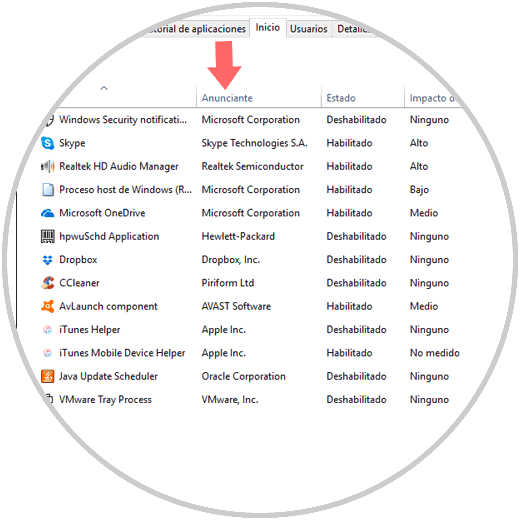
In the new window we must look at the "Advertiser" tab. There, if we see anyone who says unknown, we must proceed with their immediate disabling.
3. Scan Control Panel to delete HBPIX file in Chrome or Firefox
For this case we must review suspicious applications.
Step 1
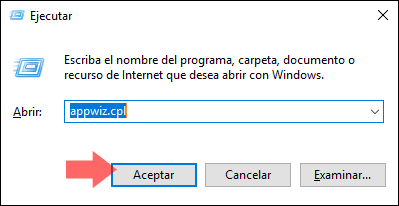
For this we use the keys:
+ R
We execute the following:
appwiz.cpl
Click on "Accept".
Step 2
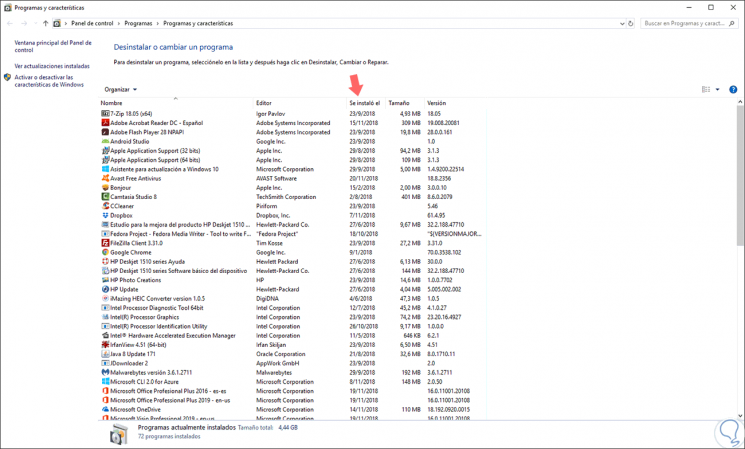
We will be redirected to the following window, there we click on the column "The installed" in order to verify that programs have been installed recently and thus detect a possible threat:
4. Analysis of the hosts file to delete HBPIX file in Chrome or Firefox
The hosts file is a file used by the Windows 10 operating system, in order to associate domain names with IP addresses, but this may be altered by Hbpix adware.
Step 1
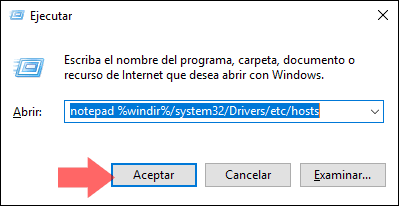
To access this file we use the keys:
+ R
We execute the following:
notepad% windir% / system32 / Drivers / etc / hosts
Press Enter or "Accept".
Step 2
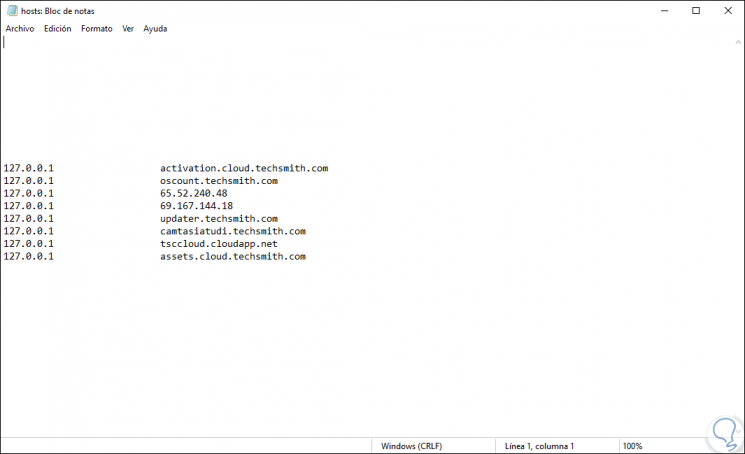
The following will be displayed. In case of detecting any anomaly in the addresses registered there we must take the immediate protection measures.
5. Analyze network settings to remove HBPIX file in Chrome or Firefox
Step 1
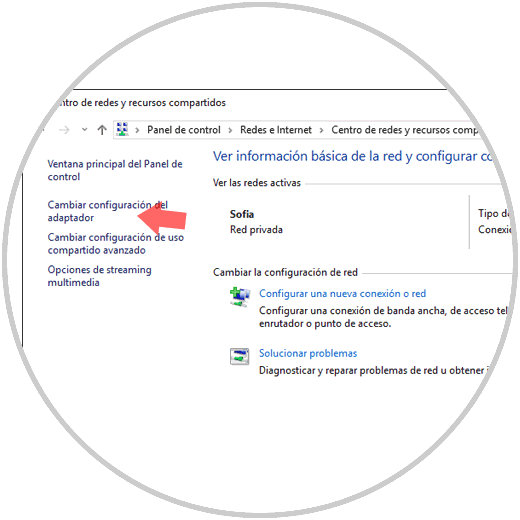
To use this option we will go to the following route:
- Center network and sharing
There we must click on the line "Change adapter settings"
Step 2
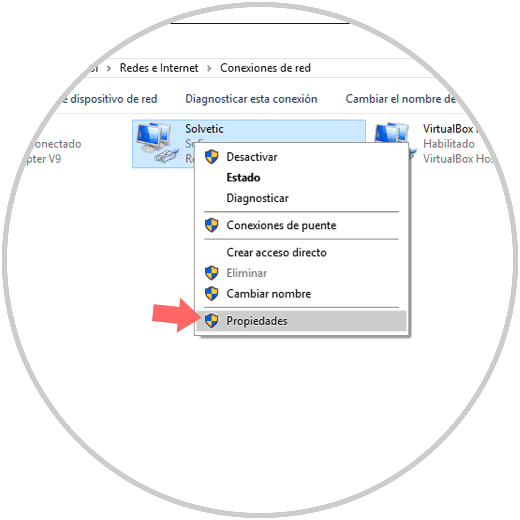
Then right click on our current adapter and select "Properties":
Step 3
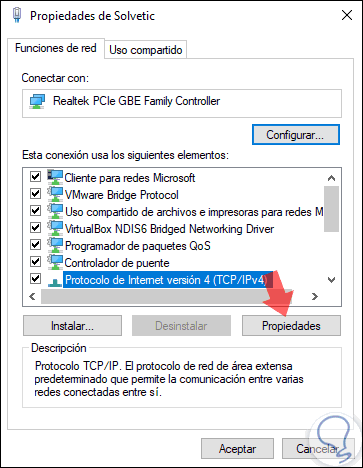
In the displayed window we go to the "Internet Protocol version 4" line, there we click on the "Properties" button.
Step 4
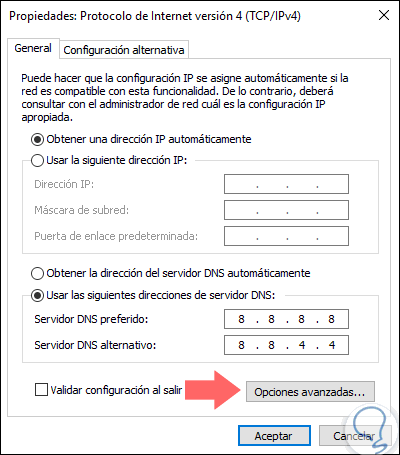
We will see the following. We click on "Advanced options".
Step 5
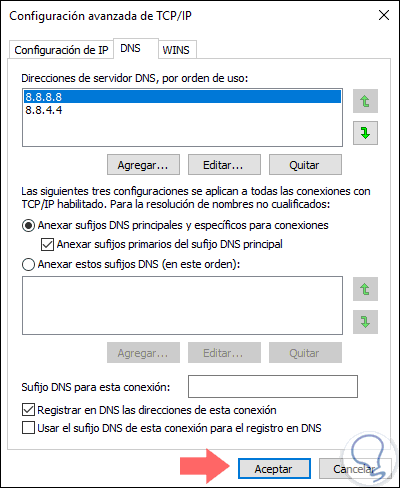
In the new window we go to the DNS section. There we will delete all the information in the DNS server addresses section and click on "OK".
6. How to remove Hbpix from Google Chrome
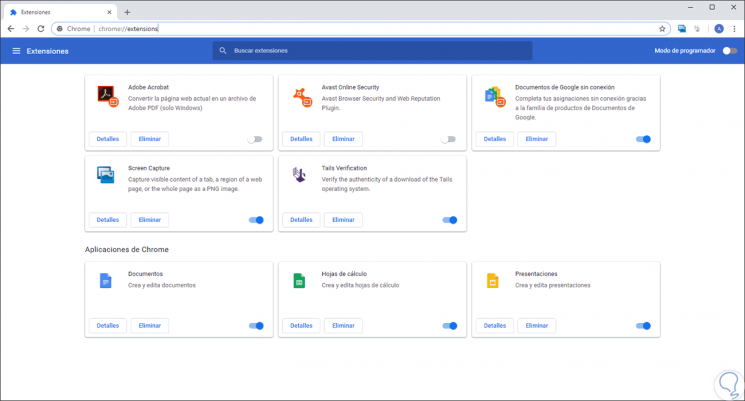
To carry out this process in Google Chrome, we open a new tab and paste the following:
chrome: // extensions /
This will give us access to the add-ons or extensions that we have installed there. There we should simply look for the adware and proceed with its removal.
Another solution for Google Chrome is to go to the following route:
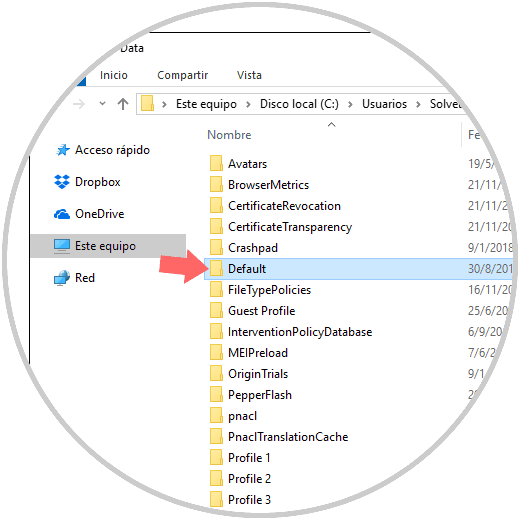
C: \ Users \ user \ AppData \ Local \ Google \ Chrome \ User Data
There we will locate the folder called Default. This should be renamed Backup Default and proceed to restart the Google Chrome browser.
7. How to remove Hbpix in Firefox
Step 1
In the case of Firefox Quantum we must go to the "Add-ons" section using one of the following options:
Option 1
In a new tab enter:
about: addons
Option 2
Click on the browser menu and select "Add-ons"
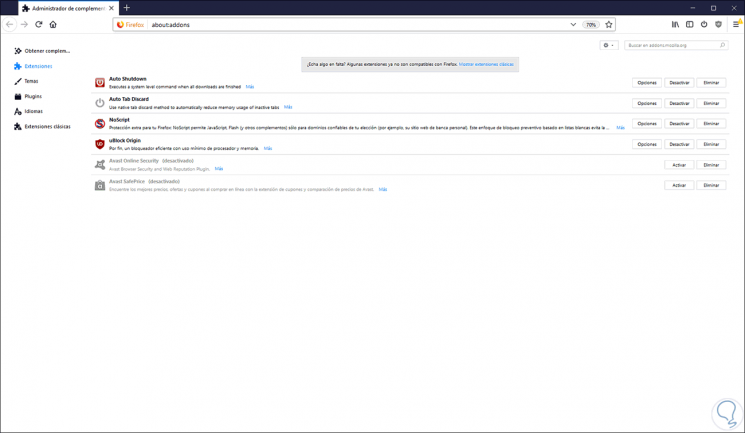
There we simply place the adware and remove it from the system.
8. How to remove Hbpix from any browser
Note
This option applies to both Google Chrome, Firefox, Edge and other browsers.
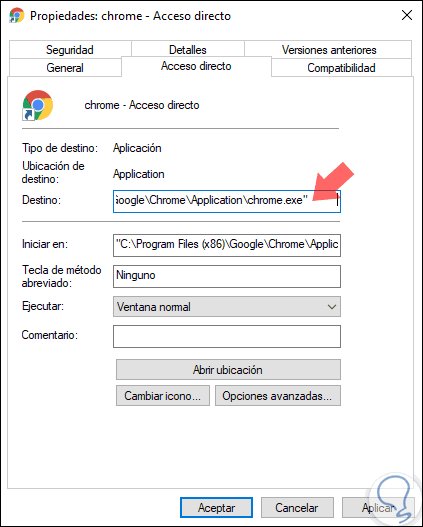
For this we must right click on the browser's shortcut on the desktop and in the window displayed go to the "Shortcut" tab and in the field "Destination" delete, if it exists, everything that is after .exe. Click on "Apply and Accept" to save the changes.
9. How to remove Hbpix from browser through system processes
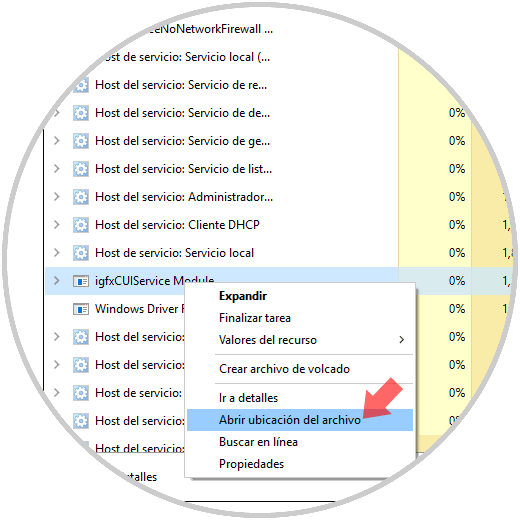
Hbpix may be camouflaged as a process in the system. To verify this, we access the "Task Manager" and there we go to the "Processes" section, there we must detect some strange process and right click on it to select the "Open file location" option. After this we must delete all the directories where we have been redirected.
With any of these tips, it will be possible to eliminate Hbpix adware and thus navigate in a comprehensive way and with the best performance benefits.