The importance of good lighting when we take our photographs is essential to end up giving images with good quality and without loss of information. We must always try to take into account the Dominican conditions of the environment and try to control everything we can to achieve the result we are looking for. If we find ourselves with a natural scene that is too dark, we will try to find a way to apply artificial light sources to compensate for the predetermined absence. Although in later editions we will be able to modify the light conditions that have resulted in our photography, the truth is that the ideal is to take it into account from the beginning to start with a photograph with optimal conditions..
The usual thing is to try to avoid using the flash when we are taking our photographs since in the end we are emitting a very intense projection of light without any type of control and in a very focused way, giving results that are normally not very usable. Normally we will use the flash when our lighting conditions are so low that we have no other resource with which to deal with this problem. If in the end you have to use the flash due to the conditions you have, the ideal is always to find a way for that light to reach the final objective in a more dispersed and less harsh way to avoid very pronounced lights in contrast to unwanted shadows. In addition, when using the flash in low light conditions we can find unwanted effects such as the one known as red eyes that we see in the looks of our photographs.
The red eye effect in photography
Although there is talk of possible causes of this type of effect on the eye, the truth is that there is a fairly solid one in this regard.
The red-eye effect in a photograph occurs because the light emitted by our source is reflected in the blood vessels that lie in the retina. Light enters the eye from the pupil to the inner part that is the retina. This retina includes cells that are responsible for capturing light information and sending it to the brain thanks to its specialization. It also has a layer called the pigment epithelium that collects another amount of light and allows the rest to pass through to an area full of blood vessels. These glasses are responsible for the fact that when they are illuminated, for example, with a large flash, that red color is emitted..
You will have noticed that it normally appears when there is little light and the flash is used, and that is that when there is little light, the pupil is quite dilated so that more light enters to be able to see. At the time of the flash, the pupil does not have time to close, so that light that the flash usually emits is directly reflected, reaching the aforementioned pigment epithelium and blood vessels and we will see it captured in the photograph with that reddish effect.
The positive thing about this effect is that if the color that both eyes reflect is red, this usually means that we have a good retina in both eyes. If the reflection appears in another type of color such as white or yellow, it could be a sign of an eye problem.
Avoid red eyes in photos
Some tips that you can take into account to avoid that unwanted red effect in the eyes are the following:
- Try not to look directly at the camera.
- Use the flash reflected on an object or surface and not focus it directly on the subject.
- Try to illuminate the space to avoid too low light conditions.
Next, we are going to see how we can use a tool as complete as Lightroom Mobile to get rid of that unwanted red-eye effect and restore a natural color to our eyes in a complete and professional way..
To stay up to date, remember to subscribe to our YouTube channel!
SUBSCRIBE ON YOUTUBE
How to remove red eye in Lightroom Mobile
As we have mentioned, the red-eye effect is produced by a phenomenon that merges the emission of direct light on our retina and it will be the composition of this by blood vessels that produces that red effect that we see in our photographs. The ideal, therefore, is to follow the advice that we have mentioned before and avoid that we are going to use that flash when the subject is looking straight ahead or avoid that light if you invite it directly and without control over the final objective.
The use of flash must be a resource that we can control and that has an aesthetic justification, preventing its appearance from ruining the results of our photographs. Many times we have the option on our mobile devices for automatic flash and it appears when we least expect it, thus ruining our photographs. If you are going to take pictures at night and you do not want the flash to appear as the protagonist, the ideal thing is that you deactivate this option in the Camera first of all.
If in the end you have found yourself with the situation of having a photograph where that red-eye effect appears, don't worry because even from your mobile device and using Lightroom Mobile we will be able to eliminate that red-eye effect and return a natural color to the gaze of our photograph.

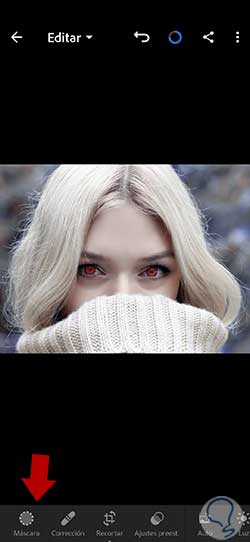
Step 1
The first thing we will do is open our photo with red eyes to solve in Lightroom Mobile.
Step 2
At the moment Lightroom Mobile does not include a direct option that eliminates red eyes, but thanks to the options it offers we can do it manually. For this we are going to work from the "Mask" section.
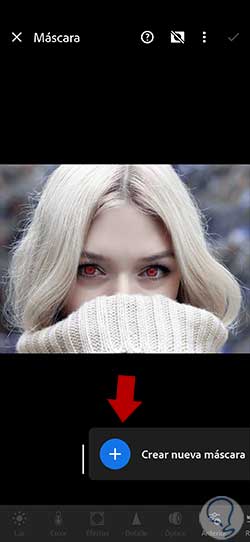
Step 3
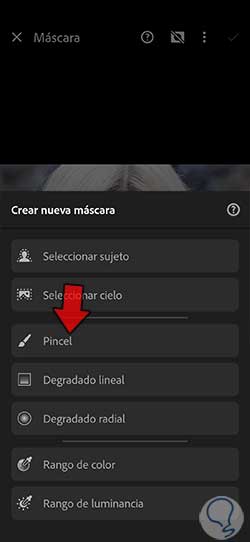
To "Create a new skin" we will have to click on the icon that you will see that appears under that name and with a "+" symbol.
Step 4
Among all the options that we can see in the list that appears, we are going to select the “Brush” option to be able to make a more precise selection. Working under masks will allow us to make non-destructive edits.
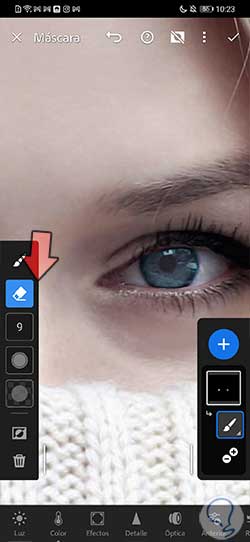
step 5
We will enter the brush mask mode where we will see both a panel on the left and on the right. The panel on the left will help us configure the values of our brush such as Size, Fades or Flow. The right panel will help us to see the mask structure that we have created. If you scroll the panels will open to see the options.
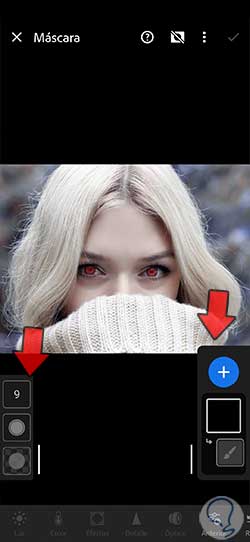
step 6
Once we have the brush configured, we are going to paint over the area to be edited, which in this case will be the eyes. We are going to paint as precisely as possible, although do not worry because it can be rectified later with the eraser. We advise you to zoom in to make it easier to define the area.
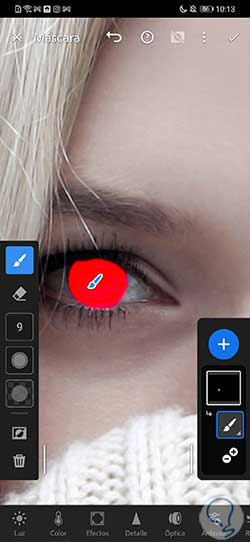
step 7
We already have our eyes selected so we can start editing them specifically. To do this, in this case we are going to work in the “Color” panel that appears at the bottom.
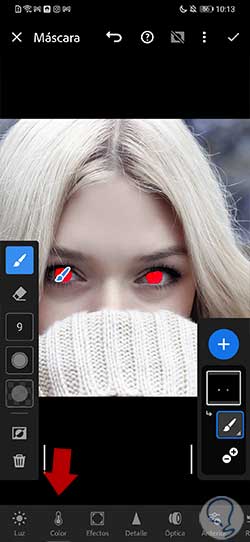
step 8
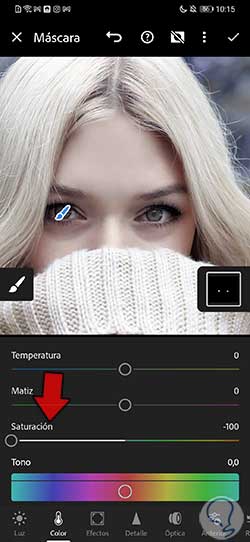
From here we are going to make modifications to get rid of that red color from our gaze in the photograph.
If we adjust the "Saturation" and reduce it to the maximum, we will see that the coloration of the red eyes is removed.
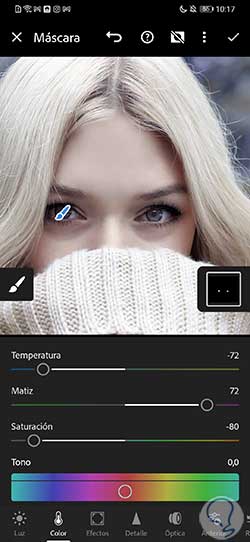
step 9
If what we want is to return a specific color to our eyes, we will also be able to edit it to achieve it. If we play by raising the Saturation a bit and we move the different regulators corresponding to the "Temperature" and the "Hue" we will see that we can return color to our eyes in a personalized way.
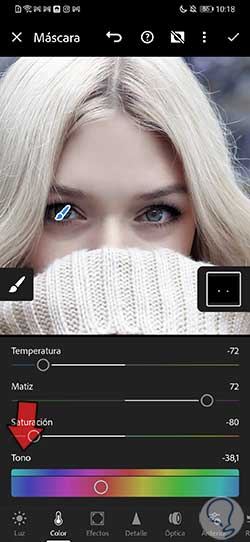
step 10
With the "Tone" option we can also move through the different possible tones and thus vary the final color of our eyes according to our needs. We will see how the color of the eyes changes, which will no longer be red.
step 11
If we continue going down, we will also see that we have the option to play directly with the "Color" by moving the selector around the color panel that appears. As you are directly modifying the color, be careful when choosing it since from bottom to top you will see that the color takes on much more intensity. If you want to put a blue color but not with such intensity, go to the bottom of the selector panel, but if you want it very intense, go to the top of the color you want.

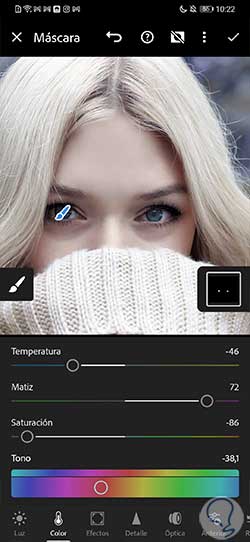
step 12
Once you have the tone and color configured for your new look, you can return to the upper options of "Saturation" or even "Temperature" and "Hue" to readjust the final result of the eye color. We will see that we have been able to remove the red from the eyes and also restore the color of our gaze.
step 13
In case you notice that when painting the editing area you have overstepped a bit, don't worry, click on the Delete icon and zooming in for greater precision we will eliminate everything that does not interest us by painting over the area.
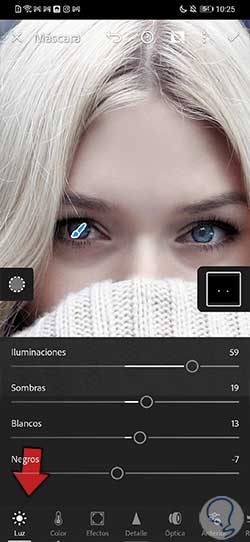
step 14
Taking advantage of the fact that we have the eye area well defined, we can apply other modifications to our gaze and thus improve it. For example, we are going to enter the "Light" section and we are going to make the modifications that we see fit to improve the look. In this case we have given these values:
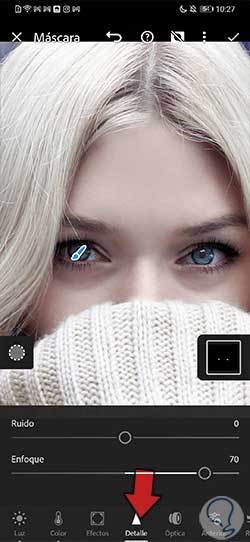
step 15
If, in addition to light and color, you want to enhance aspects such as focus in your eyes, we can go to the "Detail" section and upload the "Focus" option to further define the eyes and, therefore, the look.
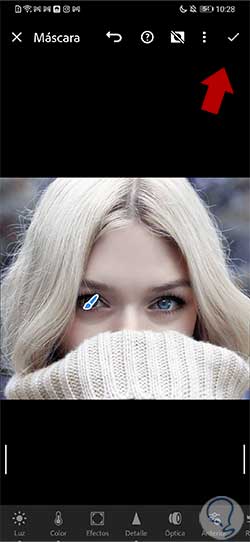
step 16
Once you finish applying all the changes, we are going to click on the upper right check so that the modifications are saved on our image.
step 17
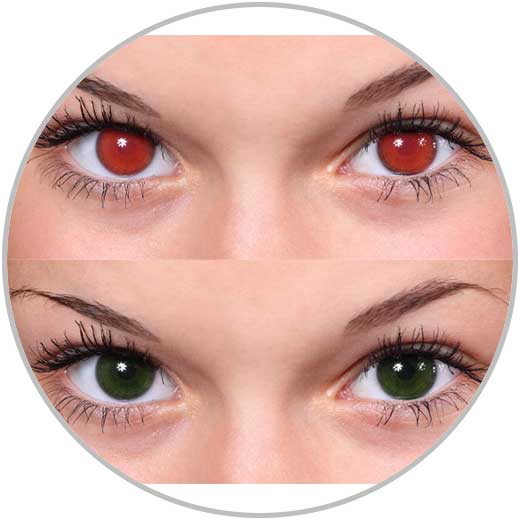
When the changes have been applied we will see the new retouched look where we have eliminated the red eyes and we have also managed to give them color again, even improving their appearance. We can see the before and after of the red eye edition from Lightroom Mobile.
In this way we will be able to remove red eyes in Lightroom Mobile and return the original color to our eyes in a professional and complete way from our mobile device.