Currently the use of wireless networks (Wi-Fi) represents a high percentage of the options available for Windows users 0 0 and this is thanks to its ease of access and availability in multiple places, today we find Wi-Fi networks so Free in public places and we can still convert our mobile data into a Wi-Fi hotspot to always be connected to our Windows 10 devices for personal or work reasons. Wi-Fi networks cover a set of protocol and access specifications for optimal operation where aspects such as:
- Quality of the devices that offer the signal.
- Elements that can interfere with the signal transmission.
- Coverage and location of the device and many other aspects.
In Windows 10, we have the possibility of automatically creating a report associated with all aspects of the Wi-Fi network which will be useful to execute administrative or support tasks and thus analyze in detail each aspect that acts in the process Connection to wireless networks..
Through this tutorial, TechnoWikis will explain how we can generate this report and thus have this valuable information for its respective analysis.
1. How to create the Wi-Fi report in Windows 10
Step 1
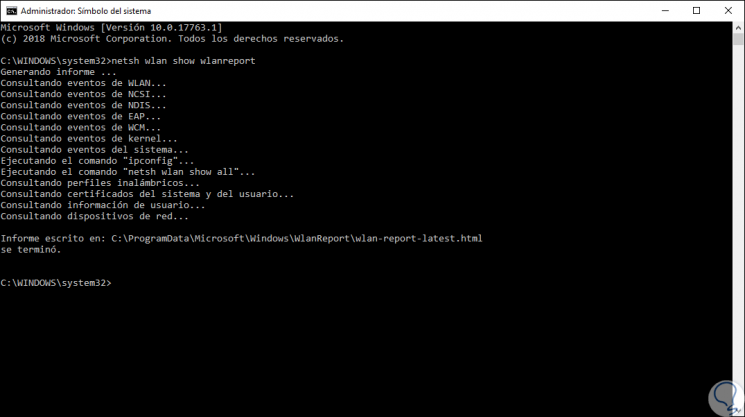
To start the process of creating the report, we must access the command prompt as administrators by right clicking on it and selecting the option “Run as administratorâ€, then, in the deployed console we will execute the following line:
netsh wlan show wlanreport
Step 2
This command is responsible for collecting information such as:
- All events associated with the wireless network
- Executing network commands such as ipconfig to view adapter details and IP addresses
- Current system user information
- Analysis of available network devices
Step 3
When performing this analysis, this data is stored in HTML format in the path
C: \ ProgramData \ Microsoft \ Windows \ WlanReport
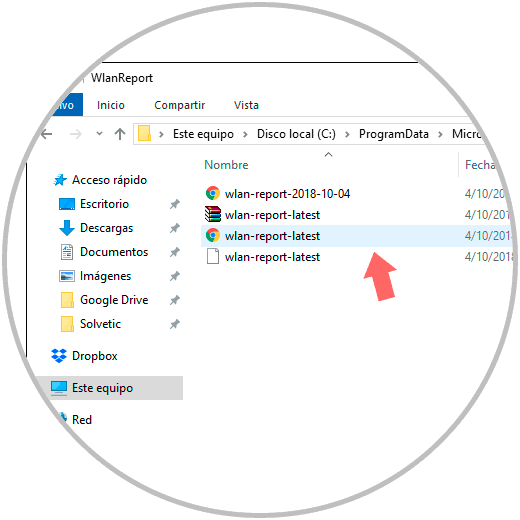
2. Access the WiFi report file created in Windows 10
There we can execute the created HTML file and this will be opened in the system default browser or, if we want it to open in another browser, we must right click on it and select Open with and there define the browser.
Step 1
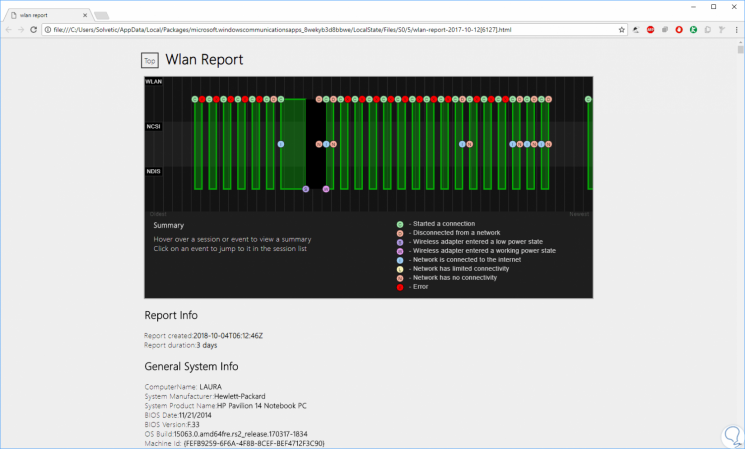
When opening this file we find the following:

Step 2
At the top we find a graphic where details such as:
- Time we disconnect from the network
- Power changes in the adapter
- Connectivity errors and more
Step 3
In this case we have not used the Wi-Fi network lately, in case it has been active we will see the following:
Step 4
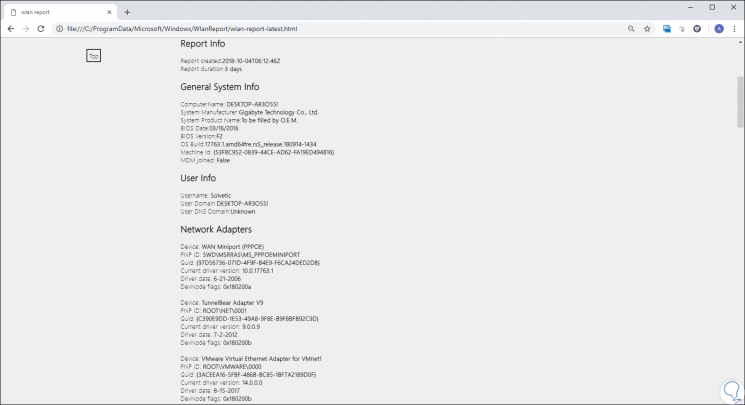
In the next section "Report Info" we will find specific details by sections such as:
General System Info
In this section we find aspects such as:
- Name of the equipment used
- Date of manufacture of the BIOS and its respective version
- Build the operating system
User Info
In this section we find details associated with the user such as:
- Domain and DNS (If applicable)
Network Adapters
This section is entirely dedicated to network adapters and there we find specific details of available network adapters such as:
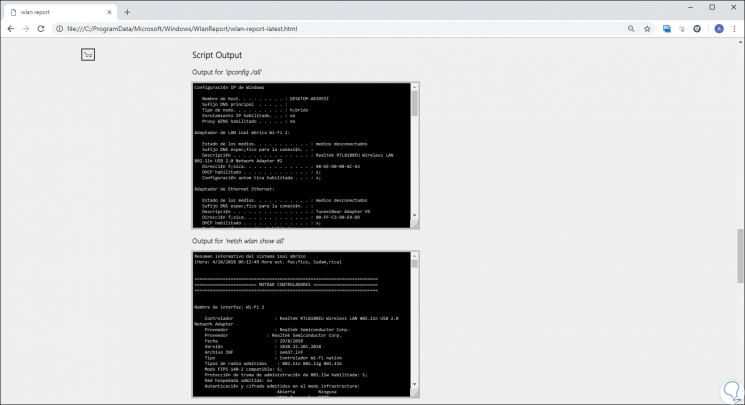
Script Output
At the bottom we find this section which is responsible for using the command prompt to execute the commands “ipconfig / all and netsh wlan show all†which give us information such as:
- Authentication and encryption methods supported by the adapter
- Available interfaces and many more details
Step 5
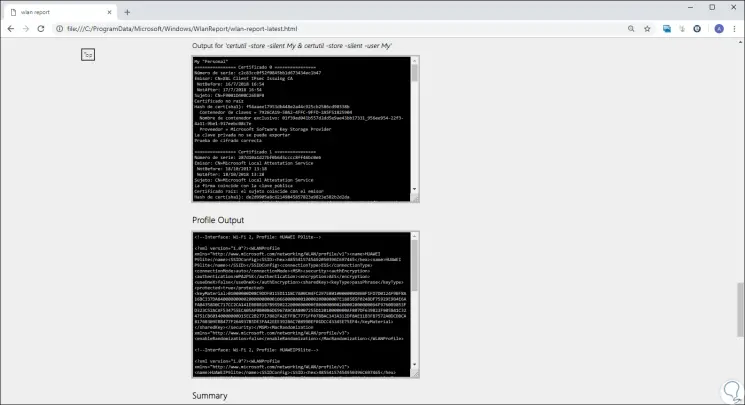
Further down, in this same section, is the command “CertUtil - store -silent My & certutil -store -silent -user My†which shows a list of all current certificates that are stored on the computer and in the section “Profile Output â€we find details of all the Wi-Fi profiles that have been stored in the device, so, every time we connect the device to a different wireless device, Windows 10 is responsible for saving the information used to connect to this network, there We find all these details except the encrypted keys and passwords:
Step 6
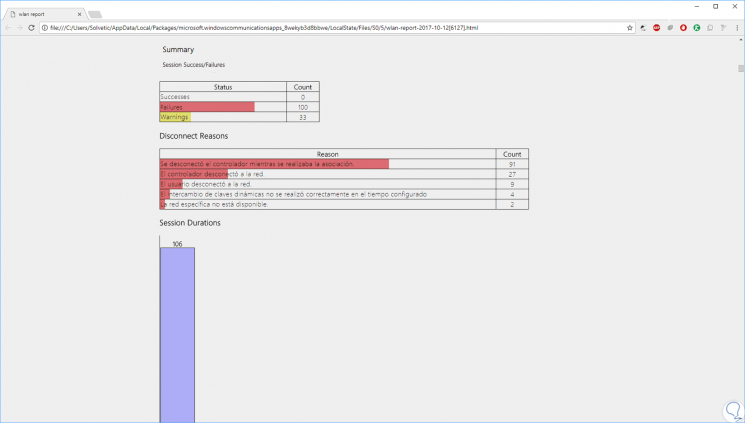
Finally, in the “Summary†section we have specific details about the status of the connections to the Wi-Fi network with values ​​such as:
- Number of successful and failed connections
- Reasons why Windows 10 has disconnected from the Wi-Fi network
- Duration of the respective sessions
Step 7
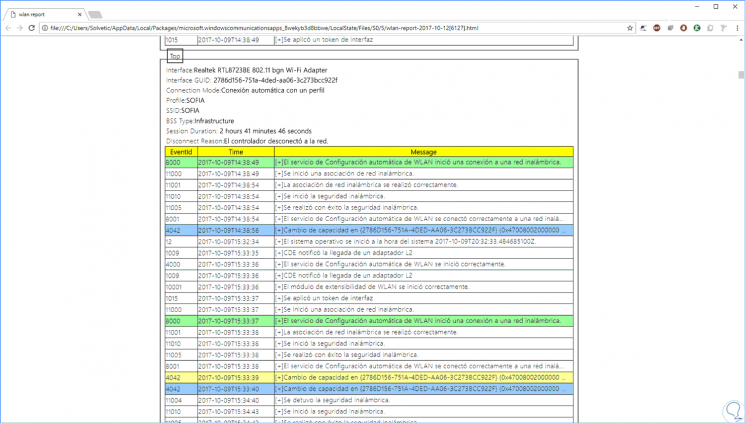
At the bottom we find the “Wireless Session†section where each adapter is detailed in detail with usage parameters such as:
- Name of the interface used
- GUID of the selected interface
- Reason why the computer disconnected from the network
- Detailed listing of event IDs, date on which the event occurred, message displayed associated with that event
We can see how this report automatically generated by Windows 10 displays valuable information that we can use to detect connection level failures and thus offer the best wireless service standards..