We enter fully with a higher-end AVM router, which we can say is one of the most complete for its performance, features and options it offers us. We are talking about the FRITZ! Box 7590 router. If you are an advanced user who needs multiple connections with advanced configurations, you are in the correct router choice site since it is the most complete for this type of networks..
Regarding the Wi-Fi connection, thanks to the fact that it performs automatic and intelligent band selection (Band Steering) you will know that it is compatible with both 2.4 Ghz and 5 Ghz, being able to be used at the same time in the devices that can with one other band
For security, it also offers us the option of activating a WiFi guest access function where, with our own password and user, it allows us to give temporary access to the Internet without having to give it access to the internal network of the other devices.
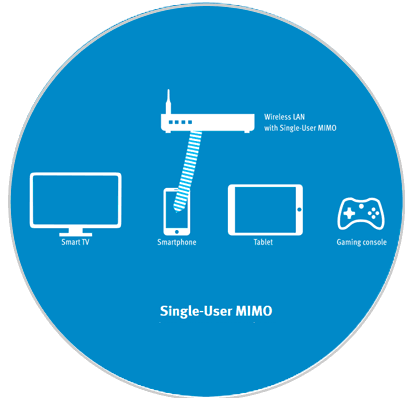
Another very interesting detail to keep in mind is that it includes intelligent wireless network through MU-MIMO (Multi-User MIMO). This functionality offers multiple Wi-Fi connections, more stable and faster (up to 2,533 Mbit / s) when multiple requests are sent to several devices at once, in this case there would be 4 devices simultaneously receiving the data transferred wirelessly to via Wi-Fi
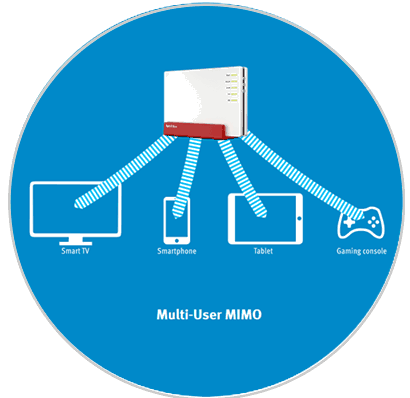
If it were Single MIMO it would be of lower performance in case of simultaneous connections of users through Wi-Fi. This FRITZ! Box 7590 router reaches speeds up to 1,733 Mbps (5 GHz) and 800 Mbps (2.4 GHz)..
When having Supervectoring, we must know that through this router 7590 allows us to reach up to 300 Mbps of download in DSL / VDSL connection. It is possible to connect cable modem, fiber terminal and even an external USB modem to be used through this router.
It has WAN ports and Gigabit Ethernet LAN, we know that it is very important today to have good and agile network communication. All network connectors offer it to us..
- 4 Gigabit Ethernet LAN ports.
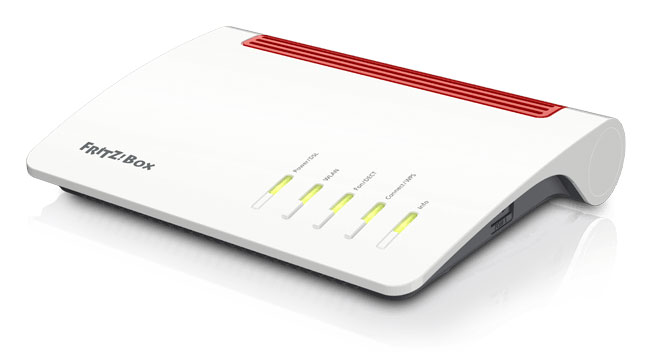
As you can see, it offers a renewed and interesting design with connections of all kinds such as the following:

As you can see in the image of connections, it also offers us the possibility of using this router as a switchboard for connections based on IP, ISDN and analogue fixed telephony. It also has a DECT base station with up to 6 cordless phones, along with 5 integrated answering machines, in addition to “Voice Mailâ€.
As a review it is also interesting to comment that on the router you can see 2 USB (3.0), one on the back and one on the side of the router. It offers interesting solutions for its use such as the so-called FRITZ! Nas where you become a personal NAS on the router by connecting a disk to some USB port input. It is also possible to connect a printer via USB to share it on a network.
More than one system administrator or advanced user will be more than good with this type of storage solution. It is also possible that we can create a multimedia file server through DLNA, UPnP AV. We will enter below to explain the use of this functionality among many others.
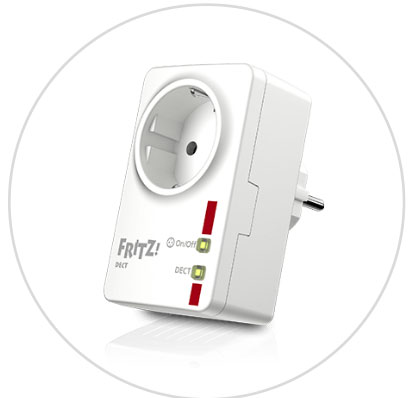
As an extra to take into account, it offers home automation and management solutions to be able to measure, record and analyze energy control data along with other devices that allow us to control certain areas of the office or home. An adapter to consider for these cases would be Fritz! DECT 200.
In next tutorials we will enter fully with the functionalities of this great device.
It is important to comment that the FRITZ! Box 7590 router also offers us the use of its integrated Firewall with active packet inspection (SPI), with which we can manage the ports to have greater internal network security. All in a simple way but at the same time very well implemented to increase our IT security.
Another functionality that it offers and we must take into account is that we have the possibility of using VPN remote access (IPsec) in a secure way. This function is highly demanded especially for the remote connections of users who need it daily, so this router complies perfectly at this point.
In the front part through a physical button, we can use WPS (Wi-Fi Protected Setup) to be able to connect without password to the devices that you want to connect via Wi-Fi.
After having used it, configured and analyzed, we can tell you from TechnoWikis, that one of the best parts that this router also has is that it has a very friendly graphical interface in Spanish. Easy to understand and with many configuration wizards to help make configurations. This facilitates more advanced configurations for users who are not so expert, in addition to that user profile they also have basic version options, focusing only on what is important.
FRITZ! Box 7590 Router
If you are looking for a complete router, with interesting functions for an audience that is looking for better control options on your router, you are in the right place.
1. Technical characteristics router FRITZ! Box 7590
Catalogs together with the technical data of the FRITZ! Box 7590 router to know in detail its technical capacity.
Wireless Wi-Fi
- Offers simultaneous dual band with Wi-Fi AC.
- A speed of up to 800Mbps in 2.4GHz and up to 1733Mbps in the 5GHz band. As we mentioned before, it includes MU-MIMO 4T4R and Four-Stream for both bands
- It is compatible with WiFi 802.11g, by a.
- "AVM Stick & Surf" technology to navigate comfortably and safely.
2.4GHz Wireless Controller
Qualcomm QCA9985, with speed up to 800Mbps in MIMO 4T4R configuration.
5GHz Wireless Controller
Qualcomm QCA9984, with 1,733Mbps speed in MU-MIMO 4 × 4
CPU
Lantiq s7123n11 sllzr.
DECT system
DIALOG SC14446 A76R101LVP. With capacity up to 6 phones.
ADSL / VDSL modem
S7164149 SLM30.
RAM
NANYA NT5CC256M16DP-DI with 512MB of RAM.
Flash
MXIC MX30LF4GE8AB-TI with 512MB capacity, also internal NAND memory.
Power supply
Uses 12V and 2.5A current intensity.
Package content
- Power supply with 1.5 m cable.
- 2 LAN cable: 1x4m and 1x1.5m.
- Quick installation guide.
- RJ-11 to RJ-45 cable to connect the router to the telephone line.
If you want to continue knowing technical data or characteristics we leave you the official link of the official website.
TECHNICAL DATA
Let us now turn to the practical explanation of how to use and configure this great FRITZ! Box 7590 router.
2 . How to configure Movistar Fiber router in Bridge mode
To be able to use the FRITZ! Box router through the internet connection of the operator router we have, the first thing we must do is configure the Movistar router in Internet connection Bridge mode. This change is so that the connection can pass and everything is managed through the FRITZ! Box 7590 router. In this case we do it on the fiber router of the Movistar operator. But it would be very similar to performing on the routers of other operators, the important thing is to see and understand the process.
Step 1
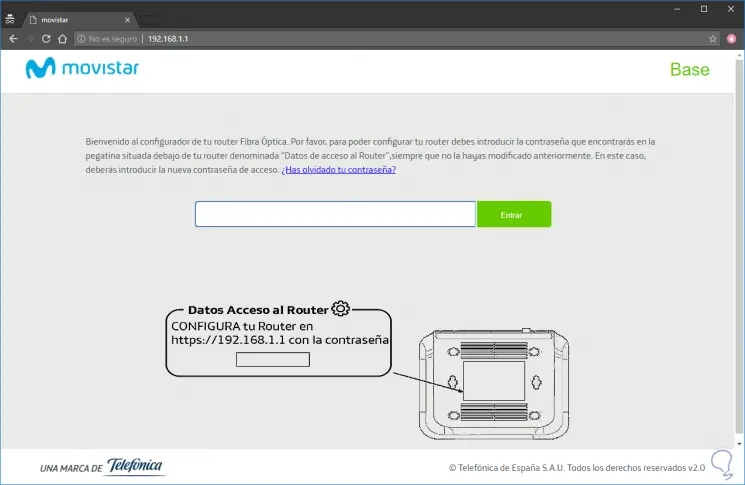
Let's start with entering the Movistar router. To do this, we must enter its local IP address in a browser. In this case by default it is usually:
http://192.168.1.1
It will ask us for a password, but if we have changed it for another, it is the one that appears at the bottom of the Movistar router that you can see where it says “Router access dataâ€.
We enter the Movistar router and go to the following options that we comment below.
Step 2
The "Advanced Settings" will allow us to select more options. To do this we must press the "Advanced Settings" menu that is located below everything on the left side of the interface.
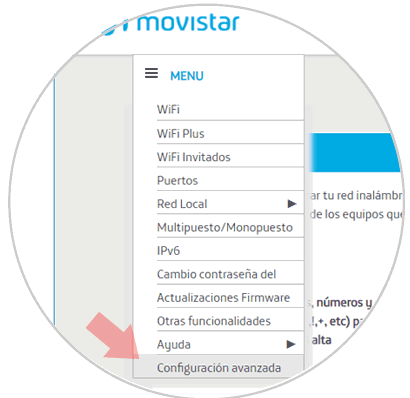
In our case, we go to the option "Advance Setup"> "Wan Service".
Step 3
Once this is done and after accepting a warning, the advanced mode interface will open and we will have many new options to configure. In this case, the one that interests us is in the "Advanced Setup" menu in the WAN Service section.
As you can see in the image, we have the WAN PPoE service in the last position.
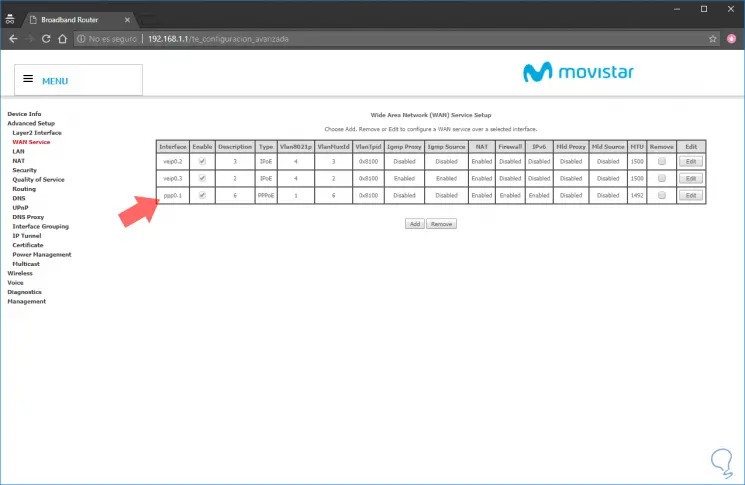
We select it to remove (“remove†in our case) and we will eliminate this service ppp0.1
If you want to reconfigure this router as a source Multipoint as it is now, you just have to reset the Movistar router while maintaining the router's back button.
Step 4
We must now press the “ADD†option to include the new necessary Bridge service. We have to select these points that you see in the image below.
Options to configure Bridge mode
- (Priority) Enter 802.1P Priority [0-7]: 1
- (VLAN ID) Enter 802.1Q VLAN ID [0-4094]: 6
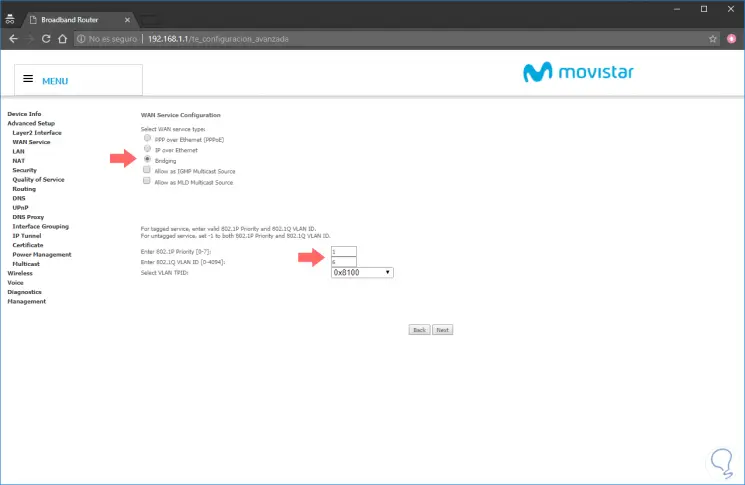
Click on "Next" and then "Save" to "Apply."
With these steps, we will have the Movistar fiber router ready to let the internet connection pass to the FRITZ! Box router or another.
3 . How to configure Fritz! Box 7590 router with Movistar Fiber router
We have explained in the previous section how to put the Movistar router into bridge mode. This would be necessary before or after configuring the FRITZ! Box router. As we have already configured the Movistar router as Bridge, it is no longer the main router (it has ONT active) and we have to configure the FRITZ! Box router to be the one that initiates the internet connection via PPPoE.
We have the option to follow the steps of the Internet configuration wizard offered by the FRITZ! Box internal menu. Following these steps we will have it started in the absence of adding some necessary data to part.
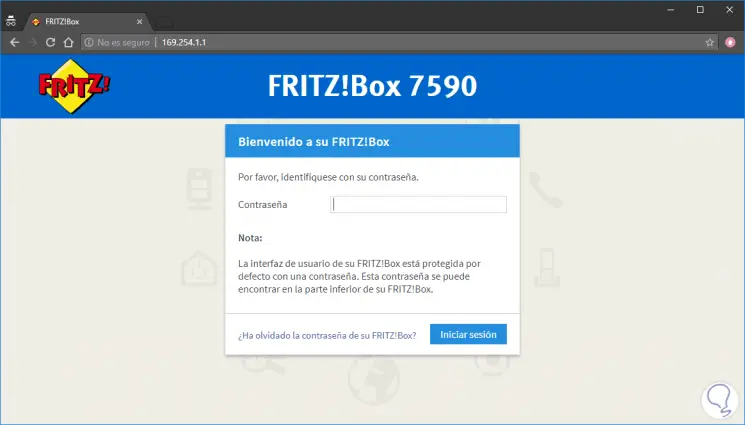
Step 1
The first thing we must do to configure the Fritz! Box 7590 router, logically is to connect it to the current and connect it with cable to one of the LAN ports of the other router that you have on the internet or to a switch where your PC is also connected to be able to get in.
On your PC you will have to put the manual static IP address on your network card:
IP: 169.254.1.2 Subnet Mask: 255.255.0.0
We open the browser and write this IP address at the top:
http://169.254.1.1/
We also have the possibility to put on our PC the IP address and subnet mask statically:
IP: 192.168.178.2 Subnet Mask: 255.255.255.0
To then enter the browser and enter this router address by default:
http://192.168.178.1/
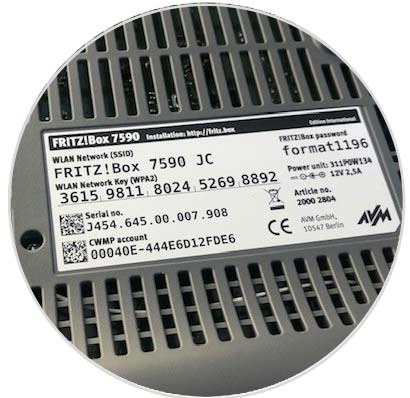
You will see that the option to enter the router appears and we will only have to type the router password that is located under the same router. It is personalized in each model, then you will change it for another one that you prefer.
If you do not know the router password, we remind you that you can reset the FRITZ! Box router password by performing the following steps in this tutorial:
To keep up, remember to subscribe to our YouTube channel! SUBSCRIBE
Step 2
When entering the password, we will enter the router for the first time and an assistant will skip asking for data such as:
- country
- Language
- DSL connection attachment configuration
After entering this data, the router will restart automatically and we can enter the main menu to configure the FRITZ! Box 7590 router.
We must enter the wizard "Configure Internet access", for this enter the menu:
- Configure internet access
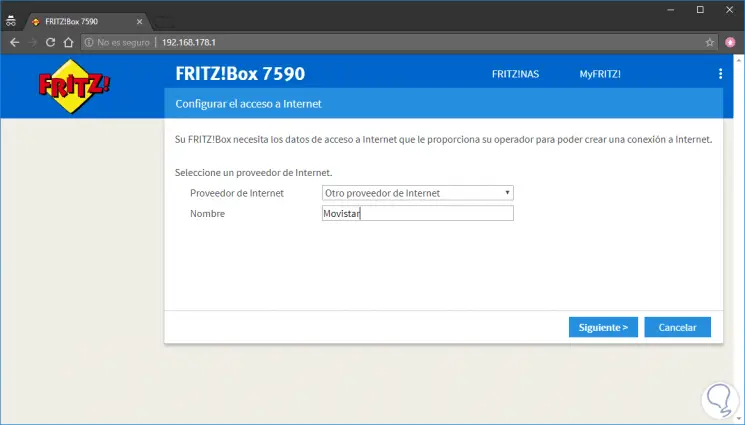
Step 3
We must select the internet provider that we have, in this case of configuration we use Fibra Movistar, when deploying the options we will see that VozTelecom and others come out, we select the option “Other internet provider†and in the name we put “Movistarâ€. Click on "Next" to continue with the configuration.
As you can see in the image, we must configure the Internet access data provided by each internet operator in order to create an Internet connection.
We must write between the following options.
Connect to a DSL connection
We must select this option if we have connected our FRITZ! Box router via cable to the DSL line. Keep in mind that the new DSL modem will be the FRITZ! Box modem that will be used to establish the Internet connection.
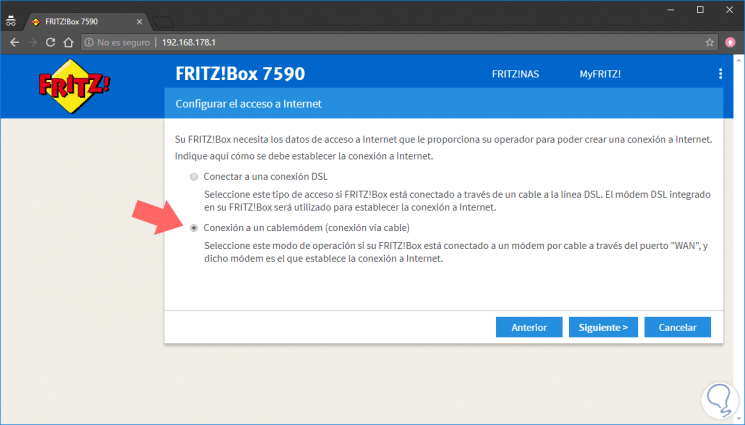
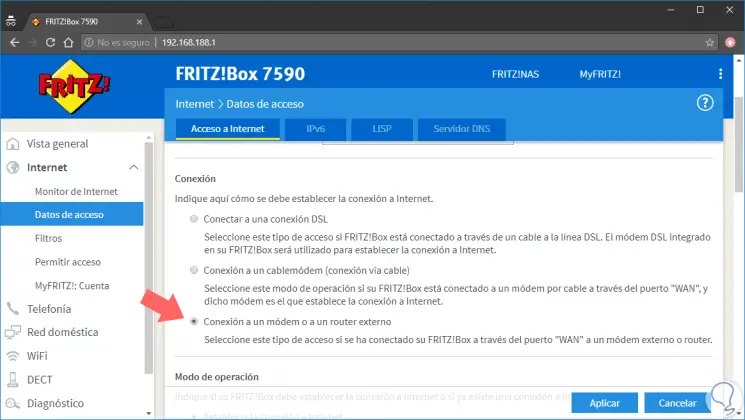
Connecting to a cable modem the network in a WAN port (cable modem or fiber optic terminal)
We must select this option if we have connected our FRITZ! Box router through "WAN" port to an already established Internet connection such as cable modem or fiber optic terminal).
Note
Note that when you use this option, the range of network addresses of your FRITZ! Box router is automatically changed.
In our case we use an example, we will configure it with a Movistar Fiber connection, so we will select the option “Connection to a cable modem (connection via cable)â€.
Step 4
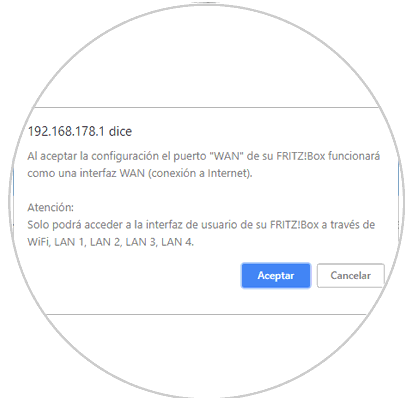
Click on "Next". A warning will be posted commenting that from now on the WAN port on the back of the FRITZ! Box 7590 router will be the Internet connection WAN interface. You can only enter your router through the LAN or Wi-Fi connections.
When you "Accept" the message, you will skip another warning that we do not connect the FRITZ! Box router to the modem cable (in this case the Movistar router). Click on "Next".
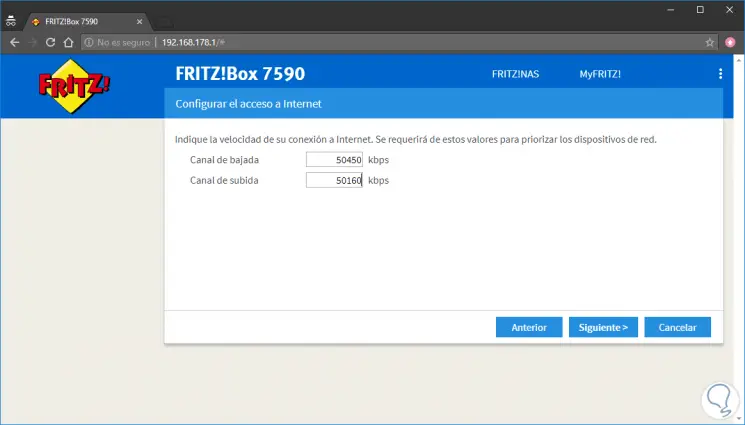
Step 5
Now we must put the download and upload speed, in this case we are configuring it with a symmetric 50 Mbps Movistar Fiber connection would be this data. From an online website like this you can calculate the Kbps by converting Mbps to Kbps:
Mbps to Kbps converter
We leave you some use cases.
We must fill in the Internet connection speed as it will serve to favor and prioritize bandwidth. Keep in mind that everything will be based on the internet speed contracted. We recommend that you check in an Internet Speed ​​Test (try several) to certify the actual download and upload of your internet connection.
In our case there are 50 Mbps symmetric (down and up) that when using Movistar official speed test offers us:
We convert it to Kbps and the data to be entered are those that appear in the image.
Step 6
Click on "Next", a message will appear warning us to connect the connection cable to the Movistar router in this case in order to have an internet connection.
Step 7
Click on "Next" and we will notice that the router automatically restarts to apply the changes. We can see that the connection to the FRITZ! Box router has changed to the IP address 192.168.188.1, so before we can re-enter the router, change the IP address of the PC, for example, IP address 192.168.188.2:
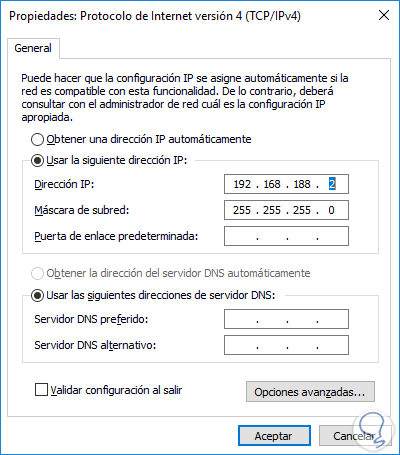
With this we return to the browser and enter the router's IP address:
192.168.188.1
It will appear again to connect. We must still configure some points so that it is correctly configured.
Step 8
Now we can connect in the WAN port of the FRITZ! Box router to one of the LAN ports of the Movistar Router in our case.
First of all, keep in mind that you can deactivate the default time limit on your FRITZ! Box 7590 router, which is default after 300 seconds of inactivity. It depends on the type of internet connection we are using, either because we connect a 3G / 4G modem or in certain countries that have rates depending on the amount of data it is good, but in this example there is no data connection limit per Movistar fiber this limitation is recommended to disable it.
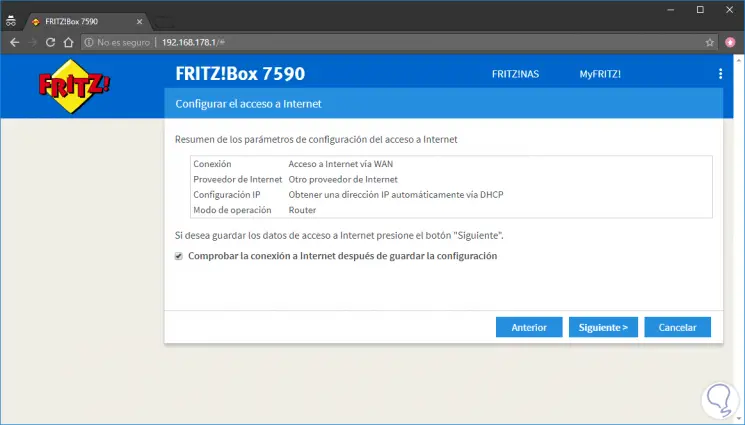
Now we are going to focus on configuring the router to have an internet connection. To do this we go to the following option in the FRITZ! Box router menu:
As you can see in the image, a selected option appears: “Connection to a modem or to an external routerâ€.
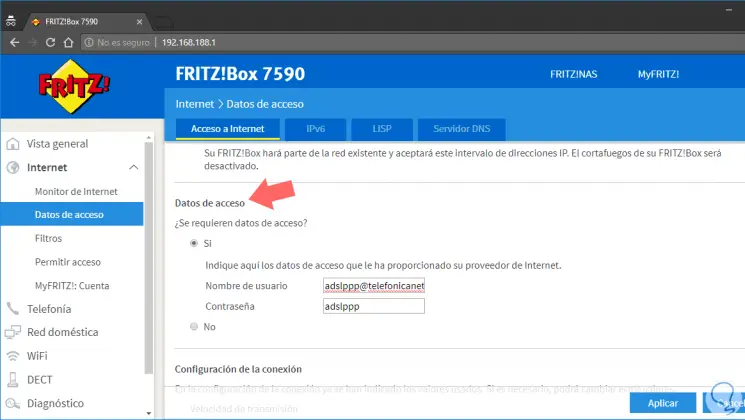
A little further down we can see the option "Access data". Click on "Yes" and we will put this data:
Username
adslppp @ telefonicanetpa
If we continue to scroll down the options, we will see that there is an important option that is the "VLAN Configuration". We must check the option “Use VLAN for internet accessâ€. And in the "VLAN Identifier" we put the "6" which is the data configured in the Movistar router at the beginning.
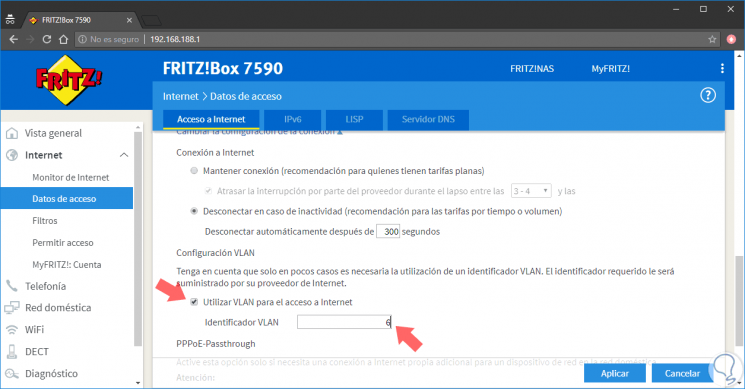
Click on the "Apply" button that appears at the bottom and it will restart automatically to apply the changes made. From this point we will already have the FRITZ! Box 7590 router configured to be able to have internet from here, being able to manage from the router all the security options Firewall, ports, connections, extras etc.
4. How to change router router FRITZ! Box 7590
One of the recommended tasks also to perform for security, is to change the default password of the FRITZ! Box router. No matter the model or version, this is recommended and necessary to do it the first time we configure the router. To do this we follow the following steps.
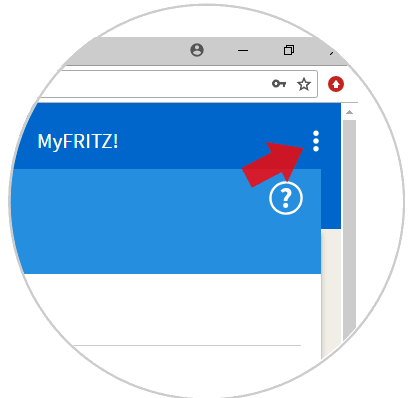
Step 1
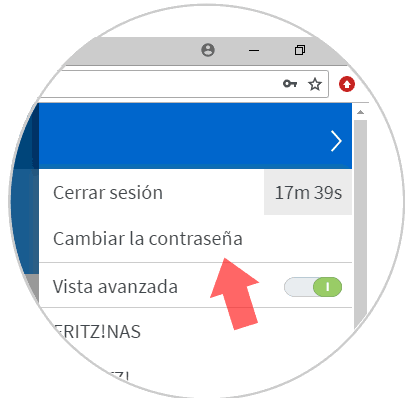
Click on the router menu icon that appears when connected to the top right.
Step 2
Select the "Change password" option.
Step 3
As you can see, now we must put the new password, we recommend that it be safe to prevent it from being unsecure. You have a bar below to see if it is safe or not what you put.
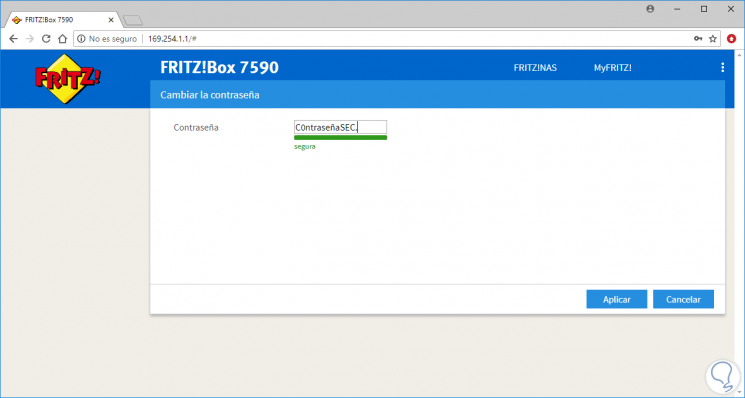
Click on "Apply", and in this simple and fast way, every time we want to reconnect to the router we will have it changed. Remember that if you forget the password you set, you have the option of being able to reset the FRITZ! Box 7590 router so that it becomes the password that appears below your router.
5. How to configure Firewall and Filters parental control router Fritz! Box 7590
One of the most important and interesting things about this router is that it allows us to have a Firewall active to protect our inputs and outputs from network connections. If you do not have another hardware firewall, it is very interesting and important to have this function active. It also allows us to apply "Filters" that serve to limit the use of the Internet with schedules and many more limitations.
Here are some interesting functions to see the potential in action.
Redirect NAT Port
If you need to redirect a port to a specific device you would have to create a NAT (Network Area Translate) entry that helps us to say that requests made to the public IP address to a specific port redirects it to the server we say.
In this example, we have a web server, where we host a web page, and what we want is to redirect port 80 (which is to see web) to a specific server so that the page appears on the internet. To do this, we add this redirection as follows.
- We indicate the static IPv4 address of the web server computer.
- Click on the bottom right in "New authorization".
- We select the application to enable (Port), in this case we choose the 80 that is internet.
- We activate the permission and accept.
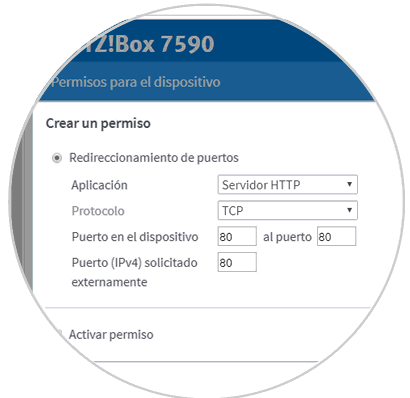
In this simple and easy to understand way we will have this NAT input activated in the FRITZ! Box router Firewall.
Parental Control: Filter hours of internet use
Thanks to some filters like this, it is possible to be able to control active internet hours for different profiles of network devices thanks to the creation of access profiles. These details are greatly appreciated, it is a great positive point of this FRITZ! Box router.
These created profiles will be necessary to determine how long it will be possible to use the Internet, in addition to being able to filter web pages that we do not want to be visited. It is also possible to generate temporary "Vouchers" of loose concrete time for some invited users.
From this link on your network, you can see how much time is left of each device.
http://fritz.box/surf.lua
You can see how much time online each device still has available.
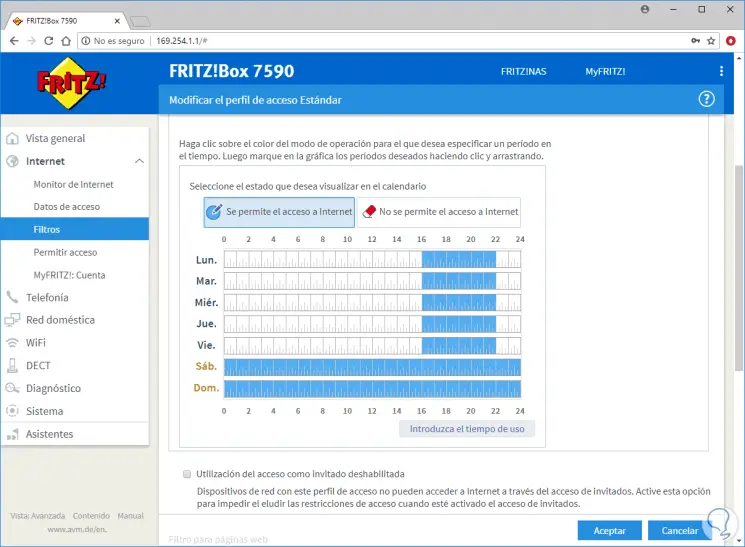
In this section that is seen in the image, you can see how you can manage the schedule that you would leave open to a profile.
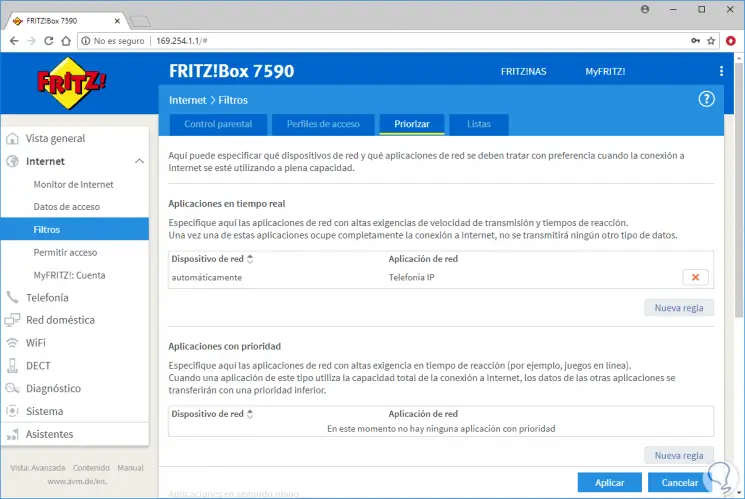
Priority filters devices in internet connection
As the title says, thanks to this filter it is possible to filter the internet connection priority when there are many devices using the internet. For many gamers, advanced users and even pro-os this will be very useful to control the connection bandwidth, giving priority between some devices and others.
We have explained some options, but we recommend that you continue investigating because it offers more possibilities of control and analysis of ports.
6. How to configure Wi-Fi router FRITZ! Box 7590
This is one of the basic tasks that we must configure in order to have the WiFi connection correctly implemented in our Wireless network zone.
The first thing would be to configure both the name of the connection, implement the access password and select the connections we enable 2.4 | 5 Ghz
Rename WiFi connection and enable or disable bands
We connect to the router and enter the next area of ​​the main menu.
We scroll down and we can see how you see in the following image, the possibility of changing the names of the WiFi connection plus the checks to enable or not the different bands.

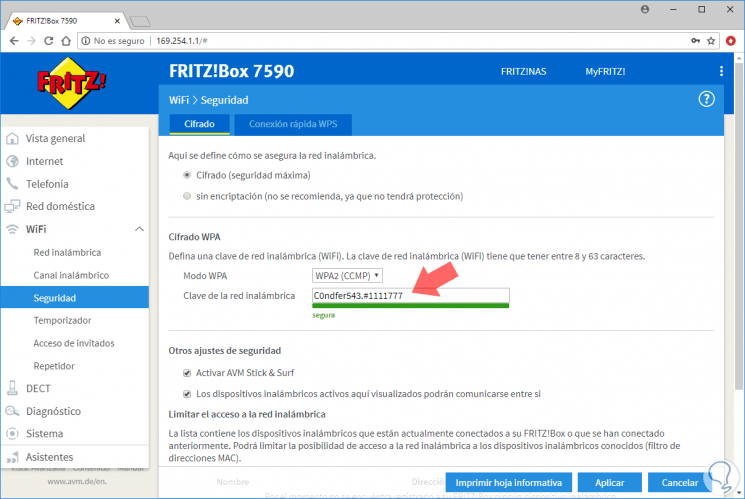
Change password WiFi connection
Another basic task that we must perform is to change the WiFi access password as we detail below.
We enter the next area.
As you can see, it is a simple menu, you can see how the encryption selection option appears (We recommend WPA2) and then put a secure password.
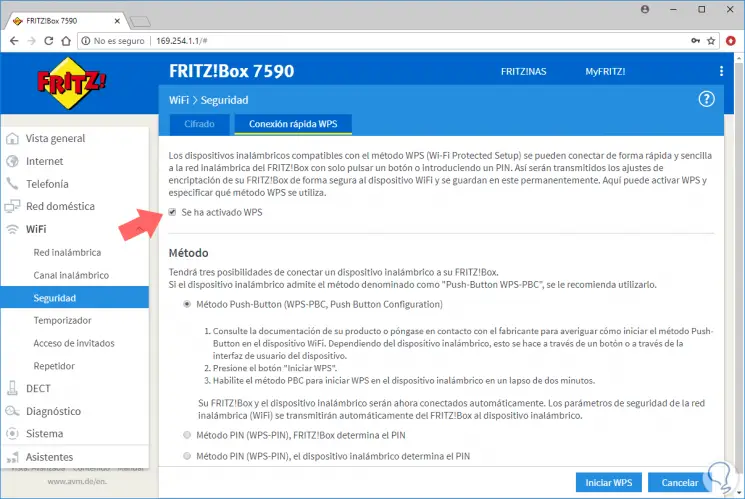
Remember that this router offers the WPS connection that would work that just by pressing the Connect / WPS button we could connect devices in a certain time (without having to enter WiFi password).
If you want to activate or deactivate the "WPS Quick Connection" option. Enter the next menu area.
If you want more detailed information here we leave you the official FRITZ! Box 7590 router manual.
FRITZ! BOX 7590 MANUAL
As you have seen, the configuration options on this FRITZ! Box 7590 router are very interesting and complete. In future tutorials we will continue making practical parts of the most demanded among you all.