Measures in Power BI, as we already know, are expressions or formulas that work with the DAX language, the specific Power BI language that is used to perform operations and calculations on our tables.
As we already explained in how to make a measure in Power BI, calculated fields and measures are two ways to perform calculations and operations on our tables. The measurements offer the advantage of offering a more fluid, lighter and professional experience when making calculations, since as we have seen they do not add extra weight to our data..
The reason is that the measures, although it is true that they are created and located in a specific data table, are not added as a new column to the tables. But nevertheless if they are created as one more field in our data table that is available to be used when we are in the final phase making the reports, when we are making tables and graphs in the visualization view.
Using the measures, as we already explained, we can do many of the operations that we do with the calculated fields, with the advantages offered by making a measure by not having to create new columns, by not adding unnecessary extra weight to the project..
With the measurements, we can perform almost any operation that comes to mind. The functions that we use to be able to do calculations, such as SUMX, work perfectly when performing a measurement, and as we have explained to you, other highly valuable functions such as Related and Calculate are functions that we can include in an expression or formula in Power BI. Related to be able to operate on columns found in other tables, and Calculate to be able to perform any operation using conditionals or filters to get specific results.
The difficulty in this case, when working with Power BI, or with other data management and visualization tools, lies precisely in the infinite number of functions that exist and that we can apply, but as long as we know them. In the case at hand, in Power BI, we also have a specific language that is DAX, and that has a different form of expression..
But, what if we told you that you can create any formula or expression in Power Bi , without knowing the functions you should use, and without knowing how to use the DAX language, and easily? Yes, it is possible, and then we will explain how. We are going to explain how to create any formula in Power BI.
Using the DAX language in Power BI is probably the most difficult part of learning and using the tool. Difficulties in this regard can arise in several ways:
- We want to create a formula or expression so we can use a function, but Power BI gives us an error because we made a mistake somewhere in the expression.
- We want to create a complex calculation in which we want to involve several columns of our tables, such as to make conditional formulas or with filters.
- Other times, especially at the beginning, when we are starting to use Power BI, we may have the question of what function or functions we should use in our formula, and how to represent them in the expression in the correct way to achieve the expected result.
1 How to create any formula in Power BI
There is a way to be able to make a formula or expression in Power BI, a way to create complex formulas quickly and effectively, using AI insights. Using ChatGPT we can not only create the general syntax of the formula that we want to perform, but we can also create the exact formula adapted to our project, so that we can copy the formula and use it directly in Power BI.
With this resource, you will be able to create practically any formula without needing to know the name of the functions. And the most important thing is that we can create the formula adapted to our specific case.
In order to create a measure in Power BI, or the formula of a calculated field, we must give the appropriate instructions so that the formula that we are going to obtain contains the names of our tables and columns in the syntax, as we have said so that we can use the formula directly without changing anything.
Steps to create any formula in Power BI
In order to create any formula in Power BI using AI, we're going to go to the Open AI URL so we can log in and use ChatGPT.
ChatGPT

When landing on the Open AI website, it will ask us to log in, so we click on LOG IN or REGISTER to be able to use the chat and make inquiries. If you don't want to create a record, you can click sign in and log in with your Google, Microsoft, or Apple account.

Once we have logged in, we can use the wizard to make our queries.

Now, we are going to work with an example where we have a sales database of a company that sells computer products, and has a presence in 3 countries: Spain. Mexico and Colombia. In the database we also have the sale assigned to the person who made the sale. We are going to use this example to be able to create some specific measures in Power BI using Chat GPT to create the formulas with the indications that we are going to give in each case.
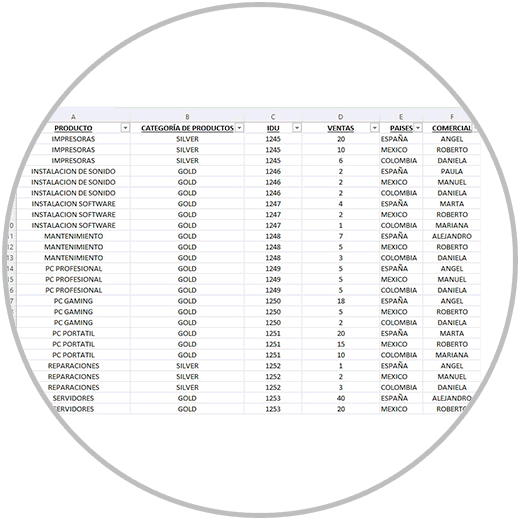
Step 1: Import file into Power BI Desktop
The first thing, as we already know, will be to import our database into Power BI Desktop, which in this example case is in an Excel file.
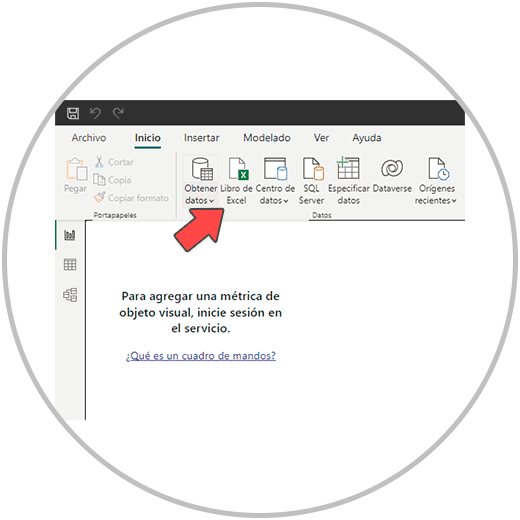
Once the file has been selected, in this example case we are going to upload the two sheets that the EXCEL contains, since in one we have the fact table, and in another we have the unit price of each product, in order to later calculate the income. Therefore, we have to select the two sheets and click on “Transform data”.
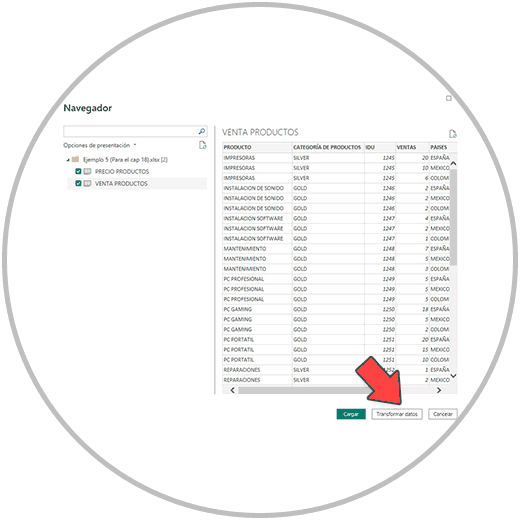
Step 2: We review and transform our data in the Power Query Editor
Now, as we already know, after clicking on transform data, the Power Query editor will open from which we will be able to transform the data. In the example, we check that the data is correct, there are no errors, or page breaks, that we use a common criterion in the concepts so that the data can be grouped correctly, etc. We review the format of the columns, and in the "PRODUCT PRICE" query, as you can see in the image below, we are going to change the format to a currency format, to the "Fixed decimal number" format.
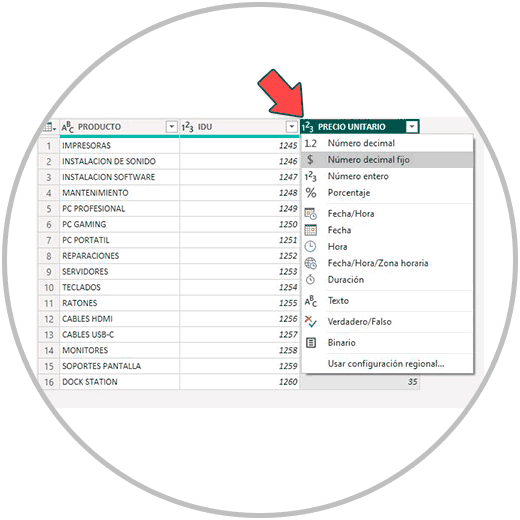
Now that we've reviewed and transformed the data, we apply the changes and close the Power Query editor from the taskbar. As we show you below in the image:
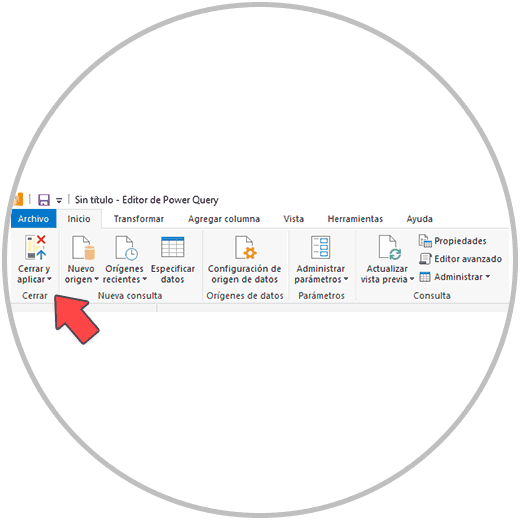
When closing the Power Query editor, the import of the data is finished, and we will automatically see that, if we go to the "data model" tab, as in the image, a relationship has been established between the two tables. When importing two Excel sheets, these in the data transformation phase were converted into queries, and when we close the Power Query editor we will see that each one has been converted into a table.
Step 3: How to relate tables in Power BI
Since the two tables have, on the one hand, the name of the product sold, and, on the other hand, a column with a unique identifier, it has been possible to establish this relationship between the tables, which, as you know, is a fundamental step to be able to carry out later operations and calculations with the entire data set.
In any case, if this relationship between tables has not been established, or you want to change the type of relationship, remember that from the control panel in "Manage relationships" we can configure and change the relationship established by default. Or directly from the model view, placing the cursor over the line that joins the tables, as in the image, we can click on delete the relationship.
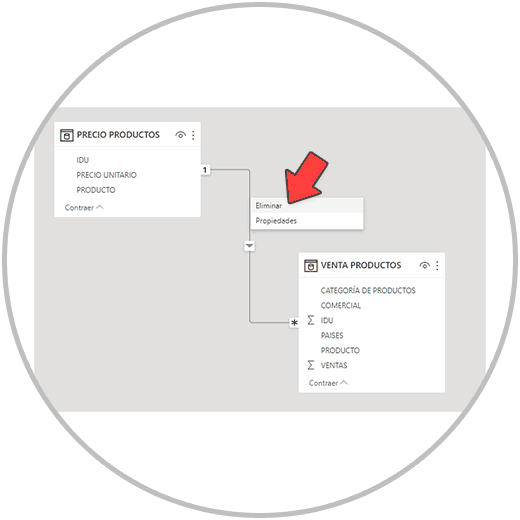
We can also establish the relationship we want manually by manually dragging the column from the model view, dragging the field or column where the unique identifier is (which in the example is the IDU column or field) to the unique identifier column of the other table .
Remember that ...
If at any time you have doubts about which columns are being used in the model to connect the tables, by clicking on the line that connects the tables, the key column that connects the tables will be marked in a darker color.
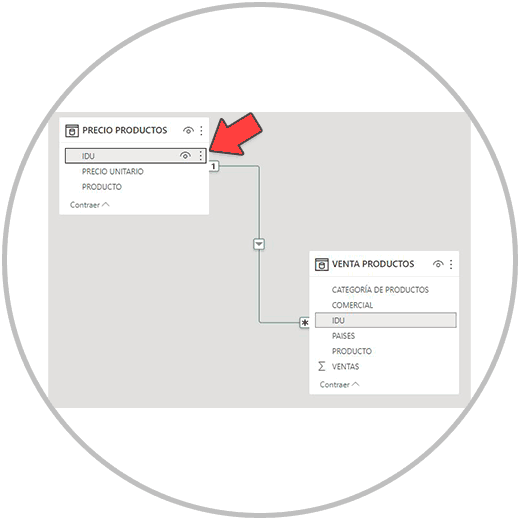
Once we already have the model created, that is, once we already have the data imported into Power BI, once we see our connected data tables in the model view, we can now perform operations and calculations on the tables, using all columns or fields. We can now add columns to our tables, in case we want to make calculated fields, and most importantly, we can now make measurements using formulas that use fields from different tables for the calculation.
As we already know, calculated fields in Power BI are useful for performing operations. But in this sense, and using the logic of "whenever we can", we are going to try to create a measure in Power BI so as not to add extra weight to our project, so as not to slow down performance, and to use this very interesting way of creating calculations and operations, already thinking about what will be our final report.
As we have already seen, making a formula to calculate a measure can be complex if we do not know how to interpret DAX well, it can be complex because we want to perform a calculation and we do not know which functions to use to obtain the result, and it can be complex because we want to perform a complicated operation using a lot of information. The use of each function requires the use of a certain expression.
Power BI offers, whenever we use a function in the operation bar, how the syntax of the formula to be carried out should be, as well as a brief description of the function and what it is for.
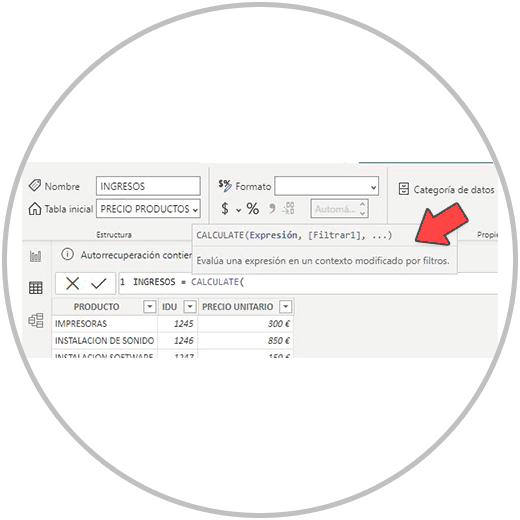
However, for the reasons already mentioned, the realization of the formula is not easy. It is in this moment of difficulty, when we can resort to the use of AI. It is not just about using AI to generate the formula, but about using AI to learn how to use DAX ; We are going to learn to know which functions to use best depending on the operation that we want to perform at each moment.
Of course we can ask ChatGPT for the syntax of a specific function, and we will get an answer with the schema of the formula. But we can go one step further and ask ChatGPT to generate the concrete and specific formula to perform the calculation we want.
In order to obtain a specific ChatGPT response, we must make a specific query, in which we are going to specify not only the calculation we want to perform, but also the names of the columns and tables where our data is located.
Step 4: Create a formula in ChatGPT for Power BI
So we are going to try asking for something simple, to see how ChatGPT returns the formula. We are going to ask you to generate a formula to make a measurement that multiplies the sales by the unit price to be able to calculate the income, which if we remember the sales and unit price columns are in different tables.
To generate the code for us, we write the following text where we specify the names of our actual tables and our fields or columns in quotes so that we can use the formula directly.
The text that we write in ChatGPT would be the following:
"Hello, I have a data model in Power BI with connected tables and I need to create a measure in Power BI called REVENUE to be able to multiply by rows the column "SALES" of the table "SALES PRODUCTS" by the column "UNIT PRICE" from the "PRODUCT PRICE" table. I need it to take the row context into account because there are multiple products that have different prices. Thank you"
As you can see, we are not indicating in our query the function we want to use, nor how it should be created. We are only explaining the operation we want to perform, indicating exactly the column and table names in quotes; And we are saying to take into account the row context, which in this case will be important to be able to perform the calculation correctly since we have several products with different prices. Therefore, in order to calculate the income correctly, the No. must be multiplied. of sales of each product, by its unit price, and then make the sum of all the income per product in order to have the correct total data.
The result we have obtained is the following:
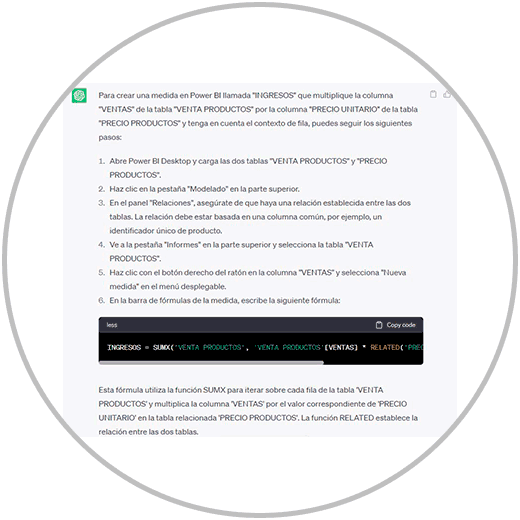
As we can see, in the response we obtain the steps to be carried out, and the specific formula that we must use to be able to carry out the specific measure that we have requested.
From the answer itself, we will find a window from which we can copy the code directly, by clicking on “Copy Code”.

We then click on “Copy Code” and open Power BI again, open the project we were working on, where we had already gone through the transformation of the data, and connected the data to our model.
What we'll do now is go to the data view in Power BI.
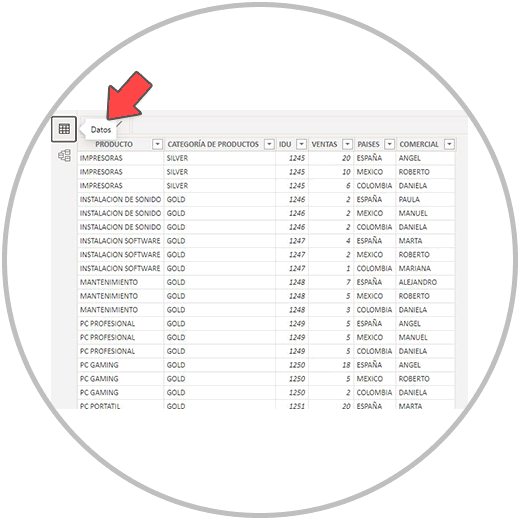
Step 5: Paste formula in Power BI Desktop
Once Power BI Desktop is open, on the right, in the "Data" view, we will select the data table from which we want to create the new measure. In our example case, we are going to create it in the table “VENTA PRODUCTOS”.
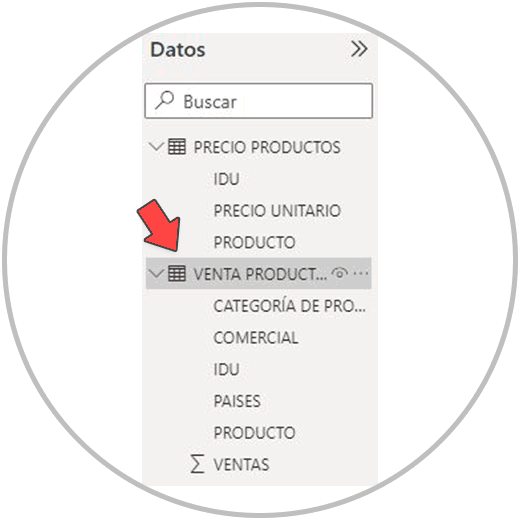
We click on the "PRODUCT SALE" table and on the taskbar, we will now look for the "New Measure" option.
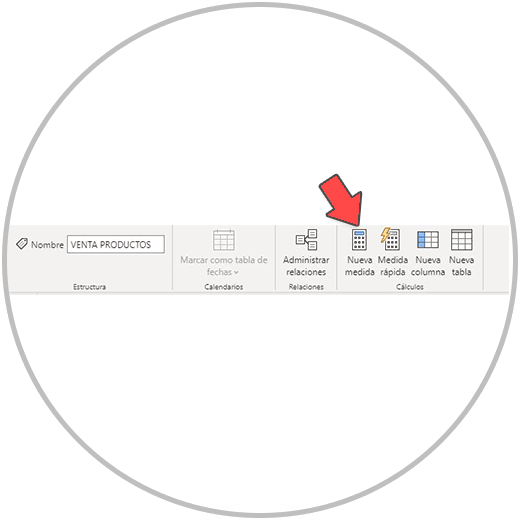
Now in the formula bar, we are going to paste the formula that we had copied from ChatGPT. As we had already indicated in the query that we wanted a measure in Power BI called income, by going to the Power BI Desktop formula bar, we are going to delete the name that Power BI gives us by default, which is called "Measure". , and we are going to paste the code or formula by doing CTRL + V.
Once we paste the formula, we click Enter from our keyboard, or as in the image below, we validate the formula with the check.
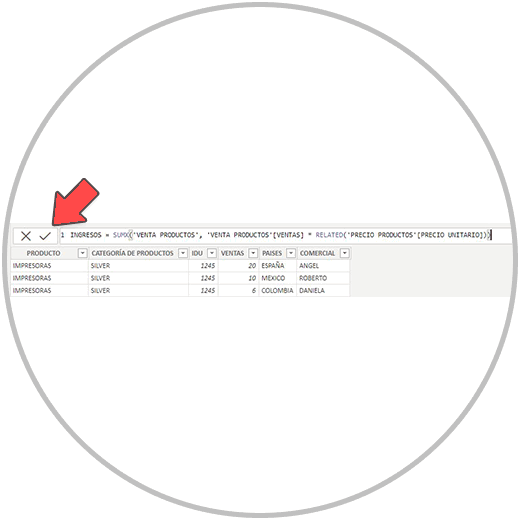
Now we have our measure created. We will always check, especially when we create a measurement based on Artificial Intelligence, that the measurement created is correct. In order to be able to create a specific correct formula, and especially when we use AI tools, we have to make sure that the query we are making is the correct one:
- We must specify in the formula the operation to be performed correctly, it does not matter if we repeat a message as in the example so that the query is clear and concise. As in the example, we've insisted that we want it to take row context into account.
- It is very important that, when we want a specific formula to be made, as in the example, we use the names of columns and tables, as well as other concepts that we use or reference to values of our columns, are written in the same way, so exact.
- The third factor to take into account is to always check that the measure has been created correctly. In order to verify that the formula is correct, in this case the formula of the measurement.
Important
In order to verify that the measurement created is correct, we can perform several actions that help us confirm that the measurement is correct. Confirming that the created measure is correct is a task we need to include in our process early on, when we're taking our first steps in Power BI, and it's something we need to do whenever we use AI to generate a formula. In some cases, like in the example, if we don't clearly specify that we want the row context to be taken into account, Power BI might fall back on other functions like SUM (instead of SUMX) to perform the calculation. As we learn to use formulas and functions, we can also be more explicit when making a query to ChatGPT and other AI tools.
2 How to check that a measure is correct in Power BI
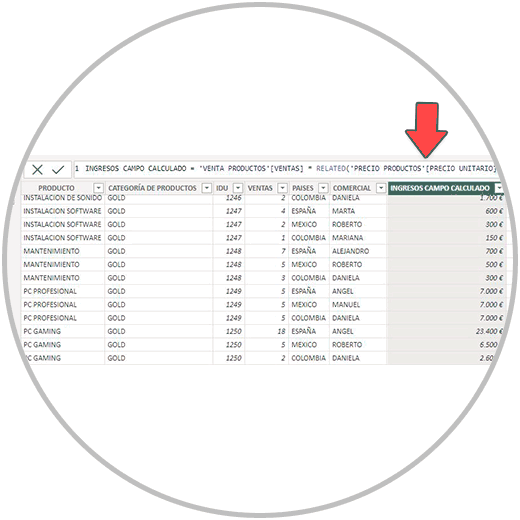
To check that the formula is correct, we can create a calculated field as we already know, and we explain how to make a calculated column in Power BI. We would add a column and perform the multiplication. In another column, we would make another calculated field where we would only have to specify in the formula that the operation to perform is = to the measure created. We compare the two calculated columns, and see if at the row level we get the same result. Look in the image below how we have created a new column called "INCOME CALCULATED FIELD" where we perform the simple operation of multiplying the sales column by the unit price of the product, using Related as we already know because the unit price is found in another table.
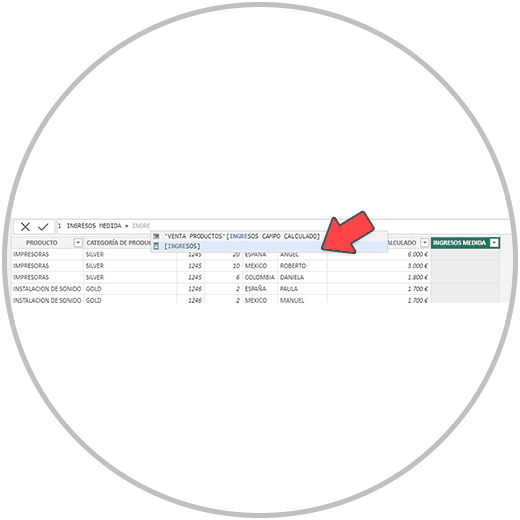
On the other hand, in the same table, on the right we create another column that we have called "MEASURED INCOME" where we are going to simply specify in the formula bar that we want that column to be = to the measure created. Look at the image below, how we can use the created measures also to make a calculated field. When you start writing after the = the name of the measure, it will let us select the measure created to perform the calculation.
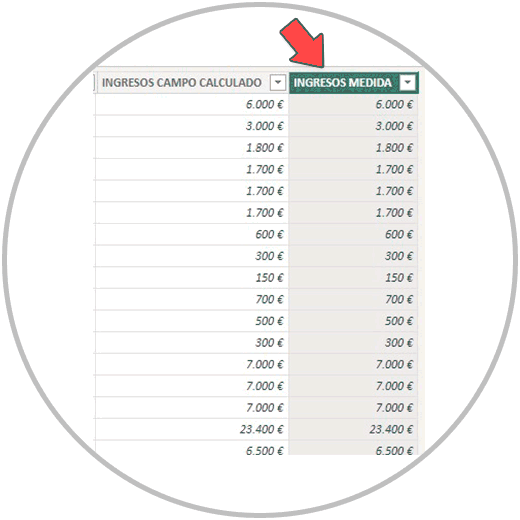
As we can now see in the image below, if we compare the two columns, we will see that the result is the same.
Another way to check that the formula created for the measure is correct is to create a table. We can go to the "Report" view in Power BI Desktop, and make a simple table where we are going to choose the measure created in the column of fields. We will check from here that the calculation made is correct. If necessary, as we have explained in the previous point, we could include the measure and the calculated field in the created table to see the totals. Above all, when we do a multiplication, subtraction, division operation, we should better use the e SUMX function as we have already explained, so that the calculation is correct in cases of having to take the row context into account.
We can make a simple table from the "Report" view in Power BI by clicking on the table icon that, as in the image below, we will find among the different options in the "Visualizations" menu; And selecting after choosing the table, on the right, the fields that we want to show. In this case we select the product field, and then we select the income field that we have made by making the calculated field (which we have called “INCOME CALCULATED FIELDS”). Then we would select the field of the measure created, which if you remember we call “INCOME”.
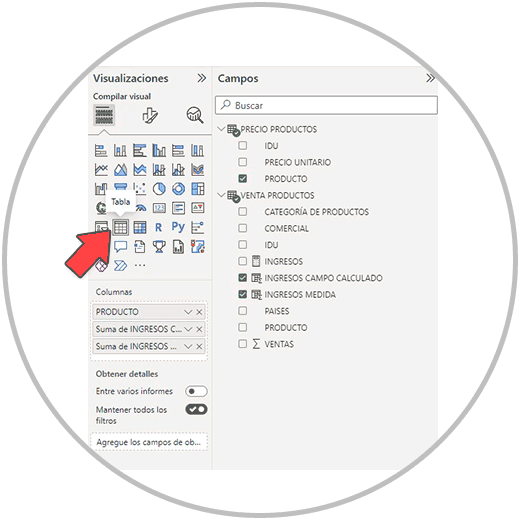
We will see how the table is created as we select the fields. And when we have selected the two fields (the calculated field and the measure), we will be able to see the table created where we can compare whether the measure and the calculated field give the same results.
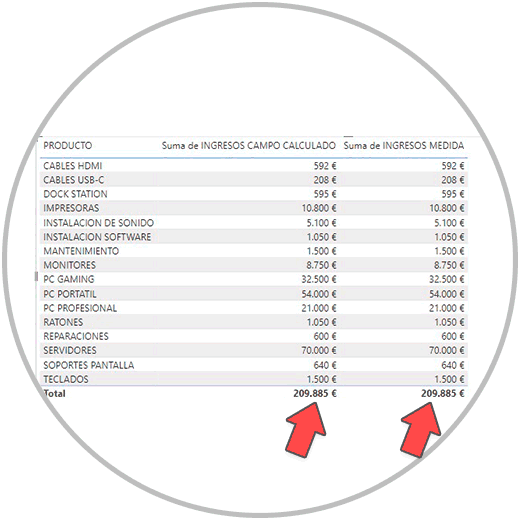
As we can see in the image, the totals are correct, and the results at the row level by product would be correct.
Using the AI to generate formula, we can create more complex formulas where, as we have explained to you, we can create even without knowing the names of the functions to use.
As an example, to see the usefulness of AI when creating formulas, we are going to see how to obtain a more specific result, continuing with the example.
We are now going to ask ChatGPT to generate a formula for us to create a measure that calculates the sum of sales of sales of a commercial named Paula, but we only want to know the sum that this person has made of the products categorized as GOLD.
This is the query we make to ChatGPT to generate the formula:
"I want to perform a measurement in Power BI on the "PRODUCT SALES" table called "SALES GOLD PAULA" to obtain the sum of the sales in the "SALES" column but only of the products categorized as "GOLD" in the "CATEGORY" column OF PRODUCTS" made by the commercial "PAULA" in the "COMMERCIAL" column
We get the answer with the explanation of the formula that we must carry out, with the steps, the code or formula that we should use in this case, and with the explanation of the formula.
We follow the same steps as before creating a new measure and pasting the formula that we have obtained from ChatGPT. Now in the "Report" view in Power BI Desktop, we are going to choose a card, in order to see the result of the formula. And we choose on the right in "Fields" the new measure created, as in the image below:
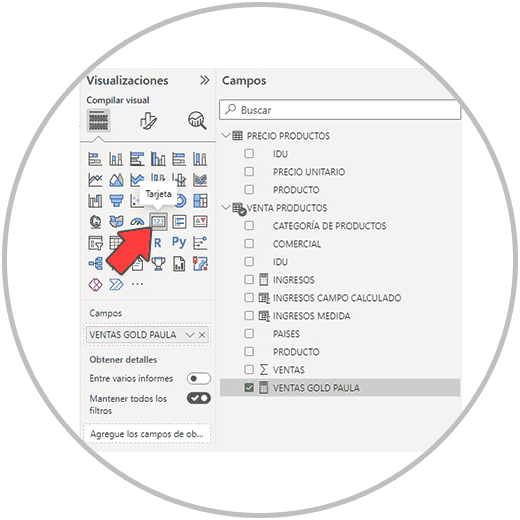
Now, as we are going to see, in the report view, a card has been created with the result we were looking for.
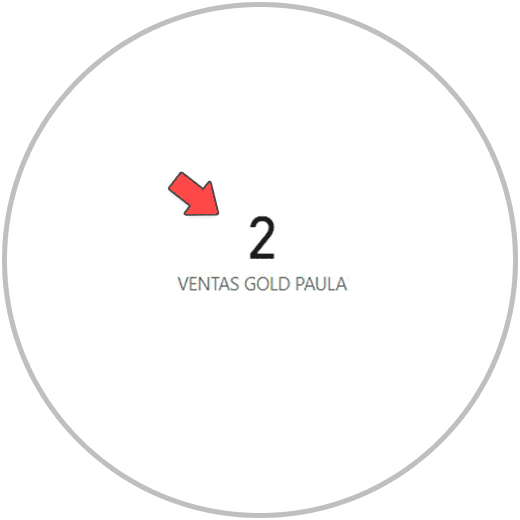
If we check this result, we will see that the calculation made is correct.
In this way you will be able to generate in Power BI the formula that fits the calculation or calculations that you want to perform. You don't need to know all the Power BI features to be able to do more complex calculations that require the use of features you don't know. But the most important thing is that you make a query in the correct way, in which we must always put:
- The name of the measure we want to perform
- The name of the table where you want to create the measure and where the columns you want to use to perform the operation are located
- You must of course always put the name of your columns or fields that you want to include in the formula, as well as the concepts by which you want to filter the information
- Remember to always put all the names as they are, and always put them in "quotes" helps to make it clearer that a column, table, has the same nomenclature.