One of the hardware elements that will always be present in all types of operating system and that will be useful is the printer , we have seen how these have been at the forefront of the latest technologies, because today we have printers that connect through Wi-Fi network, multifunction printers and many more, but all have the common objective of capturing everything we carry out in the system and its programs, documents, images, presentations and more..
Within the entire printing process a vital point is carried out that allows everything to be carried out in the correct way and is the print queue, this print queue has been developed as a queue where all printing tasks wait in a image controller until they are printed and thus release this queue, this queue is generated because the printer buffer has the ability to store all documents, so it gives rise to the print queue where the elements will be stored to print.
In these print queues, the data that needs to be processed is based on the order of arrival, so, the first item that arrives is the first one that will be printed but in some cases, speaking of Windows operating systems, it is possible that Let's see some error message associated with the print queue , this indicates that this function is not working in the correct way or that some component of it is with errors and thus cannot interact correctly with other programs to execute the printing ..
TechnoWikis will explain how we can repair the print queue in Windows 10, 8, 7 and thus allow all print jobs to work properly.
1. Edit Print Queue Properties to repair Windows 10 printer error
The first method to analyze is to access the services of the print queue and there validate certain parameters, remember that if the service is failing or incorrectly configured, it will have an impact on the way the print will work.
Step 1
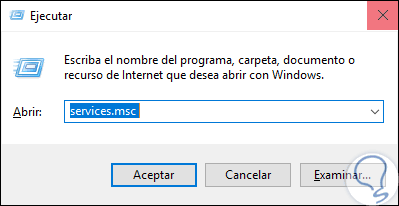
To use this method, we will combine the following keys and execute the “services.msc†command:
+ R
Step 2
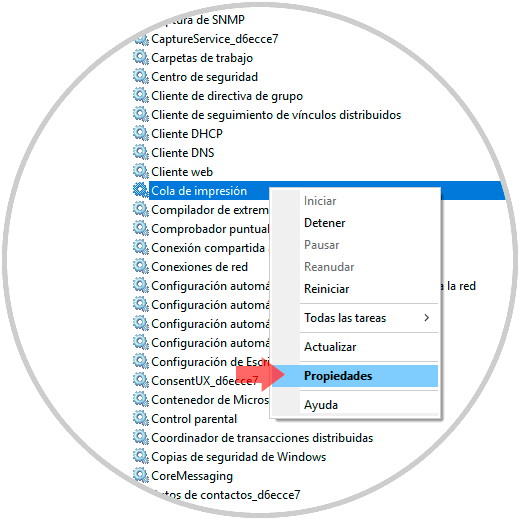
Press Enter or Accept and in the displayed window we must locate the service called “Print Queueâ€, there we will double click on it or right click> Properties:
Step 3
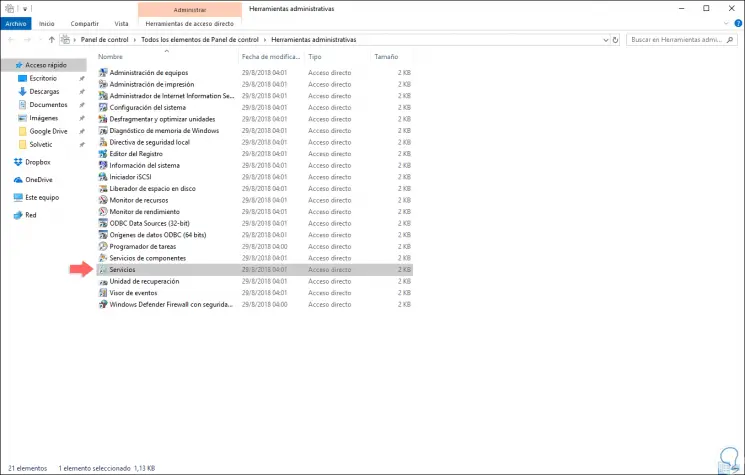
Another way to access these services is on the route:
- All the elements of " Control Panel ".
Step 4
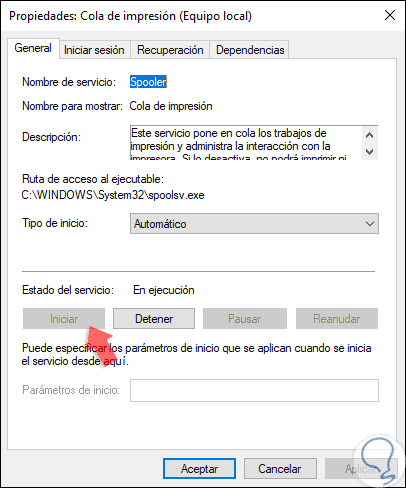
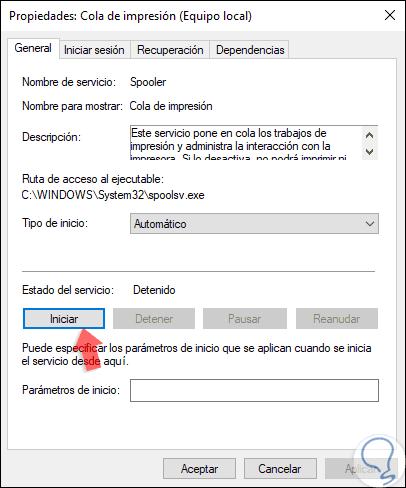
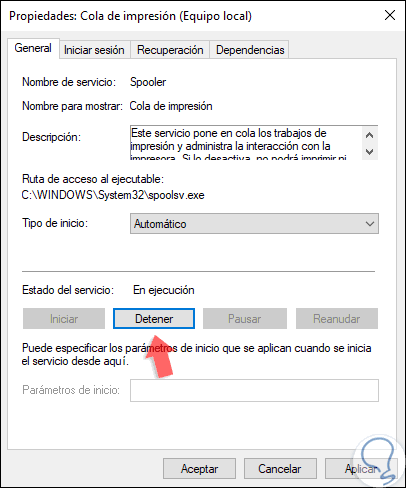
There we will double click on the “Services†section and proceed to locate the “Print Queue†service. In the service properties window we go to the "General" tab and first click on the "Stop" button:
Step 5
Some errors can be corrected by stopping the print queue and starting it again, so once the service is stopped, click on the "Start" button to restore the service again and check the printing, the problem should be solved:
Step 6
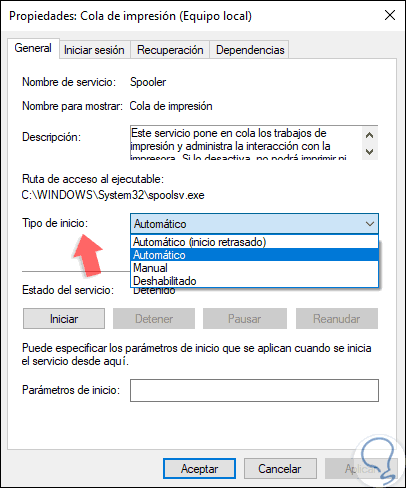
Another option to use with the printing services in Windows, is to validate that the service is being started automatically, if this section is in manual it is possible that the service fails, so that being automatic we will have the certainty of that this will always be executed.
In the properties of the service, in the "General" tab, we can display the options of the "Startup type" field and select "Automatic" there. Click on "Apply" and "Accept" to save the changes..
Step 7
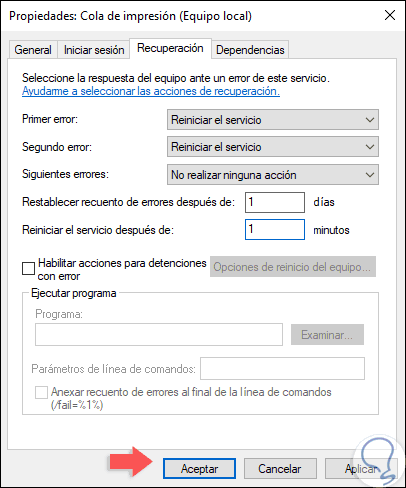
This automatic start applies to the print service where the print queue is included. In addition to this process, it is possible to edit the recovery options which carry out certain actions in case of failures of the service in question, for this we go to the “Recovery†tab and there we configure the following values:
- First error: Restart the service
- Second error: Restart the service
- Following errors: Do not take any action
- Reset error count after: 1 day
- Restart service after: 1 minute
Step 8
Once this is done, click on the "Apply" button to save the changes.
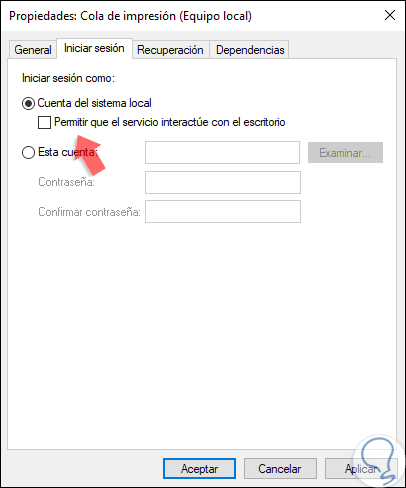
Now, another of the tasks that we can perform within the printing service in Windows is to avoid its interaction with the desktop, this, although not common, can be causing the service to fail due to external processes, to disable this option, We will go to the tab "Start session" and there we deactivate the box "Allow the service to interact with the desktop":
Step 9
Click on "Apply" to save the changes and it is ideal to restart the device so that the changes are effective and we can check if the printing works correctly.
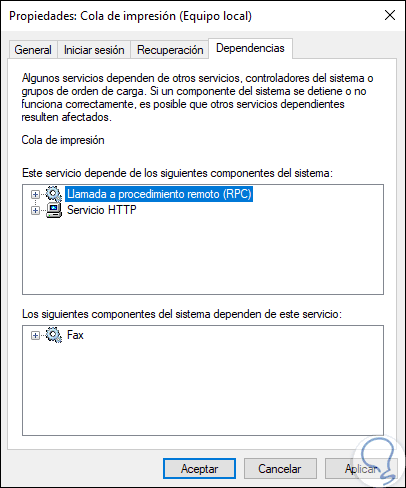
If not, we can continue in the printing services, this time we will check the dependencies, this since some Windows services depend on other services for optimal operation, so if any of the dependent services fails it is print may also do it.
To validate this we will go to the “Dependencies†tab and there we will see what services are dependent on in real time:
Step 10
Now, we must check each of these services that have the following parameters:
- Validate that the status "Started" is found in the "Status" column.
- Check that in the "Startup type" field it is "Automatic".
If not, we must access its properties to make the changes.
2. Reset the printer status to repair Windows 10 error
Step 1
Another option with which we have is to carry out some tasks on the default values ​​of the printer, first, we access the service properties as we have seen and there we click on the “Stop†button to deactivate the service Print:
Step 2
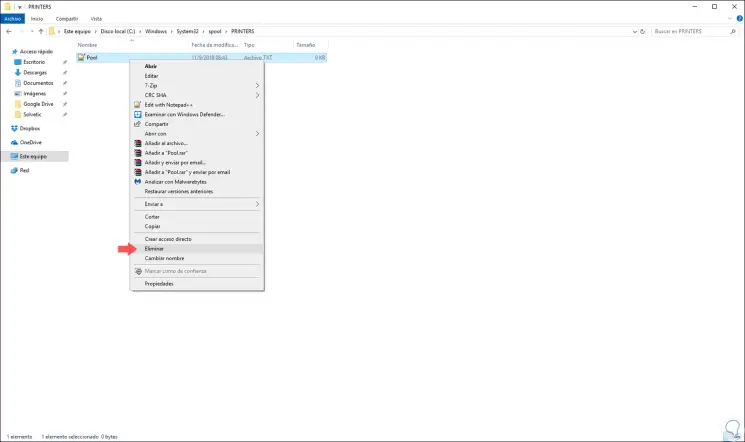
Now we will go to the following path in the Windows file explorer:
C: \ Windows \ System32 \ spool \ PRINTERS
Upon entering the folder you will see that you can delete it without problems.
Step 3
There we must access this folder and delete all the contents of PRINTERS but not the folder itself. Now we must go back to the properties of the service and click on the "Start" button to activate the printing service.
3. Update drivers to repair Windows 10 printer error
TechnoWikis has often recommended updating the drivers periodically since as the operating system releases new versions, as well as the programs and applications, it is normal for the devices to work, but erroneously, so that when we update them we are getting them to work the way it should be and you will notice that the error can be solved in this way.
Step 1
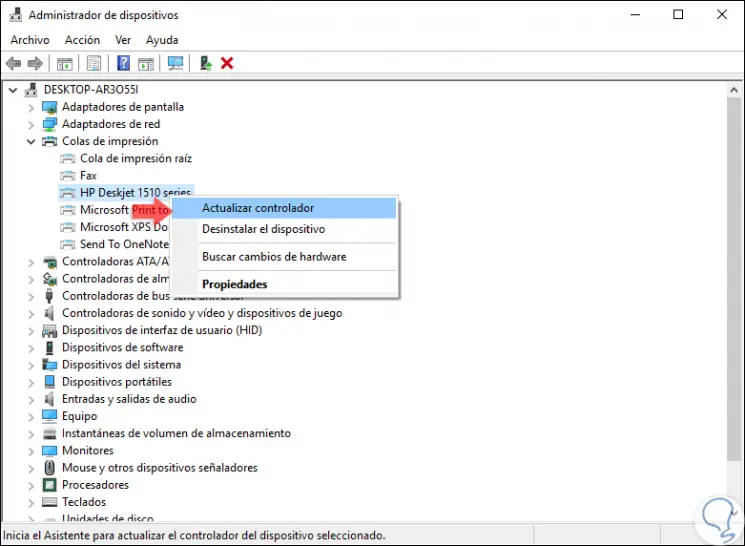
For this update we will go to the Device Manager using one of the following options:
- Using the following keys, or right click on the Start menu, and there select "Device Manager".
+ X
- Using the Windows + R keys and executing the devmgmt.msc command, press "Enter" or "OK".
+ R
Step 2
In the displayed window we will go to the "Print queues" section and there we will right click on the current printer and select the "Update driver" option.
Later we can update the driver automatically or locally if we have downloaded the latest update available.
4. Remove printer from Windows 10 system
Step 1
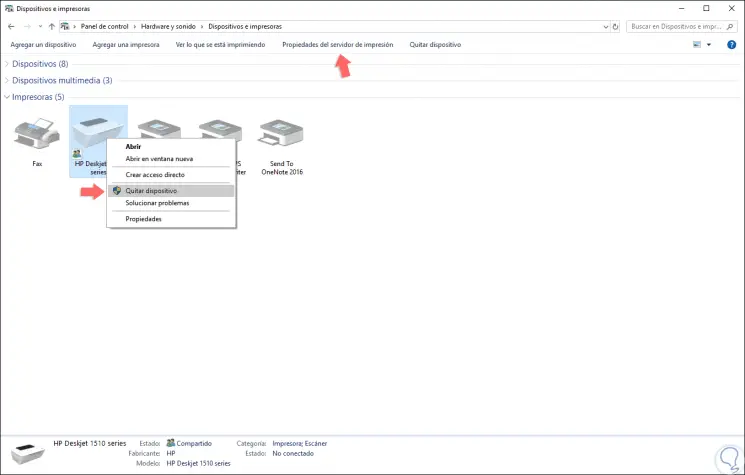
In case the error persists and no solution is found, another alternative to use lies in the possibility of removing the printer from the system and then installing it again, this allows all the default values ​​to be restored, for this we will go to the next route:
Step 2
There we will right click on the printer with error and select the option “Remove deviceâ€:
Step 3
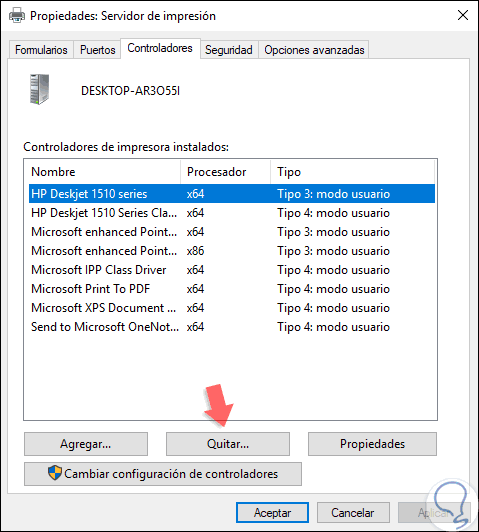
Alternatively, we must remove the drivers of said printer, for this we click on the "Print server properties" option and in the window we will go to the "Drivers" tab.
Now we select the printer and click on the "Remove" button located at the bottom. After this we can install the printer again and check that it works correctly.
5. Check file systems to repair Windows 10 error
Step 1
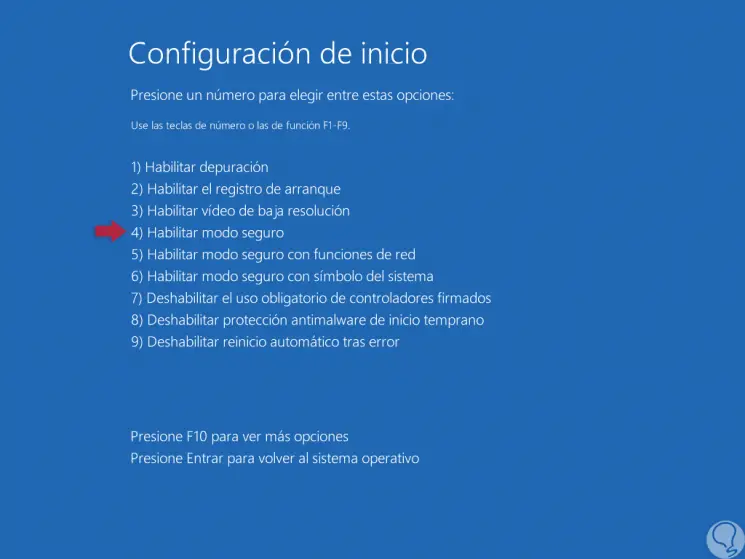
For this process it is recommended to access in safe mode, to know how to achieve it we can go to the following link:
Step 2
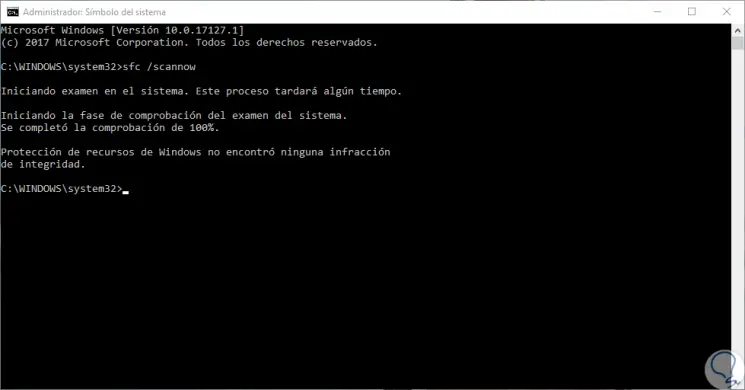
Once we access this mode, we must open the command prompt console as administrators and then execute the following:
sfc / scannow
Step 3
SFC ( System File Checker ) is a utility integrated in Windows thanks to which a detailed analysis of the file systems is made in search of errors, so if they exist, they are corrected.
In case we see the message "Windows Resource Protection found damaged files and repaired them correctly", it will be necessary to restart the computer in normal mode and then print to validate its function.
If the message is: "Windows Resource Protection found damaged files and failed to repair some of them" it will be necessary to continue with the steps of the wizard. If any failed file has been generated, we must execute the following line in the console.
findstr / c: â€[SR]â€% windir% \ Logs \ CBS \ CBS.log> â€% userprofile% \ Desktop \ sfcdetails.txtâ€
This will create a text file with the details of the failed files that we can access to check what the problem is.
6. Manage print service content in Registry to repair Windows 10 printer error
Step 1
Now we will see some other additional processes that will be of great help to correct this error, first, we can go to the next route in the browser.
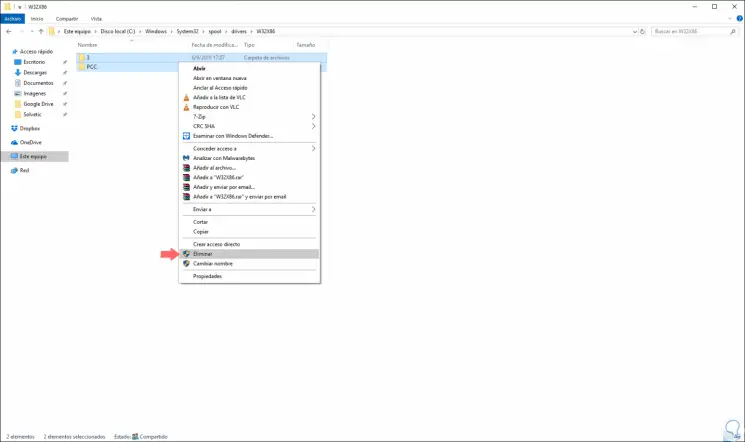
C: \ Windows \ System32 \ spool \ drivers \ W32X86
Step 2
There we must delete all the contents of the folder:
Step 3
Now, we will access the Windows registry editor, at this point we recommend creating a restore point or a backup since it will work with records which can affect the system if they are incorrectly configured.
To access the registry editor we will use the following keys and execute the “regedit†command and press Enter. We must enter the following route:
+ R
It is this route:
HKEY_LOCAL_MACHINE \ SYSTEM \ CurrentContrlSet \ Control \ Print
Step 4
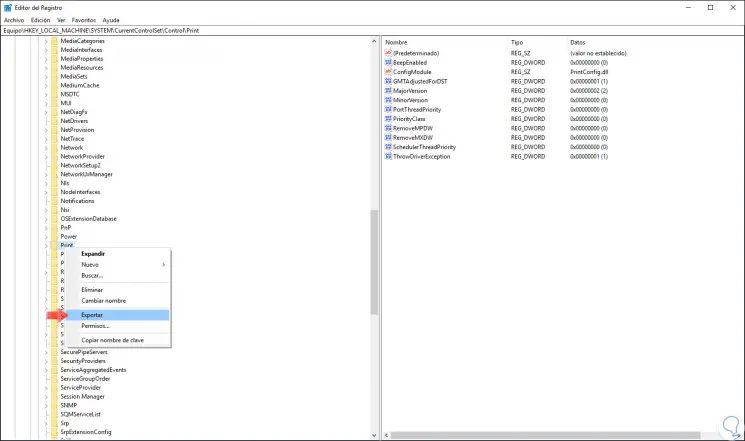
We will right click on the “Print†folder and select the “Export†option:
Step 5
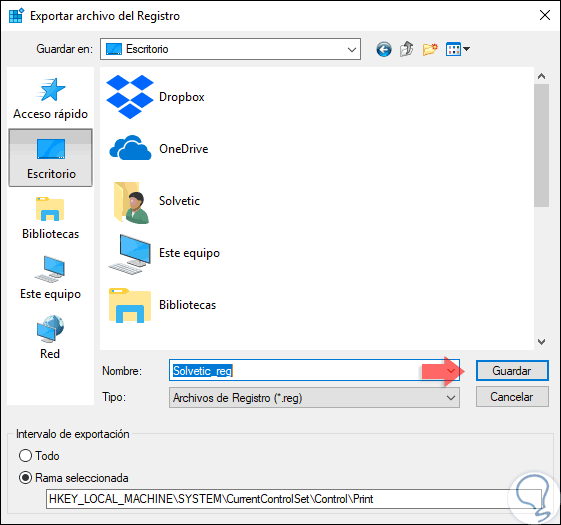
With this we will create a backup copy of the records in this section, there we must select the path where the copy of this record will be hosted:
Step 6
Click on the "Save" button to apply the changes. Now we must go to the following key:
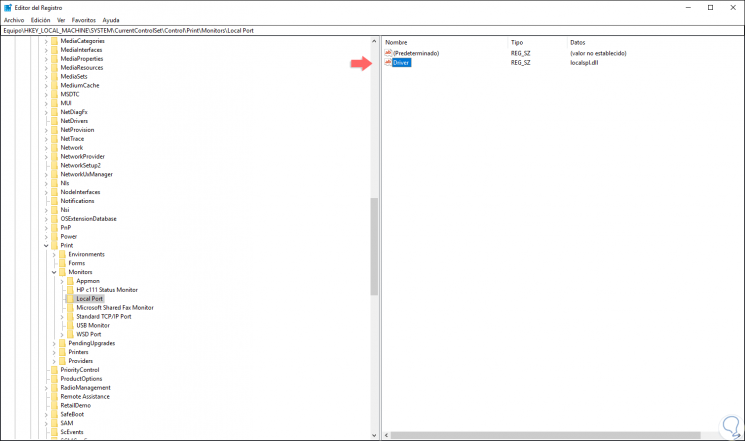
HKEY_LOCAL_MACHINE \ SYSTEM \ CurrentContrlSet \ Control \ Print \ Monitors \ Local Port
Step 7
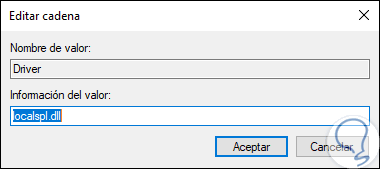
There we verify that the "Driver" key exists and that its value is "localspl.dll":
Step 8
If it does not exist, we will right click on some free space and select the option “New / String Valueâ€:
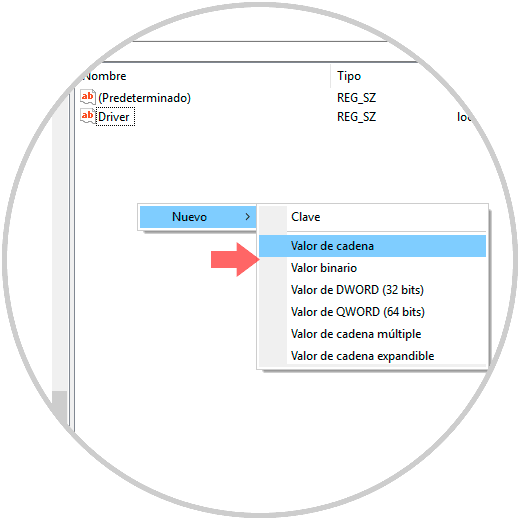
Step 9
We assign the name "Driver" and double click on it, then go to the field "Value information and enter localspl.dll:
Step 10
Click on OK to save the changes. Now we will go to the following route:
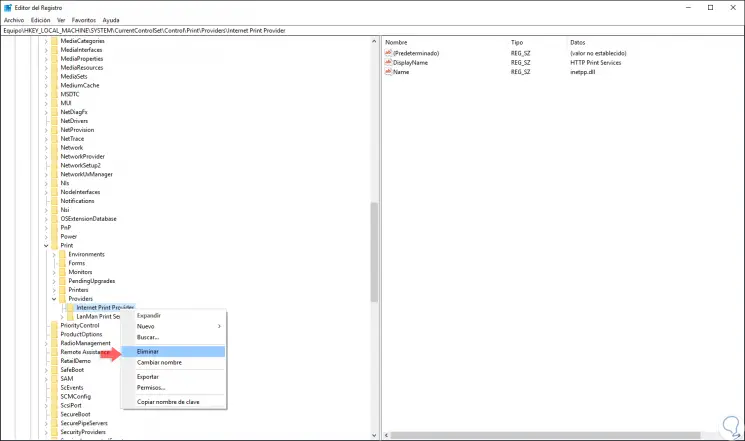
HKEY_LOCAL_MACHINE \ SYSTEM \ CurrentContrlSet \ Control \ Print \ Providers
Step 11
There we must delete the existing subfolders by right clicking on them and selecting the "Delete" option:
Step 12
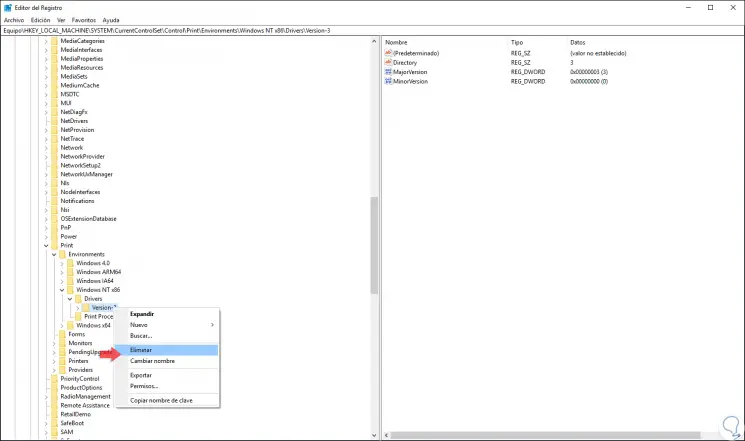
We must confirm the action by pressing Yes on the message displayed. We must carry out this same process in the following route:
HKEY_LOCAL_MACHINE \ SYSTEM \ CurrentContrlSet \ Control \ Print \ Environments \ WindowsNTx86 \ Drivers
Step 13
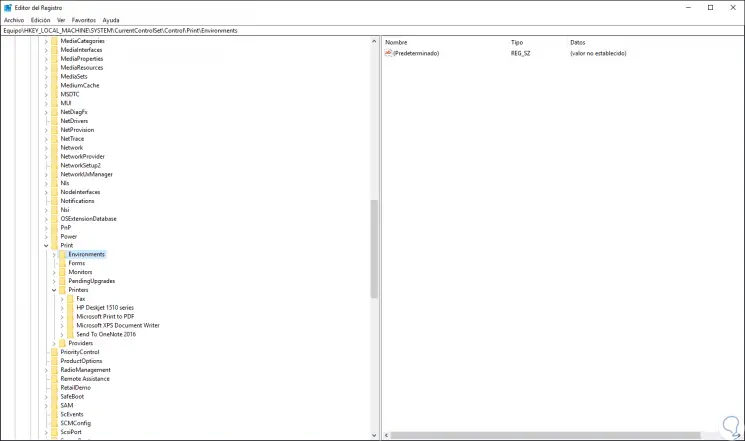
Finally we will go to the next route. There we must delete all the folders of the installed physical printers but not those that the system installs automatically (Microsoft Print to PDF, Send to OneNote, etc).
Finally, it is enough to restart the operating system and verify that the printing is working correctly and no error associated with the print queue is generated.
HKEY_LOCAL_MACHINE \ SYSTEM \ CurrentContrlSet \ Control \ Print \ Printers
We can see that we have different alternatives to solve the printer error in Windows environments and thus have the best features of our printer.