One of the tasks that we constantly perform when we work with documents in Microsoft Word , regardless of its edition, is to add images, tables, hyperlinks and apply formats to the content so that its appearance is much more professional and can provide much more information precise and dynamic of the data or elements to represent..
These types of tasks usually involve adding a large number of multimedia elements, such as embedded images, fonts and other objects , which as a rule make the final file occupy several megabytes in size. Although for many users this may go unnoticed or not be relevant.
This becomes a problem when attaching said file through email , uploading it to a website , publishing it on some platform, and this is because these types of files have a size limit to be uploaded. Therefore, it will not be possible to carry out this task..
That is why it is important to learn to reduce the size of our Microsoft Word files without losing the quality or content of them and for this reason TechnoWikis will give a series of practical tips to achieve this.
Note
The indicated tips apply in the same way for both Microsoft Word 2016 and Microsoft Office 2019.
1. How to convert the document from .doc to .docx in Word 2019, 2016 to reduce size
As of Office 2007, the .docx extension was introduced as a storage alternative; until Microsoft Office 2013 that was set as the default format ..
Documents were normally saved in the .doc format, which is a format similar to the current one, .docx, but which has some fundamental differences that act directly on the possibility of maintaining the format correctly. As we said, from the arrival of Office 2013 by default the documents are stored in .docx..
The .docx format was developed by Microsoft as a replacement for .doc and this change is linked to the growing competition for free and open source formats such as Open Office and ODF. With the .docx files, the coding work for these was done in XML, so the letter X is added in .docx and thanks to this new coding it has been possible to add more support for advanced functions.
One of the most striking developments is that .docx files act in the same way as a ZIP file since it compresses the document's content. Thus, converting a .doc file to the .docx format will reduce its size in some cases drastically.
To convert a .doc file to .docx we must do the following:
Step 1
We will access this file and then go to the "File" menu. There we go to the "Information" section to locate the "Compatibility mode" category and click on the "Convert" option:

Step 2
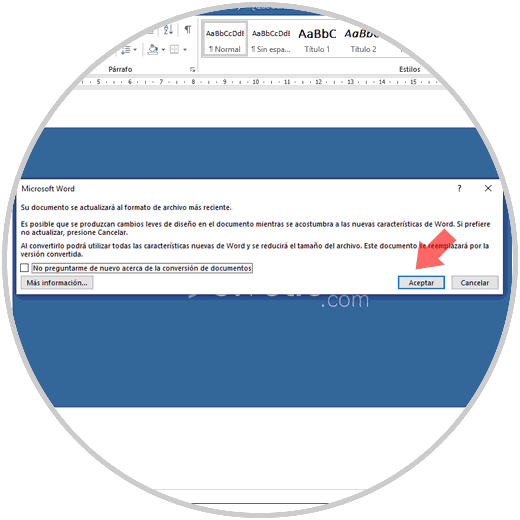
The following message will be displayed. There we click on the "Accept" button
Step 3
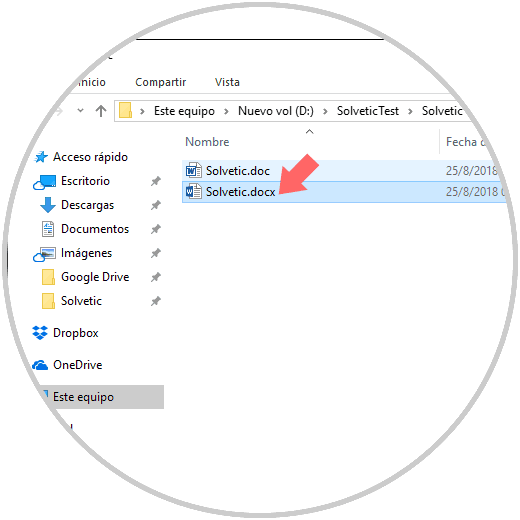
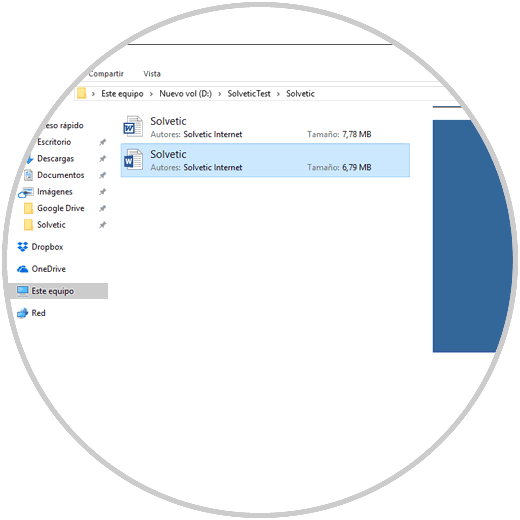
Then it will be necessary to indicate the path and name to save the file with the new format. Microsoft Word carries out this conversion by creating a new version of the document in the new .docx format; so that the previous version of .doc will still be available and we can validate the difference in size between both extensions:
2. Perform editing tasks during image storage in Word 2019, 2016 to reduce document size
During the tasks of editing an image in Microsoft Word , all image editions are stored as an active part of the document. Thus, if we crop an image in the document, Word will still retain the entire original image - This represents a space impact that can become quite high and unnecessary. You must take it into account when saving space.
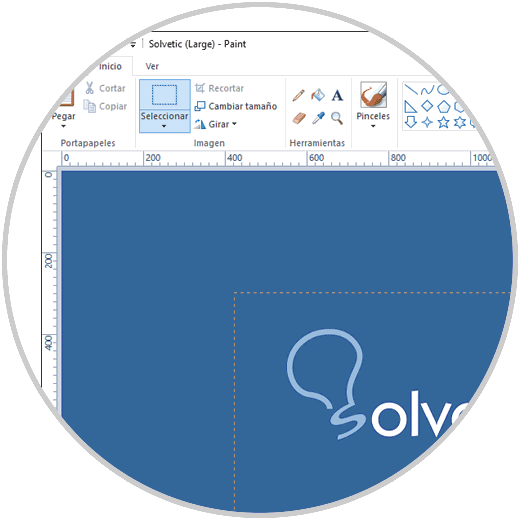
To avoid this, it is recommended that, if we know that the images of the Microsoft Word document should be edited, (such as cropped, apply filters, modify their orientation, etc.), it is ideal to use integrated applications, such as Paint, Paint 3D , Preview, etc. From there run the edits and then save this image and insert it, already edited, into the Word document. With this we will help reduce the size of the final document.
3. Insert images instead of copy and paste to reduce document size Word 2019, 2016
Normally we use the copy and paste method to add various elements, such as an image, to the Microsoft Word document; But the fault is that Word makes use of certain assumptions about how to manage the image.
For example, if the image we have pasted is in BMP or JPG format, which is a large file type, usually Word paste it with all its properties dramatically increasing the file size and especially if this image is in HD (High Definition).
In this case, TechnoWikis recommends that the respective editing tasks be done first, if applicable, to the image in any image application; so that after this it is saved somewhere in the disk and then we go to the "Insert" menu and in the Illustrations group select Images:
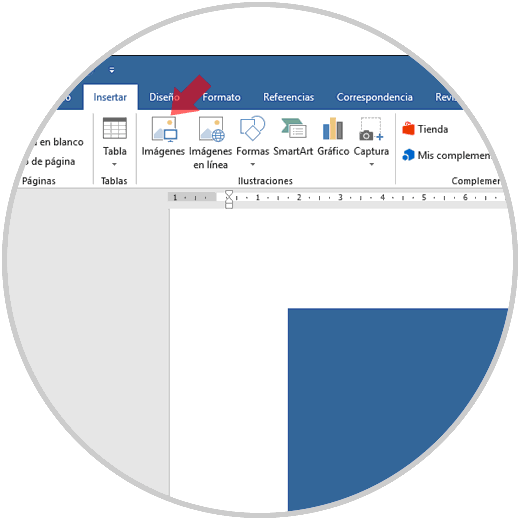
There we will go to the path where the edited image has been hosted and proceed to upload it to the Word document thus reducing the overall size of the file.
Note
Obviously we must be careful with the quality properties of the images since if we convert them to another format to reduce their size we can generate a poor quality of these.
4. Compress images in an integrated way to reduce document size Word 2019, 2016
Compressing an element has been one of the best practices to reduce the size of all types of elements and thus share them with other users and even add security measures to them. With Microsoft Word, we have the possibility to compress the images of the document in order to reduce their size significantly.
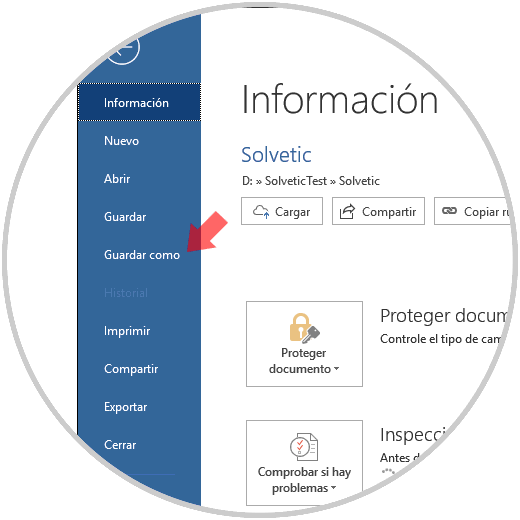
Step 1
To do this, we will go to the "File" menu and select the "Save as" option:
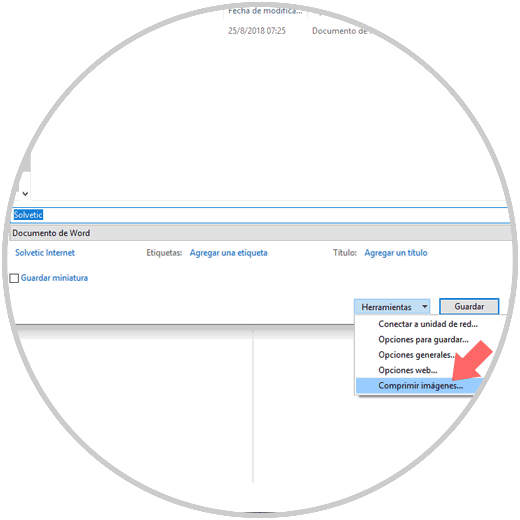
Step 2
In the window displayed, click on the "Tools" button located in the lower right and select the option "Compress images":
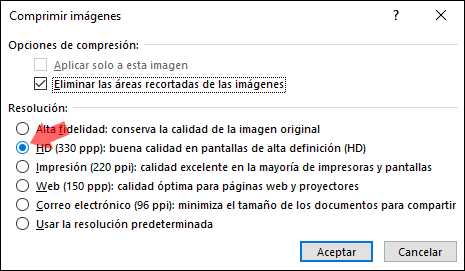
Step 3
The following window will be displayed. There we must define the quality with which the images of the document have to be compressed and we can see that the option "Apply only to this image" is attenuated since, with this method, the configuration used will be applied to all images and not only to one individually.
5. Link elements instead of embedding to reduce document size Word 2019, 2016
One of the options that Microsoft Word allows us is the ability to embed various elements to the active document, such as mp3 files, PowerPoint presentations or Excel spreadsheet. This, although useful, may cause the final size of the Word file to be increased.
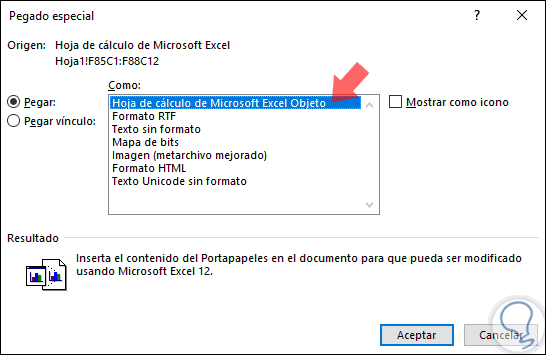
The good thing about linking an element is that, when making any changes to the original document, this change will be reflected in the Word document. For example, to paste some Excel cells, we proceed to copy the desired cells, and then in Word we go to the "Paste" option and there we select "Paste Special":
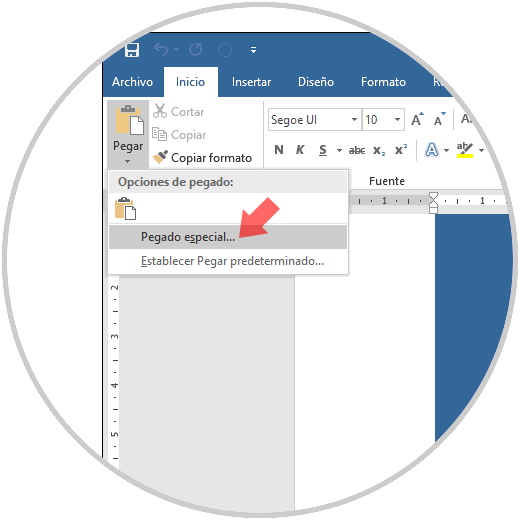
In the displayed window we select the line "Microsoft Excel Object Spreadsheet". Click on "Accept" and in this way the element has been linked.
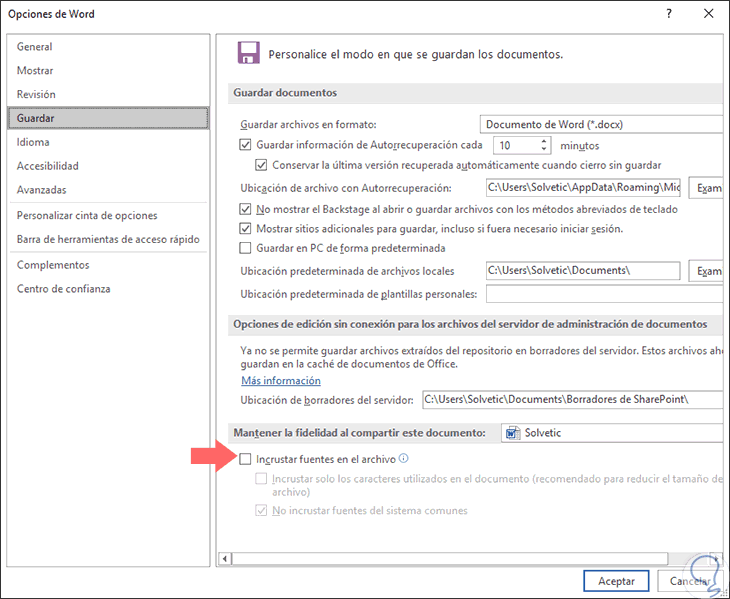
6. Stop embedding fonts in the Word file to reduce document size
When we have added fonts to obtain better presentations of the final document, it is normal that, when sharing these files with other users, there is an option to download the fonts used automatically, which means an increase in the file size.
To prevent Word from downloading these fonts automatically, we go to the "File"> "Options" menu and in the pop-up window we select the "Save" section and there we uncheck the "Embed fonts in the file" box. Click on "Accept" to apply the changes.
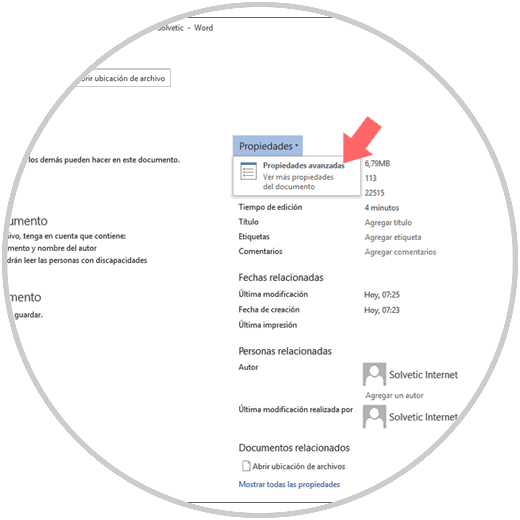
7. Avoid storing thumbnails in the file to reduce document size Word 2019, 2016
By default, Microsoft Word gives us the option of storing a thumbnail image of the active document so that Windows can generate a preview in the File Explorer of that document:
Note
Although this is a practical option to verify the content of a document, it represents an additional space task in the document.
Step 1
To prevent Microsoft Word from performing this process, we go to the "File" menu and there, in the "Information" section, we click on the "Properties" button and click on the "Advanced Properties" option:
Step 2
In the pop-up window, we will go to the "Summary" tab and there we deactivate the "Save thumbnails for all Word documents" box. Click on the "Accept" button to apply the changes.
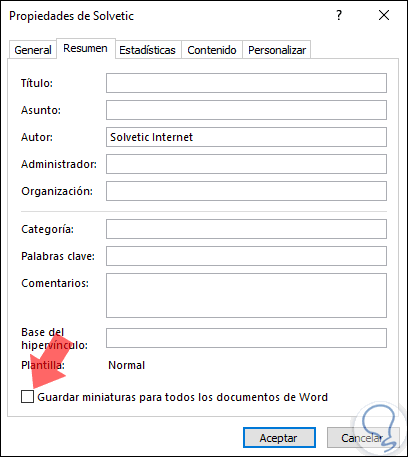
Note
This option will also be possible to deactivate it from "Save as". There, just uncheck the "Save thumbnail" box

8. Disable auto-recovery function to reduce document size Word 2019, 2016
It is not the most suitable advice since this function of self-recovery of Word, has as mission to make periodic backups of the file while we work on it. So if the application fails or the computer has some kind of problem (power outages, reboots, etc.) thanks to this function we will have several versions automatically retrieved from open documents the next time we access Word.
That function makes the file size larger but it is one of the best security options in Microsoft Word.
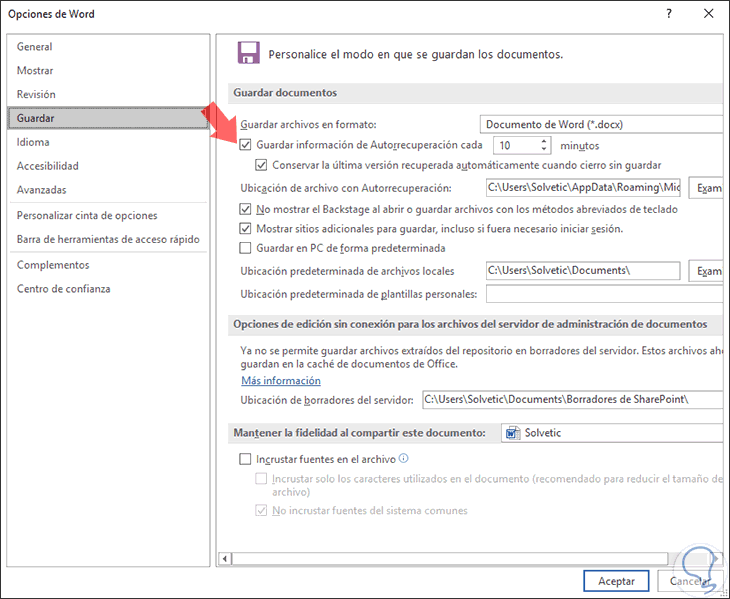
If we want to disable it to reduce the final file size, we must go to the "File"> "Options" path and in the "Save" section we uncheck the "Save AutoRecover information every (minutes)" box. Click on "Accept" to apply the changes.
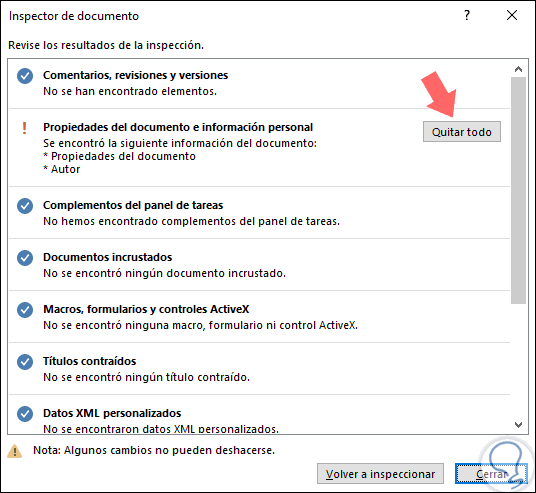
9. Delete personal and hidden information from the Microsoft Word document to reduce size
Word stores a variety of information, both visible and hidden, in the file on aspects that have been edited in the file and these, for security, we may wish other users to not see. This type of information increases the final file size so that its disablement performs two tasks, security and space.
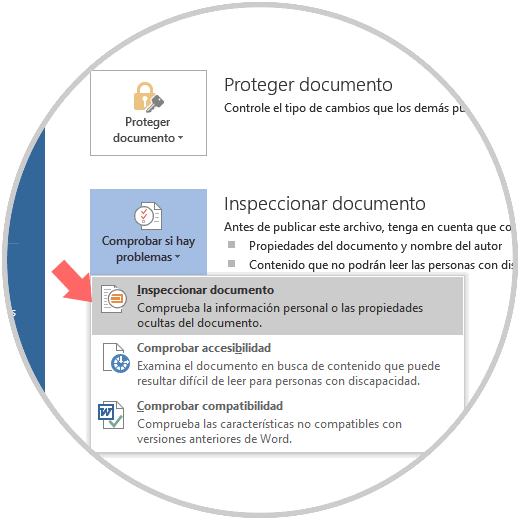
Step 1
To carry out this process, we go to the "File / Information" menu and there we click on the "Check for problems" button located in the "Inspect document" section and select the "Inspect document" option:
Step 2
The following message will be displayed. Click on the "Yes" button

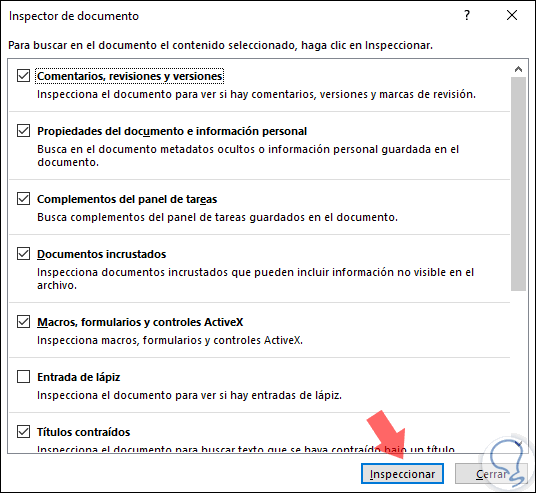
Step 3
Next we must select the variables to be applied with the inspector. Once selected click on the "Inspect" button
Step 4
As soon as the process is finished we will see the respective results, there we can click on the button Remove all of each section, if applicable:
10. Copy all information in a new Word document to reduce document size
By nature, when working on a Microsoft Word document, it saves several elements in the background to carry out its own tasks on the document. So a practical solution is to copy all the content into a new file.
For this, we will create a new blank document, we proceed to select all the content in the current document by pressing the following keys:
+ E Ctrl + E
In the new document, we will press the following key combination to paste everything:
+ V Ctrl + V
This will copy all the text, sections, format, page layout options and more parameters configured in the original document, but no AutoRecover information or previous versions will be copied, which will help reduce the final document size, which is at final the objective that we have from the beginning.
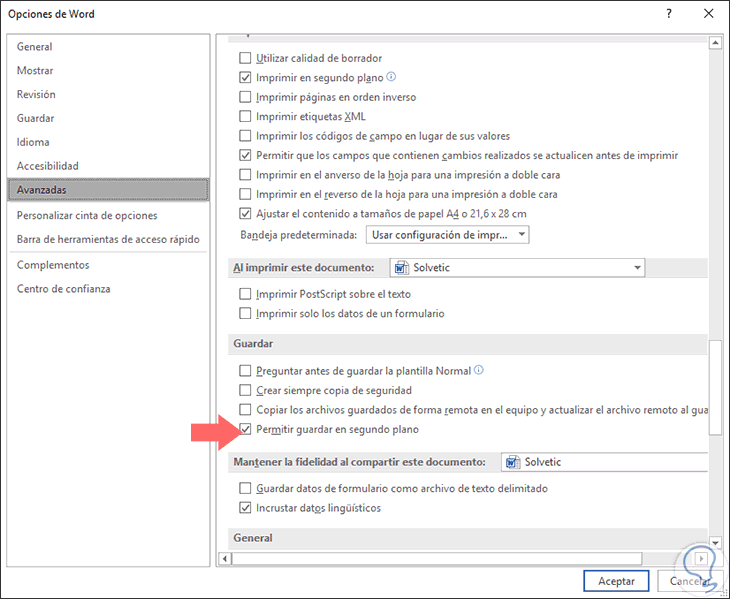
11. Disable background storage to reduce document size in Word 2019, 2016
Microsoft Word has an integrated function which allows you to save the changes of the document in the background in order to avoid information loss. This setting is enabled by default in Word and consists of saving the document in the background while we are working on it. Thus, when saving the file, there will be less changes to save and therefore the process will be faster.
This function implies the use of a little more file size so that if we want to disable this function to access better levels of size, we must go to the "File"> "Options" path and there, in the "Advanced" section , we go to the "Save" category and uncheck the "Allow save in background" box. Click on "Accept" to apply the changes.
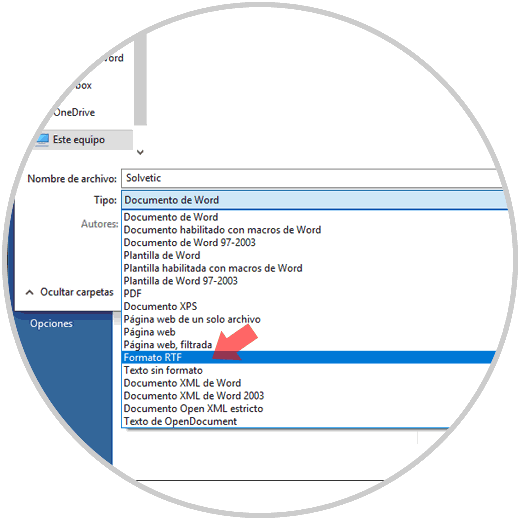
12. Convert files to RTF or HTML and then convert them to .docx to reduce Word document size
The RTF (Rich Text Format) format is a free standard for documents with a slightly more advanced format than the already known plain text format, but it does not have all the features of .docx, The purpose is to convert the docx file to RTF in order to eliminate all the additional format and any hidden data allowing the final file size to be reduced.
The same method can be applied with HTML which is a web format that helps reduce the final file size.
For this, just go to the option "Save how" and in the "Type" section select "RTF or HTML". Click on "Save" to apply the changes.
13. Change page size to reduce document size Word 2019, 2016
Normally we use the Letter size for our files, but we can use other formats such as A4 in order to increase the capacity of text in a Word sheet and thus reduce the final document size.
To define the new document size we will go to the "Format" menu and in the "Page setup" section click on the "Size" option and there we select the best option as appropriate:

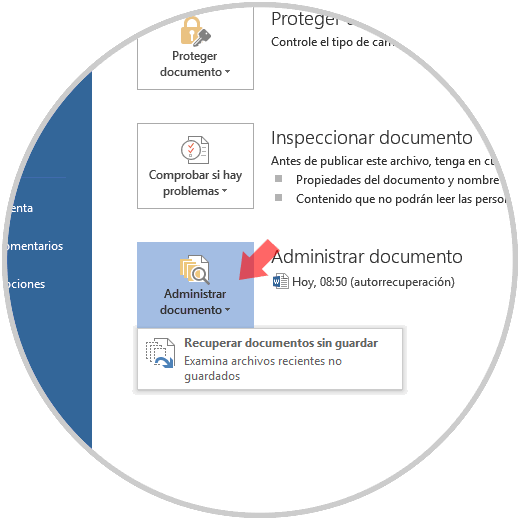
14. Remove previous versions of the document to reduce size in Word document 2019, 2016
Microsoft Word retains earlier versions of the document as it works on it. We have mentioned that this is the "Autosave" functionality, but we can eliminate these previous versions to free up space in the document and thus make its size smaller.
For this we will go to "Information" and there we click on the "Manage document" section:
Note
This will review previous versions that have been saved from the current file and we can proceed to delete it, but for best results it is recommended to copy and paste the contents of the file into a new Word document.
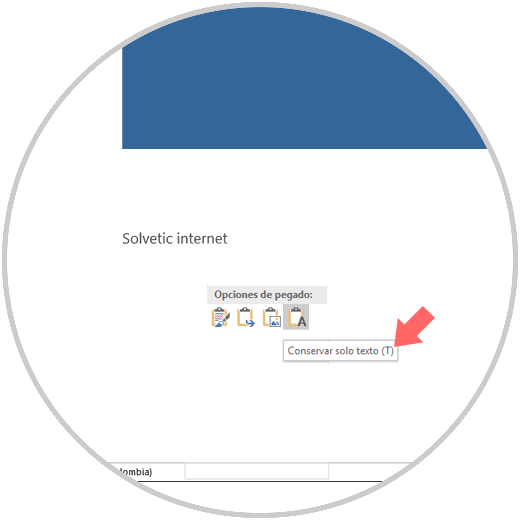
15. Paste only text without formatting to reduce size in Word document 2019, 2016
Normally we use the option to copy and paste directly so that all the format that has the origin, such as tables, colors, themes, etc., will also be applied which affects and increases the size of the Word file.
To prevent the copied information from being pasted with its format, let's right click and select the option "Keep only text". Thus, we will paste the text without copying the source format.
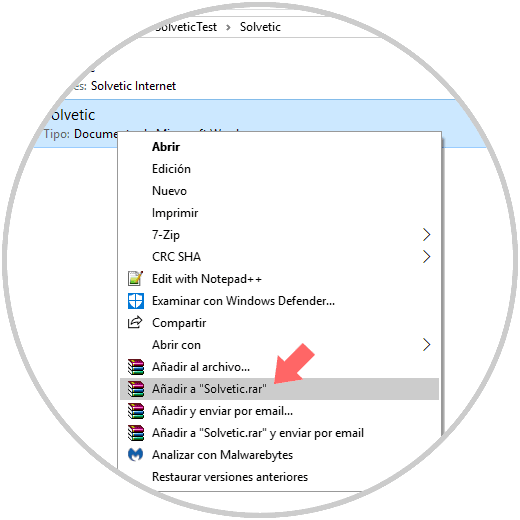
16. Compress Word file to reduce size with 7-Zip or WinRAR
We have indicated that a .docx document is a compressed file; so that it can be opened with an application, such as 7-Zip or WinRAR, to see all its content. We can extract all the files from the .docx file, add them to a compressed file and then rename a file extension with .docx.
In addition, we can compress the document created in any of these applications which can be downloaded for free at the following link:
7-Zip
WinRAR
After installation, we can right click on the Word file and use any of these for compression:
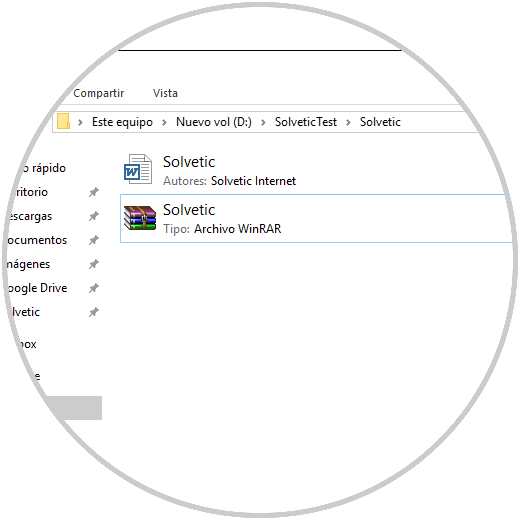
Then, we can see the final size with which the selected file was compressed:
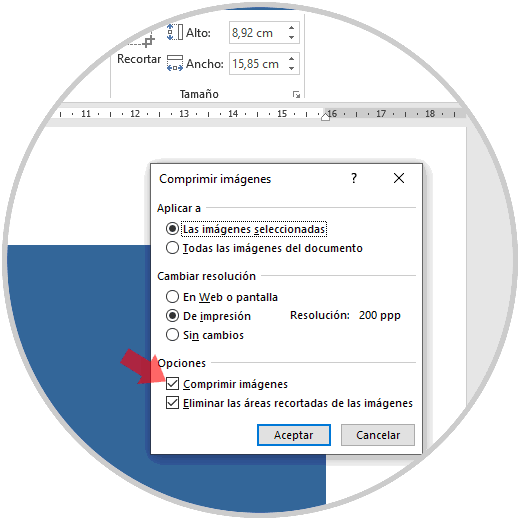
17. Compress a particular image to reduce size in Word document 2019, 2016
We have seen that it is possible to compress all the images inserted in the Word document globally; but if we want to compress only one in particular, we must select it and click on the "Image tools" menu.
There go to "Format"> "Compress images", and the following window will be displayed where we will select the compression quality and we can define if it will only be applied to the current image or all in the document:
Thus, we have useful options to reduce the size of our Word 2016 or 2019 files and manage them in a much more centralized and simple way.