The concern for the IT Security of users is one of the actions that has increased the most in recent years due to the large amount of private information that circulates through the network and the practices that can be performed to take over this data Normally not for very good purposes..
Privacy is one of the best, perhaps the best, IT Security practices that we can carry out in order to prevent unauthorized access, information theft , security flaws and in general everything that is related to our personal information.
Normally, everything we create in terms of IT, such as files or documents, is hosted on our computer and therefore we create passwords , encrypt the units among other actions. But another interesting option, although not practical for many people, is to make use of an anonymous operating system which has as its main objective the anonymous use of its entire environment..
The great disadvantage of this is that it cannot be used as an operating system to host information since everything will be deleted after the restart.
This would be the case of the anonymous Tails operating system and today in TechnoWikis we will explain how we can create a bootable USB with this system in a useful way step by step in this tutorial to perform anonymous browsing and many other interesting things such as pentesting or audits ..
What is tails?
Tails is a Linux operating system to be run live; that is, no local installation is required. Which means it can be started on almost any computer from a USB stick or a DVD.
Tails has been designed in order to preserve privacy and anonymity and is useful in cases such as:
- Make use of the internet anonymously in order to avoid censorship.
- With Tails, all Internet connections are forced to go through the Tor network, which adds greater security and privacy.
- When using Tails we do not leave any type of evidence on the used equipment.
- We will be able to make use of the latest cryptographic tools in order to encrypt files, emails and instant messages.
Tails is a complete operating system that has been designed to be used from a USB or DVD regardless of the original operating system of the computer. In addition, Tails is free software and is based on Debian GNU / Linux.
Tails is integrated with several applications that have been preconfigured with the best levels of security. Within these applications we have:
- Instant messaging client.
- Image and sound editor and much more.
Tails functionalities in the field of security
- Ability to encrypt USB sticks or external hard drives with LUKS, which is the Linux standard for disk encryption.
- It will be possible to encrypt and sign emails and documents using the OpenPGP standard; both from the integrated email client of Tails, text editors or file finder.
- It will be possible to protect instant messaging conversations with the OTR utility, which is a cryptographic tool designed to encrypt and authenticate and also allows plausible denial.
- We can safely erase the files and carry out cleaning tasks of the free space of the hard disk using Nautilus Wipe.
Requirements to use Tails
- Two USB devices are required to create the USB media; since the Tails operating system itself can install the full version of Tails, that is, an intermediate version of Tails will be installed first on the USB and then Tails can be installed from there. take it into account to be able to implement it correctly.
- In both USB sticks, a minimum of 8 GB of available space is recommended.
- The intermediate Tails is necessary since it is currently impossible to install Tails directly from the Windows operating system. For this reason it is necessary to create an intermediary Tails in a second USB device. It should also be noted that this Tails intermediary does not have all the security and usability functions.
1. How to download and verify Tails ISO
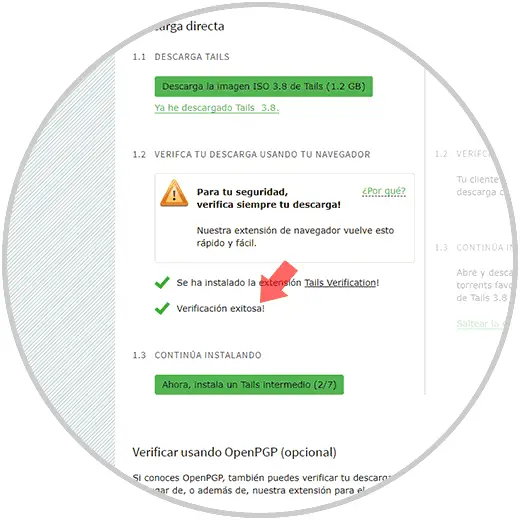
Tails offers us the option to verify and validate the download of the downloaded ISO image in order to be sure that it is correct and that its source code has not been edited with something malicious.
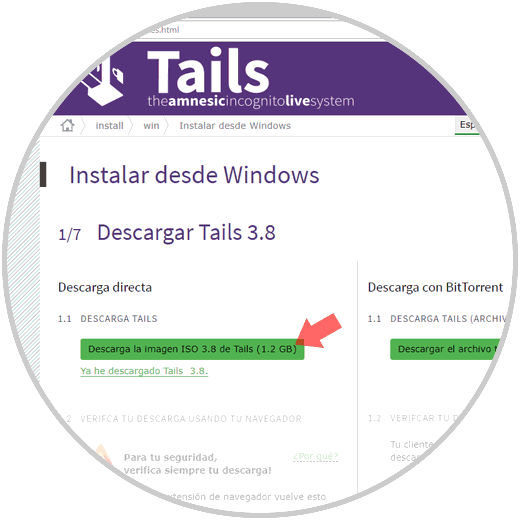
Step 1
For this verification, we will go to the following official Tails link where the download is available. There we click on the button "Download the ISO 3.8 image of Tails"
Tails
Note
In this case we will use Google Chrome, but it is possible to do it from Firefox Quantum
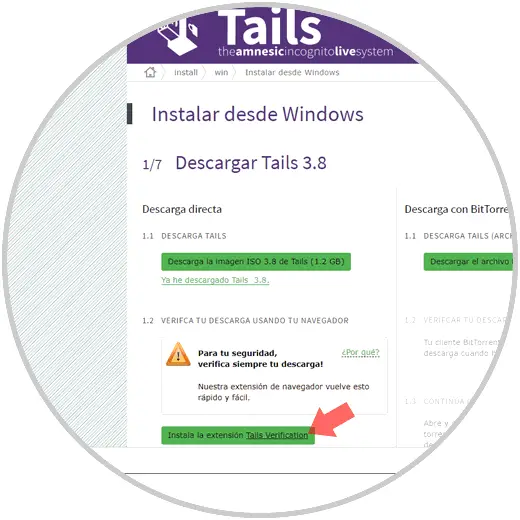
Step 2
Which, once downloaded, will activate the second option in order to install the extension for the Google Chrome browser and thus verify the ISO image. Click on the "Install the Tails Verification extension" button
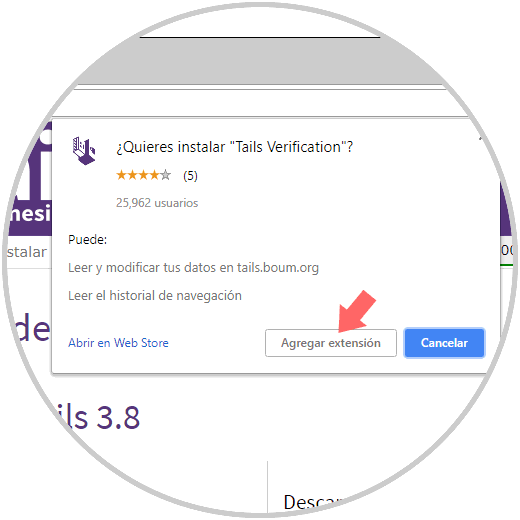
Step 3
The following message will be displayed. Click on the "Add extension" button
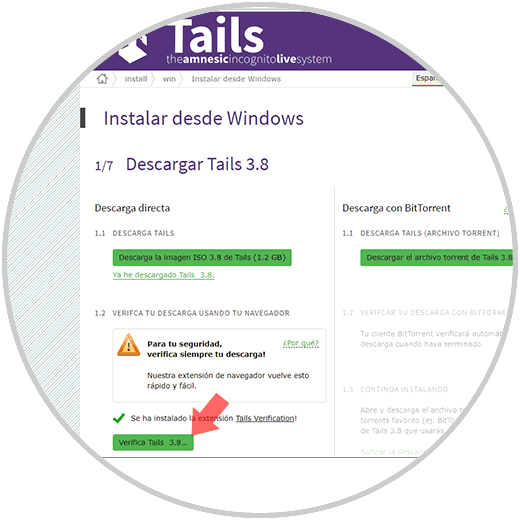
Step 4
Once added to Google Chrome we will see this. Click on the Verify Tails 3.8 button in order to start the verification process.
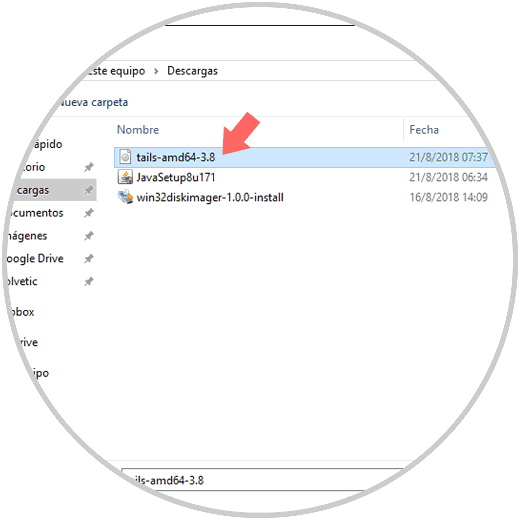
We must select the ISO image that we have downloaded:
Step 5
Now we see that the verification process of this image begins:
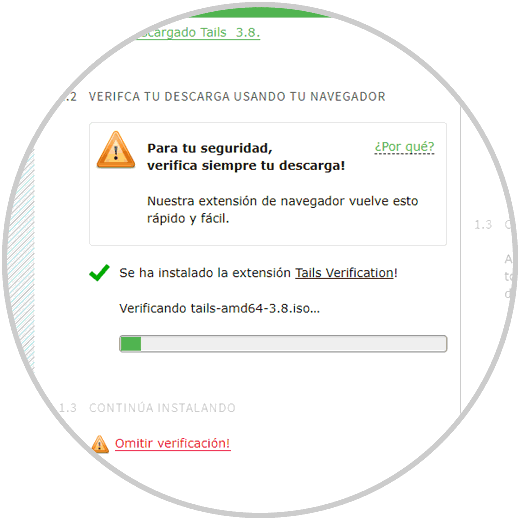
Once this process is finished we will see the result of the analysis. From this moment we are ready to perform the intermediate installation of Tails.
2. How to configure and create USB anonymous internet with Tails
It is time to configure the ISO image of Tails on the USB media to be bootable.
Windows settings
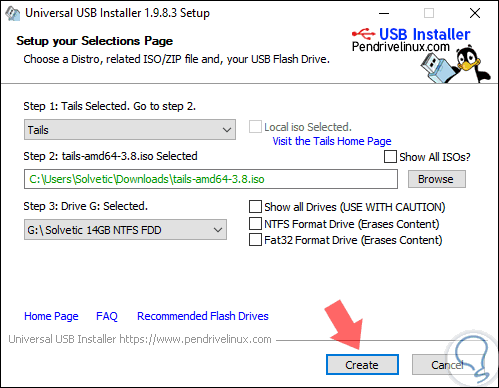
In the case of Windows, in this Windows 10 tutorial, we will use the free Universal USB Installer utility which can be downloaded at the following link.
Universal USB Installer
Universal USB Installer is a tool to create USB bootable Live Linux where it will be possible to choose from a wide selection of Linux distributions to burn to the USB media.
The following will be necessary for its use:
- In the "Step 1" field, click on the drop-down list and select "Tails"
- In the "Step 2" field we will go to the route where the Tails ISO image is downloaded.
- In the "Step 3" field we select the USB medium where this image is to be recorded.
- With this defined, click on the "Create" button to create the bootable USB media.
Linux configuration
In the case of Linux it will be necessary to access the terminal in order to validate where the USB memory is mounted. To do this we can execute the following command to see the drives mounted on Linux:
ls / dev / | grep sd
Once we define the USB path, we will clone the ISO image of Tails on that unit like this:
sudo dd if = Downloads / tails-amd64-3.0.1.iso of = / dev / sdb bs = 8M
Note
We must define exactly the path where the ISO image is located and the path (/ dev / sdb) assigned by the system to the USB medium
.
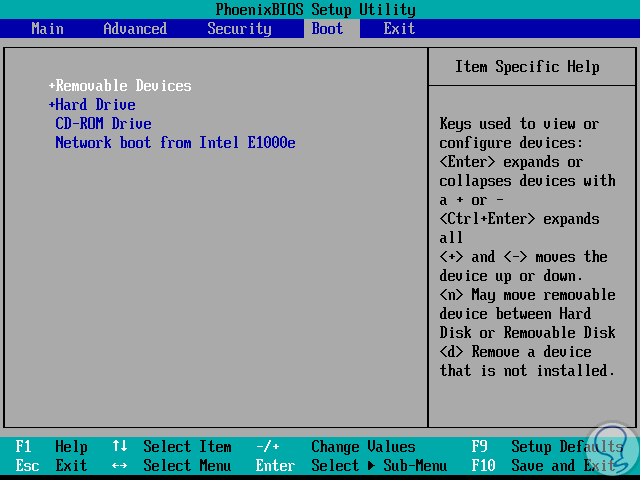
3. How to configure equipment to create anonymous internet USB with Tails
Now, we must access the BIOS or UEFI of the computer where Tails is to be used and there, in the Boot section, define the type of boot to use, USB or DVD.
With this defined we are ready to execute intermediate Tails.
4. How to install Tails to create Booteable anonymous internet USB
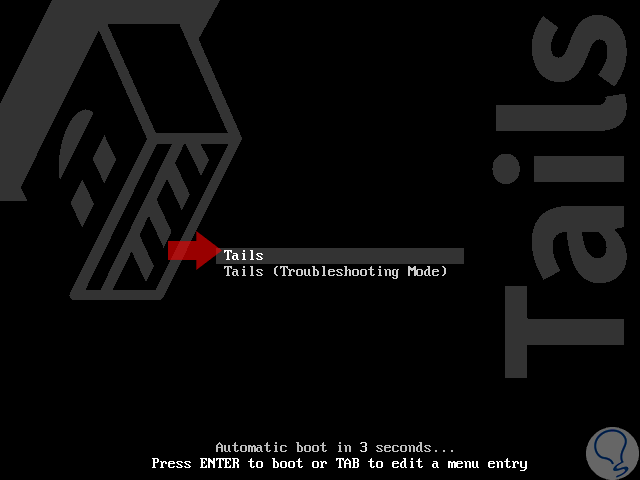
Step 1
Once we restart the system this will be the first Tails window, there we select the "Tails" line. Press "Enter"
Step 2
In a moment we will see the following:
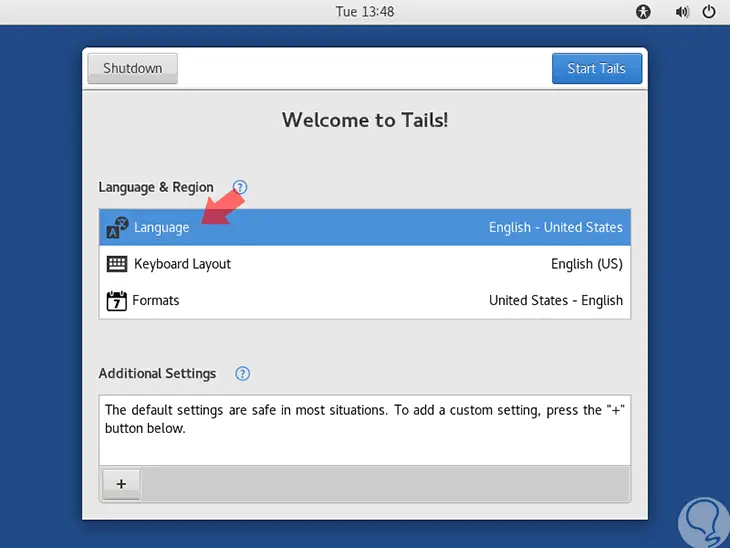
Step 3
There we click on the "Language" line in order to select the appropriate language:
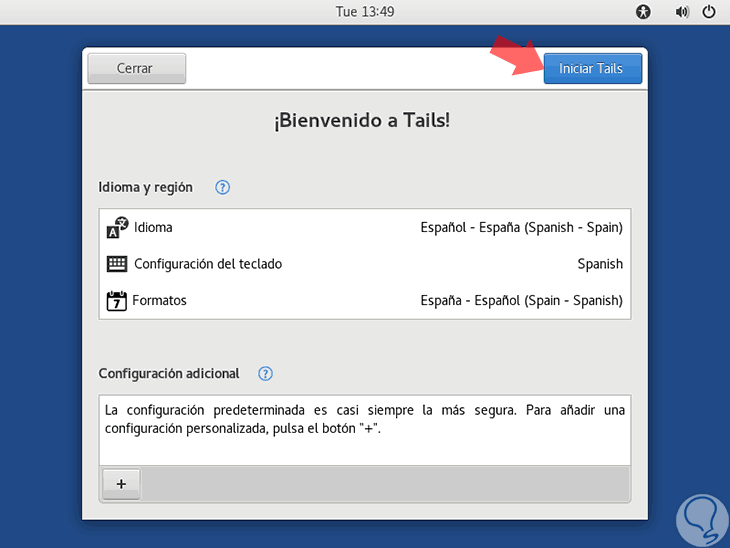
Step 4
Once selected, click on the "Start Tails" button and thus access the official Tails environment:
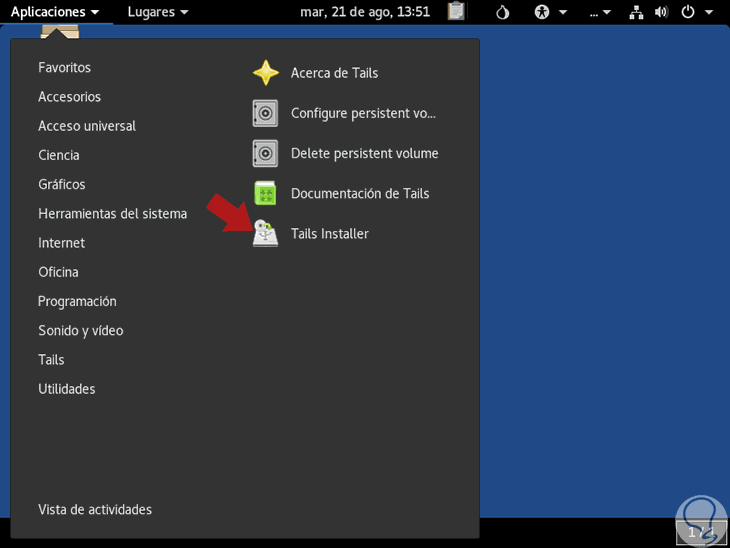
Step 5
Now we must connect the second USB drive that is where Tails will be installed and after its connection, we go to "Applications / Tails" and there we select "Tails Installer":
Step 6
The following wizard will be displayed where it will be possible to use the USB media that we have connected or some locally hosted ISO image. Select the option "Clone the current Tails"

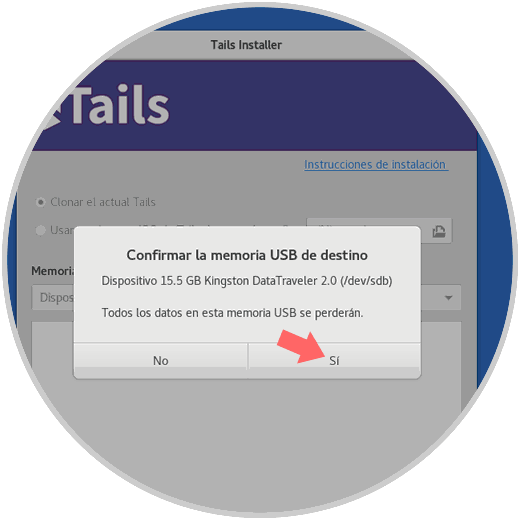
Step 7
In the Destination USB Memory field, select the one that we have connected, click on the Install button and the following message will be displayed. We confirm the action by clicking on the "Yes" button
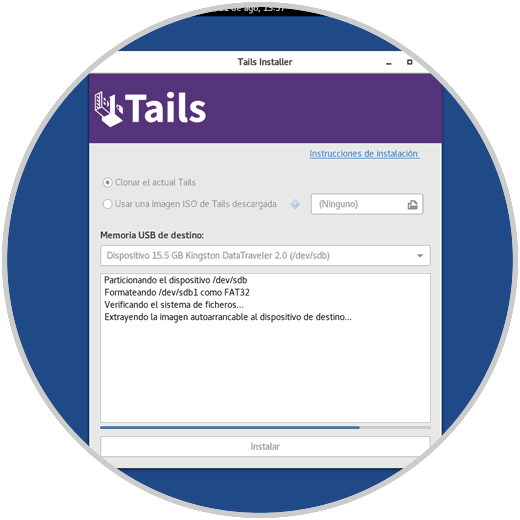
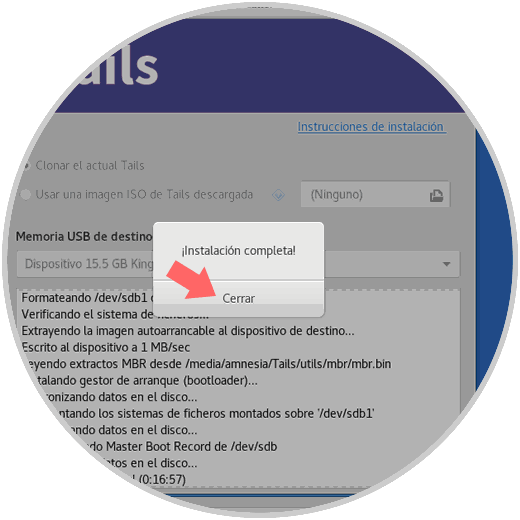
Step 8
We will see that the installation process of the full version of Tails begins.
Step 9
Once finished we will see the following:
Thus, this SUB medium is ready to be installed on any computer and thus execute Tails from there and have this privacy option.