Do you want to learn how to separate the contents of a cell in Excel? Separating the data or content of a cell in Excel is a very simple task if you know the appropriate resources to be able to carry out this task successfully. Separating data in Excel, data that is in the same cell is an action called "separate text in column" ; An option that, as we are going to explain to you, can be carried out in Excel, in a simple way, taking into account considerations that are important, and that we are going to explain to you..
Along the way, we will also explain some scenarios that we may encounter when we want to separate text into columns, and how to solve it. We will also give you some extra resources so you can start working in Excel faster.
In Excel, just as we can join or concatenate the content of several cells in one cell, as we already explained in how to concatenate in Excel, we can also carry out the reverse operation, that is, separate the information we have in a cell , in several cells..
Thus, with this resource that we are going to teach you, you will be able to separate the content of a column into several columns .
Why separate text into columns?
This type of task is common when we work with databases or Excel data tables that have information grouped in the same cell.
As a general rule, we should avoid, as we already know, gathering information in a cell because this makes it difficult to work with the data later . But it may be, when we work in a group or in an organization with more people, that this information has been sent to us or shared with us, and that we have to work with this information that they have shared with us.
To be able to work with this data, for example, to perform mathematical operations, addition, subtraction, calculate an average value, etc. We should not mix text and number information in the same cell, or numerical information of different types in the same cell..
We need each type of information to be separated into cells, organized in columns ; And that in a cell only one type of information is collected to be able to analyze or report it. As an example, let's see the image below where we have data from several students grouped all in the same column, where text information is combined, which are properties of the student, such as their name, with the name of the class, and with the final grade. of the course.

In this image, could we calculate, for example, the average grade of the class by performing an operation in Excel? The answer is no.
If we want to perform any operation on this data, we must separate this data into columns. It does not matter if the first and last name in this case are in the same cell, but we must separate the average grade of each student from the first and last name if, for example, we wanted to know the average grade of the course.
On the other hand, it is also very common to have to separate text into columns when we download files or data from external sources, which sometimes come in a different format, with all the information grouped and separated by a space, a comma, or a period. and comma, or by another sign or symbol used as a separating element.
Formats such as CSV are very common formats that we will encounter when downloading data or information from an external server. Due to data compression, and other characteristics inherent to the format, this is the format in which data files are downloaded; In order to work with the data as we have just explained, it will be necessary to carry out this task of separating the information into columns.
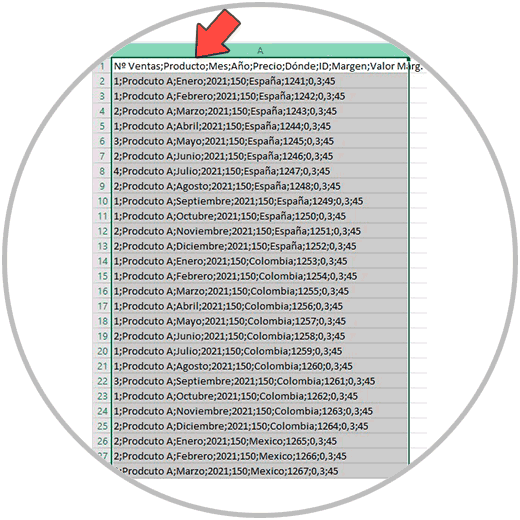
In the example image that we can see below, we see information that we have downloaded in a CSV format.
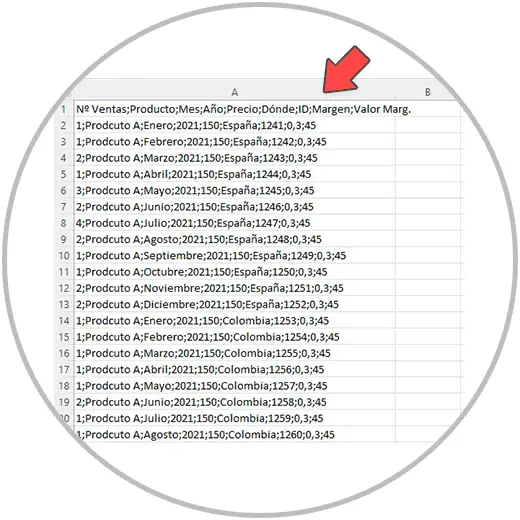
In this example, apart from having difficulties reading or interpreting the information, it is impossible to perform operations, use functions, or perform any other task in Excel for analysis purposes. In order to carry out an analysis with this data, we will have to find a way to separate all this information, and as you can see in the image below, it is possible, and we are going to explain how to carry out this task (in a simple, without complications):
One of the most important aspects in Excel, which we have already mentioned, and which we must always keep in mind, is to work in well-organized data tables, with columns that collect the information, separating the information into cells and columns, not mixing the information. information. As we have seen in the example, being aware of having a single piece of data within each cell is important in the immediate future to be able to analyze the information later. Having an order in Excel is essential. As they say, things well done are well done.
Having the data well organized does not always depend on us because we may encounter cases in which we have to work on sheets that we have not created, or on Excel sheets that we have downloaded from a data server. Be that as it may, we will explain below how to separate text into columns step by step.
1 How to separate text in columns in Excel: Separate first and last name in Excel
Now that we know that we can carry out this operation in Excel, let's see what steps we must follow to be able to separate the information from a cell into several cells. We will use as an example the file that we have shown you in the previous photo.
Steps to separate text into columns
The first thing we are going to do is open our file where we have the unified data, where we have the data to separate into columns.
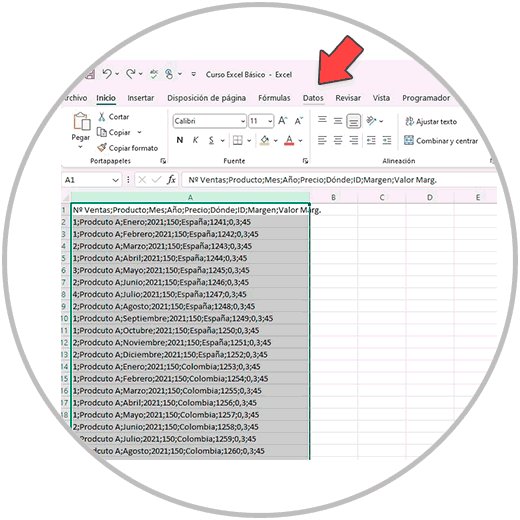
Once the file is open, we are going to select the column where the data is. In order to select the entire column, we click on the column letter, just above the headings, as you can see in the photo.
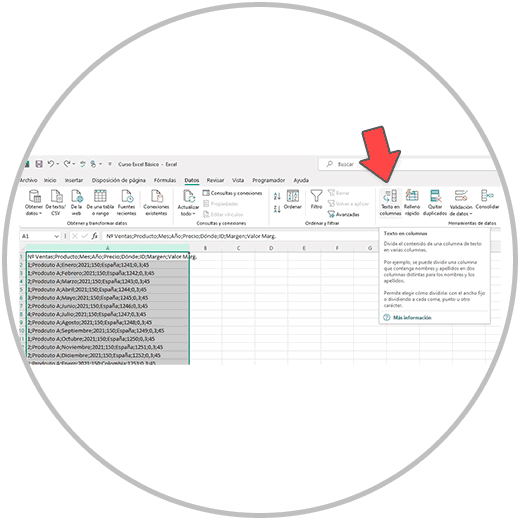
Once the entire column is selected, we go to the ribbon and click on the “Data” tab
By clicking on “Data”, we will see all the options found within the toolbar for “Data”. The option that interests us is called “Text in Columns”.
When clicking on “Text in columns”, a window with several options now appears.
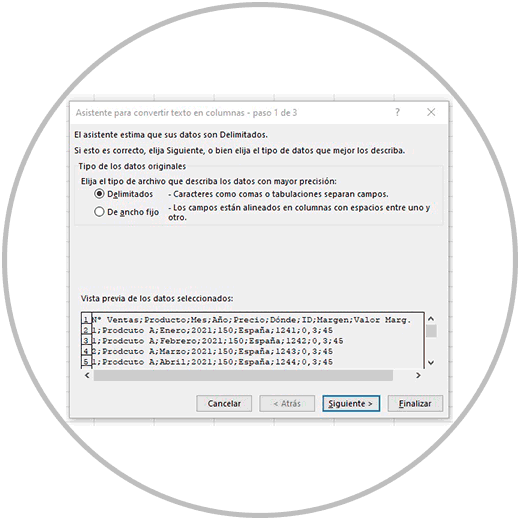
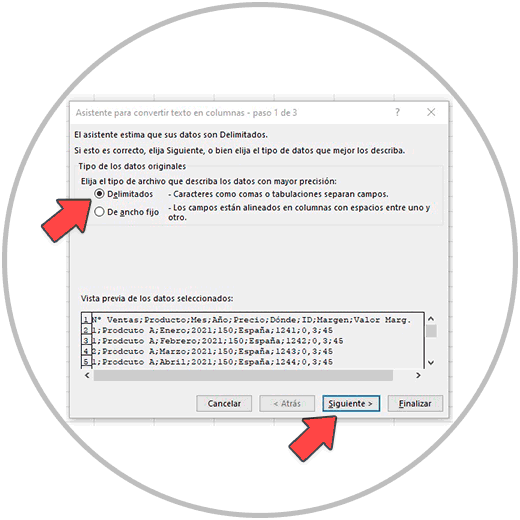
We make sure that we have selected the first option “Delimited” and click on “Next” in the window at the bottom left.
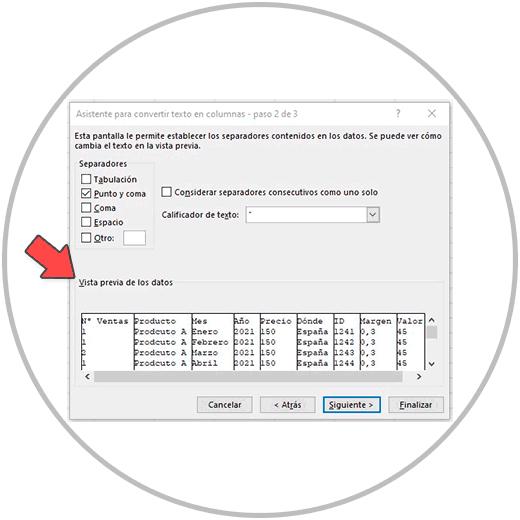
Now in the window, we must select the element, sign or symbol that, within the same cell, is used to separate the data. In our example the separation sign used to separate the data is a semicolon. Therefore, in this window we select the separator, which in the example is “semicolon”.
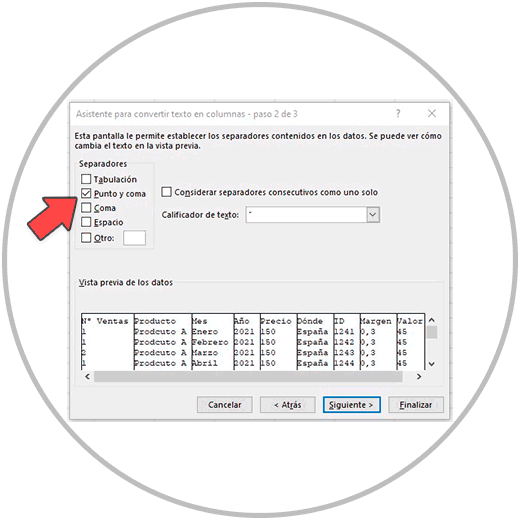
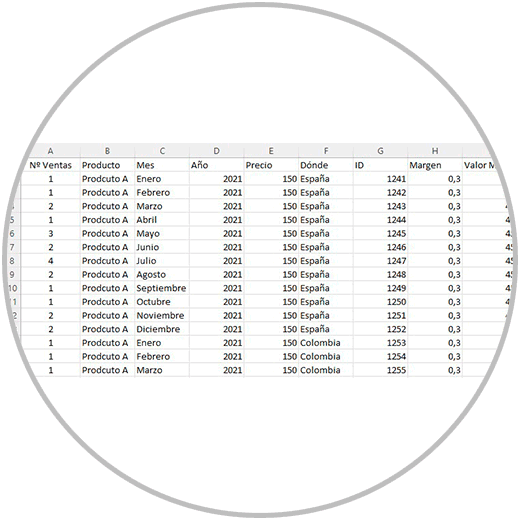
As we can see in the image below, now we can “preview” the data that we had in the same column, separated into different columns.
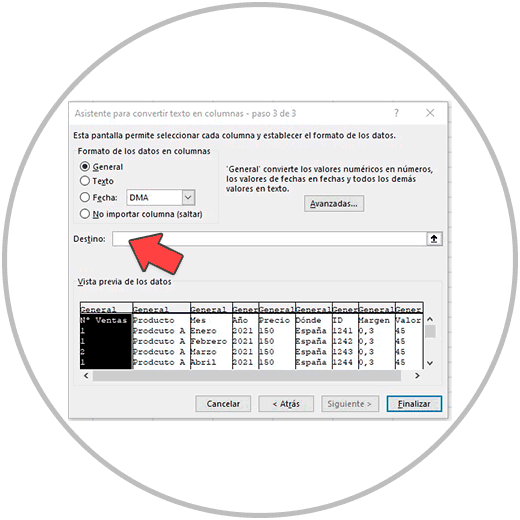
We click on “Next”, and then, in the next step, we can change the format of each column, although we can do this step later, once we have separated the data in each column. In this step you do not need to make a format change.
Something we can do, if necessary, is choose the destination cell from where you want the data to start pasting. We must realize that when we finish the process, several cells to the right will automatically be occupied, as many as the original column contains information.
(In this example, we do not change the destination cell, but we will explain later how to choose the destination cell with an example).
In the image below you can see how when you click next, the information is separated into several columns correctly.
Separate data in Excel when we have other separators
In the example, we have seen how we can separate information that was delimited by semicolons.
However, we can separate the information that is delimited by commas, spaces, or other separation signs, choosing in the window or wizard the corresponding sign in each case .
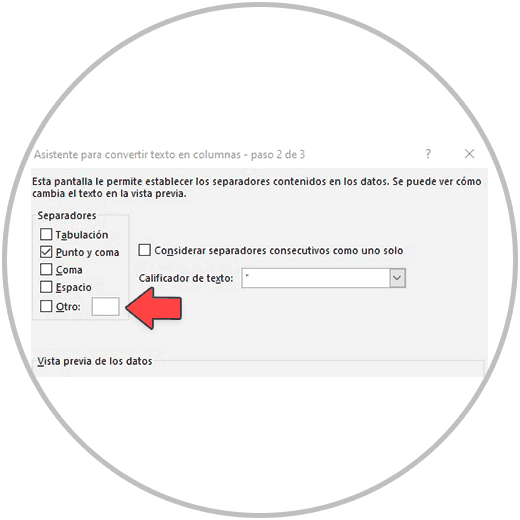
Keep in mind that, if the information is separated by signs other than the comma, semicolon or space, we can always select “Other” in this step, and write in the window the sign that is being used to separate data within the same cell.
Thus, for example, it is very common to find, for example, talas with the information of names and surnames in the same Excel cell. To be able to separate a first and last name in an Excel cell, we follow the same process, taking into account how we have just explained the separator that is used in each case, to be able to indicate it in the wizard as we have seen before, choosing a space, a comma, semicolon or any other sign used in order to separate information within the cell. In the image you can see where we should indicate what
2 “There is already data here, do you want to replace it?”
One of the situations that can occur in the last step, when we are separating the text into columns, is to encounter the following message.
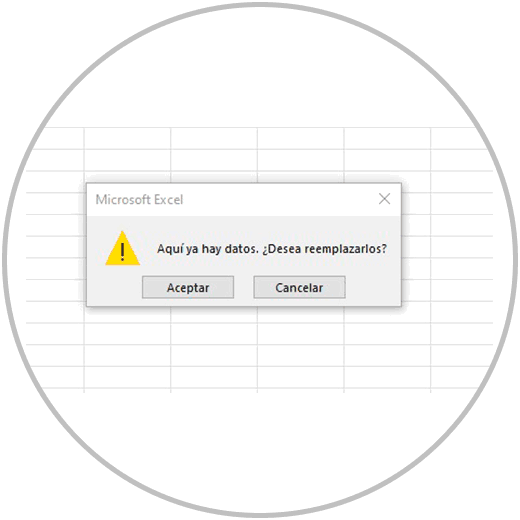
Why do we see a message saying " There is already data here, do you want to replace it?" The answer is because we already have one or more cells with content, in the cells that the data will now occupy when we separate them into columns.
In the image below, you can see an example of when we will see this message that alerts us if we want to occupy the cells that have content.
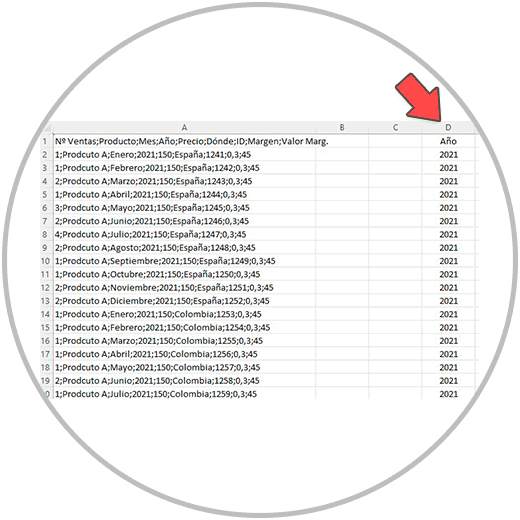
In this example case, we have information in column D. If it is information that you do not need, and you would prefer that the data to be separated be pasted on top, we can click “OK”. However, as a precaution, it is more reasonable to click “Cancel” and first see what information is going to be “stepped on” carefully.
In case we do not want to “step on” the information that in the example was in column D, we cancel and what we are going to do is add more columns in front of column D. To do this we position ourselves and click on the letter of the column we want to move, in the example column D.
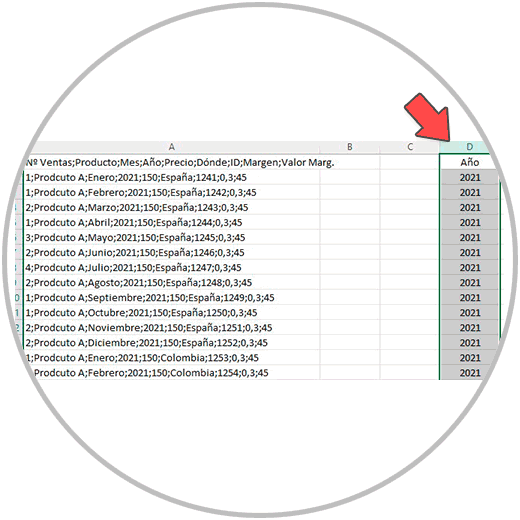
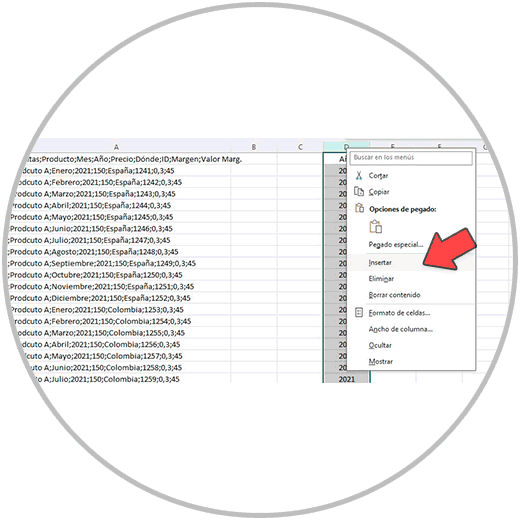
Then, with the mouse we right-click, and in the menu that appears, we will click on “Insert”.

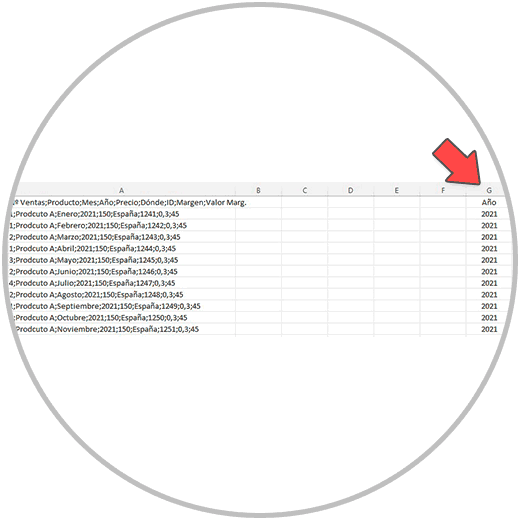
We will then see how column D has moved to the next column, column E.
Now if we want we can add more columns in front as we already know by selecting the column we want to move, right-clicking, and then clicking “Insert”.
TIP: Press the F4 key to repeat the same operation in Excel
One of the resources that Excel has to be able to work faster is to be able to repeat the last operation by pressing a key on our keyboard (The F4 key) .
In this case the last operation carried out was to add one more column. Well, if we select the column that we want to move to the right again and press the “F4” key on our keyboard, we will see how a new column is added, moving our data one more column to the right.
This is one of the actions we can carry out to avoid overwriting the cells that have content when we separate text into columns. Keep in mind, as we have seen before, if we see the message “There is already data here, do you want to replace it?” Remember that, in the previous step, we could also select the destination cell, from which the data would be pasted from there to the right.
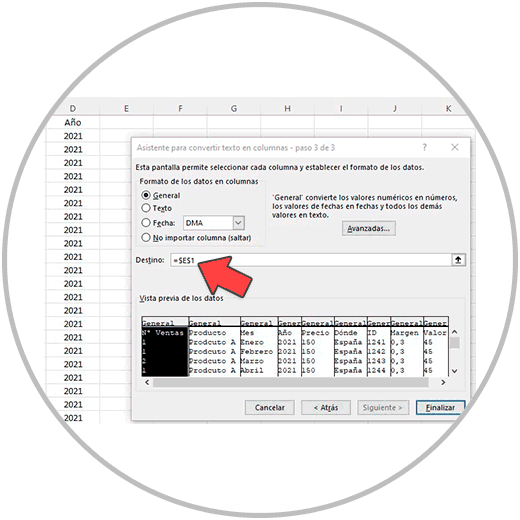
Thus, following the same example, if when separating text into columns we realize that in one of the columns, in the example D, we already have data and we do not want it to be replaced, this time we are going to manually select a destination cell .
We would perform all the steps again until we reach this wizard window, where this time we are going to do the following:
We first delete the contents of the Destiny box
With the mouse we select the destination cell from which the data will begin to be pasted (which will be cell E1) and click on “Finish”.
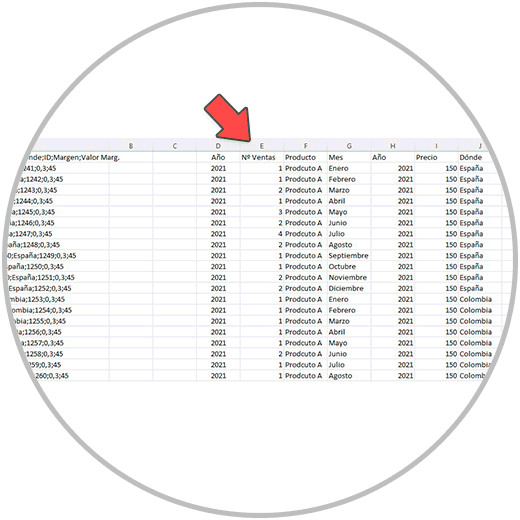
Now, as we will see below, the data has begun to be pasted from the column that we have selected, column “E1”. (Right after column D, as we wanted to avoid stepping on the data).
As we have seen, separating text into columns is a simple task to carry out. It is a simple task where we must take into account where the resource is that allows us to perform the operation, which if you remember is within the Excel ribbon in “Data” and then in “Text in columns”.
Also remember that it is important to start by first selecting the column that we want to separate into several columns.
Also remember that we can select the type of separator that is being used in the cell that contains the information. We have used the period and the comma in the example, but we could find other signs such as periods, commas, spaces, even other symbols. In any case, as we have explained, we can separate the text into columns, regardless of the separation that is being used.
As always, once we have completed our task, we will check that the result we have obtained is the desired one. If we have carried out the operation correctly, we will be able to analyze the information better, and we will be able to perform mathematical operations on the columns that contain data.