Nowadays the work in PC equipment has become harder and more constant thanks to the vertiginous change that this world gives, not only of IIT but of all the areas where one must spend many hours in front of the PC realizing projects, managements , fixing various problems or just spending hours of learning or entertainment..
Well, no matter what the reason for using our equipment, it is vital and essential to have concentration times where we do not want to receive any type of notification. Therefore, Windows 10 has thought about this because with its new edition April 2018, version 1803, the concentration assistant has been included. This basically allows us to configure a range of hours in which we will not receive any type of notification, something that is usually common in Windows 10, both at the application level and for emails, reminders and so on.
TechnoWikis will explain the process to activate and configure this concentration wizard in order to improve our productivity in Windows 10..
1. Access the concentration wizard in Windows 10
Step 1
To start the process, we will go to the Start menu and there we will select the “Configuration†utility where we will see the following:
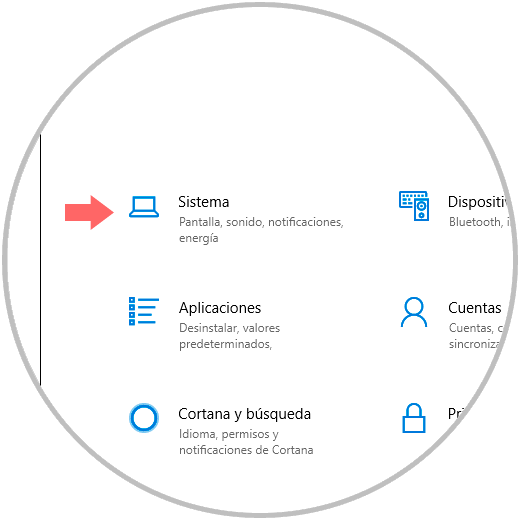
Step 2
There we click on the "System" section and in the new window we go to the "Concentration Assistant" category where we will see the following:
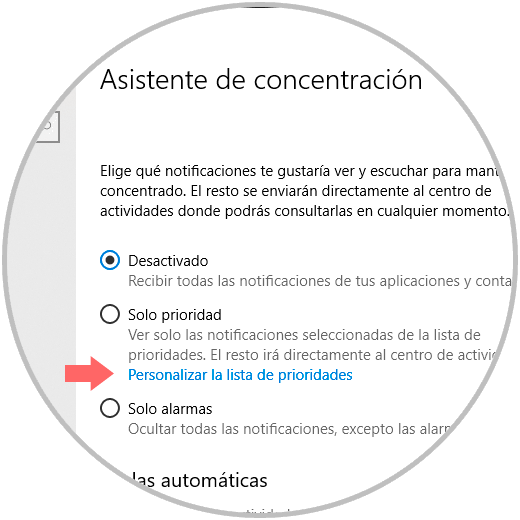
Step 3
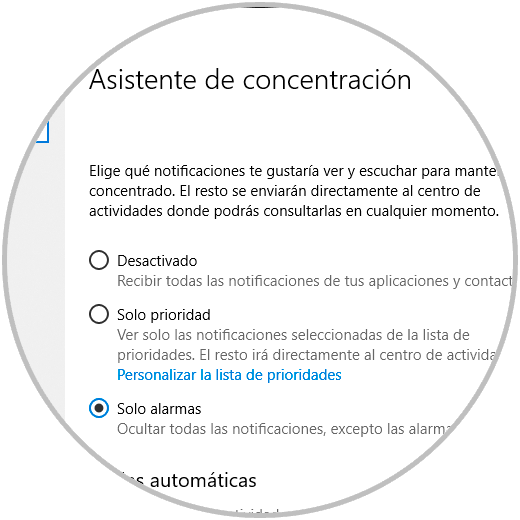
There we can see that we have three options that are:
disabled
Notifications in the system are not silenced.
Priority only
Only priority applications will be displayed, which we can manually configure from the “Customize the priority list†line.
Only alarms
Everything is silenced, except operating system alarms.
Step 4
If we choose to select the “Priority only†option, when we click on the “Customize the priority list†line we will see the following:
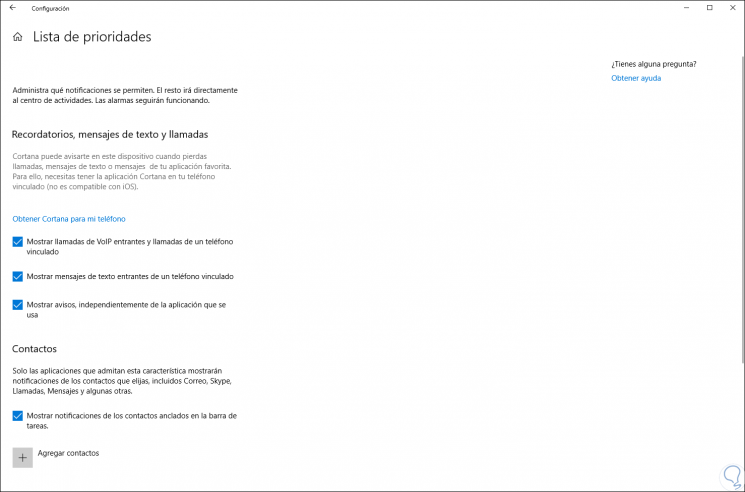
Step 5
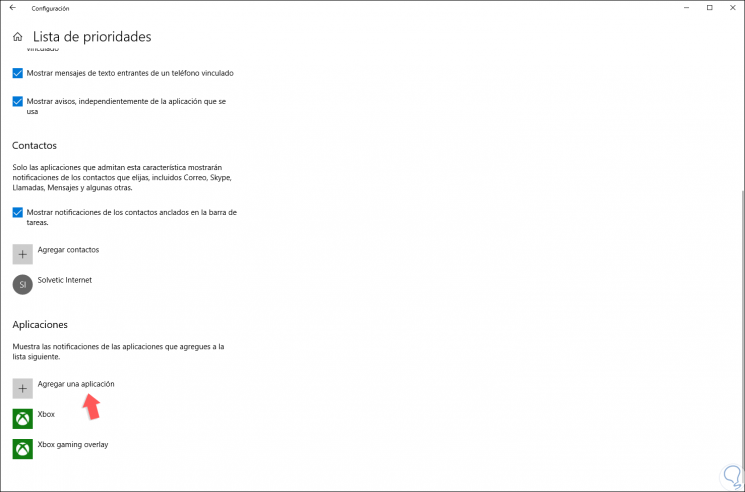
In the "Reminders, text messages and calls" section, Cortana is integrated to notify us when on this device when we can lose some text, message or phone call of any of the compatible applications, but to make effective use of this option we must Have the digital assistant installed on the linked phone and this is not available in all regions yet.
In the "Contacts" section, we may receive notifications of the contacts that are added to this list. Only supported applications can display the messages of the selected people and this option is compatible with applications such as Skype, Mail, Messaging and others.
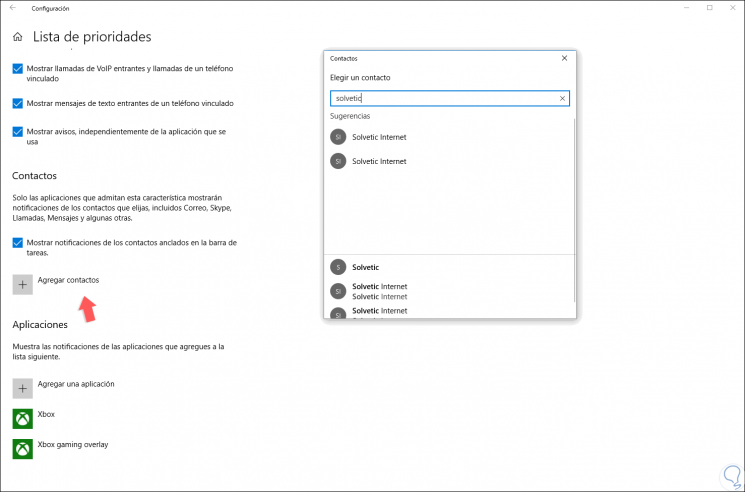
To add a new contact, click on the “Add contact†line and in the pop-up window we will locate it:
Step 6
Now we will see this contact within the priority list:
Step 7
In the "Applications" section we will be able to add applications from which we wish to receive some kind of notification, by default Xbox and Xbox gaming overlay are added. To add a new application, simply click on the “Add an application†button and select it in the pop-up window:

2. Create rules to use the concentration wizard in Windows 10
As Windows 10 users, we are able to create specific rules where the concentration assistant will be active so that we can focus exclusively on the task to be performed.
Step 1
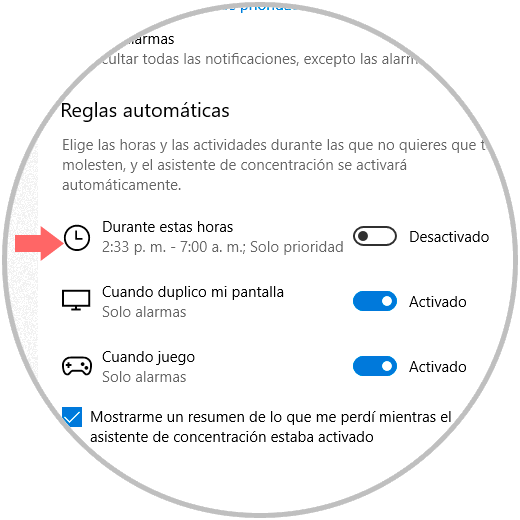
In the Concentration Assistant we can see the section “Automatic rules†where by default the following is established:
During these hours
It is disabled and is the option where we can configure a time range to activate the wizard.
When I double my screen
It is active by default and the alarm only option is enabled.
When I play
It is another option that is active by default, since the game requires maximum concentration, and also only display alarms.
Step 2
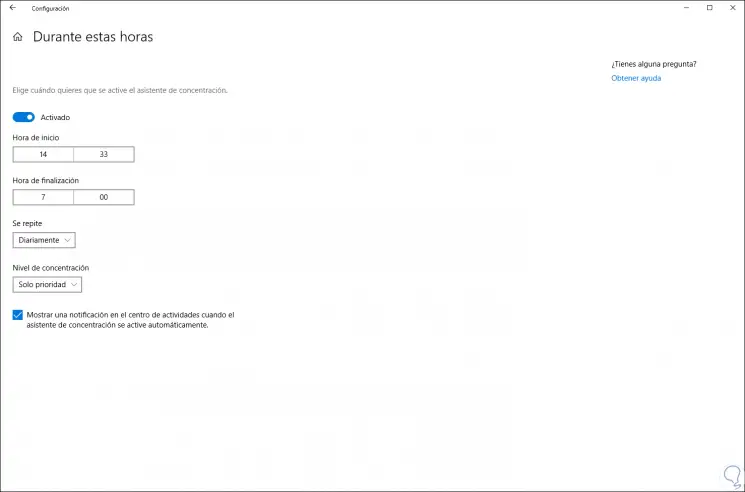
To define a new time range, click on the “During these hours†option and the following wizard will be displayed where we will define the following:
- Start and end time of the concentration assistant
- Frequency to execute the action (Daily, weekend or we can define which days of the week will be applied)
- Type of concentration (Alarms only or priority only)
Step 3
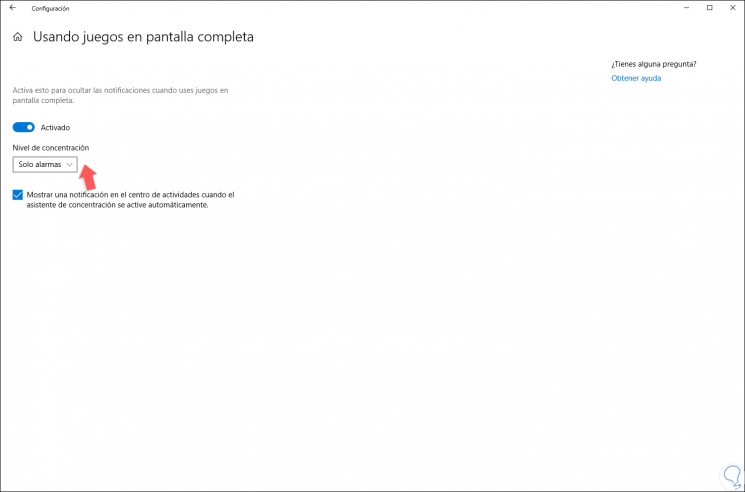
In the same way, if we want to modify the type of concentration of the games or screen duplicity, we must click on them and select the desired option:
3. Ways to configure the concentration wizard in Windows 10
Windows 10 offers us some alternatives to configure this wizard, these are:
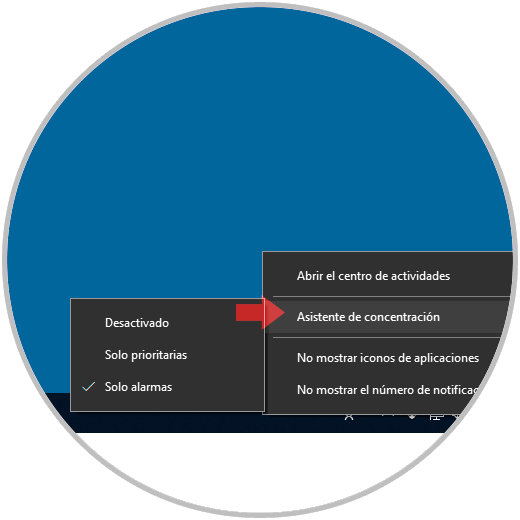
Through the Action Center
When the assistant is active we will see the half moon symbol in the notification center which indicates that we will only receive the notifications that we have configured, now, if we right click on it we can see the option “Concentration Assistant†and there select the option desired:
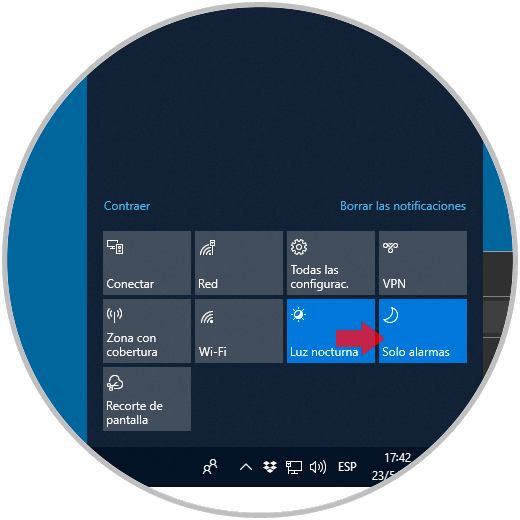
Through the tiles in the Action Center
To make use of this option we open the Windows 10 notification or action center, located in the lower left corner of the taskbar, and we will see the following. There we can see the tile with the Concentration Assistant and its respective type of concentration, just click on it to establish a new type or deactivate it.
Through the Configuration utility
For this, we go to the next route. There, in the upper section, just activate the desired box and the change will be automatic.
4. Create a shortcut to the concentration wizard in Windows 10
We can create a shortcut on the desktop in order to double-click directly access the concentration assistant options.
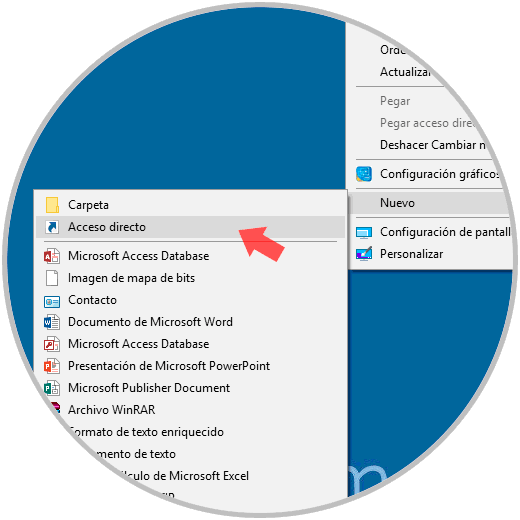
Step 1
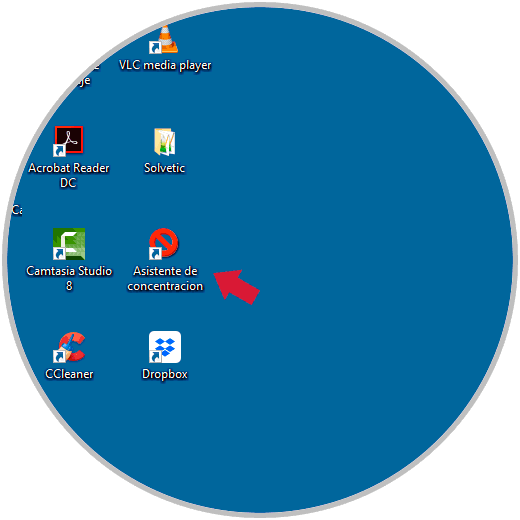
To start, we will right click somewhere free on the desktop and select the option "New / Shortcut":
Step 2
In the displayed window we will enter the following line:
ms-settings: quiethours
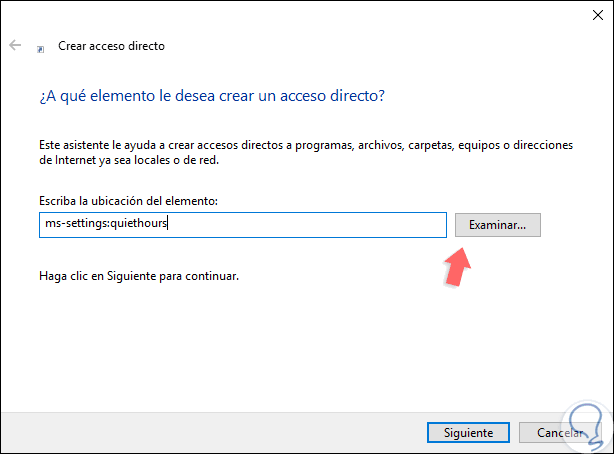
Step 3
Click on "Next" and assign a name for that access:
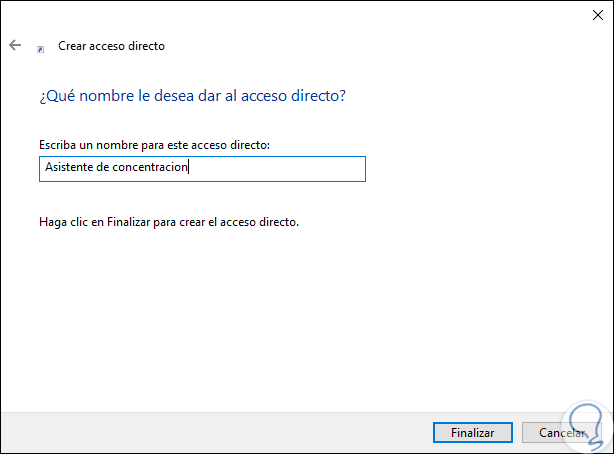
Step 4
Click on "Finish" to create the shortcut. Now we are going to customize the shortcut, for this we will right click on it and select “Propertiesâ€:
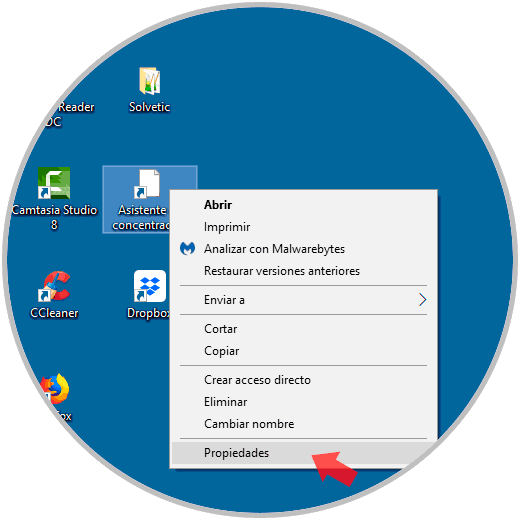
Step 5
The following window will be open and we will go to the “Web Document†tab:
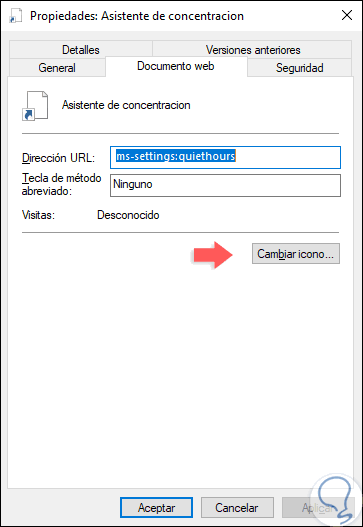
Step 6
There we click on the "Change icon" button and select the desired icon in the options displayed:
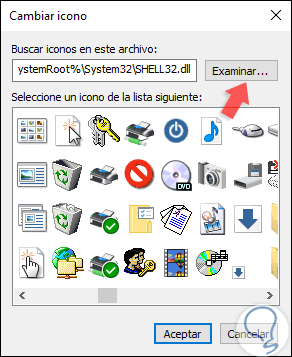
Step 7
Click on OK and we can see that the icon is applied automatically:
Step 8
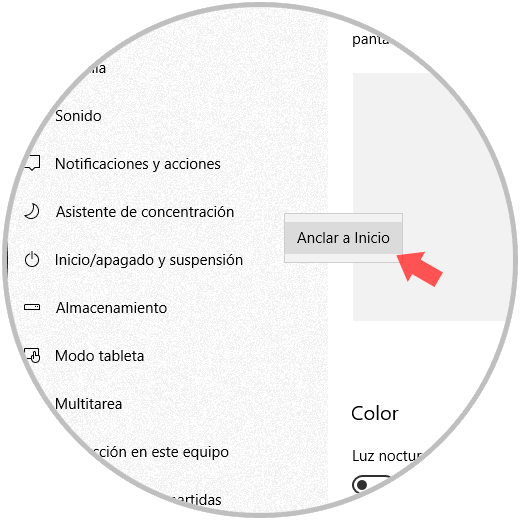
Finally, if we wish to anchor the Concentration Assistant to the Start menu, just go to the following route:
Step 9
There we will right click on Concentration Assistant and select the option “Pin to Startâ€:
This simple Microsoft allows us to make use of this assistant in Windows 10 April 2018 to enjoy a quiet work and in total concentration..