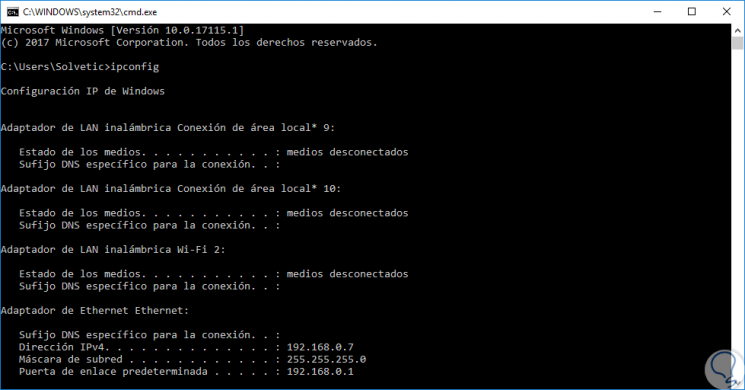
The IP (Internet Protocol) address is the identity of our team to access the network and enjoy everything that it offers us, by default, when we acquire an internet service through an ISP (internet provider), we will have a fixed or dynamic IP address that allows us to navigate without problems, this is obtained using the "ipconfig" command in Windows environments:
Now, there is a problem that happens to multiple users and it is that the IP address is with the syntax 169.254.xx which affects its optimal navigation and with it all network tasks such as file transfer, connectivity between devices and more. These types of connection errors interrupt our daily tasks thus slowing our work. Sometimes they are easy to detect and solve mistakes but in other cases the task becomes more complex..
Common mistakes with IP
Some reasons why we can see this IP error are:
- The DHCP server is temporarily unavailable.
- The device is not ideally connected to the network.
- The necessary connection permissions are not available.
- The router, modem or router is in service level errors and therefore this error is generated.
- The WiFi or Ethernet connection does not work correctly.
- You cannot access any web page.
- Trans problems are detected installing some kind of software.
- The DNS service does not work well and gives problems.
- The IP address of the adapter cannot be renewed.
In order to use some ways to fix your WiFi or Ethernet connection, we leave you a compilation of options that can help you in this from Windows 10.
Today TechnoWikis brings a series of tips to allow navigation to return to normal values ​​and thus enjoy an ideal Internet experience..
To keep up, remember to subscribe to our YouTube channel! SUBSCRIBE
1. Validate the system configuration in Windows 10, 8, 7
Step 1
At this point there is a series of parameters and actions that can help solve this IP addressing problem and some of the tasks are:
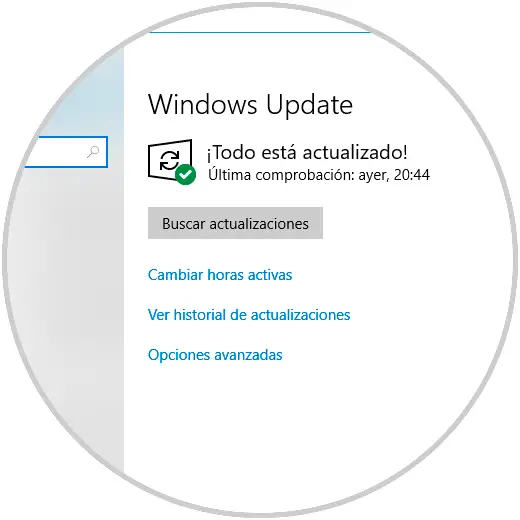
- Update the operating system using Windows Update
- Migrating the operating system
- Restoring the system to an earlier date using system restore.
Step 2
In some cases, the network parameters are configured directly manually according to the supplier's instructions to have a reliable IP.
2. Uninstall the network adapter in Windows 10, 8, 7
The drivers have been designed to allow the hardware elements to work in the correct way, but in certain cases, this can present various errors, so it is recommended to uninstall the network adapter and then, automatically, the operating system will load the new drivers, this helps correct the mentioned error.
Step 1
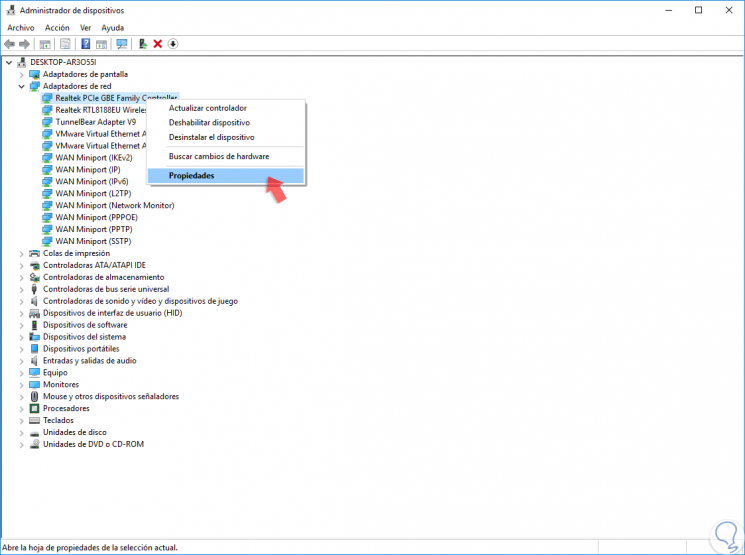
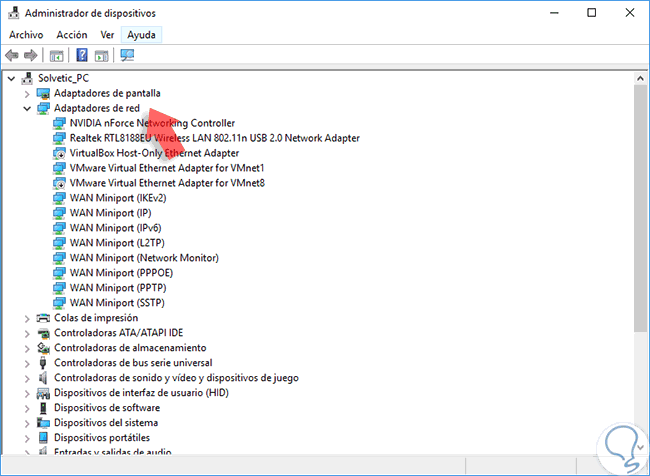
For this, we will go to the Device Manager using one of the following options:
Device administrator
Step 2
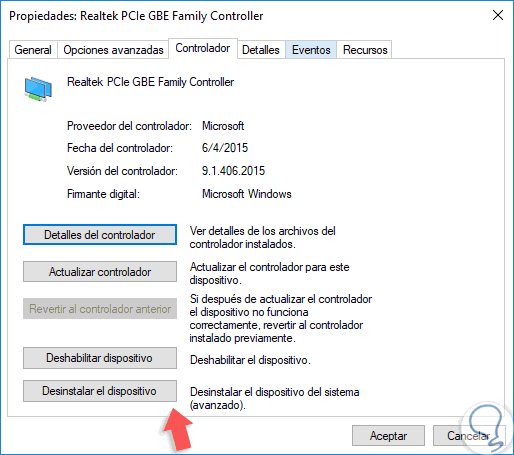
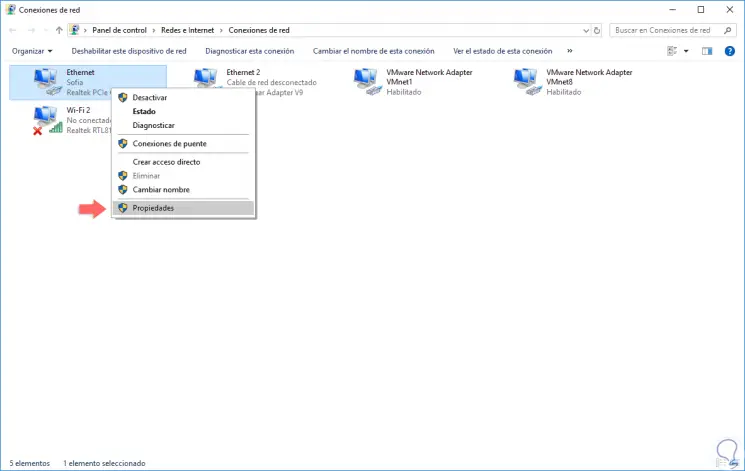
In the displayed window we go to the "Network adapters" section and we will right click on the adapter where the IP failure occurs and select the "Properties" option:
Step 3
In the displayed window we go to the "Controller" tab. There we click on the "Uninstall driver" button and finally, we restart the system so that the changes are applied.
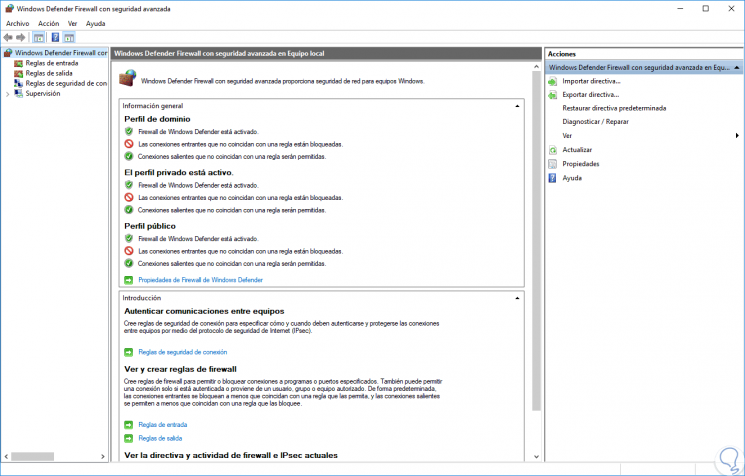
3. Validate Firewall settings in Windows 10, 8, 7
The Windows Firewall has been designed to protect the computer from incoming and outgoing connections that present some kind of threat to the user.
The IP 169.254 error can be created by the same Firewall rules because the network interface independently creates an ad-hoc network which accommodates the mentioned error.
To correct this, we can access the system Firewall and there reset its rules..
4. Re-configure the IP address in Windows 10, 8, 7
A common cause of this type of error is a bad configuration, internal or external, of the IP address and its solution is to configure it again to take the original values.
Step 1
For this, we will use the key combination and execute the following:
+ R
compmgmt.msc
Step 2
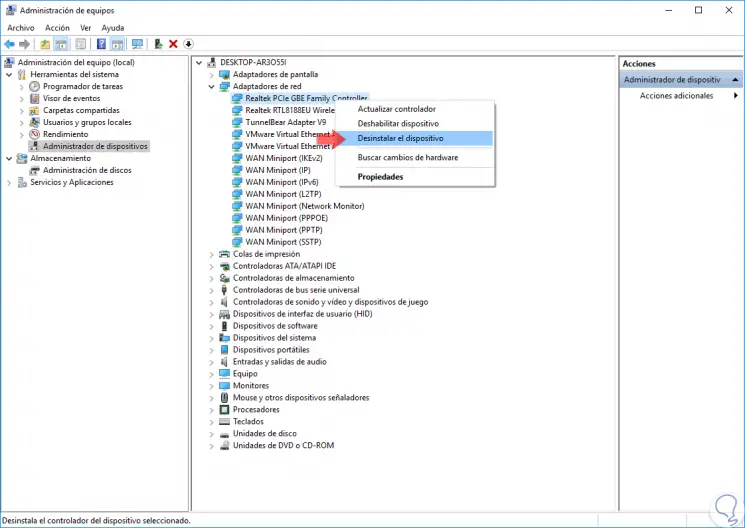
In the window that we will see, we go to the “Device Manager†section, then click on “Network adaptersâ€, we will right click on the current adapter and select the “Uninstall the device†option:
Step 3
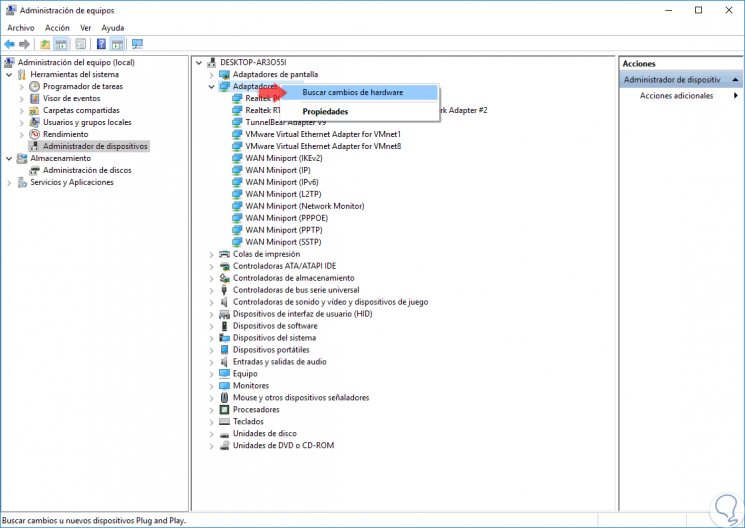
Then, we will right click on the “Network adapters†line and select the option “Search for hardware changesâ€:
Step 4
Once this is finished, again we use the following keys and this time we execute the following:
+ R
ncpa.cpl
Step 5
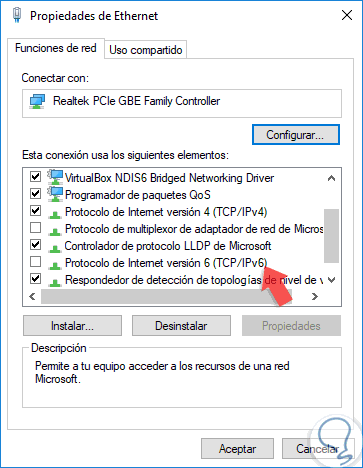
We will right click on the adapter with error and select "Properties":
Step 6
In the options displayed, we deactivate the “Internet Protocol version 6†box:
Step 7
Click on OK to save the changes. Finally, we go to the command prompt as administrators and execute the following lines. After this, we restart Windows and check the network status.
netsh winsock reset catalog netsh int ip reset reset.log ipconfig / release ipconfig / renew
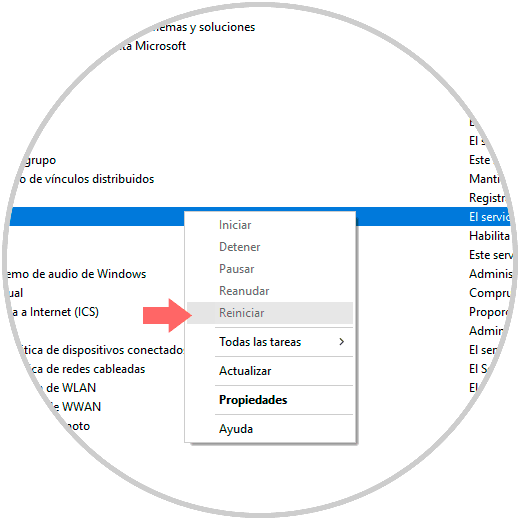
5. Restart the DNS client in Windows 10, 8, 7
This service may be with some anomaly that prevents its correct and optimal operation, which is why it is recommended to restart it. For this, we use the following keys and execute the services.msc command. In the window that appears, we locate the service called "DNS Client", we will right click on it and select the option "Restart" if it is available:
+ R
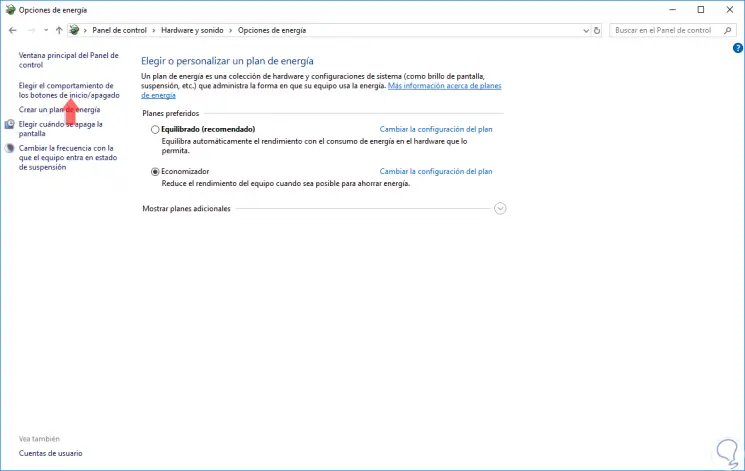
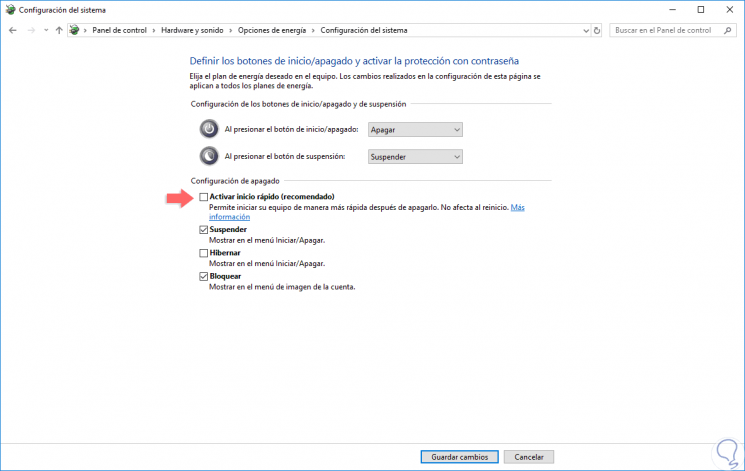
6. Disable quick start in Windows 10, 8, 7
Windows 10 has a function called quick start which is responsible for managing the system boot in a different way to make it much faster and faster.
Step 1
To edit this function we will go to the following route:
Step 2
There we click on the “Choose the behavior of the start / off buttons†located on the left side and we will access the following:
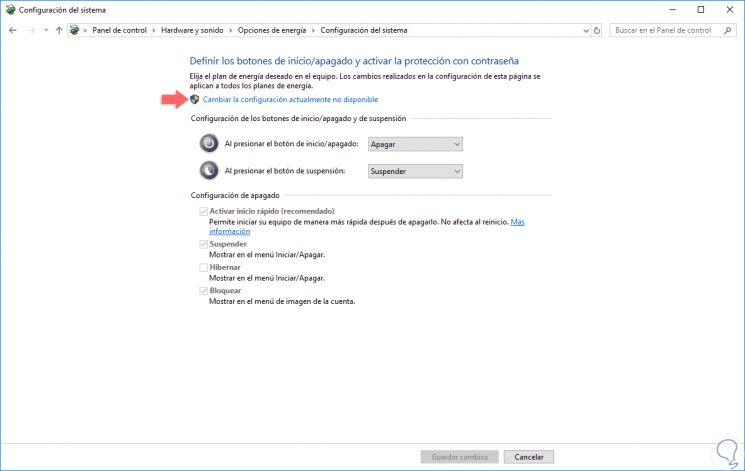
Step 3
Click on the “Change currently unavailable settings†line and we can deactivate the “Activate quick start†box located in the “Shutdown configuration†section. Click on the "Save changes" button to finish.
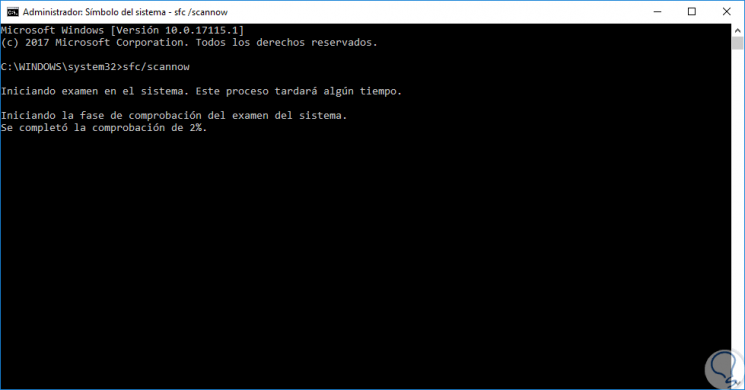
7. Execute the SFC command on Windows 10, 8, 7
SFC (System File Checker) is a utility included in Windows through which a detailed analysis of the system files system is executed and if there are errors, proceed with its fix or recovery.
For this, we will access the command prompt as administrators and execute the following:
sfc / scannow
8. Reset the IP address and netmask in Windows 10
In the event that none of the above solutions help correct this error, we can resort to resetting the IP address and network mask values.
Step 1
For this we will go to the following route:
- Center network and sharing
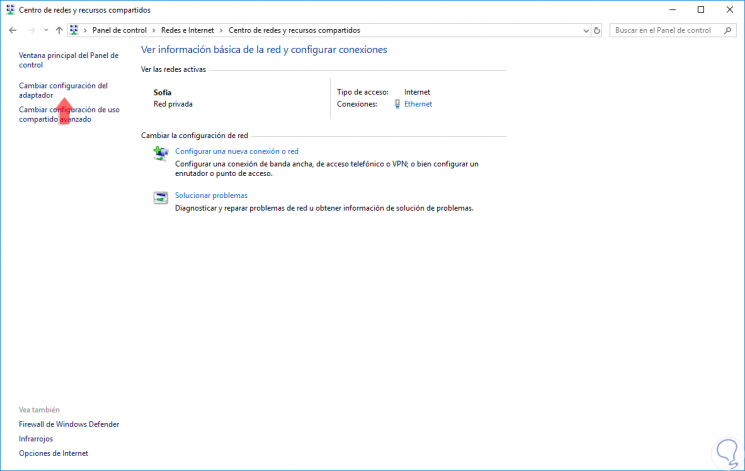
Step 2
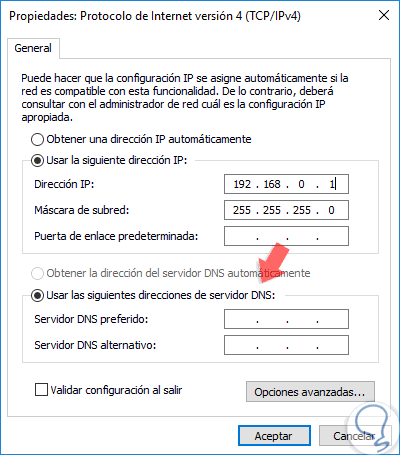
There we click on the line “Change adapter settings†located on the left side and there we will right click on the current network adapter and select Properties â€and in the window we will uncheck the box“ Internet Protocol version 6 â€and select the line "Internet Protocol version 4" and click on the "Properties" button:

Step 3
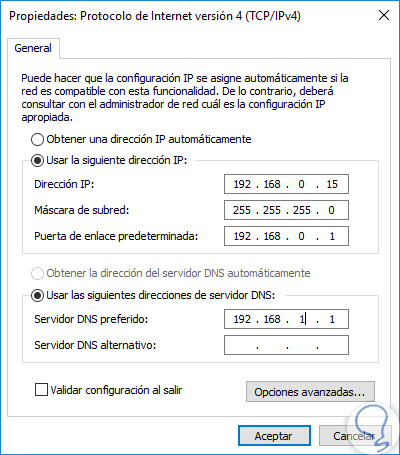
Now, in the new window we activate the “Use the following IP address†box and define the following:
- Subnet mask: 255.255.255.0.
- We activate the option “Obtain DNS server address automaticallyâ€.
Step 4
Click on "Accept" to save the changes. We will be able to execute the automatic configuration for the network connection again, if it is not completed as expected, we will configure the network information like this:
9. Reset the TCP / IP protocol to solve invalid IP error Windows 10
The TCP / IP protocol constitutes a set of protocol systems that allow services between computers that are not within the same network. They are the protocols on which the Internet is based and links to TCP and IP that in principle are independent protocols. This set of TCP / IP protocols is based on a 4-layer model called DARPA called Application, Transport, Internet and Network Interface.
In the application layer it allows applications to enter services from other layers. Within the diversity of protocols of the application layer we can mention some better known: HTTP, FTP, SMTP, Telnet.
To reset this protocol in case it is generating problems in our connection and giving IP errors would be the following.
Step 1
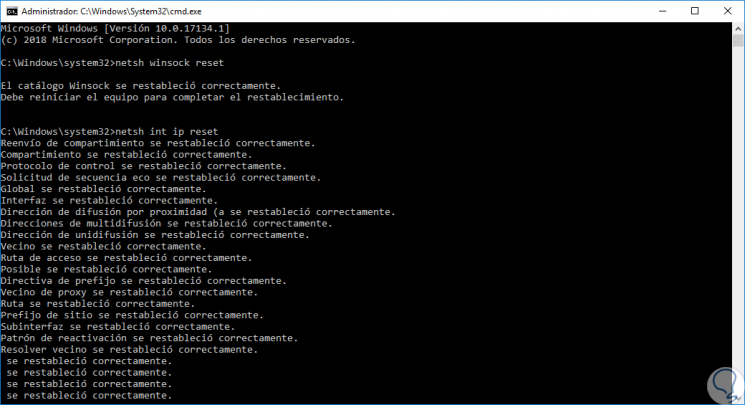
To solve the problem we will use a command called netsh. To do this, the first thing is to enter the command window as administrators.
Step 2
Next, we execute the following commands:
netsh winsock reset netsh int ip reset
Step 3
With the “netsh winsock reset†command, we can restore the winsock to the configuration it presented by default. This command is useful when we have problems accessing the Internet or network.
With the netsh int ip reset command we will retype two keys in the Registry that use the TCP / IP protocol. Let's say we would be doing an action similar to removing and reinstalling the TCP / IP protocol.
SYSTEM \ CurrentControlSet \ Services \ Tcpip \ Parameters \ SYSTEM \ CurrentControlSet \ Services \ DHCP \ Parameters \
Step 4
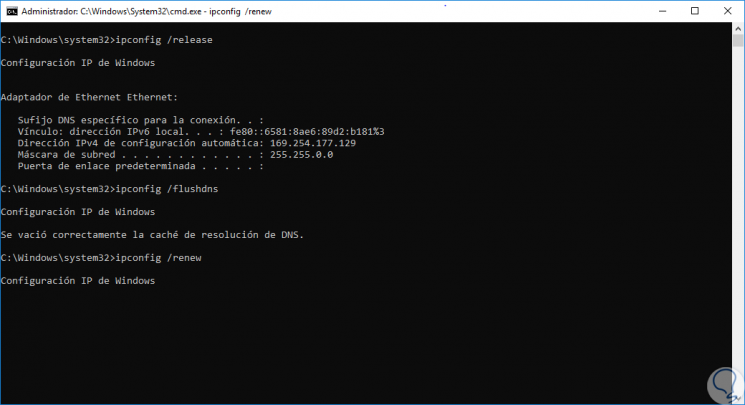
When we have executed them, we restart the system so that the modifications are applied. Now we will execute the following commands to free and renew the IP and empty its cache.
ipconfig / release ipconfig / flushdns ipconfig / renew
10. How to update the network driver in Windows 10, 8, 7
Another option is that we are having connection and Internet problems due to problems with network controllers. Therefore, we are going to see the steps to be able to update them and thus verify that we do not have the problem here.
Step 1
The first thing we will do is open the Device Manager as follows:
To keep up, remember to subscribe to our YouTube channel! SUBSCRIBE
Step 2
Now you must search for the category of “Network adaptersâ€
Step 3
Now we must deploy this category and locate our adapter. We right click on it and click on "Update driver software".
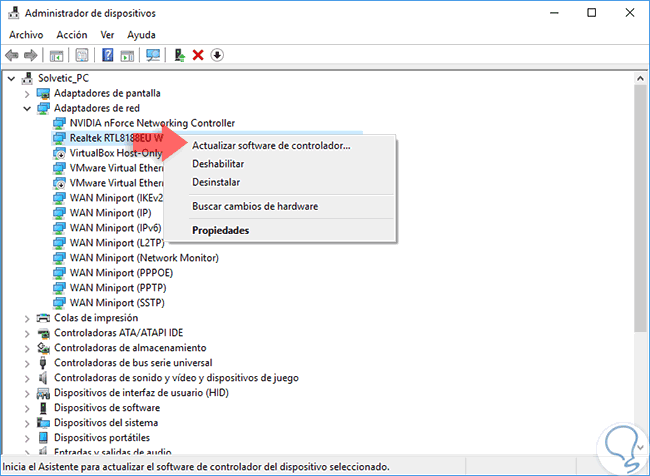
Step 4
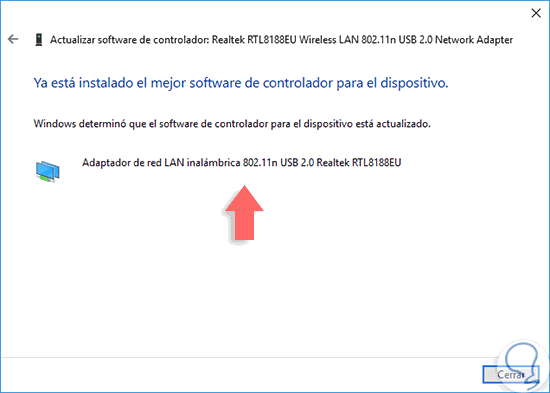
Next, a window will open so you can automatically search for driver software to update them. We choose automatic mode instead of manual.
With any of the solutions provided we will correct the error of IP 169.254 on Windows systems and thus solve errors in our network connection that we care to access services such as the Internet.